
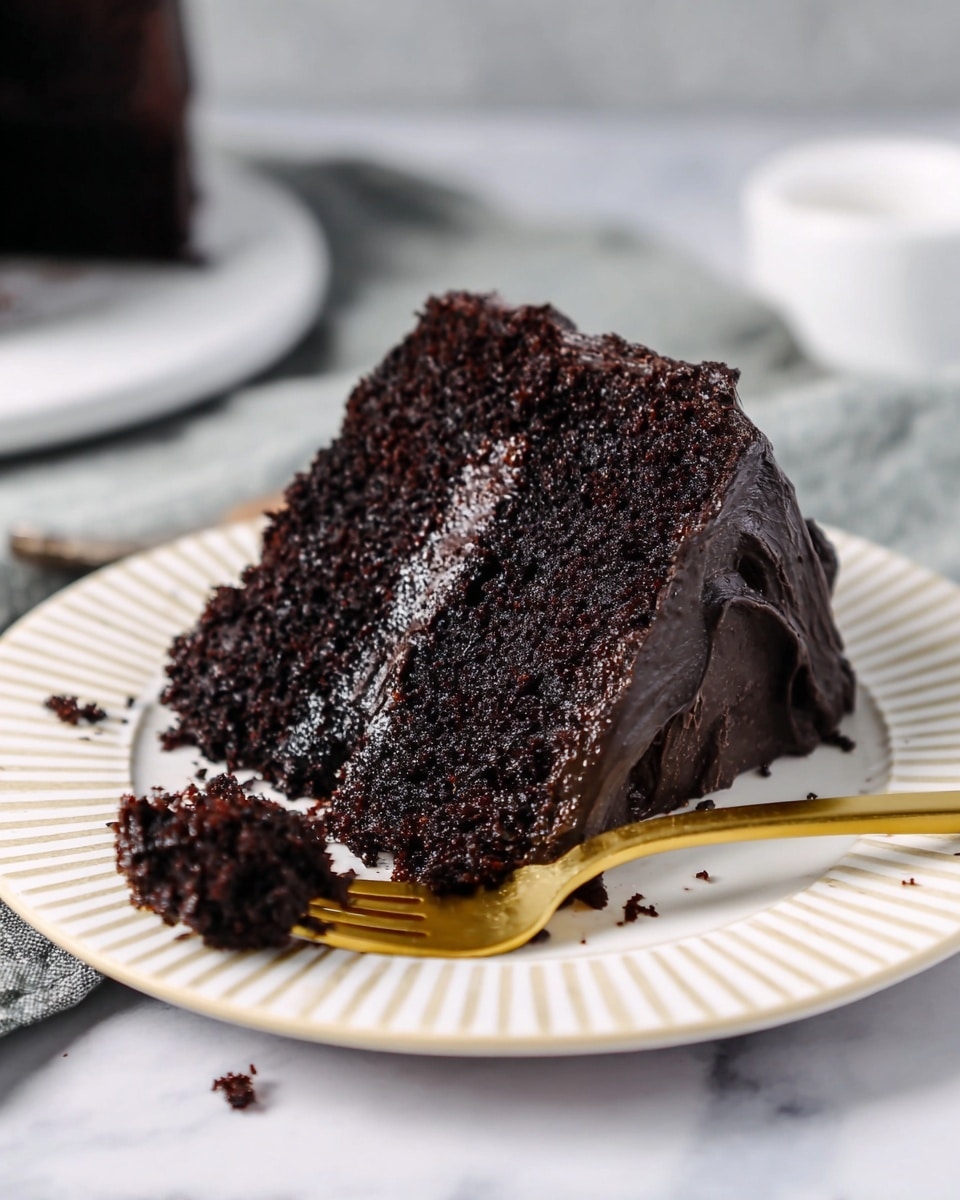
If you’re looking for a show-stopping dessert that’s not only delicious but also fun to make, you have to try this Spider Cake Recipe. It’s a moist chocolate cake layered with rich, fudgy chocolate buttercream and decorated to look like a fuzzy little spider—perfect for Halloween or anytime you want to delight your guests. I absolutely love how this turns out every single time, and once you’ve made it, you’ll keep coming back for more. Let me walk you through everything so you can nail this charming cake with zero stress!
Why You’ll Love This Recipe
- Moist & Fluffy Cake: This recipe produces a tender chocolate cake that’s perfectly moist every time, thanks to a smart mix of buttermilk and hot water.
- Deliciously Rich Buttercream: The chocolate buttercream frosting is decadently smooth with just the right balance of sweetness and deep cocoa flavor, with a fun black tint to bring the spider to life.
- Easy Yet Impressive Decoration: Don’t worry about complicated piping; the bubble tea straws create adorable spider legs and the frosting technique is beginner-friendly but looks professional.
- Great Make-Ahead Option: You can prep the cake layers and frosting ahead of time, making this perfect for when you want a stunning dessert but limited on time.

Ingredients You’ll Need
The ingredients for this Spider Cake Recipe come together beautifully to create a rich, luscious chocolate cake and a creamy, luxurious frosting. Using quality cocoa powder and room temperature wet ingredients makes a world of difference—trust me, I’ve learned this the hard way!
- All-purpose flour: Be sure to measure properly by spooning into your cup or use a scale for best results.
- Granulated sugar: Sweetens without overpowering, lends great texture.
- Dark or Dutch-processed cocoa powder: I prefer Dutch-processed for a richer chocolate flavor.
- Baking powder & baking soda: Give your cake the perfect rise and crumb.
- Fine salt: Balances sweetness and enhances flavors.
- Hot water: Helps bloom the cocoa powder, amplifying that chocolatey taste.
- Buttermilk: Adds moisture and a slight tang that complements the chocolate.
- Vegetable or canola oil: Keeps the cake tender and moist.
- Egg: Binds everything together, room temperature for best mixing.
- Vanilla extract or vanilla bean paste: Enhances the overall flavor with a warm, fragrant note.
- Unsalted butter (for frosting): At room temp for easier whipping and best texture.
- Powdered sugar: For that silky smooth, spreadable buttercream.
- Heavy whipping cream: Makes the frosting soft and creamy.
- Dark chocolate chips: Melted and cooled, give the frosting a luscious chocolate punch.
- Dark baking cocoa: Deepens the color and intensifies chocolate flavor in the frosting.
- Black gel food coloring: To get the fun spooky black color for the spider body.
- Black bubble tea straws: For creating cute, bendy spider legs.
Variations
I love that this Spider Cake Recipe is super adaptable. I often tweak it depending on the occasion or who I’m serving it to—feel free to make it your own!
- Dairy-Free Version: Try swapping the buttermilk for a mix of almond milk and vinegar, and use dairy-free butter and cream substitutes for the frosting—I’ve done this for friends and it still turns out amazing.
- Flavor Twists: I sometimes add a dash of espresso powder to the cake batter to deepen the chocolate flavor, or sprinkle espresso powder into the frosting—it’s subtle but oh so good.
- Fruity Touch: Adding a layer of raspberry jam between cake layers gives a lovely tart contrast—my family goes crazy when I do this!
- Mini Spider Cakes: If you want to try this for a party, scale down the recipe to make cupcakes and decorate each one with a mini spider using smaller straws or pretzel sticks.
How to Make Spider Cake Recipe
Step 1: Get Your Pan and Oven Ready
Start by preheating your oven to 350°F (175°C). Greasing your 6-inch domed cake pans well is key—I use a non-stick spray to be safe. If you have heating cores, pop them in; they’re a game changer, helping the cake bake evenly and prevent doming too much. I put my pans on a baking sheet so they’re easy to handle going in and out of the oven. If you want a bigger cake, double the recipe for 8-inch pans—just remember to adjust baking time.
Step 2: Whisk Up Your Dry and Wet Ingredients
Sift or whisk your dry ingredients—flour, sugar, cocoa powder, baking powder, baking soda, and salt—all together in a large bowl. This ensures everything blends nicely and avoids clumps. In a separate bowl, whisk together the hot water, buttermilk, oil, eggs, and vanilla until smooth. The hot water blooming the cocoa is a trick I learned that really intensifies that chocolate flavor!
Step 3: Combine and Bake
Gently pour the wet ingredients into the dry and stir just until fully combined. Over-mixing is a no-no here because it can make the cake dense—mix enough to get it all incorporated and no more. Then, divide the batter evenly between your prepared pans, filling only about halfway to two-thirds full. I like weighing my pans after filling to make sure both layers are even. Bake for about 35-40 minutes, but start checking at 35 — a toothpick should come out with just a few moist crumbs attached. After baking, let them cool in the pans for about 10 minutes before flipping onto wire racks to cool completely.
Step 4: Prepare the Chocolate Buttercream
While the cakes cool, start the frosting by beating softened butter with vanilla and salt until creamy (about 30 seconds). Gradually add powdered sugar, halfway through pouring in heavy cream to lighten things up. Save about a quarter cup of this white buttercream aside in a small piping bag fitted with a round tip—you’ll use this for the eyes later on. Into the remaining frosting, stir in melted dark chocolate, sifted dark cocoa, and black gel food coloring until smooth and the color is deep and spooky. To help with piping the spider’s details, take a couple tablespoons of that black frosting and put it into another small bag with a tiny opening. Keep the rest covered with plastic wrap so it doesn’t crust.
Step 5: Shape the Spider Legs
This is where your black bubble tea straws come in handy. Fold each straw about halfway down, then sandwich them in a thick book to bend and hold their shape. I found letting them rest for 20-30 minutes works best—they keep the bend without too much spring back. This trick makes those legs look more natural and spider-like!
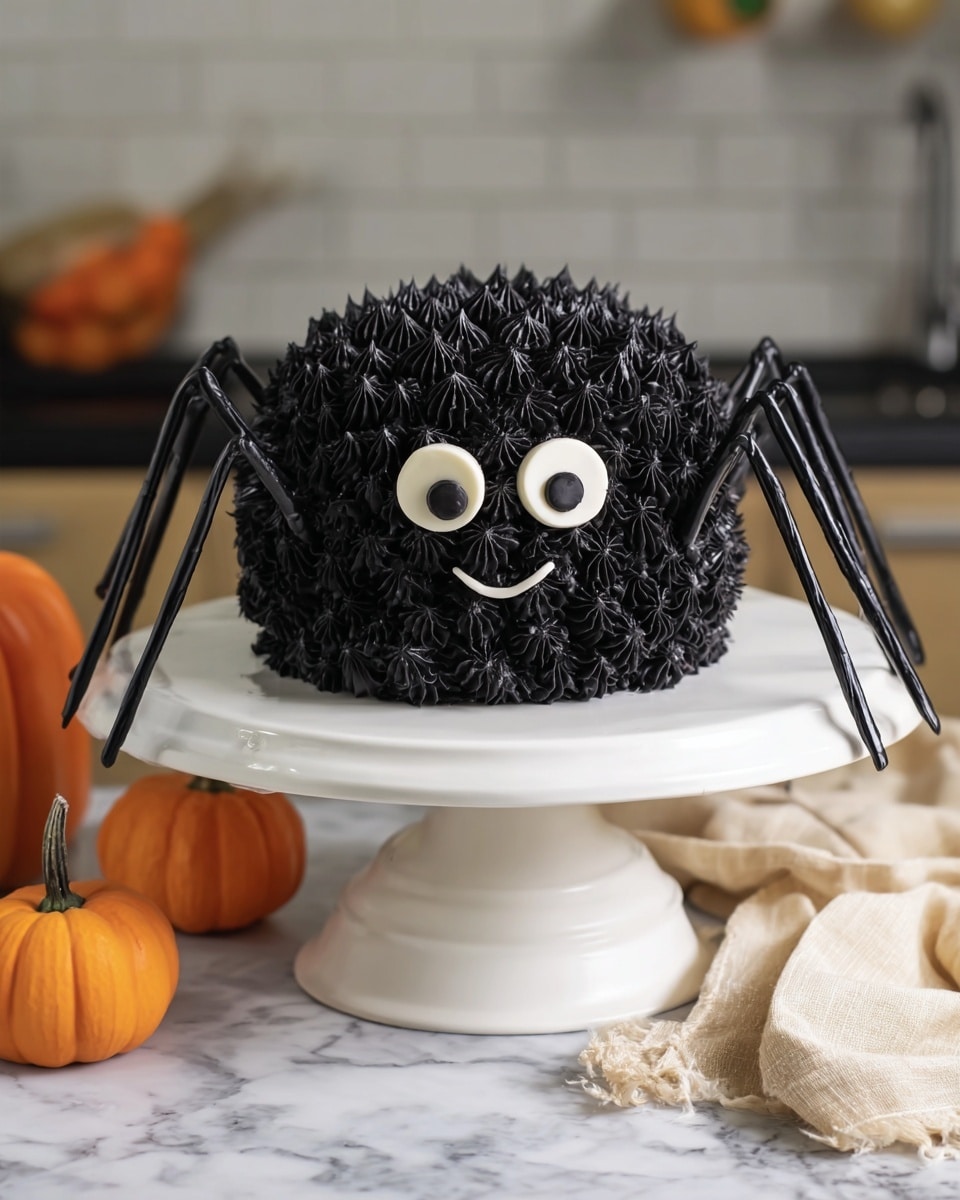
Step 6: Assemble and Decorate Your Spider Cake
Start stacking your cake layers on a greaseproof cake board. Use the layer with the trimmed dome (cut about ½ inch off for easier stacking) on the bottom and secure it with a little dollop of chocolate buttercream. Spread a thin, even layer of chocolate buttercream on top before stacking the next cake layer. Once stacked, pop your cake in the freezer for 10 minutes—trust me, this step makes frosting so much easier because the buttercream firms up. Next, apply a smooth crumb coat over the entire cake. Use an offset spatula or acetate sheet for a polished finish. Pipe the two eyes with the white buttercream first, then add black pupils using the small piping bag with black frosting. Finally, put the big grass piping tip onto your large piping bag filled with black frosting and cover your cake to give your spider that adorable fuzzy look. Finish by positioning the bent bubble tea straws on each side of your cake board as legs, securing them with some clear tape if needed.
Pro Tips for Making Spider Cake Recipe
- Room Temperature Ingredients: I always set out eggs, butter, and buttermilk at least 30 minutes ahead—this helps everything blend smoothly and gives a better cake crumb.
- Don’t Overmix Your Batter: Mix just until the wet and dry ingredients are combined to keep your cake light and tender.
- Weigh Your Batter for Even Layers: Using a kitchen scale to portion batter means cake layers bake evenly, which makes stacking a breeze.
- Freeze Before Frosting: Chilling the stacked cake for 10-20 minutes prevents the frosting from sliding off and saves a lot of frustration.
How to Serve Spider Cake Recipe
Garnishes
I usually keep the garnishes simple to let the spider design shine. The white and black buttercream eyes are my absolute favorite detail—it makes the cake come alive! You could also add a dusting of edible glitter or some candy eyes for a playful twist. If you’re feeling creative, a few small fondant spiders or web designs around the base would be adorable and totally thematic.
Side Dishes
While the Spider Cake is decadent enough to be a centerpiece, I love serving it alongside some fresh berries or a light citrus salad to cut through the richness. A scoop of vanilla ice cream or whipped cream on the side is always a crowd-pleaser too—adds that perfect creamy contrast.
Creative Ways to Present
For parties, I sometimes place the cake on a dark platter with a Halloween-themed cake stand and scatter edible “spiders” or candy webs around it. Another fun idea is placing the cake inside a clear dome cake cover and adding faux spider webs around for that spooky wow factor. Pair with themed cupcakes or cookies to complete your creepy dessert table.
Make Ahead and Storage
Storing Leftovers
If you have leftovers (and trust me, you might!), keep your Spider Cake covered tightly in the fridge to prevent it from drying out—it stays great up to a week thanks to the buttercream sealing in moisture. I wrap mine in plastic wrap and place the cake back in its box or a cake carrier.
Freezing
I sometimes freeze the finished cake for up to a month before an event. I wrap it well in several layers of plastic wrap and then aluminum foil to protect it from freezer burn. When ready, thaw overnight in the fridge and let it come to room temp before serving—frosting might need a gentle smooth with a spatula, but it tastes just as fantastic as fresh!
Reheating
This cake tastes best at room temperature. After removing from the fridge, allow it to sit out for at least 30 minutes before slicing. Avoid microwaving as it can make the cake soggy and the frosting separate. If you want to soften cold buttercream quickly, a brief blast of warm air from a hair dryer at a distance works wonders without melting the cake.
FAQs
-
Can I make the Spider Cake Recipe gluten-free?
Yes! You can substitute the all-purpose flour with a gluten-free blend, but I recommend one that includes xanthan gum to help with structure. Keep in mind that baking times might vary slightly, so start checking early. The texture will be a bit different but still delicious.
-
What if I don’t have bubble tea straws for the spider legs?
No worries! You can use pretzel sticks, licorice strings, or even pipe thicker buttercream legs using a grass tip. The key is to have the legs look crafty and fun, so feel free to get creative with what you have.
-
How do I avoid the cake layers baking unevenly?
Using heating cores helps bake the cake evenly and prevents a tall dome. Also, filling the pans no more than two-thirds full and weighing batter for equal portions ensures even baking. If your oven runs hot, try baking at a slightly lower temperature for a longer time.
-
Can I use a different frosting for this Spider Cake?
You can substitute with a cream cheese frosting or a Swiss meringue buttercream if you prefer, but keep in mind the color might be trickier to darken for the spider’s fuzzy body. The chocolate buttercream in this recipe balances flavor, texture, and decoration really well.
-
How do I keep the frosting smooth and avoid crusting?
Cover the frosting with plastic wrap making sure it touches the surface to prevent air exposure if you’re pausing mid-way. Keep the frosting at room temp while working and avoid drafts. This recipe’s buttercream also stays soft longer thanks to the cream and melted chocolate.
Final Thoughts
This Spider Cake Recipe has quickly become a favorite for me and my family, especially around festive times like Halloween. It’s approachable, fun to decorate, and that moist, chocolatey cake with luscious buttercream never disappoints. If you want to impress your guests or simply treat yourself to a delicious, visually stunning dessert, you really can’t go wrong. I hope you enjoy baking and eating it as much as I do—and I’d love to hear how it turns out for you!
Print
Spider Cake Recipe
- Prep Time: 30 minutes
- Cook Time: 40 minutes
- Total Time: 1 hour 55 minutes
- Yield: 12 servings
- Category: Dessert
- Method: Baking
- Cuisine: American
Description
This delightful Spider Cake is a moist and rich chocolate dessert perfect for any occasion. Featuring layers of tender chocolate cake paired with creamy chocolate buttercream, the cake is decorated with a fun spider theme using black and white frosting and bubble tea straws for legs. The recipe includes detailed steps to achieve even, fluffy cake layers and a luscious frosting, making it both a feast for the eyes and the palate.
Ingredients
Moist Chocolate Cake Recipe
- 1 cup all-purpose flour (130g)
- 1 cup granulated sugar (200g)
- 1/3 cup dark or Dutch-processed cocoa powder (30g)
- 1 tsp baking powder (4g)
- 3/4 tsp baking soda (5g)
- 1/2 tsp fine salt (3g)
- 1/2 cup hot water (120g)
- 1/2 cup buttermilk, room temperature (120g)
- 1/4 cup vegetable or canola oil (55g)
- 1 large egg, room temperature (56g)
- 1 tsp vanilla extract or vanilla bean paste (4g)
Chocolate Buttercream Frosting
- 1 cup (2 sticks) unsalted butter, room temperature (226g)
- 1 tsp vanilla extract or vanilla bean paste (4g)
- 1/4 tsp fine salt (2g)
- 3 cups powdered sugar (375g)
- 1/2 cup heavy whipping cream, room temperature (120g)
- 3/4 cups dark chocolate chips, melted and cooled (135g)
- 1/2 cup sifted dark baking cocoa (40g)
- Squirt of black gel food coloring
Decorative Tools and Miscellaneous
- 8 Black Bubble Tea Straws
Instructions
- Prepare Cake Pans: Preheat your oven to 350°F (175°C). Grease two 6-inch domed cake pans and two heating cores with non-stick spray to ensure even baking. Place the heating cores in the center of each pan and set the pans on a baking sheet for easy handling.
- Mix Dry Ingredients: Sift or whisk together the all-purpose flour, granulated sugar, dark cocoa powder, baking powder, baking soda, and salt in a large bowl to remove lumps and evenly distribute ingredients.
- Mix Wet Ingredients: In a separate bowl, whisk together the hot water, buttermilk, vegetable oil, egg, and vanilla extract until fully combined.
- Combine Batter: Pour the wet ingredients into the dry ingredients and gently mix just until incorporated to avoid overmixing, which can lead to dense cake layers.
- Fill and Bake: Evenly divide the batter between the prepared pans, filling each no more than two-thirds full to prevent overflow. Bake for 35-40 minutes or until a toothpick inserted into the center comes out with a few moist crumbs. Baking times may vary based on oven and heating cores; monitor carefully after 35 minutes.
- Cool Cake Layers: Remove cakes from oven and let them rest in the pans for 10 minutes. Then invert onto wire racks to cool completely. Once cool, level tops using a serrated knife. Trim about 1/2 inch off the domed top of one layer for easier stacking. Wrap and freeze if storing for later.
- Make Chocolate Buttercream: Beat room temperature butter on medium speed until smooth, about 30 seconds. Add vanilla extract and salt, mixing on low until combined. Gradually add powdered sugar, and midway through, add heavy cream to ease mixing. Remove 1/4 cup of plain white buttercream to a small piping bag with a round tip; set aside.
- Prepare Chocolate Buttercream: Mix melted chocolate, sifted cocoa powder, and black gel food coloring into the remaining frosting on low speed until fully incorporated and smooth. Place 2 tablespoons of this black buttercream in a small piping bag with a 1/2 cm opening. Cover remaining frosting with plastic wrap to prevent crusting.
- Shape Bubble Tea Straw Legs: Fold each bubble tea straw halfway and place them in a large heavy book for 20-30 minutes so they retain their bent shape.
- Assemble Cake Layers: Place the trimmed dome cake layer on a greaseproof cake board using a dab of chocolate buttercream to fix it. Spread an even layer of chocolate buttercream on top using an offset spatula, then top with the second layer. Freeze for 10 minutes to firm the frosting and aid frosting application.
- Frost the Cake: Cover the entire cake evenly with black chocolate buttercream and smooth using an acetate sheet or offset spatula.
- Decorate Eyes: Pipe two spider eyes onto the cake’s side using the reserved white and black buttercream in small piping bags or tips.
- Add Spider Legs: Attach the bent bubble tea straws to the sides of the cake, four on each side, using tiny strips of clear tape to secure their bases to the cake board, mimicking spider legs.
- Serve and Enjoy: Your spider cake is now ready to impress as a delicious, spooky centerpiece for celebrations!
Notes
- Use room temperature ingredients to ensure smooth batter and frosting mixing.
- Accurately measure flour by spooning into measuring cup and leveling, or preferably use a kitchen scale.
- Mix batter just until combined to keep cake tender and fluffy.
- Weigh batter in pans to ensure even cake rising and consistent baking.
- Tap cake pans on counter before baking to release air bubbles.
- Level cooled cake layers with a serrated knife for neat stacking.
- Chill cake layers before assembly for easier frosting application.
- Freeze baked and trimmed cake layers if preparing in advance.
- Store leftover frosting airtight in the fridge for up to a month or freezer for 3 months; stir well before reuse.
- Refrigerate frosted cake for up to one week or freeze up to one month to keep fresh.
Nutrition
- Serving Size: 1 slice (approx. 1/12 of cake)
- Calories: 420 kcal
- Sugar: 38 g
- Sodium: 180 mg
- Fat: 25 g
- Saturated Fat: 14 g
- Unsaturated Fat: 9 g
- Trans Fat: 0 g
- Carbohydrates: 48 g
- Fiber: 3 g
- Protein: 4 g
- Cholesterol: 55 mg


