

If you’ve been hunting for a show-stopping turkey recipe that’s juicy, flavorful, and actually cooks faster than your traditional roast, then you’re in the right place. Spatchcock Turkey with Butter and Herb Rub Recipe is my go-to whenever I want tender meat with crispy skin—and I absolutely love how this turns out every single time. I’m excited to share all my tips and little tricks so you’ll nail it like a pro, even if it’s your first time spatchcocking a turkey!
Why You’ll Love This Recipe
- Speedy Cooking: Spatchcocking cuts roast time drastically, so you get perfect turkey in around an hour.
- Juicy & Flavorful: The butter and herb rub seeps into every nook, locking in moisture and delivering deliciousness.
- Crispy Skin Magic: Flattening the bird exposes more skin to heat, giving you irresistible, crackly skin.
- Beginner Friendly: I’ll walk you through spatchcocking step-by-step so you won’t feel overwhelmed.

Ingredients You’ll Need
For this Spatchcock Turkey with Butter and Herb Rub Recipe, each ingredient has its place in creating that perfect balance of flavor and juiciness. Choosing fresh butter and a good quality turkey makes all the difference, and having fresh herbs on hand is always a bonus if you want to experiment.
- Whole Turkey: A fresh or fully thawed 12-pound bird works best for spatchcocking; smaller or bigger birds adjust the cooking time.
- Butter: Softened butter is key to spreading evenly and helping the rub adhere well to the skin and joints.
- Salt: Essential for seasoning and enhancing natural turkey flavors.
- Pepper: Freshly ground black pepper adds a subtle kick without overpowering.
- Cooking Spray: Helps prevent sticking and promotes even browning on your roasting tray.
- Turkey Brine (optional but recommended): Soaks the turkey for 18-24 hours to lock in moisture — I swear by this step for moist meat.
Variations
I like to switch things up sometimes depending on the season or the occasion, and that’s what makes this Spatchcock Turkey with Butter and Herb Rub Recipe so wonderfully versatile. Don’t hesitate to make it your own!
- Herb Variations: I’ve swapped the classic salt and pepper for combinations like garlic and rosemary or thyme and sage, which add a different aroma profile that my guests love.
- Spicy Kick: Adding a bit of smoked paprika or cayenne into the butter rub gives the turkey a subtle heat that’s really addictive.
- Brining Alternatives: If you’re short on time, a quick dry brine or even a compound butter rub with citrus zest can help keep the turkey juicy.
- Butter Substitutes: For a dairy-free option, olive oil works perfectly while still helping the turkey brown beautifully.
How to Make Spatchcock Turkey with Butter and Herb Rub Recipe
Step 1: Brine Your Turkey for Ultimate Juiciness
Start by removing the neck and giblets from your thawed turkey—save those for gravy or stock if you like! I always brine my turkey in a saltwater solution for around 18-24 hours. This step is a game-changer for keeping the meat juicy after roasting, especially since spatchcocking exposes more surface area. Once brined, make sure to rinse the bird thoroughly with cold water and pat dry completely. Moisture on the skin means it won’t crisp up properly, and that’s the last thing you want.
Step 2: Master the Spatchcock – Removing the Backbone
Now for the fun part: spatchcocking! Using a sharp pair of poultry or kitchen shears, carefully cut along each side of the backbone from tail to neck. If you get stuck, I found starting at the tail end makes it smoother, but sometimes switching to the neck end and meeting in the middle works better. Don’t be afraid to use the tip of your scissors to snip through some ribs. Once the backbone is out, flip your bird so it’s breast-side up. Press down hard on each breast to crack the ribs and flatten the turkey. This flattens the bird for even cooking and crispy skin. Tuck wings under the breast and arrange the drumsticks and thighs well—no tearing or breaking the skin is key here.
Step 3: Prep and Apply the Butter and Herb Rub
Mix softened butter with salt and pepper until combined. This simple rub is magic for locking flavor and moisture. I like to slather the butter not only on the skin but also around the joints where the thighs and wings meet the breast. Trust me, this makes a difference in how the flavor penetrates and helps keep those joints juicy. Use your hands to get the butter under the skin as much as you can for maximum flavor beneath the surface.
Step 4: Roast at 400°F Until Perfectly Cooked
Place your flattened turkey on a sheet pan sprayed lightly with cooking spray. Roast in a preheated oven at 400°F for about 1 hour and 10 minutes. You’ll want to baste every 20-30 minutes with melted butter and pan drippings to keep things moist and flavorful. The turkey is done when the thickest part of the breast and thigh reaches 165°F—an instant-read thermometer is your best friend here. After roasting, let the turkey rest for 10-20 minutes to let juices redistribute before carving.
Pro Tips for Making Spatchcock Turkey with Butter and Herb Rub Recipe
- Use Sharp Poultry Shears: They make cutting through bones and ribs much easier and safer—dull scissors will just frustrate you.
- Don’t Skip Brining: It’s my secret for juicy turkey every time. If you’re in a rush, even a quick brine is better than none.
- Press Firmly When Flattening: The ribs need to crack to help the bird lay flat; this ensures even cooking and crispy skin all over.
- Check Thermometer Early: Start checking internal temp 10 minutes before time’s up to avoid overcooking the breast.
How to Serve Spatchcock Turkey with Butter and Herb Rub Recipe
Garnishes
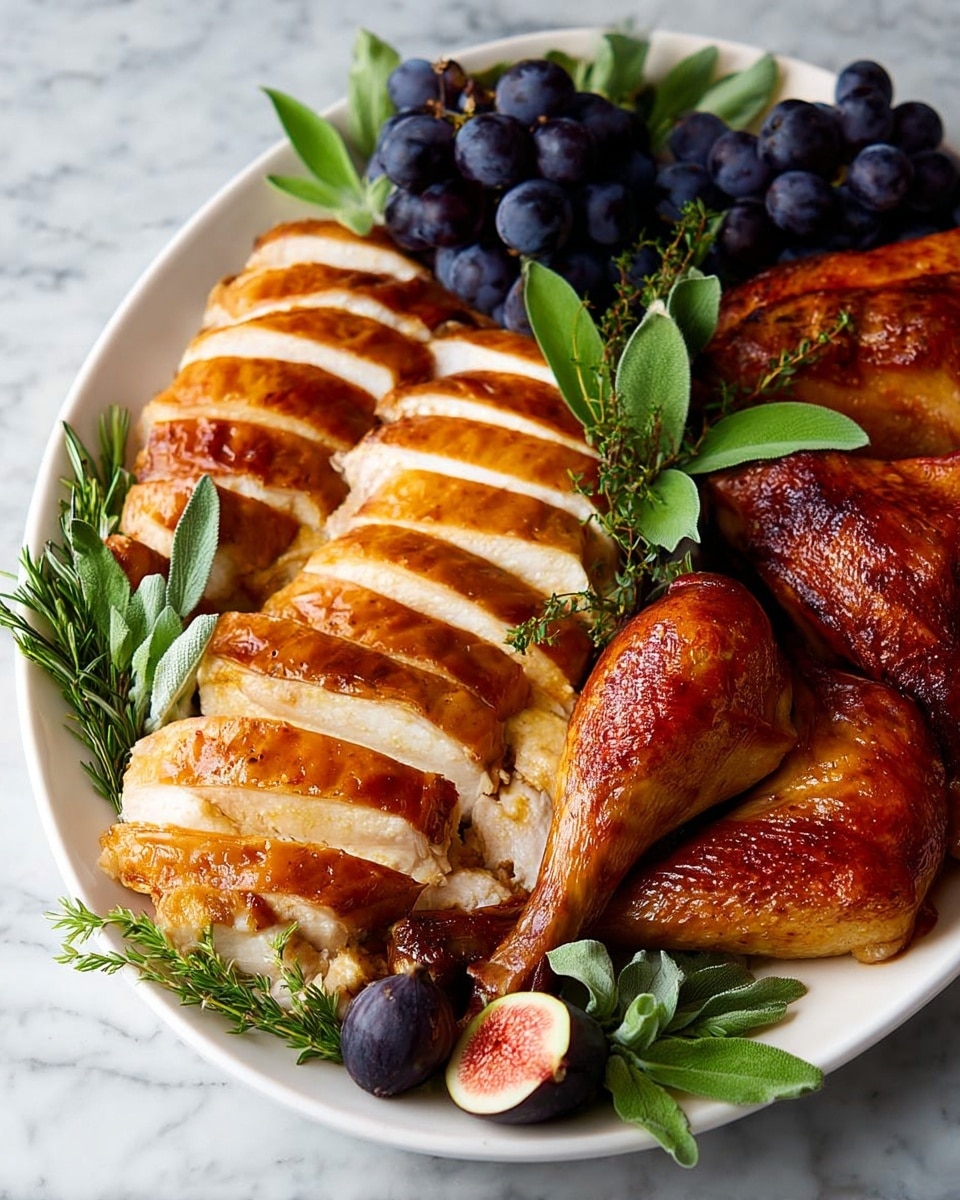
I love garnishing the turkey platter with fresh herb sprigs like rosemary and thyme, plus a few lemon wedges for a pop of color and brightness. They give the presentation a rustic, inviting feel while complementing those buttery herb flavors perfectly.
Side Dishes
Some of my favorite sides to serve alongside this spatchcock turkey include garlicky mashed potatoes, honey-glazed carrots, and a crisp green salad with a tangy vinaigrette. If it’s fall, I swear by roasted Brussels sprouts with a drizzle of balsamic glaze—it pairs beautifully with the rich turkey flavors.
Creative Ways to Present
For special occasions, I like to carve the turkey directly on a large wooden board surrounded by seasonal fruits and veggies—think figs, pomegranate seeds, or roasted root vegetables. It makes dinner feel festive and the colors are stunning in photos!
Make Ahead and Storage
Storing Leftovers
After enjoying your feast, I recommend letting any leftover turkey cool completely before storing it in airtight containers. Keep the meat separate from any bones or skin for easier reheating. Refrigerated turkey is best eaten within 3-4 days.
Freezing
If you want to freeze leftovers, slice the meat and place it in freezer-safe bags with as much air removed as possible. This recipe freezes beautifully—I’ve pulled slices out months later for sandwiches or quick dinners with great results.
Reheating
To keep the turkey moist when reheating, I cover it with foil and warm it gently in the oven at 325°F. Adding a splash of broth or a knob of butter before covering works wonders. Avoid microwaving if you want to preserve texture and flavor.
FAQs
-
What does spatchcocking a turkey mean?
Spatchcocking means removing the turkey’s backbone and flattening the bird, which helps it cook more evenly and faster while giving you that crisp, golden skin we all crave.
-
Do I have to brine the turkey for this recipe?
While brining isn’t mandatory, I highly recommend it because it locks in moisture and enhances flavor, especially when roasting at high heat. If you’re short on time, even a quick brine or dry brine helps!
-
Can I use frozen turkey for spatchcocking?
You can, but make sure it’s completely thawed first—usually a couple of days in the fridge—so it’s easier and safer to cut open and flatten the bird.
-
How do I know when the turkey is done?
Use an instant-read thermometer and check that both the thickest part of the breast and thigh reach 165°F. This ensures safety without drying out your turkey.
Final Thoughts
This Spatchcock Turkey with Butter and Herb Rub Recipe truly transformed how I approach holiday cooking—and it might just do the same for you. It’s straightforward, yields incredible flavor, and the crispy skin? To die for. I hope you give this a try and enjoy the juicy, tender turkey that comes out every time. Trust me, once you master the spatchcock method, you’ll wonder how you ever cooked turkey any other way!
Print
Spatchcock Turkey with Butter and Herb Rub Recipe
- Prep Time: 20 minutes
- Cook Time: 1 hour 10 minutes
- Total Time: 1 day 1 hour 30 minutes
- Yield: Serves 12
- Category: Main Course
- Method: Roasting
- Cuisine: American
Description
This Spatchcock Turkey recipe offers a flavorful and evenly cooked turkey by removing the backbone and flattening the bird before roasting. Brining the turkey overnight enhances its juiciness, while a butter rub seasoned with salt and pepper ensures a crispy, golden skin. Roasting at a high temperature yields tender, moist meat perfect for any festive occasion.
Ingredients
Turkey and Brining
- 12 pound turkey, giblets and neck removed
- 1 recipe turkey brine
Butter Rub
- 1/2 cup butter, softened
- 1 teaspoon salt
- 1 teaspoon pepper
Other
- Cooking spray
Instructions
- Remove Giblets: Take out the neck and giblets from a fully thawed whole turkey to prepare it for brining and cooking.
- Brine the Turkey: Prepare the turkey brine according to the recipe directions and submerge the turkey in the brine for 18-24 hours to enhance moisture and flavor.
- Rinse and Dry: After brining, rinse the turkey thoroughly with cold water to remove excess salt and pat dry completely with paper towels.
- Spatchcock the Turkey: Using poultry or kitchen shears, remove the backbone by cutting along both sides, then flip the bird breast side up and press firmly on each breast until the ribs crack, flattening the turkey. Tuck wings underneath the breast and arrange drumsticks and thighs flat without tearing the skin or breaking joints.
- Prepare Butter Rub: Mix softened butter with salt and pepper until combined to create a flavorful spread for the turkey.
- Butter the Turkey: Generously coat the entire turkey with the butter mixture, paying special attention to joints where wings and thighs connect to the breast for optimal seasoning.
- Roast: Place the turkey on a sheet pan sprayed with cooking spray and roast at 400°F (204°C) for about 1 hour and 10 minutes. Roast until the internal temperature of the breast and the thickest part of the thigh reach 165°F (74°C) for safe consumption.
- Baste Regularly: Every 20-30 minutes, baste the turkey with melted butter and pan drippings to keep the meat moist and enhance flavor and color.
- Rest and Serve: Remove the turkey from the oven and let it rest for 10-20 minutes to allow juices to redistribute before carving and serving.
Notes
- If cutting out the backbone is difficult, try adjusting your cutting position slightly closer or farther from the backbone.
- Use the tip of the scissors for precise snipping of bones as needed.
- Starting the backbone cut from the tail end of the bird is recommended, but if challenges arise, begin from the neck end so the cuts meet in the middle.
Nutrition
- Serving Size: 1 slice (approx. 8 oz cooked turkey)
- Calories: 420
- Sugar: 0g
- Sodium: 450mg
- Fat: 25g
- Saturated Fat: 10g
- Unsaturated Fat: 13g
- Trans Fat: 0g
- Carbohydrates: 0g
- Fiber: 0g
- Protein: 50g
- Cholesterol: 140mg


