

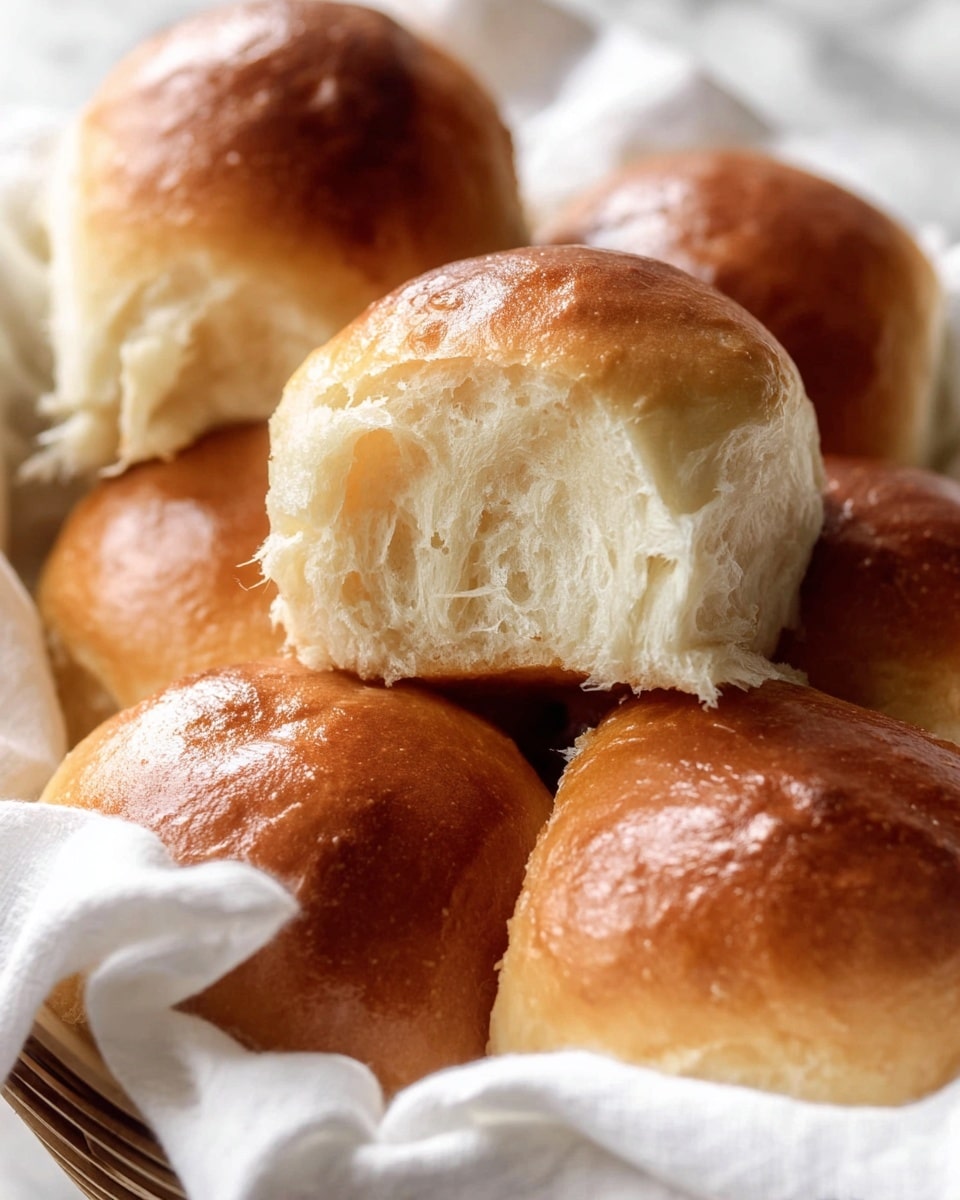
There’s something so comforting about freshly baked bread, isn’t there? I absolutely love how this Soft Dinner Rolls Recipe turns out—fluffy, buttery, and perfectly soft every time. Whether you’re looking to elevate your family dinner or need an irresistible side for a special occasion, these rolls will become your new go-to. Stick with me, and I’ll share every little secret to help you nail these soft, pillowy rolls in your own kitchen.
Why You’ll Love This Recipe
- Perfectly Soft Texture: Thanks to a combination of gentle kneading and the right balance of butter and milk, these rolls remain tender and fluffy.
- Easy to Make: You don’t need fancy equipment—though a stand mixer helps—and the ingredients are pantry staples.
- Versatile: Serve them plain or brushed with honey butter, perfect for any meal from weeknight dinners to holiday feasts.
- Great for Beginners: I used to struggle with sticky dough, but this recipe walked me through it gently, and it’ll do the same for you.

Ingredients You’ll Need
Each ingredient here plays a key role in creating that wonderful soft and fluffy texture. You’ll find that warming the milk just right and using softened butter really gives these rolls their signature tenderness and flavor.
- Whole milk: Warming it to about 110°F wakes up the yeast gently without killing it, which is crucial for a good rise.
- Platinum Yeast from Red Star instant yeast: This instant yeast is a game-changer for quick and reliable rising. You can swap for active dry yeast, but expect a slightly longer rise.
- Granulated sugar: Splitting it ensures the yeast gets fed early while adding a touch of sweetness to the dough.
- Large egg: Helps enrich the dough and adds structure.
- Unsalted butter: Softened butter mixed into the dough keeps the rolls tender and rich.
- Salt: Brings out flavor and balances the sweetness.
- All-purpose flour or bread flour: Both work well, but bread flour gives you a chewier bite, while all-purpose makes them lighter and fluffier.
- Optional topping (melted unsalted butter and honey): Add a sweet, glossy finish that’s hard to resist.
Variations
I love making this Soft Dinner Rolls Recipe just as is, but sometimes I like to mix it up a bit and add my own twist. Feel free to personalize these rolls to suit your taste or dietary needs—you might discover a new favorite version.
- Whole wheat flour substitution: For a healthier option, swap out half the all-purpose flour for whole wheat. My family loves how it adds a nutty flavor without losing too much fluff.
- Garlic herb rolls: Add garlic powder and chopped fresh herbs like rosemary or thyme into the dough for a savory spin. These are handy when you want rolls that double as a flavorful side.
- Dairy-Free Version: Substitute the milk with almond or oat milk and use a dairy-free butter to accommodate dietary restrictions—I’ve done this with great success for friends!
- Sweet Rolls: Increase sugar slightly and add cinnamon to the dough for a sweet breakfast roll that’s irresistible with morning coffee.
How to Make Soft Dinner Rolls Recipe
Step 1: Wake up the yeast and mix the basics
Start by whisking together your warm milk, instant yeast, and one tablespoon of sugar in your mixer bowl (or a large bowl if mixing by hand). Let this sit for about 5 minutes; this little rest time allows the yeast to get nice and bubbly. One thing I discovered is that yeast loves warmth but hates overheating—so stick close to that 110°F mark and you’ll avoid any yeast disasters.
Step 2: Mix and build your dough gradually
Add the remaining sugar, egg, softened butter, salt, and one cup of flour to the yeast mixture. Mix on low for 30 seconds, then scrape the bowl down before adding the remaining flour. Mix on medium speed until the dough starts pulling away from the sides. If it feels too wet, sprinkle in a tablespoon of flour at a time—just enough to bring it together without making it dry. I remember the first time I ignored this and my dough was a sticky mess, so trust me here!
Step 3: Knead with love for soft rolls
Whether you continue kneading in your mixer for about 5 minutes or knead by hand, this step is essential for developing gluten and that lovely stretchy texture. The dough will be slightly sticky but don’t over-flour it—add just a sprinkle here or there if needed. I like to poke the dough lightly: if it bounces back slowly, you’re golden. The “windowpane test” is another great way to check your kneading—stretch a small piece until it’s thin enough to let light through without tearing. This technique saved me tons of frustration when I started baking bread.
Step 4: The first rise—patience pays off
Coat a large bowl with oil, place your dough inside, turning it to cover every side with a little slickness. Cover it well with foil or a towel and find a cozy, warm spot (your kitchen counter usually works just fine). In about 1 to 2 hours, your dough should double in size—that’s the yeast doing its magic. I usually keep an eye on mine; sometimes I open the cover to peek because it’s just so fun seeing the dough puff up!
Step 5: Shape your rolls and let them rise again
Once your dough has risen, punch it down gently to release the air. Divide it into 14-16 equal pieces—don’t worry about precision; eyeballing works well! Use a bench scraper for cleaner cuts, if you have one. Roll each piece into a smooth ball and arrange them snugly in a buttered 9×13-inch pan or your favorite baking dish. Cover again and let them rise for about an hour until puffy and soft. This second rise is where your rolls get their fluffy cloud-like texture.
Step 6: Bake and finish with a buttery glaze
Preheat your oven to 350°F and set your rack lower down to avoid overly browning the tops. Bake for about 20-25 minutes until golden and tempting. If you see some spots browning quicker, just tent the pan loosely with foil. Right out of the oven, brush the rolls with melted butter mixed with honey—that’s my secret for an irresistibly shiny, sweet finish that keeps them soft. Let them cool a little, then get ready to enjoy the fruits of your labor.
Pro Tips for Making Soft Dinner Rolls Recipe
- Keep milk warm, not hot: If the milk’s too warm, it’ll kill the yeast, so use a kitchen thermometer or test it feels like warm bath water.
- Don’t over-flour your dough: It’s tempting, but adding too much flour will make rolls dense; embrace a little stickiness.
- Second rise is key for softness: Don’t rush this step; it ensures light, fluffy rolls that practically melt.
- Use soft, room-temperature butter: It blends smoothly into the dough, locking in moisture and richness.
How to Serve Soft Dinner Rolls Recipe
Garnishes
I’m a big fan of the honey-butter glaze right after baking—it adds just the right touch of sweetness and shine. For savory dishes, a sprinkle of flaky sea salt or fresh herbs like chopped chives on top of the buttered rolls adds a beautiful finish and flavor boost.
Side Dishes
These soft rolls shine alongside hearty soups like creamy tomato bisque or chicken noodle. They also pair perfectly with roasted vegetables, mashed potatoes, or your favorite cozy stew. Trust me, my family goes crazy for these rolls dipped in buttery gravy!
Creative Ways to Present
For a special occasion, I like to bake the rolls in a cast iron skillet to get a rustic look and crusty edges. Arranging the rolls in a circular “flower” shape in the pan makes a beautiful centerpiece. You can even serve them in little paper bags tied with twine for a charming dinner party touch.
Make Ahead and Storage
Storing Leftovers
Leftover rolls keep beautifully at room temperature when wrapped tightly in plastic wrap or a resealable bag—good for 2-3 days. For me, storing them in the fridge for up to a week works well too, just bring them back to room temp before serving to regain softness.
Freezing
I’ve frozen both the shaped dough and baked rolls with great results. When freezing dough, thaw and let it rise again for around 4–5 hours before baking. Baked rolls freeze well too—just thaw overnight and warm slightly in the oven for that fresh-baked feel.
Reheating
To reheat without drying out, I cover rolls loosely with foil and pop them in a 300°F oven for about 10 minutes or until warm. You can sprinkle a tiny bit of water in the pan to add steam if they feel dry. The honey-butter glaze brushed again after warming really brings them back to life.
FAQs
-
Can I make soft dinner rolls without a stand mixer?
Absolutely! While a stand mixer makes kneading easier, you can mix and knead this dough by hand using a large wooden spoon or silicone spatula, then knead on a lightly floured surface. It takes a bit more elbow grease, but the results are just as delicious.
-
What if my dough is too sticky or too dry?
If the dough feels sticky but still holds together, resist the urge to add lots of flour—it should be slightly tacky to stay soft. Add flour sparingly, one tablespoon at a time. If it’s too dry and crumbly, try adding a teaspoon of lukewarm milk.
-
Can I use active dry yeast instead of instant yeast?
Yes, you can substitute active dry yeast in this recipe, but keep in mind that the rising times will be a bit longer, as active dry yeast takes more time to activate. Follow the same process for warming the milk and dissolving yeast for best results.
-
How do I know when the rolls are done baking?
Look for golden brown tops and a springy texture when you gently press a roll. If you want to be extra sure, you can use an instant-read thermometer—the internal temperature should be around 190°F (88°C).
Final Thoughts
This Soft Dinner Rolls Recipe has truly become one of my kitchen staples—and I think once you try it, you’ll feel the same. It’s approachable even if you’re new to bread baking, yet rewarding enough to impress family and friends. Here’s to more cozy meals filled with buttery, freshly baked rolls that bring smiles all around. Give this recipe a try—you won’t regret it!
Print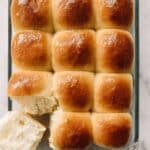
Soft Dinner Rolls Recipe
- Prep Time: 3 hours, 25 minutes
- Cook Time: 22 minutes
- Total Time: 3 hours, 47 minutes
- Yield: 14-16 rolls
- Category: Bread
- Method: Baking
- Cuisine: American
Description
This Soft Dinner Rolls recipe yields fluffy, tender rolls perfect for any meal. Made with simple ingredients like milk, yeast, sugar, butter, and flour, these rolls are easy to prepare using a stand mixer or by hand. With two rising periods and baking at 350°F, the rolls develop a golden crust and soft interior, ideal for serving warm with butter or as sandwich buns.
Ingredients
Dough Ingredients
- 1 cup (240ml) whole milk, warmed to about 110°F (43°C)
- 2 and 1/4 teaspoons Platinum Yeast from Red Star instant yeast (1 standard packet)
- 2 Tablespoons granulated sugar, divided
- 1 large egg
- 1/4 cup (4 Tbsp; 56g) unsalted butter, softened to room temperature and cut into 4 pieces
- 1 teaspoon salt
- 3 cups (390g) all-purpose flour or bread flour (spooned & leveled)
Optional Topping
- 2 Tablespoons (28g) melted unsalted butter mixed with 1 Tablespoon honey
Instructions
- Prepare the dough: In the bowl of a stand mixer, whisk warm milk, yeast, and 1 tablespoon sugar together. Cover and let sit for 5 minutes to activate the yeast. If you don’t have a stand mixer, mix in a large bowl with a wooden spoon or silicone spatula.
- Mix initial dough: Add remaining sugar, egg, butter, salt, and 1 cup of flour to the yeast mixture. Using a dough hook or paddle attachment, mix on low speed for 30 seconds. Scrape down the bowl, then add the remaining flour. Beat on medium speed until dough begins to pull away from bowl sides, about 2 minutes. Add flour 1 tablespoon at a time if dough is too wet to knead.
- Knead the dough: Continue kneading the dough in the mixer for 5 minutes or knead by hand on a lightly floured surface for 5 minutes until the dough is soft, slightly sticky but still manageable. Perform the windowpane test to check gluten development. The dough should slowly bounce back when poked.
- First rise: Lightly grease a large bowl with oil or nonstick spray. Place dough in bowl and turn to coat with oil. Cover with foil, plastic wrap, or a kitchen towel and let rise in a warm spot for 1-2 hours until doubled in size.
- Prepare pan and shape rolls: Grease a 9×13 inch baking pan or two 9-inch pans. Punch down the risen dough and divide into 14-16 equal pieces. Shape each piece into a smooth ball and arrange spaced in the prepared pan.
- Second rise: Cover shaped rolls with foil, plastic wrap, or a towel and let rise for about 1 hour until puffy.
- Preheat oven: Adjust oven rack to lower position and preheat oven to 350°F (177°C) to avoid overbrowning the rolls’ tops.
- Bake the rolls: Bake rolls for 20-25 minutes until golden brown, rotating pan halfway through baking. Tent with foil if tops brown too quickly.
- Add topping and cool: Remove rolls from oven and brush with optional honey butter. Allow to cool a few minutes before serving.
- Storage: Store leftover rolls tightly covered at room temperature for 2-3 days or in the refrigerator up to 1 week.
Notes
- Freezing: Freeze shaped rolls (step 6) in a greased pan covered tightly for up to 3 months. To bake, thaw and let rise 4-5 hours before baking as directed. You can also freeze fully baked rolls for 3 months; thaw and reheat at 300°F for about 10 minutes.
- Overnight rise: Prepare through shaping (step 6) and refrigerate shaped rolls up to 15 hours. Let rise for 1-2 hours at room temperature before baking. Alternatively, do the first rise in the fridge overnight, then allow 2 hours rise at room temperature before baking.
- Flour choice: Use all-purpose flour for soft rolls or bread flour for chewier texture; results remain tender and fluffy with either.
- Yeast substitutions: Platinum Yeast is an instant yeast. Substitute with active dry yeast but extend rising times slightly.
- Baking pans: Glass pans brown rolls slower than metal, which can brown too quickly. Adjust oven rack and monitor rolls accordingly.
Nutrition
- Serving Size: 1 roll (approx. 60g)
- Calories: 140
- Sugar: 3g
- Sodium: 150mg
- Fat: 4.5g
- Saturated Fat: 2.5g
- Unsaturated Fat: 2g
- Trans Fat: 0g
- Carbohydrates: 22g
- Fiber: 1g
- Protein: 4g
- Cholesterol: 35mg


