

If you love garlic and creamy, dreamy dips, you’re in for a treat with this Roasted Garlic Aioli Recipe. It’s one of those sauces that instantly elevates anything it touches—fries, grilled veggies, sandwiches—you name it. The magic here is in roasting the garlic until it’s caramelized and sweet, which takes away the raw sharpness and gives the aioli a deeply rich, mellow flavor. Stick with me, and I promise you’ll want to make this on repeat.
Why You’ll Love This Recipe
- Deep roasted garlic flavor: Roasting transforms garlic into a smooth, sweet, buttery spread that’s simply irresistible.
- Super versatile: You can use this aioli as a dip, spread, or sauce to instantly upgrade your meals.
- Easy to make: With just a handful of simple ingredients, you get a gourmet, homemade condiment in under an hour.
- Customizable: Easy to tweak with herbs, spices, and citrus to suit your personal taste.

Ingredients You’ll Need
The ingredients for this Roasted Garlic Aioli Recipe are simple but perfectly balanced. Each one plays a role to build that classic creamy, tangy, and garlicky flavor that you’ll fall in love with. When shopping, picking fresh garlic bulbs and good mayonnaise really makes a difference.

- Garlic head: Fresh, firm garlic bulbs roast beautifully and become creamy and sweet inside.
- Olive oil: Just a bit to help roast the garlic cloves and add richness.
- Mayonnaise: This creates the creamy base; homemade or store-bought both work well.
- Lemon juice: Adds brightness and balances out the richness.
- Dijon mustard: Brings mild tang and depth to the aioli.
- Salt and pepper: Essential for seasoning and bringing out all the flavors.
- Parsley or chives (optional): Fresh herbs for garnish, adding a pop of green and fresh flavor.
Variations
I love that this Roasted Garlic Aioli Recipe lets you get creative. Over the years, I’ve played around with different twists depending on what I have on hand or the vibe I’m going for in a meal. Feel free to personalize the flavor—you’ll enjoy making it your own.
- Smoky aioli: Add a pinch of smoked paprika for a subtle smoky kick; it’s a game-changer with grilled dishes.
- Herb infusion: Mix in fresh basil or dill instead of parsley for a fresh herbal note.
- Spicy version: Toss in a dash of cayenne or chipotle powder to wake up your taste buds.
- Vegan adaptation: Use vegan mayonnaise to keep it plant-based but just as tasty.
How to Make Roasted Garlic Aioli Recipe
Step 1: Roast the Garlic to Perfection
Start by preheating your oven to 400°F (200°C). Peel away the outer papery layers of the garlic bulb but keep the cloves snug inside their skins. Slice the top off the bulb to expose the tops of the cloves—this step is key to get that beautiful caramelization. Drizzle olive oil over the exposed garlic, then wrap it tightly in foil. Pop it in the oven and roast for 30 to 40 minutes until the cloves become soft, golden, and fragrant. You’ll know it’s ready when the aroma fills your kitchen and the cloves feel buttery to the touch.
Step 2: Mash and Mix the Aioli
Once roasted, let the garlic cool just enough so you can handle it without burning your fingers. Squeeze the soft cloves out of their skins and into a small bowl. Mash them with a fork until creamy—this part is so satisfying! Then, combine the mashed garlic with mayonnaise, lemon juice, and Dijon mustard. Stir everything together until smooth and well blended. Now season with salt and pepper to taste, adjusting as you go. If you like it thinner, a splash of water or extra lemon juice does the trick.
Step 3: Let the Flavors Meld
Transfer the aioli to a container, cover it, and pop it in the fridge for at least 30 minutes. Giving it some resting time really lets those roasted garlic flavors deepen and blend beautifully with the creamy base. I like to make this a day ahead whenever I can because the flavor just hits differently.
Pro Tips for Making Roasted Garlic Aioli Recipe
- Perfect roasting: Don’t rush the roasting time—patience yields that sweet, mellow garlic that makes all the difference.
- Smooth texture: If you want silkier aioli, use a food processor to blend ingredients instead of mashing by hand.
- Balance acidity: Add lemon juice gradually so you don’t overpower the delicate roasted garlic flavor.
- Proper storage: Keep the aioli in an airtight container in the fridge to maintain fresher taste for up to a week.
How to Serve Roasted Garlic Aioli Recipe

Garnishes
I usually sprinkle freshly chopped parsley or chives over the top just before serving. Not only do they add a vibrant pop of color, but their fresh, herbaceous notes contrast wonderfully with the roasted garlic’s richness. Sometimes I’ll also drizzle a tiny bit of extra virgin olive oil around the edge for a glossy finish.
Side Dishes
This aioli pairs so well with crispy roasted potatoes, grilled vegetables, or as a dip for crab cakes. My family goes crazy for it as a sandwich spread, especially on grilled chicken or veggie burgers. If you’re hosting, it’s a hit as a dipping sauce for crudités or artisan bread.
Creative Ways to Present
For parties, I love serving this roasted garlic aioli in small ramekins surrounded by a colorful platter of crudités, breadsticks, and chips. You could also use edible flowers as garnish for a fancy touch or swirl the aioli decoratively on plates when plating seafood or grilled meats—it’s an easy way to wow guests!
Make Ahead and Storage
Storing Leftovers
I always keep leftover aioli in a sealed jar in the fridge. It stays fresh for about 5 to 7 days, so I make sure to label it with the date. Give it a quick stir before using again because it can thicken slightly after chilling.
Freezing
While you technically can freeze this aioli, I found that the texture changes a bit once thawed and it may separate. If you do freeze it, thaw slowly in the fridge and whisk well before serving to bring back its creaminess.
Reheating
This sauce is best served cold or at room temperature. If you want to warm it just slightly, do so gently by placing the container in warm water, stirring frequently. Keep in mind that heating too much can break the emulsion and alter the texture.
FAQs
-
Can I use pre-minced garlic instead of roasting fresh garlic for this aioli?
While pre-minced garlic is convenient, it lacks the rich caramelized flavor that roasting fresh garlic imparts. Roasting softens the garlic’s sharpness and adds a sweet, buttery depth—essential for authentic roasted garlic aioli. I highly recommend using fresh garlic for the best results.
-
How long can I store roasted garlic aioli in the fridge?
Stored in an airtight container, the aioli will keep well for up to one week in the refrigerator. Always check for any off smells or changes in texture before using leftovers to ensure freshness.
-
What’s the difference between aioli and mayonnaise?
Traditional aioli is a garlic-flavored mayo-like sauce made from garlic, olive oil, lemon juice, and often egg yolks emulsified together. Mayonnaise is a more neutral emulsified sauce made of egg yolks and oil. Using roasted garlic in mayonnaise creates a delicious aioli with a distinct roasted flavor.
-
Can I make this Roasted Garlic Aioli Recipe dairy-free?
Absolutely! This recipe doesn’t have dairy ingredients, so as long as you use a dairy-free mayonnaise, your aioli will be dairy-free too. It’s great for folks with sensitivities but still crave rich, garlicky flavor.
Final Thoughts
I absolutely love how this Roasted Garlic Aioli Recipe turns out every single time—it feels fancy yet is so easy to make. When I first tried roasting garlic for aioli, I was amazed how much smoother and less sharp it made the sauce. Since then, it’s become a staple in my kitchen, and my family always asks for more. If you give it a try, I’m confident you’ll soon be sharing it with friends and dreaming up new ways to enjoy it. Trust me, once you taste that roasted garlic goodness in a creamy aioli, you’ll wonder how you ever went without it!
Print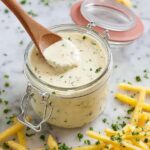
Roasted Garlic Aioli Recipe
- Prep Time: 5 minutes
- Cook Time: 40 minutes
- Total Time: 45 minutes
- Yield: 8 servings
- Category: Condiment
- Method: Roasting
- Cuisine: Mediterranean
- Diet: Vegetarian
Description
This Roasted Garlic Aioli combines the rich, mellow flavor of caramelized roasted garlic with creamy mayonnaise, tangy lemon juice, and a hint of Dijon mustard. Perfect as a dip, spread, or sandwich condiment, this versatile aioli brings a gourmet touch to any dish with minimal effort.
Ingredients
Roasted Garlic
- 1 head garlic
- 1 tablespoon olive oil
Aioli Base
- ½ cup mayonnaise
- 1 tablespoon lemon juice
- ½ teaspoon Dijon mustard
- Salt and pepper, to taste
Garnish
- Parsley or chives, chopped
Instructions
- Preheat Oven: Preheat your oven to 400°F (200°C) to prepare for roasting the garlic.
- Prepare Garlic: Peel away the outer layers of the garlic bulb, keeping the cloves intact. Slice off the top of the bulb to expose the garlic cloves. Place the bulb on aluminum foil, drizzle with olive oil, and wrap tightly in the foil.
- Roast Garlic: Roast the wrapped garlic bulb in the oven for 30-40 minutes until the cloves are soft and golden brown.
- Cool and Mash: Remove the garlic from the oven, let it cool slightly, then squeeze the soft roasted cloves out of their skins into a bowl. Mash them with a fork until smooth and creamy.
- Mix Aioli: In another bowl, combine the mashed roasted garlic with mayonnaise, lemon juice, and Dijon mustard. Stir thoroughly until well blended. Season with salt and pepper to taste and adjust seasoning as needed.
- Garnish: If desired, sprinkle chopped parsley or chives over the aioli for added flavor and color.
- Chill: Transfer the aioli to a serving dish or airtight container. Refrigerate for at least 30 minutes to allow the flavors to meld together before serving.
Notes
- Roast extra garlic cloves along with the ones needed for the aioli; they make a delicious spread for bread or a flavor boost to other dishes.
- For an even smoother texture, blend the aioli ingredients using a food processor or blender.
- If the aioli is too thick, thin it out gently with a little water or additional lemon juice.
- The aioli thickens further after chilling, so adjust the consistency accordingly before refrigerating.
- Personalize by adding a pinch of smoked paprika or a touch of honey for a unique flavor twist.
Nutrition
- Serving Size: 2 tablespoons
- Calories: 110
- Sugar: 0.3 g
- Sodium: 140 mg
- Fat: 11 g
- Saturated Fat: 1.7 g
- Unsaturated Fat: 8.5 g
- Trans Fat: 0 g
- Carbohydrates: 1.3 g
- Fiber: 0.2 g
- Protein: 0.3 g
- Cholesterol: 5 mg


