
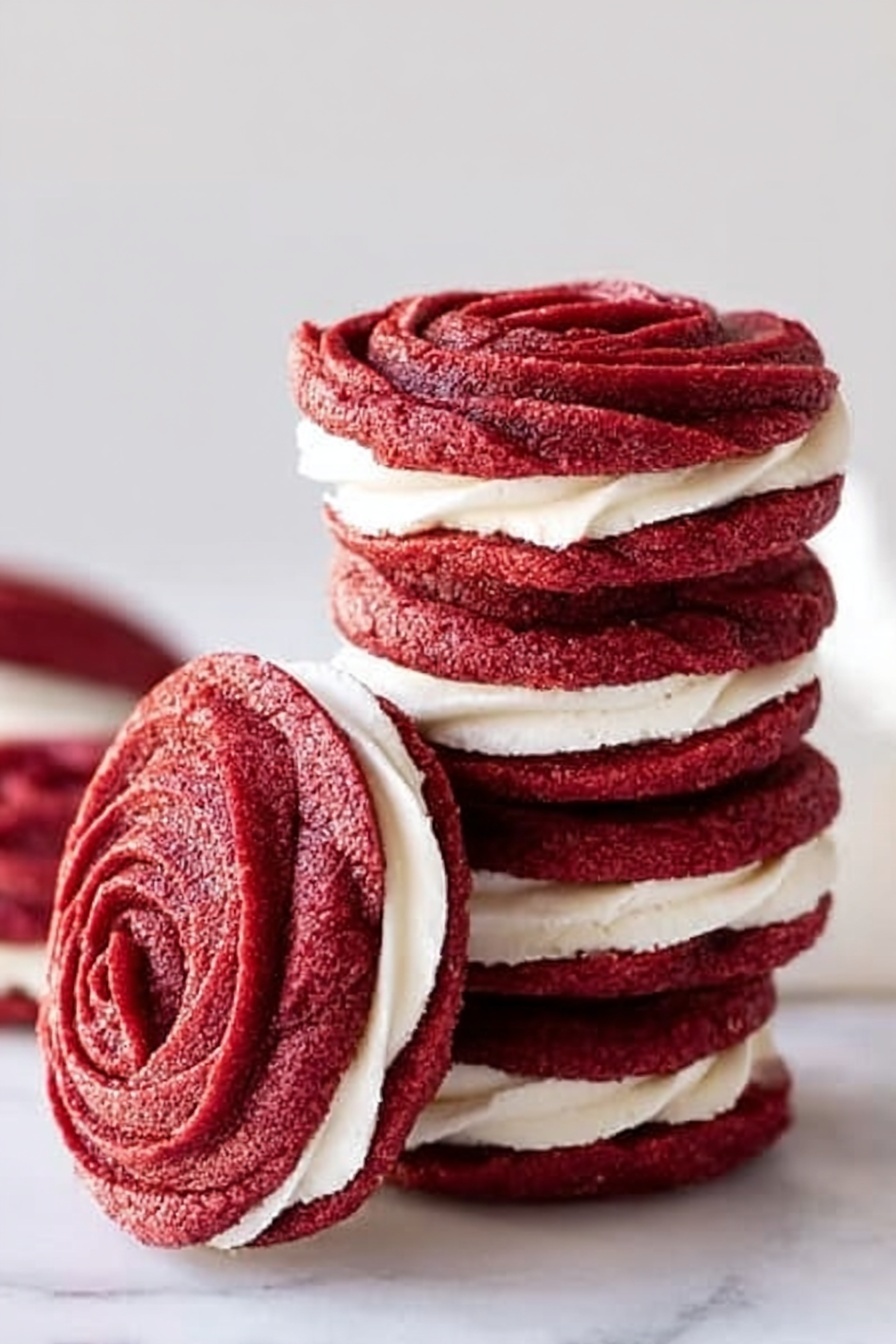
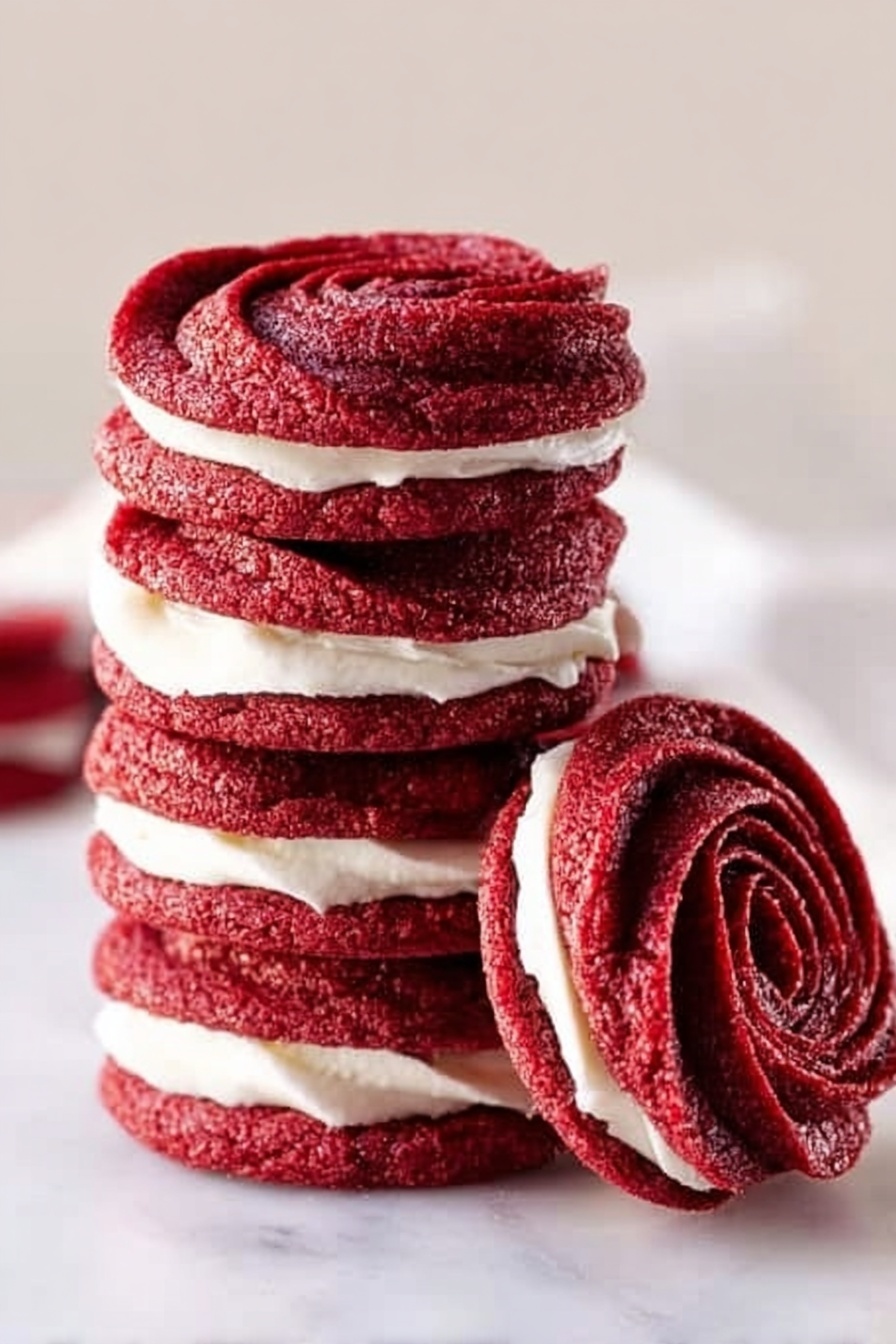
If you’re looking for a show-stopping treat that’s as delightful to eat as it is beautiful to behold, you’re going to love this Red Velvet Rose Cookies Recipe. These are not your everyday cookies—they’re little rose-shaped gems that bring a touch of elegance and a burst of classic red velvet flavor in every bite. Trust me, once you try this recipe, you’ll want to make these for every special occasion, or honestly, just because.
Why You’ll Love This Recipe
- Elegant Presentation: These cookies pipe into beautiful rose shapes that impress every time.
- Classic Flavor with a Twist: A perfect balance of rich cocoa and red velvet charm.
- Easy Yet Stunning: Simple ingredients come together for a fancy-looking cookie without the fuss.
- Perfect for Sharing: These cookies turn into heavenly sandwiches with marshmallow buttercream, making them even more irresistible.

Ingredients You’ll Need
The ingredients in this Red Velvet Rose Cookies Recipe are straightforward, but each one plays a crucial role in creating that soft texture and vibrant red hue that make these cookies so special. I always keep a good quality cocoa powder and gel food coloring on hand for the best results.
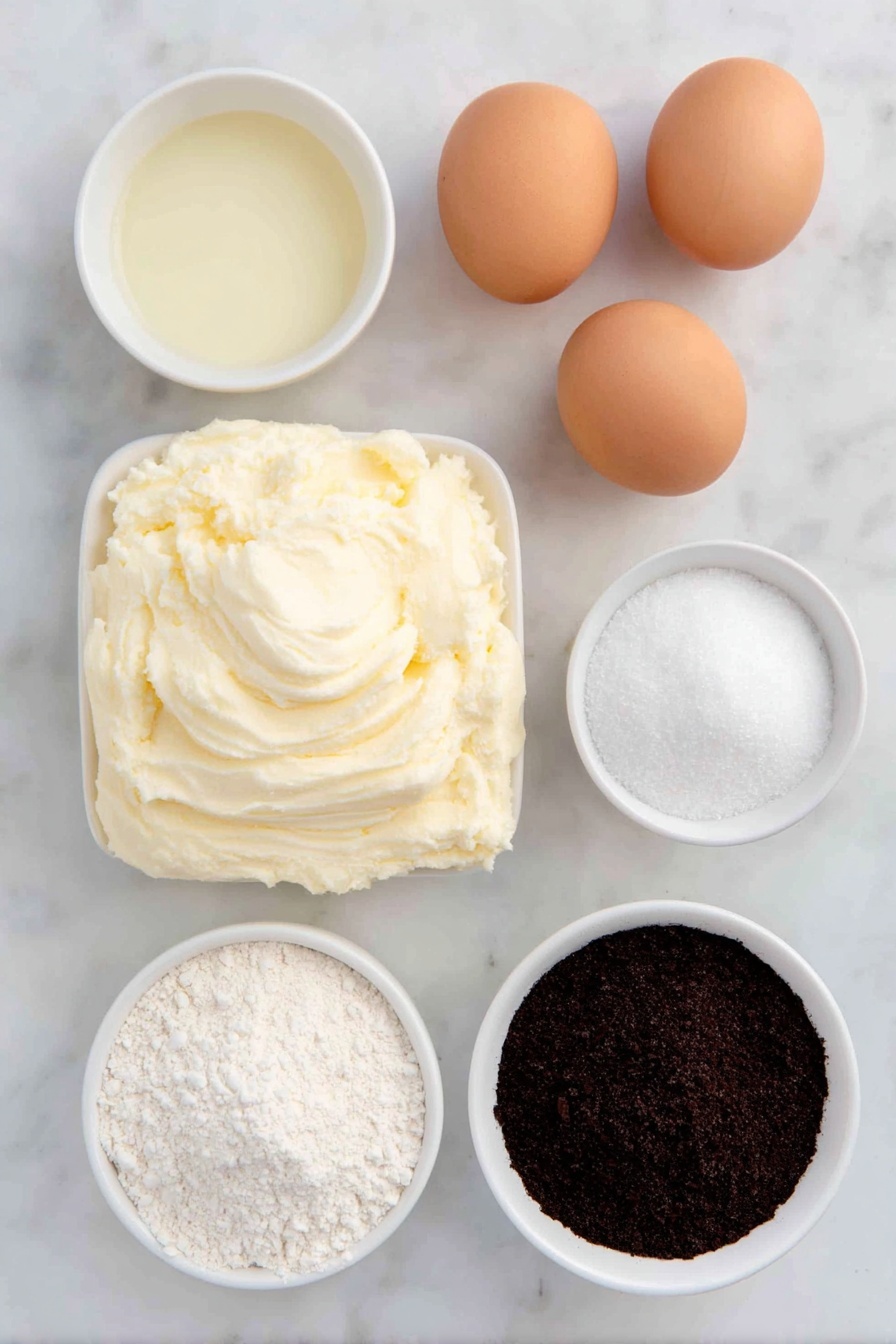
- Shortening: Gives these cookies their tender, melt-in-your-mouth texture and helps maintain the shape when piping.
- White sugar: Sweetens and helps the cookies develop that slight crisp edge.
- Eggs: They bind everything together and add richness to the dough.
- Vanilla extract: Adds warm, aromatic depth that complements the cocoa beautifully.
- Buttermilk: Provides gentle acidity for tenderness and helps intensify the classic red velvet flavor.
- Red gel food coloring: Use gel, not liquid, for vibrant color without affecting dough consistency.
- All-purpose flour: The structure base of the cookies, ensuring they’re sturdy yet soft.
- Unsweetened cocoa powder: For that unmistakable chocolate note without overpowering the red velvet taste.
- Salt: Balances sweetness and enhances all the flavors.
Variations
I love making these Rose Cookies every which way depending on the occasion. Feel free to play around with flavors and fillings—making this recipe truly yours is half the fun. Here are a few ideas that have worked well for me:
- Flavor Swap: Sometimes I add a teaspoon of espresso powder to the dry ingredients for a mocha twist that’s subtle but adds complexity.
- Dairy-Free Version: You can swap the buttermilk for a mix of almond milk and a splash of lemon juice, which works surprisingly well.
- Filling Options: Instead of marshmallow buttercream, try cream cheese frosting or even raspberry jam for a fruitier flare.
- Festive Colors: Change up the red gel food coloring with pink or purple shades for themed parties or holidays.
How to Make Red Velvet Rose Cookies Recipe
Step 1: Cream and Combine Like a Pro
Start by preheating your oven to 350°F (175°C), then cream together the shortening and sugar in a stand mixer. This step is key—you want the mixture light and fluffy, which sets the stage for tender cookies. Once they’re nicely combined, add the eggs one at a time on medium-low speed to avoid curdling.
Step 2: Mixing the Wet and Dry Ingredients
Turn the mixer to low, then mix in the vanilla, buttermilk, and that gorgeous red gel food coloring. In a different bowl, whisk together the flour, cocoa powder, and salt to make sure everything is evenly distributed. Gradually add your dry ingredients to the wet—keep the mixer on low to avoid overworking the dough. If you notice the dough feeling dry, don’t hesitate to add a little more buttermilk (up to 1/4 cup), but add it slowly—it’s easy to go overboard!
Step 3: The Art of Piping Rosettes
This is where it gets fun and a bit fancy—you’ll pipe the dough into delicate rose shapes using a piping bag fitted with a 1M or 2D tip. I like using very small amounts of dough for each rosette, so they bake evenly and keep their shape. Pipe them onto a parchment-lined baking sheet, spacing them apart so they don’t stick together while baking.
Step 4: Bake and Cool with Care
Bake these beauties for 6-8 minutes—you’ll notice the dough still looks a little wet when they’re done, and that’s totally normal. Let the cookies cool completely at room temperature before handling. This helps them firm up just enough without losing their soft, tender crumb.
Step 5: The Ultimate Cookie Sandwich
For an unforgettable treat, spread about a tablespoon of marshmallow buttercream on the bottom of one cookie, then gently press another cookie on top. This sandwich combo is a crowd-pleaser—you’ll see why my family goes crazy for these every time!
Pro Tips for Making Red Velvet Rose Cookies Recipe
- Use Gel Food Coloring: Gel coloring packs more punch without adding extra liquid that can mess with your dough texture.
- Keep Dough Chilled Slightly: If your dough feels too soft to pipe cleanly, a quick chill helps it hold shape better.
- Don’t Overbake: The cookies look a bit wet right out of the oven, but they’ll firm up as they cool—removing them too late makes them dry.
- Practice Your Piping: I recommend trying a few test rosettes on parchment before piping your entire batch—it’s easier than it sounds!
How to Serve Red Velvet Rose Cookies Recipe
Garnishes
I love to dust these cookies lightly with powdered sugar for a delicate, snow-kissed look, or sometimes I add tiny edible pearls right in the center of each rosette for a touch of sparkle—makes them perfect for gifting or special occasions.
Side Dishes
Serve these with a cup of rich hot chocolate or a creamy latte. They also pair beautifully alongside fresh strawberries or a simple fruit salad to balance the sweetness.
Creative Ways to Present
For holiday parties or bridal showers, arranging Red Velvet Rose Cookies Recipe sandwiches on a tiered cake stand makes a stunning centerpiece. I sometimes wrap individual cookies in cellophane tied with a ribbon as delightful edible favors—guests always ask for the recipe!
Make Ahead and Storage
Storing Leftovers
Store your cookies in an airtight container at room temperature. They stay fresh for up to 3 days, though honestly, they rarely last that long! Placing a slice of bread in the container helps keep them soft by maintaining moisture balance.
Freezing
I’ve freeze-dried the cookie dough piped into rosettes ahead of time. Just pop the piped shapes on a baking sheet, freeze until solid, then transfer to a freezer bag. Bake them straight from frozen, adding a minute or two to the baking time—this is a life-saver for busy days.
Reheating
To refresh leftovers, give them 10-15 seconds in the microwave or a quick 2-minute warm-up in a 300°F oven. This brings back that soft, freshly-baked texture without drying them out.
FAQs
-
Can I use butter instead of shortening for this Red Velvet Rose Cookies Recipe?
Butter can be used, but I recommend sticking with shortening to preserve the cookie’s delicate shape when piping. Butter has more moisture and melts differently, which can cause the cookies to spread and lose their rose pattern.
-
Why does the cookie dough look wet after baking?
This is completely normal for this recipe. The cookies will set and firm up as they cool, so don’t be alarmed if they look a bit underdone when you pull them from the oven.
-
What piping tip works best for shaping the rose cookies?
I recommend a Wilton 1M or 2D tip—these create the classic swirl effect that looks just like a rose. If you’re new to piping, practicing on parchment before baking helps build your confidence.
-
Can I make these cookies vegan?
With some substitutions like vegan shortening, flax eggs, and plant-based buttermilk alternatives, you can make a vegan version. Just keep in mind the texture and piping properties might vary slightly.
-
How do I store Red Velvet Rose Cookie sandwiches with marshmallow buttercream?
Store these sandwiches in an airtight container in the fridge. They’re best eaten within 2 days to enjoy the cookies at their freshest without the filling becoming too soft.
Final Thoughts
This Red Velvet Rose Cookies Recipe has quickly become one of my go-to recipes when I want to impress guests or make a special treat for my family. It’s so gratifying to see how these delicate, pretty cookies brighten any dessert table—and the taste doesn’t disappoint. I highly encourage you to give this recipe a try; with a little practice, you’ll master the piping and wow everyone with your homemade edible roses. Plus, the marshmallow buttercream sandwich filling might just become your new favorite indulgence, like it did for me!
Print
Red Velvet Rose Cookies Recipe
- Prep Time: 10 minutes
- Cook Time: 8 minutes
- Total Time: 18 minutes
- Yield: 8 servings (about 16 cookies, 8 sandwich pairs)
- Category: Dessert
- Method: Baking
- Cuisine: American
Description
Delight in these beautifully piped Red Velvet Rose Cookies, featuring a tender cocoa-infused dough enhanced with classic red velvet flavors. Perfectly baked to a soft, slightly ‘wet’ finish, these cookies are piped into elegant rose shapes and sandwiched with a luscious marshmallow buttercream for a stunning and delicious treat.
Ingredients
Cookie Dough
- 2/3 cup shortening
- 1 3/4 cups white sugar
- 2 large eggs
- 1 teaspoon vanilla extract
- 1/4 cup buttermilk (plus up to 1/4 cup more if needed)
- 1 teaspoon red gel food coloring
- 2 cups all-purpose flour
- 1/2 cup unsweetened cocoa powder
- 1/2 teaspoon salt
Filling
- About 1 tablespoon marshmallow buttercream per sandwich (recipe for marshmallow buttercream not included)
Instructions
- Preheat Oven: Preheat your oven to 350°F (175°C) to prepare for baking the cookies.
- Cream Shortening and Sugar: In a stand mixer, beat together the shortening and sugar until fully combined and creamy.
- Add Eggs: With the mixer on medium-low speed, add eggs one at a time, ensuring each is fully incorporated before adding the next.
- Add Wet Ingredients: Lower the mixer speed to low and mix in the vanilla extract, buttermilk, and red gel food coloring until evenly blended.
- Combine Dry Ingredients: In a separate bowl, whisk together the all-purpose flour, unsweetened cocoa powder, and salt.
- Mix Dry into Wet: Gradually add the dry ingredients into the wet mixture on low speed. If the dough feels dry, add up to an additional 1/4 cup buttermilk cautiously to achieve desired consistency.
- Pipe Dough into Rosettes: Transfer dough into a piping bag fitted with a 1M or 2D tip. Pipe small rosettes directly onto parchment-lined baking sheets, spacing appropriately.
- Bake Cookies: Bake in the preheated oven for 6-8 minutes. Expect the cookies to look slightly ‘wet’ in the center; this is normal and ensures softness.
- Cool Cookies: Allow cookies to cool to room temperature on a wire rack for easy handling.
- Assemble Cookie Sandwiches: Spread approximately 1 tablespoon of marshmallow buttercream onto the bottom of one cookie, then gently press another cookie on top to form a sandwich.
Notes
- If dough is too dry, add buttermilk gradually up to 1/4 cup to avoid over-moistening.
- The cookies will look slightly wet when done baking; do not overbake as they will firm up upon cooling.
- Use a piping bag with a star tip (1M or 2D) to achieve beautiful rose shapes.
- For best results, use gel food coloring as it won’t affect the dough’s consistency.
- Marshmallow buttercream recipe is recommended but not included; feel free to replace with any favorite frosting.
- Cookies can be stored in an airtight container for up to 3 days before assembling to maintain freshness.
Nutrition
- Serving Size: 1 cookie sandwich (2 cookies with buttercream)
- Calories: 250
- Sugar: 20g
- Sodium: 150mg
- Fat: 12g
- Saturated Fat: 5g
- Unsaturated Fat: 5g
- Trans Fat: 0g
- Carbohydrates: 32g
- Fiber: 1g
- Protein: 2g
- Cholesterol: 35mg


