
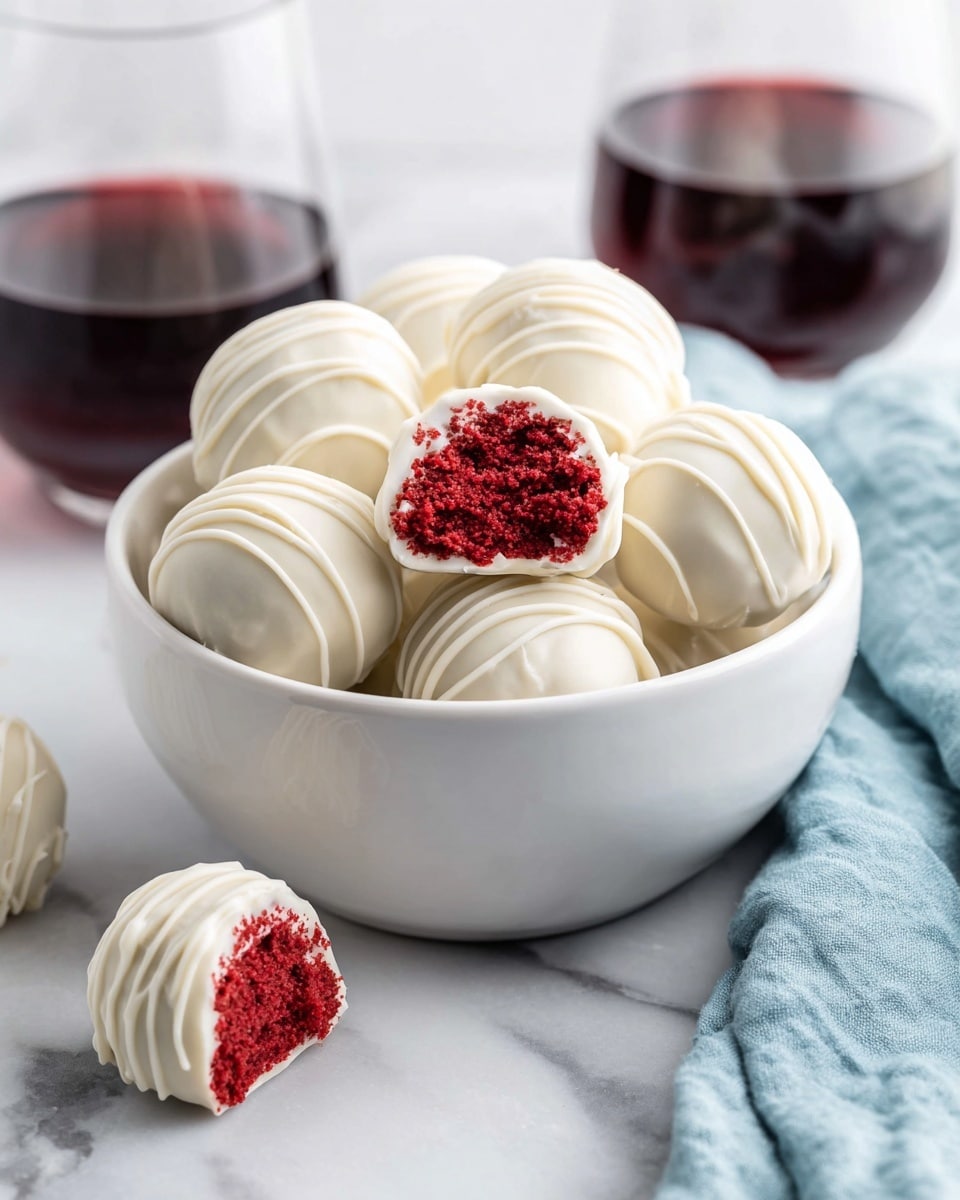
If you’re craving a fun, bite-sized treat that’s bursting with flavor and just a little bit nostalgic, then this Red Velvet Cake Pops Recipe is going to be your new best friend. I absolutely love how these little cake balls combine the rich, velvety taste of red velvet cake with a luscious cream cheese center, all coated in a smooth chocolate shell. Trust me, once you make these, they’ll disappear faster than you can say “yum,” so keep reading—I’m sharing all my tips to make sure your Red Velvet Cake Pops come out perfect every time!
Why You’ll Love This Recipe
- Perfect Bite-Size Desserts: These pops are just the right size to pop in your mouth, making them ideal for parties or a quick sweet fix.
- Moist & Velvety Texture: The cake base stays wonderfully moist, blending beautifully with the creamy filling for a luscious treat.
- Customizable & Fun: You can easily add your own twist with different coatings and garnishes, so they never get boring.
- Make-Ahead Friendly: Prep them in advance and keep them fresh in your fridge or freezer for whenever a dessert craving strikes.

Ingredients You’ll Need
Each ingredient here plays a key role in creating cake pops that are moist, flavorful, and stable enough to hold their shape when dipped. I always recommend using quality ingredients, especially fresh cream cheese and good chocolate for the coating — it really makes a difference in the final taste.
- Flour: Provides structure but just a little to keep the cake light.
- Unsweetened cocoa powder: Adds that subtle chocolate note essential in classic red velvet.
- Baking soda: Helps the cake rise and keep it tender.
- Salt: Balances sweetness and enhances all the flavors.
- Canola oil: Keeps the cake moist without adding heaviness.
- Sugar: Sweetens and provides tenderness.
- Buttermilk: Adds tang and helps with cake tenderness.
- Egg white: Lightens the batter for fluffy texture.
- Red food coloring: That iconic vibrant red that makes red velvet pop visually.
- Vanilla extract: Deepens flavor and rounds out sweetness.
- White vinegar: Reacts with baking soda to give the cake a light crumb.
- Cream cheese: The rich, tangy filling that is the heart of red velvet.
- Powdered sugar: Smooths out the cream cheese and sweetens the filling.
- Almond bark or white chocolate: For that glossy, firm coating that holds the pops together.
Variations
I love how versatile this Red Velvet Cake Pops Recipe is. While the classic version is a crowd-pleaser, sometimes I like to tweak things up to keep them interesting or accommodate dietary preferences. Feel free to experiment and make these your own—it’s part of the fun!
- Chocolate Coating Swap: I’ve tried substituting almond bark with dark chocolate or colored candy melts, which adds a personalized look and deeper flavor.
- Dairy-Free Version: Using dairy-free cream cheese and coconut oil-based coating means you can enjoy these pops even if you’re avoiding dairy.
- Mini Pops for Kids: Making smaller balls turns these into adorable bite-sized treats that kids can easily handle and love.
- Festive Sprinkles: Customizing with sprinkles on the coating is my go-to for holidays or birthday parties—it adds that extra pop of fun.
How to Make Red Velvet Cake Pops Recipe
Step 1: Prepare Your Batter and Bake
Start by preheating your oven to 350°F, which is just right for baking cupcakes that stay moist. I like placing cupcake liners only on the outer edge of the pan to make the most of the heat distribution. Mix your dry ingredients—flour, cocoa powder, baking soda, and salt—very well, sifting them if you can to avoid lumps. In a separate bowl, beat the wet ingredients: canola oil, sugar, buttermilk, egg white, red food coloring, vinegar, and vanilla extract. Then gently fold the dry ingredients into the wet ingredients until just combined—overmixing can make cakes tough, and we want soft and tender here!
Step 2: Bake and Cool Your Cupcakes
Divide your batter evenly among the cupcake liners. Pop them in the oven and bake for about 20-22 minutes. A toothpick coming out clean is your best indicator that they’re done perfectly. This is one place where patience pays off because overbaking dries out the cake, and underbaking means collapsing crumbs. Once out, let the cupcakes cool completely on a wire rack—warm cake is tricky to crumble and mix.
Step 3: Make the Cream Cheese Filling & Form Cake Balls
When your cupcakes are cooled, crumble them into fine crumbs in a large bowl. It’s kind of fun to squish them with your hands to break them up. Next, combine your softened cream cheese with powdered sugar until smooth—this creates the magic that binds your crumbs and transforms them into the velvety pops we love. Fold the crumbs into this mixture thoroughly. Once combined, scoop heaping tablespoons and roll them into balls. I always refrigerate mine for at least 4 hours so they firm up and become easier to dip without falling apart.
Step 4: Dip and Decorate
Chop your almond bark or white chocolate into smaller pieces and melt carefully in the microwave, stirring every 30 seconds to avoid burning. I find stirring is key here—it ensures a silky smooth coating that’s easy to work with. Quickly dip each cake ball into the melted coating, use a fork to turn and cover all sides, then let it drip off before setting them onto wax paper to dry. If you want to get fancy, sprinkle a few colored sugar bits or crushed nuts while the coating is still wet. These cake pops can be made a few days ahead and kept refrigerated until you’re ready to wow your guests.
Pro Tips for Making Red Velvet Cake Pops Recipe
- Don’t Skip Cooling the Cake: I’ve learned that skipping this step makes crumb mixing messy and the balls too fragile.
- Use Softened Cream Cheese: Soft cream cheese blends best with crumbs—cold cream cheese chunks will make your mixture lumpy and harder to work with.
- Stir Melted Coating Carefully: Keeping your coating smooth is crucial—too hot and it won’t coat well; too cool and it hardens too fast.
- Chill Before Dipping: Firm pops hold their shape better when dipped, so refrigerate for at least 4 hours or overnight if you can.
How to Serve Red Velvet Cake Pops Recipe

Garnishes
I’m a big fan of keeping garnishes simple but festive. A light sprinkle of edible glitter, crushed freeze-dried strawberries, or even colored sanding sugar adds just the right amount of sparkle. I’ve found that contrasting colors really make the reds pop, so white or gold sprinkles are my go-to favorites.
Side Dishes
These cake pops are pretty rich on their own, so I usually serve them alongside fruit-infused water or a light sparkling punch to balance things out. For a party, mini fruit skewers or simple cheese platters pair surprisingly well by letting the pops shine as the star dessert.
Creative Ways to Present
One of my favorite presentation ideas is to stick these pops into a floral foam block covered with pretty tissue paper or shredded paper filler, making it look like a bouquet of sweets. For birthdays and holidays, adding themed toppers or wrapping them individually in cellophane tied with ribbons turns these into delightful edible gifts.
Make Ahead and Storage
Storing Leftovers
I keep leftover cake pops in an airtight container in the fridge, where they happily stay fresh for up to 3 days. Bringing them to room temperature for about 15 minutes before serving brings out their full flavor and soft texture again.
Freezing
If you want to save some for later, freezing works great! Just layer the pops in a freezer-safe container separated by parchment paper to prevent sticking. They keep well for up to a month. Thaw them overnight in the fridge to avoid condensation on the coating.
Reheating
I don’t usually “heat” cake pops since they’re best enjoyed chilled or at room temperature. But if you want to soften the cream cheese a bit, leaving them on the counter for 10-15 minutes works perfectly without risking melting the coating.
FAQs
-
Can I make these Red Velvet Cake Pops Recipe without cream cheese?
While cream cheese adds the signature tang and richness to red velvet cake pops, you can substitute it with mascarpone or even sweetened buttercream if needed. Just note that it will change the texture and the flavor slightly, but they’ll still be delicious.
-
What’s the best way to store red velvet cake pops?
Store them in an airtight container in the fridge for up to three days. For longer storage, freeze them layered with parchment paper. Always thaw in the fridge to keep the coating intact.
-
Can I use boxed cake mix instead of baking from scratch?
Absolutely! Using boxed red velvet cake mix can speed up the process. Just bake according to package instructions, crumble, and proceed with mixing the cream cheese filling as usual. I’ve done this many times with great results.
-
How do I prevent the coating from cracking?
Make sure your cake balls are well chilled and the coating isn’t too cold when dipping. Also, avoid rapid temperature changes—room temperature pops into cold coating or vice versa can cause cracks. Using almond bark or candy melts designed for coatings helps too.
-
Can I add sticks for cake pops?
Definitely! Although this recipe doesn’t require sticks, you can insert lollipop sticks into the chilled balls before dipping for classic cake pops on sticks. Just dip the stick ends in melted coating before inserting to help them stay secure.
Final Thoughts
Honestly, I keep coming back to this Red Velvet Cake Pops Recipe again and again because it’s such a reliable, crowd-pleasing favorite. Whether you’re making them for a holiday, a birthday, or just a cheeky weekend treat, they’ve never let me down. I hope you find the same joy in creating and sharing these as I do—it’s like sending a little bite of happiness to anyone lucky enough to try them. So, grab your ingredients, get cozy in the kitchen, and give this recipe a whirl. You’re going to love the results, and your friends and family will be begging for the recipe too!
Print
Red Velvet Cake Pops Recipe
- Prep Time: 1 hour
- Cook Time: 22 minutes
- Total Time: 1 hour 22 minutes
- Yield: 10 truffles
- Category: Dessert
- Method: Baking
- Cuisine: American
Description
Delightfully rich and creamy Red Velvet Cake Pops made from scratch using classic ingredients and coated with smooth white chocolate for a perfect bite-sized treat. These cake pops are easy to prepare and ideal for parties or special occasions.
Ingredients
Dry Ingredients
- 1/3 cup plus 1 tablespoon flour
- 2 teaspoons unsweetened cocoa powder
- 1/8 teaspoon baking soda
- 1/8 teaspoon salt
Wet Ingredients
- 1/4 cup canola oil
- 1/4 cup sugar
- 2 tablespoons buttermilk
- 1 egg white
- 1 teaspoon red food coloring
- 1/8 teaspoon white vinegar
- 1/4 teaspoon vanilla extract
For the Filling
- 3 ounces cream cheese, softened
- 1/2 cup powdered sugar
For the Coating
- 12 oz. almond bark (or white chocolate), for coating
Instructions
- Preparation: Preheat the oven to 350°F. Line a cupcake tin with 4 cupcake liners placed around the outside edge. Gather all the ingredients to have them ready for use.
- Mix Dry Ingredients: In a small bowl, sift together the flour, baking soda, salt, and cocoa powder ensuring no lumps remain for an even batter.
- Mix Wet Ingredients: In a separate bowl, use an electric mixer to beat together the canola oil, sugar, buttermilk, egg white, red food coloring, white vinegar, and vanilla extract until well combined and smooth.
- Combine Batter: Gradually add the sifted dry ingredients to the wet mixture, mixing slowly to incorporate all components evenly without overmixing.
- Bake the Cupcakes: Divide the batter evenly among the 4 cupcake liners. Bake at 350°F for 20-22 minutes or until a cake tester inserted into the center comes out clean. Remove from the oven and allow to cool completely on a wire rack.
- Make Cake Mixture: Once cool, crumble the cupcakes into fine crumbs. In a mixing bowl, combine softened cream cheese and powdered sugar, then add the cake crumbs and stir thoroughly until the mixture is uniform.
- Form Cake Balls: Scoop heaping tablespoons of the cake mixture and roll into balls with your hands. Place the balls on a plate and refrigerate for at least 4 hours to firm up.
- Melt Coating: Chop the almond bark into 1-inch chunks. Place in a microwave-safe bowl and heat on medium power in 30-second intervals, stirring between each, until completely melted and smooth.
- Coat Cake Pops: Using a fork, dip each chilled cake ball quickly into the melted almond bark, turning to coat all sides evenly. Place each coated ball on wax paper to dry.
- Storage: The cake pops can be made up to 3 days in advance and stored in the refrigerator until ready to serve.
Notes
- The recipe can be easily doubled and baked in a 6-inch round cake pan to yield approximately 20 truffles.
- Make sure the cake balls are well chilled before dipping to ensure the coating sets properly.
- Use white chocolate almond bark for a smooth, glossy finish but you can substitute with any white chocolate coating.
- Store the cake pops in an airtight container in the refrigerator to maintain freshness.
Nutrition
- Serving Size: 1 truffle (approx. 40g)
- Calories: 160 kcal
- Sugar: 14 g
- Sodium: 90 mg
- Fat: 9 g
- Saturated Fat: 4 g
- Unsaturated Fat: 4 g
- Trans Fat: 0 g
- Carbohydrates: 18 g
- Fiber: 1 g
- Protein: 2 g
- Cholesterol: 15 mg


