

If you’re looking for a sweet treat that feels like a little celebration every time you bite into it, then you’re going to adore this Pink White Chocolate Fudge Recipe. I remember the first time I made this fudge—my kitchen smelled heavenly, and my family couldn’t stop raving about how creamy and perfectly sweet it was. This fudge isn’t just beautiful with its soft pink hue, it’s surprisingly simple to whip up. Stick with me, and I’ll share all my insider tips to make sure your fudge turns out just right every time.
Why You’ll Love This Recipe
- Super Creamy Texture: The sweetened condensed milk blends perfectly with white chocolate for an ultra-smooth fudge every time.
- Pretty & Versatile: The soft pink color and optional mix-ins make it ideal for gifts, parties, or just a treat to brighten your day.
- Quick & Easy: You’ll be surprised how fast this fudge comes together—perfect for last-minute sweets!
- Kid-Friendly: Little ones love helping with the coloring and cutting, making it a fun family activity.

Ingredients You’ll Need
The magic of this Pink White Chocolate Fudge Recipe is in its simplicity. You don’t need a long list of ingredients—just a few things you might already have, plus a touch of pink for fun. Using good-quality white chocolate wafers makes melting a breeze, and the sweetened condensed milk adds that rich, creamy feel that fudge is all about.
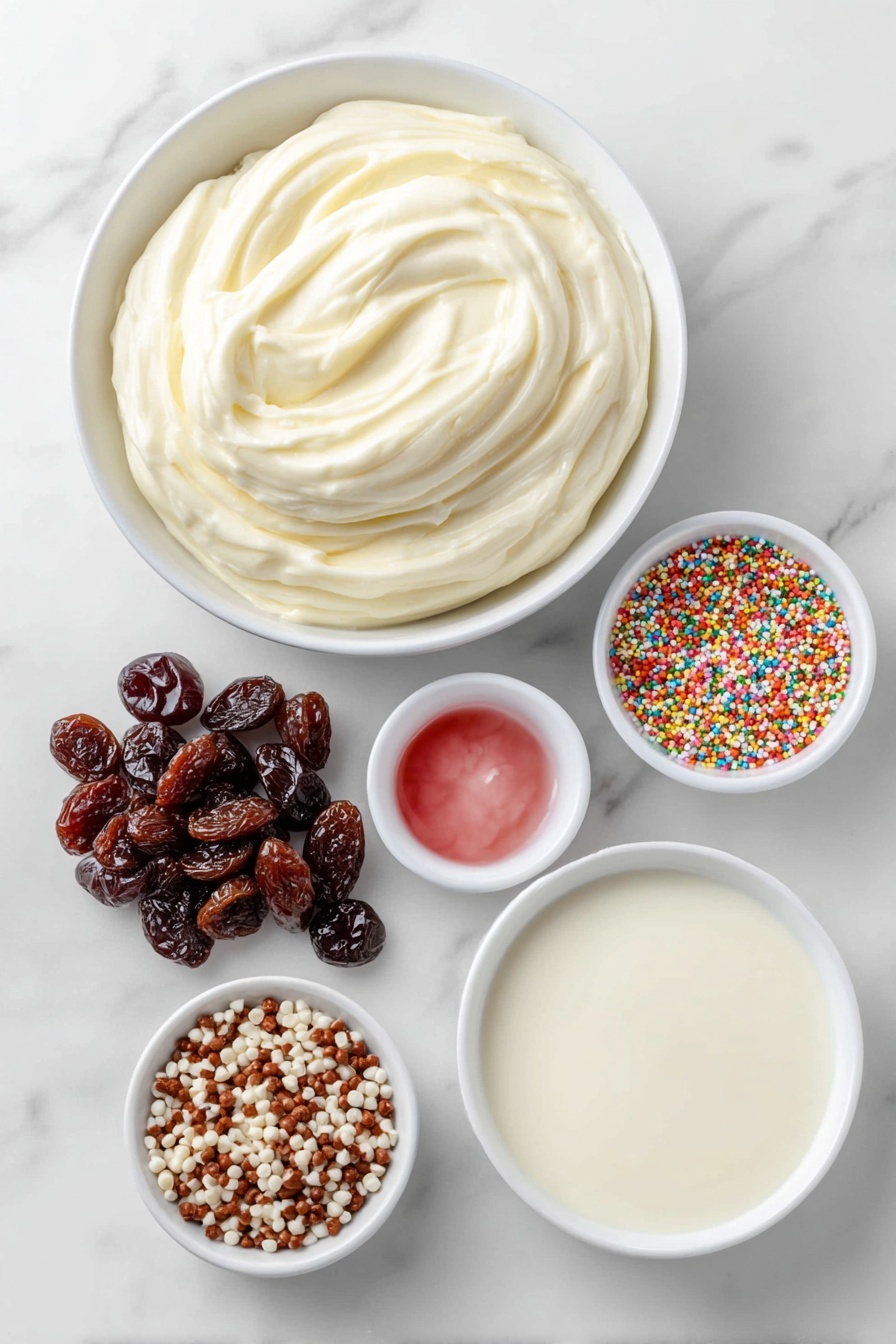
- White chocolate melting wafers or high-quality chopped white chocolate: Wafers melt evenly and smoothly, but if you prefer chopped chocolate, just chop it finely for an easy melt.
- Sweetened condensed milk: This is the secret to creamy fudge—you could try light versions, but full fat works best for texture.
- Pink gel food coloring: Gel is my favorite because it’s super concentrated and doesn’t thin out the fudge like liquid colors sometimes do.
- Optional sprinkles: Adds a fun, festive crunch if you’re feeling playful.
- Optional dried cherries: I love adding these for a bit of chew and tartness that complements the sweet fudge beautifully.
Variations
One of the things I love most about this Pink White Chocolate Fudge Recipe is how easy it is to customize. Whether you love the classic look or want to jazz it up for a special occasion, there’s plenty of room to get creative and tailor it to your taste.
- Dried Fruit Mix: I once tossed in some chopped dried cranberries alongside cherries, and the mix of tang and sweet was amazing.
- Nutty Twist: Adding chopped pistachios or almonds gives a delightful crunch and a bit of saltiness to cut through the sweetness.
- Different Colors: For a fun party twist, try layering different colors of gel food coloring for a marbled or ombré effect. It’s easier than it sounds and looks stunning.
- Alcohol-Infused: For adult gatherings, a splash of flavored liqueur (like raspberry or cherry) stirred in adds a gourmet flair.
How to Make Pink White Chocolate Fudge Recipe
Step 1: Prep Your Pan with Care
Start by lining a 9×9 inch pan with parchment paper. I like to let it overhang on two sides—it makes lifting out the fudge a breeze later on without sticking issues. This simple step saves you from a messy cleanup and keeps your fudge looking perfect.
Step 2: Melt the Chocolate and Condensed Milk
If you’re using chopped white chocolate, make sure you chop it into small, even pieces. This helps everything melt evenly and avoid burning spots. Combine the chocolate and sweetened condensed milk in a large, microwave-safe bowl. Microwave in 20 to 30-second increments, stirring well between each round. I’ve found it usually takes just two rounds to get a creamy melt, but stirring is key—sometimes that residual heat finishes the job.
Step 3: Add Your Pink Color and Optional Mix-ins
Once smooth, add a few drops of pink gel food coloring. If you want that pretty ombré effect, don’t stir it all in—leave some of the white chocolate mixture untouched so the colors contrast beautifully. If you’re adding dried cherries or sprinkles, fold them in gently now for an even distribution without breaking your fudge texture.
Step 4: Chill and Set
Pour the mixture into your prepared pan and spread it evenly. Pop it in the fridge for about an hour until it’s fully set and firm. This is where patience absolutely pays off—try not to sneak a taste too early!
Step 5: Cut into Sweet Shapes
After the fudge is firm, lift it out using the parchment overhang. Use a heart-shaped cookie cutter for adorable bite-sized treats. Here’s a trick I discovered: place a kitchen towel over the cookie cutter to protect your hands and press gently but firmly—this prevents any sticky fingers and makes cutting neat.
Pro Tips for Making Pink White Chocolate Fudge Recipe
- Use Gel Food Coloring: I tried liquid food coloring once and it made the fudge too runny—gel coloring keeps the texture perfect.
- Chop Chocolate Finely: If not using wafers, finely chopping helps the chocolate melt evenly without clumps or burnt spots.
- Don’t Skip Stirring: Stirring between microwave intervals distributes heat so you avoid overcooking any part of the chocolate.
- Cutting Trick: Use the kitchen towel over your cookie cutter to avoid sticky fingers and get clean edges.
How to Serve Pink White Chocolate Fudge Recipe

Garnishes
I love topping these fudge hearts with just a sprinkle of edible glitter or some tiny white chocolate curls for special occasions—they add a delicate sparkle. If you’re adding sprinkles, I like mixing pastel-themed ones to keep it playful and pretty.
Side Dishes
Pink White Chocolate Fudge pairs beautifully with a cup of tea or coffee—great for cozy afternoons. I also love serving it alongside fresh berries or a tart fruit compote to balance the sweetness.
Creative Ways to Present
For Valentine’s Day or birthdays, I like arranging these fudge hearts in a pretty box lined with tissue paper, tied with a ribbon—it makes a thoughtful homemade gift. Another time, I layered colors into the pan for a fun rainbow effect that impressed all my guests.
Make Ahead and Storage
Storing Leftovers
Store any leftover fudge in an airtight container in the refrigerator. I’ve found it stays fresh and delicious for up to two weeks when stored this way. Just make sure to separate layers with parchment paper to prevent sticking.
Freezing
If you want to keep fudge longer, freezing works wonders. Wrap individual pieces tightly in plastic wrap and then foil. When you’re ready to enjoy, thaw them overnight in the fridge.
Reheating
Most of the time, fudge is best enjoyed cold or at room temperature, so reheating isn’t really necessary. But if you want to soften it slightly, let it sit out for 10-15 minutes before serving—it’ll become delightfully tender without losing shape.
FAQs
-
Can I use regular white chocolate bars instead of melting wafers?
Absolutely! Just make sure to chop the white chocolate into small, even pieces so it melts smoothly. Melting wafers are designed for easy melting but chopped chocolate works just as well if you’re careful about stirring and heating gradually.
-
What can I do if my fudge is too soft or sticky?
Usually, fudge softens if it hasn’t chilled long enough or if additional liquid colors were added. Make sure to refrigerate it for at least an hour and use gel food coloring to avoid extra moisture. If it’s still sticky, chill it longer and slice it cold.
-
Is it possible to make this fudge without food coloring?
Yes! The fudge will look more classic ivory-white, which is just as delicious. The pink color is just a fun twist for special occasions, but leaving it out won’t change the texture or taste.
-
How long does this fudge stay fresh?
Stored in an airtight container in the refrigerator, your fudge should stay fresh for about two weeks. For longer storage, freezing is a great option.
Final Thoughts
This Pink White Chocolate Fudge Recipe is one of my favorite go-to sweets when I want something pretty, quick, and incredibly satisfying. It’s picky-person approved and super forgiving to make, which means you’ll feel like a fudge pro in no time. I truly hope you enjoy making (and eating) it as much as my family and I do. Give it a try—you might just find your new favorite sweet treat!
Print
Pink White Chocolate Fudge Recipe
- Prep Time: 10 minutes
- Cook Time: 5 minutes
- Total Time: 1 hour 15 minutes
- Yield: 12 servings
- Category: Dessert
- Method: Microwaving
- Cuisine: American
Description
This delightful Pink White Chocolate Fudge recipe offers a creamy, sweet treat combining smooth white chocolate and sweetened condensed milk, enhanced with a fun pink color and optional dried cherries and sprinkles. Perfect for festive occasions or a charming homemade gift.
Ingredients
Main Ingredients
- 20 ounces white chocolate melting wafers or high-quality chopped white chocolate
- ½ cup plus 1 tablespoon sweetened condensed milk
- A few drops pink gel food coloring
Optional Ingredients
- Sprinkles
- Dry cherries
Instructions
- Prepare the Pan: Line a 9×9 inch pan with parchment paper, allowing it to overhang on two sides for easy removal later. Set it aside while you prepare the fudge.
- Chop Chocolate (if needed): If using regular white chocolate blocks rather than melting wafers, chop the chocolate into small pieces to ensure even melting in the microwave.
- Combine Ingredients: Place the white chocolate and sweetened condensed milk into a large microwave-safe bowl, ready for melting.
- Microwave and Stir: Heat the mixture in 20- to 30-second increments in the microwave, stirring well after each interval. Typically, two rounds are sufficient. Stirring well before each interval helps the residual heat melt the chocolate evenly without overheating.
- Add Color: Once the chocolate is smooth and melted, add a few drops of pink gel food coloring. For a pretty ombre effect, mix some of the fudge thoroughly with the color, leaving some white sections uncolored.
- Mix in Optional Add-ins: If desired, gently fold in dried cherries and sprinkles to add texture and extra flavor to your fudge.
- Set the Fudge: Pour the fudge mixture into the prepared pan, spreading it evenly. Refrigerate for about 1 hour, or until fully set and firm.
- Cut into Shapes: When the fudge is hard, use a heart-shaped cookie cutter to cut out shapes. To avoid hand strain, place a kitchen towel on top of the cutter and press gently to cut cleanly.
- Serve: Arrange the fudge shapes on a plate and enjoy this sweet, charming treat perfect for sharing.
Notes
- Use high-quality white chocolate for the best flavor and texture.
- Do not overheat the chocolate to prevent graininess; stirring frequently helps.
- The pink gel coloring is preferred over liquid to avoid altering the fudge consistency.
- Dried cherries complement the sweetness of white chocolate well but can be omitted if unavailable.
- Store fudge in an airtight container in the refrigerator to keep it fresh.
- Cutting fudge using a cookie cutter with a towel helps protect your hands and produces clean shapes.
Nutrition
- Serving Size: 1 piece (approx. 40g)
- Calories: 180
- Sugar: 28g
- Sodium: 40mg
- Fat: 8g
- Saturated Fat: 5g
- Unsaturated Fat: 2g
- Trans Fat: 0g
- Carbohydrates: 27g
- Fiber: 0.5g
- Protein: 2g
- Cholesterol: 10mg


