
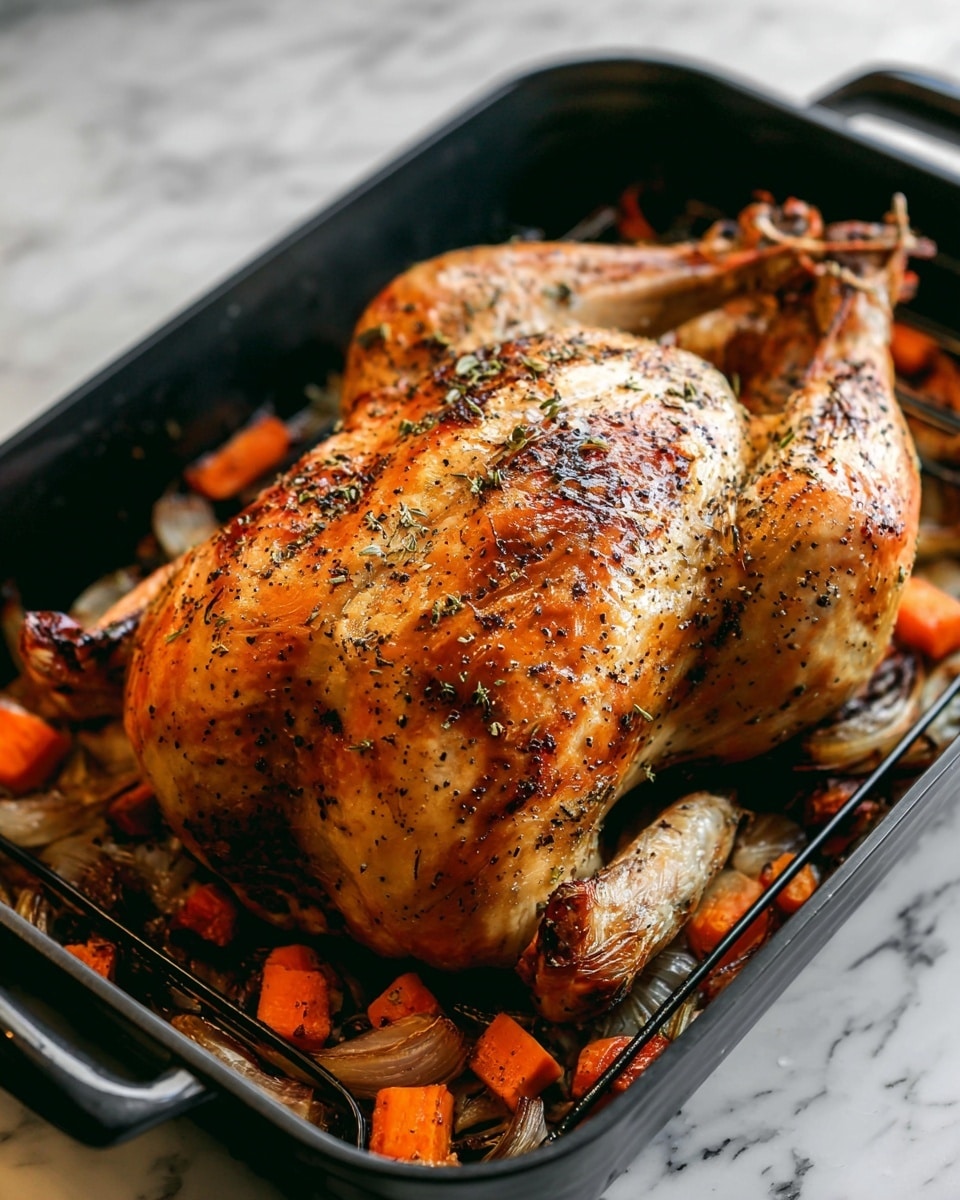
I absolutely love sharing this Perfectly Roasted Thanksgiving Turkey with Aromatics and White Wine Recipe because it takes the guesswork out of making a juicy, flavorful bird that’ll impress everyone at your holiday table. When I first tried roasting a turkey with aromatics and a splash of white wine, it changed the whole game for me—the flavors are amazing, and it’s surprisingly simple. Stick with me, and I’ll walk you through everything you need to know to get that perfectly crisp skin and tender, juicy meat.
Why You’ll Love This Recipe
- Juicy, Flavor-Packed Turkey: The dry brine and white wine bring out incredible moisture and subtle aromatic flavors.
- Crispy, Golden Skin Every Time: Letting the skin dry out in the fridge is my secret to perfect crunch.
- Simple Yet Elegant: You don’t need fancy techniques—just good ingredients and straightforward steps.
- Family-Approved and Crowd-Pleasing: My family goes crazy for this recipe every Thanksgiving, and I bet yours will too.

Ingredients You’ll Need
The ingredients here all work together beautifully to infuse the turkey with flavor and aroma. Picking fresh aromatics and a decent dry white wine will really elevate the dish—no need to spend a fortune, just something you’d enjoy drinking.
- Turkey: A 14- to 16-pound thawed turkey is perfect for this recipe; planning ahead for thawing is key.
- Brine (Dry or Wet): I usually go with a dry brine because it’s fuss-free, but either works great to keep the bird juicy.
- Carrots: Fresh, medium-sized carrots add natural sweetness and depth to the roasting pan aromatics.
- Red Apples: These bring a subtle fruity note that balances the savory flavors.
- Yellow Onion: Adds earthiness and a mild sweetness that works perfectly with the turkey.
- Lemon: The brightness from lemon slices helps cut through the richness of the turkey.
- Garlic: Whole garlic cloves roasted slowly give a mellow, luscious flavor.
- Fresh Thyme: Aromatic herb that enhances the turkey without overpowering it.
- Unsalted Butter: Melted for brushing the turkey, helping to crisp the skin and infuse flavor.
- Freshly Ground Black Pepper: For seasoning and a mild kick.
- Dry White Wine: Sauvignon Blanc or Pinot Grigio work beautifully to keep the roasting pan moist and add delicate acidity.
Variations
I love making this Perfectly Roasted Thanksgiving Turkey with Aromatics and White Wine Recipe my own by switching up some aromatics or brining methods depending on the mood or what’s in season—you should totally do the same! It’s easy to add your twist and make it fit your family’s taste.
- Citrus Twist: I sometimes swap lemon for oranges or add a few sage sprigs along with the thyme, which adds a lovely warmth to the flavor profile.
- Herb Brine Variation: For a fresher herbal note, try adding rosemary or oregano to your dry brine mix; I started doing this recently and it’s a hit.
- Wet Brine for Bigger Birds: When roasting a larger turkey, a wet brine might help keep things juicier; just make sure to dry the skin well before roasting.
- Basting with Herb Butter: Mix some finely chopped herbs in your melted butter and brush halfway through roasting for an aromatic boost.
How to Make Perfectly Roasted Thanksgiving Turkey with Aromatics and White Wine Recipe
Step 1: Brine Your Turkey (1 to 3 Days Ahead)
Before roasting day, the most important step is brining to ensure juicy, flavorful meat. I typically go with a dry brine—it’s less messy and just as tasty—but a wet brine also works beautifully if you prefer. Remove the neck and giblets, then either rub the dry brine all over the turkey or submerge it in your wet brine. For a dry brine, let it rest uncovered in the fridge for 24 to 48 hours; for a wet brine, 12 to 24 hours is perfect. This gives the salt and any herbs time to really penetrate the meat—trust me, don’t skip this!
Step 2: Dry Out the Skin
On the day before roasting or the morning of, remove the turkey from the brine and pat the skin very dry. If you did a wet brine, give it a good rinse first. Then, place the turkey uncovered on a baking sheet in the fridge. This drying step is my favorite trick to get that crispy, golden skin we all crave. You’ll notice the skin turns a bit translucent—this means it’s drying nicely.
Step 3: Prep Aromatics and Stuff the Turkey
About 30 minutes before roasting, chop your carrots, apples, onion, lemon, and garlic into chunks—no need to peel or core, just rinse and chop. I love the rustic vibe of this. Stuff the turkey cavity with half the aromatics and all the fresh thyme sprigs. Scatter the rest in the bottom of your roasting pan. This combo steams, roasts, and infuses the turkey with tons of flavor.
Step 4: Tie, Butter, and Season
Next, tuck the wings under the turkey’s body—this helps prevent them from burning. Then, tie the legs snugly together with kitchen twine or aluminum foil. Brush the entire turkey with melted butter—it really helps with browning—and season generously with freshly ground black pepper. No need for extra salt here if you’ve brined well.
Step 5: Roast at High Heat with Wine
Preheat your oven to 450°F and place the turkey on a rack in the lowest oven position. Pour the whole bottle of dry white wine into the pan—it adds moisture and lovely acidity. Roast the turkey at 450°F for 45 minutes. This initial blast is what jump-starts the skin crisping and locks in juices.
Step 6: Lower Heat and Continue Roasting
After 45 minutes, reduce the oven to 325°F. If you have a meat thermometer (digital with alarms are my favorite), insert it into the thickest part of the thigh without touching bone. Roast for another 1 to 1½ hours or until the thigh reaches around 160°F and the breast hits about 155°F (I personally take mine off a bit earlier to keep it juicy). If the breast starts browning too quickly, tent it with foil. Remember, temperature is your friend here, so check early and often.
Step 7: Let Your Turkey Rest
Once done, transfer the turkey to a cutting board and cover loosely with foil. Let it rest for at least 20 to 30 minutes—that’s when all those lovely juices redistribute, making every bite perfect. While the turkey rests, you can make gravy if you want, but honestly, the pan juices from this method are so tasty alone.
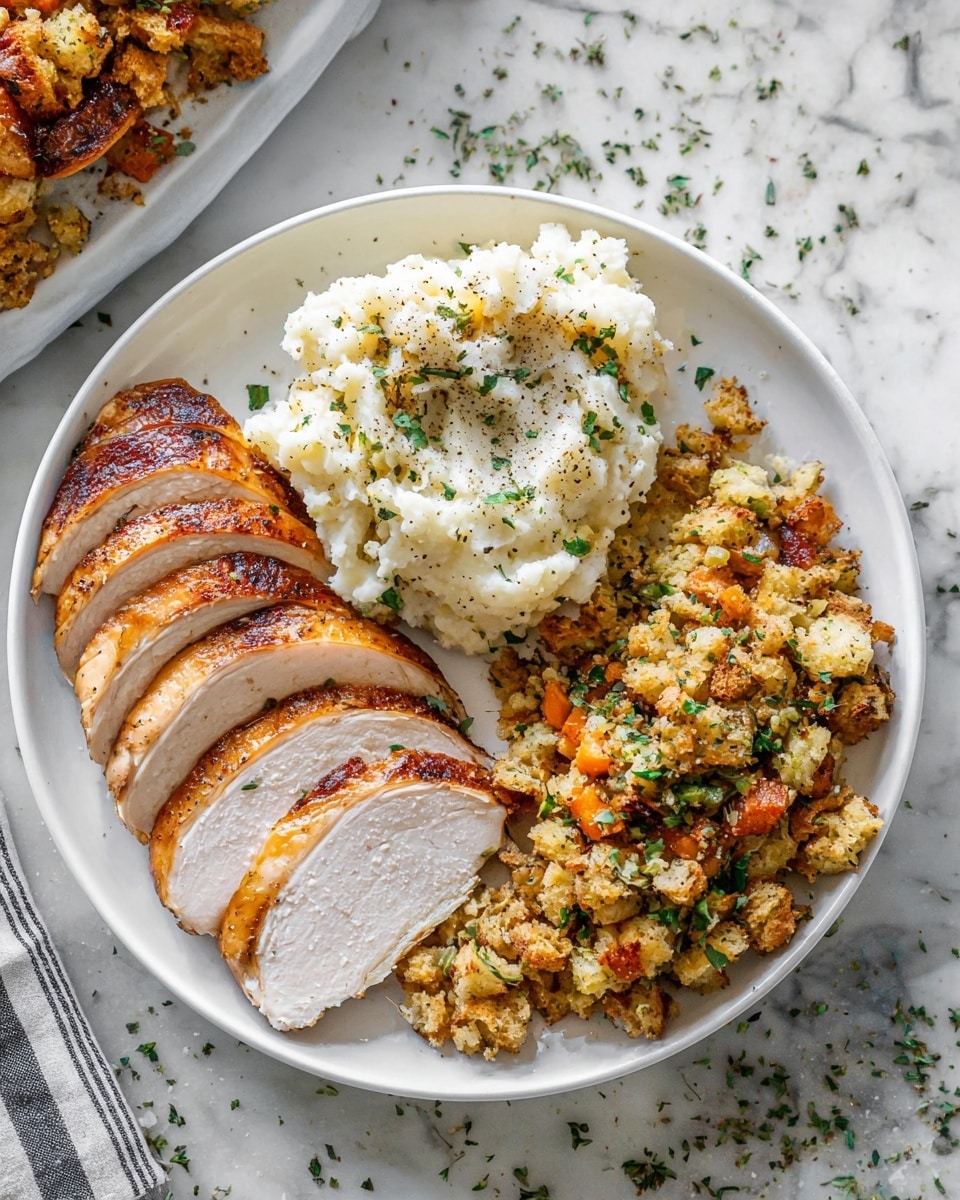
Step 8: Carve and Enjoy
Now for the best part—carving! Use a sharp knife and work slowly to get nice even slices. Serve with the pan juices or your favorite gravy, and enjoy the oohs and ahhs from your family and friends—they’ll definitely notice the difference with this Perfectly Roasted Thanksgiving Turkey with Aromatics and White Wine Recipe.
Pro Tips for Making Perfectly Roasted Thanksgiving Turkey with Aromatics and White Wine Recipe
- Don’t Rush the Brine: I learned that even a simple dry brine for 24 hours makes a world of difference for juicy turkey.
- Dry Skin = Crispy Skin: Leaving the turkey uncovered in the fridge dries out the skin perfectly—don’t skip this step!
- Thermometer Is Your Best Friend: It prevents overcooking and ensures juicy, perfectly done meat every time.
- Tent Breast to Prevent Burnt Skin: If the breast browns too fast, foil tent keeps it moist while the thighs finish cooking.
How to Serve Perfectly Roasted Thanksgiving Turkey with Aromatics and White Wine Recipe
Garnishes
I like to garnish this turkey simply with a few fresh thyme sprigs and lemon wedges around the platter—it adds color and a fresh aroma that invites everyone to dig in. Sometimes, I scatter a handful of thinly sliced apples around the turkey for that little touch of sweet contrast.
Side Dishes
This turkey pairs beautifully with classic Thanksgiving sides like creamy mashed potatoes, green bean almondine, and a vibrant cranberry sauce. I also love serving it with roasted Brussels sprouts tossed with a bit of balsamic glaze—adds a nice bite and complements the wine’s acidity.
Creative Ways to Present
For special occasions, I’ll arrange the carved slices of turkey on a rustic wooden board, surrounded by fresh herbs, roasted carrots, and apple slices from the cavity. It looks stunning and invites guests to help themselves while chatting around the table.
Make Ahead and Storage
Storing Leftovers
After your feast, I recommend refrigerating leftover turkey in an airtight container or zip-top bag. To keep it moist, drizzle some of the turkey drippings or broth over the meat before sealing. My family finds this keeps the turkey juicy and ready for sandwiches or reheated dinners up to 4 days later.
Freezing
If you want to keep turkey longer, freeze it in a freezer-safe container for up to 3 months. When you’re ready to use it, thaw it overnight in the fridge and reheat gently to maintain flavor and moisture.
Reheating
My go-to for reheating is wrapping turkey slices in foil, drizzling a little broth or pan juices inside, sealing it well, and warming in a 300°F oven until heated through. This keeps the meat tender and prevents drying out.
FAQs
-
Can I use a frozen turkey for this recipe?
You absolutely can, but be sure to thaw it completely in the fridge first—plan on about 24 hours for every 5 pounds. If you’re short on time, you can opt for a cold water thaw (changing water every 30 minutes), but it usually takes around 8 hours for a 15-pound bird. Planning ahead is essential for best results.
-
Which brine method should I choose: wet or dry?
Both work well! I’m partial to dry brine because it’s easier and less messy, but if you want that extra plump, juicy texture, a wet brine delivers. Keep in mind you’ll want to thoroughly dry the turkey’s skin after a wet brine to get that crispy finish.
-
What if my turkey is smaller or larger than 14 to 16 pounds?
Great question! Roast times vary, so plan about 10 to 12 minutes per pound at 325°F after the initial 450°F start. For smaller birds, subtract 15 minutes per pound under 14, and add about 10 minutes per pound over 16. Use a meat thermometer to check doneness rather than relying solely on time.
-
Is it necessary to let the turkey rest?
Yes! Resting for 20 to 30 minutes lets the juices redistribute, so your turkey slices will be moist and not dry. It also makes carving easier. Don’t skip this step—you’ll notice the difference!
Final Thoughts
This Perfectly Roasted Thanksgiving Turkey with Aromatics and White Wine Recipe has become my go-to holiday staple because it’s reliable, simple, and yields incredible flavor every time. I love how the white wine and fresh aromatics elevate the bird without overwhelming it, and how the skin crisps up gorgeously. You’ll impress your family and guests, without stressing yourself out in the kitchen—just the way Thanksgiving should be. Give it a try, and I promise you’ll come back to this recipe year after year!
Print
Perfectly Roasted Thanksgiving Turkey with Aromatics and White Wine Recipe
- Prep Time: 20 minutes
- Cook Time: 2 hours 15 minutes
- Total Time: 3 hours 30 minutes
- Yield: 10 to 12 servings
- Category: Main Course
- Method: Baking
- Cuisine: American
Description
This Thanksgiving Turkey recipe guides you through preparing a tender, juicy turkey with crispy skin using a mix of wet or dry brining, aromatic stuffing, and a two-step roasting process starting at high heat for a flavorful crust, then finishing low and slow for perfect doneness. Enhanced with fresh herbs, citrus, and a splash of white wine during roasting, this classic celebration centerpiece promises rich flavors and moist, savory meat for your holiday feast.
Ingredients
Turkey and Brine
- 1 14- to 16-pound turkey, thawed
- 1 brine (use Dry Brine Turkey or wet Turkey Brine recipe, dry brine preferred 99% of the time)
Aromatics and Flavorings
- 3 medium carrots, scrubbed and chopped
- 2 red apples, quartered
- 1 large yellow onion, quartered
- 1 lemon, quartered
- 1 head garlic, halved crosswise and broken into large pieces
- 8 sprigs fresh thyme
- 4 tablespoons (1/2 stick) unsalted butter, melted
- Freshly ground black pepper, to taste
- 1 bottle dry white wine such as Sauvignon Blanc or Pinot Grigio
Instructions
- Brining (1 to 3 days before roasting): Remove the neck and giblets from the turkey; discard or save for gravy. Brine the turkey using a wet or dry brine method. Aim for 12 to 24 hours of wet brining or 24 to 48 hours for dry brining. Any brine is beneficial for flavor and moisture retention.
- Drying the skin (1 day before or morning of roasting): For wet brine, rinse turkey thoroughly and pat dry. Place uncovered on a rimmed baking sheet in the refrigerator to dry skin for a few hours up to 24 hours. For dry brine, leave uncovered in fridge on a baking sheet. Drying the skin helps achieve crispiness and a translucent look.
- Bring to room temperature (1 hour before roasting): Remove turkey from refrigerator to allow it to come to room temperature. Ensure plastic leg attachment is removed.
- Preheat oven and prepare pan (30 minutes before roasting): Preheat your oven to 450°F placing the oven rack in the lowest position. Remove or reposition other racks if needed. Let the oven heat fully for 20-30 minutes, ensuring it’s very hot.
- Chop aromatics: Chop carrots into 1-inch pieces, quarter apples, onion, lemon, and cut garlic head in half and into large chunks without peeling or coring.
- Stuff cavity and arrange aromatics: Stuff the turkey cavity with all thyme sprigs and half of the carrots, apples, onion, lemon, and garlic. Scatter remaining aromatics in the bottom of a large roasting pan.
- Tie wings and legs, then butter and pepper the turkey: Tuck wings under the body. Tie legs snugly together with kitchen twine or aluminum foil rope. Place a rack in roasting pan and lift turkey onto it. Brush entire turkey with melted butter and sprinkle with freshly ground black pepper.
- Add wine and roast at high temperature (45 minutes): Pour white wine carefully into the roasting pan, filling up to 2 inches from top. Roast turkey on the lowest rack at 450°F for 45 minutes to develop a golden crust.
- Reduce temperature and continue roasting (1 to 1 ½ hours): Lower oven temp to 325°F. Insert a meat thermometer into the thickest part of the thigh without touching bone. Roast until thigh reaches 160°F to 180°F and breast 155°F to 165°F, approximately 2 to 2 ½ hours total cooking time for a 14- to 16-pound bird. Tent breast with foil if it darkens too fast.
- Rest the turkey (20 to 30 minutes): Remove turkey from oven and transfer to a cutting board. Cover loosely and let rest to redistribute juices. Prepare gravy if desired.
- Carve and serve: Slice the turkey and serve with pan juices or gravy, enjoying the fruits of your labor with family and friends.
Notes
- Turkey Thawing: Plan 24 hours thawing per 5 pounds of turkey in the fridge (3 days for 15 lb). For faster thawing, submerge turkey in cold water, changing water every 30 minutes (about 8 hours for 15 lb).
- Cooking Time Adjustments: Use 10-12 minutes per pound at 325°F. Start checking earlier if smaller than 14 lb or extend time if larger.
- Wet vs Dry Brine: Wet brine yields slightly juicier turkey; dry brine is simpler and preferred for ease. Both work well.
- Storage: Refrigerate leftover turkey in airtight containers for up to 4 days. Drizzle with pan juices to keep moist.
- Reheating: Wrap turkey in foil with drippings or broth, reheat in a 300°F oven until warmed through.
- Freezing: Freeze turkey in airtight containers up to 3 months. Thaw overnight in refrigerator before reheating.
Nutrition
- Serving Size: 1 serving (approximately 6 oz cooked meat with butter)
- Calories: 350
- Sugar: 2g
- Sodium: 210mg
- Fat: 20g
- Saturated Fat: 8g
- Unsaturated Fat: 11g
- Trans Fat: 0g
- Carbohydrates: 4g
- Fiber: 1g
- Protein: 38g
- Cholesterol: 110mg

