
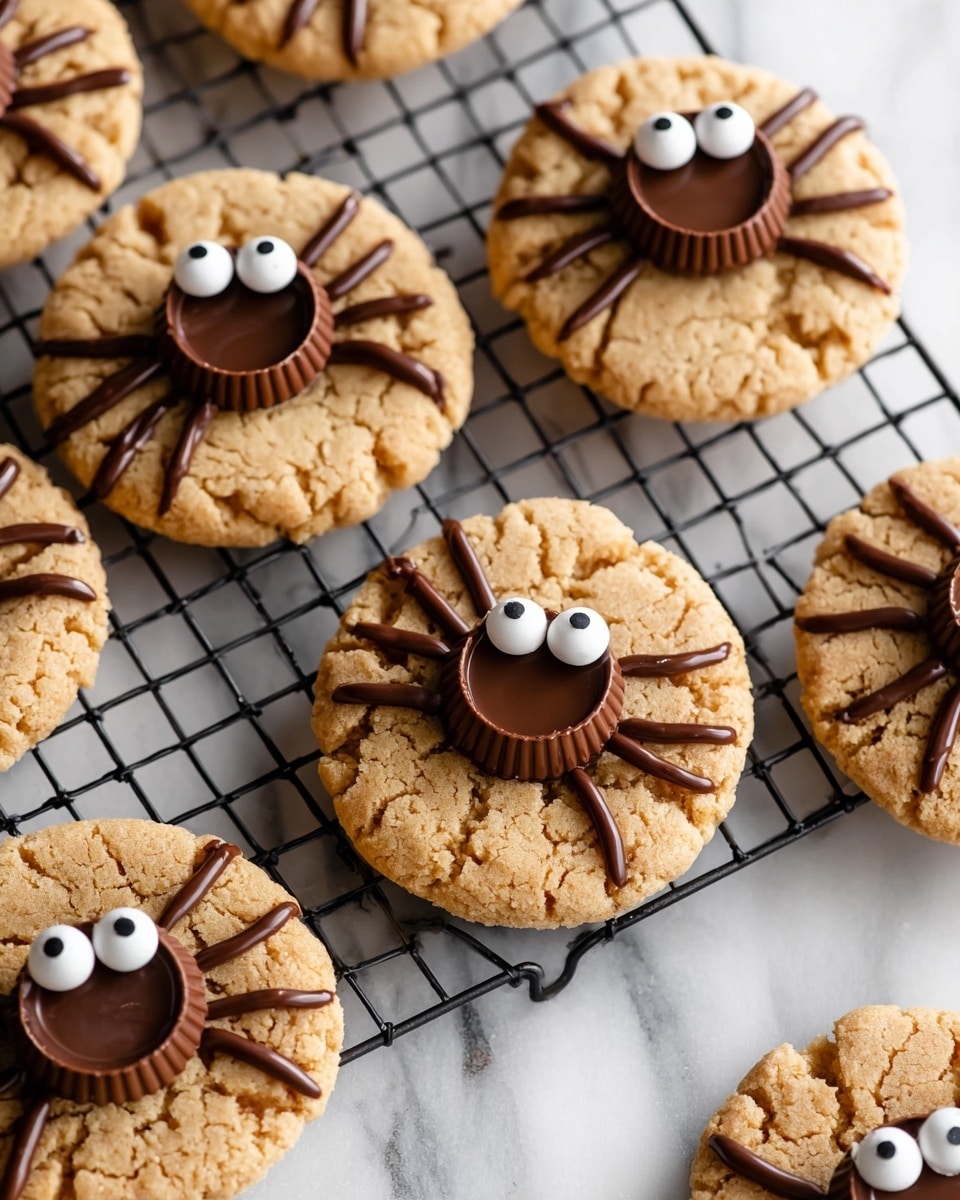
If you’re hunting for a Halloween treat that’s as cute as it is delicious, I’ve got just the thing: my Peanut Butter Spider Cookies Recipe. These little critters are fun to make, guaranteed to get a few smiles, and the peanut butter flavor is downright addictive. Whether you’re baking with kids or looking for a conversation starter at your next party, this recipe is a fan-freaking-tastic choice you’ll want to bookmark.
Why You’ll Love This Recipe
- Super Simple Ingredients: You probably have everything in your pantry already, making it perfect for last-minute baking sessions.
- Kid-Friendly Fun: Decorating these peanut butter spider cookies with candy eyes and chocolate legs is hands-down the best part.
- Perfect Texture: Soft and chewy in the middle with just a hint of crunch from the sugar coating—these cookies nail it every time.
- Great for Any Occasion: Whether it’s Halloween or just a fun baking day, these spidery treats are crowd-pleasers.

Ingredients You’ll Need
This Peanut Butter Spider Cookies Recipe calls for classic baking staples plus a few fun extras to bring the eerie spider look to life. Each ingredient plays a unique role, so I love using creamy peanut butter to keep the cookies moist and tender. And for the decorations? Candy eyes are what truly bring the spiders to life!
- All-purpose flour: Provides the base—make sure it’s fresh for the best crumb.
- Baking soda: Gives a gentle rise to keep these cookies from turning too dense.
- Salt: Enhances all those peanut buttery flavors.
- Granulated sugar: For sweetness and a bit of crunch when you roll the dough.
- Light brown sugar: Adds moisture and a subtle caramel note.
- Creamy no-stir peanut butter: The heart of the recipe—skip the natural kind to avoid watery dough!
- Unsalted butter, room temperature: For richness and tenderness.
- Large egg, room temperature: Helps bind everything perfectly.
- Pure vanilla extract: Boosts the overall flavor depth.
- Mini Reese’s cups: The adorable spider bodies—unwrapped, of course!
- Chocolate chips: Melted for piping spider legs.
- Candy eyes: The finishing touch—grab them in the baking aisle or craft store.
Variations
I love to personalize this Peanut Butter Spider Cookies Recipe depending on the occasion or who I’m baking for. You can easily swap out elements or add your flair—trust me, mixing things up keeps the whole process exciting.
- Gluten-Free Version: I switched to a gluten-free flour blend once and was thrilled at how well it held together without sacrificing that great peanut butter flavor.
- Nut Allergies: If you’re cooking for friends with allergies, sunflower seed butter is a solid sub that still gives you that creamy texture.
- Spooky Decorations: Swap candy eyes for colored icing or mini gummy spiders–these little touches make them perfect party snacks.
- Chocolate Peanut Butter Twist: Fold in mini chocolate chips directly into the dough for an extra layer of indulgence I just can’t resist.
How to Make Peanut Butter Spider Cookies Recipe
Step 1: Preheat and Prep
Start by preheating your oven to 375º F and lining your baking sheet with parchment paper. This little setup step means no cookies stick and makes cleanup a breeze—one of those kitchen hacks I swear by.
Step 2: Mix Dry Ingredients
In a medium bowl, whisk together the all-purpose flour, baking soda, and salt. I find this helps distribute everything evenly so you don’t get any weird salty bites or clumps of soda. Set this aside while you cream the butter and sugars.
Step 3: Cream Butter, Sugars & Peanut Butter
Using a stand mixer or hand mixer, combine granulated sugar, brown sugar, unsalted butter, and the creamy peanut butter. Beat for about 2 minutes until it’s fluffy and well combined. It’s important to scrape down the sides so everything melds perfectly.
Step 4: Add Egg and Vanilla
Mix in the large egg and vanilla extract until everything is just combined—about 30 seconds. You don’t want to overmix here; a gentle touch keeps the texture spot on.
Step 5: Combine Wet & Dry Ingredients
With the mixer on low, slowly add the dry flour mixture and beat just until combined. Stop once you don’t see any more flour—overmixing will lead to tougher cookies, and that’s the last thing we want.
Step 6: Shape and Sugar-Coat
Scoop a heaping tablespoon of dough and roll it into 1-inch balls. Roll each ball in the extra granulated sugar to give the cookies a delicate crunch on the outside. Place these on the baking sheet at least 1 ½ inches apart to give them room to bake evenly.
Step 7: Bake and Add Reese’s Cup “Spider” Body
Bake your cookies for about 10 minutes or until they’re light golden brown. Once out of the oven, let them cool for just 3 minutes—then gently press a mini Reese’s cup in the center of each cookie. This step is crucial because pressing while the cookie is too hot or too cold can break the cup or the cookie.
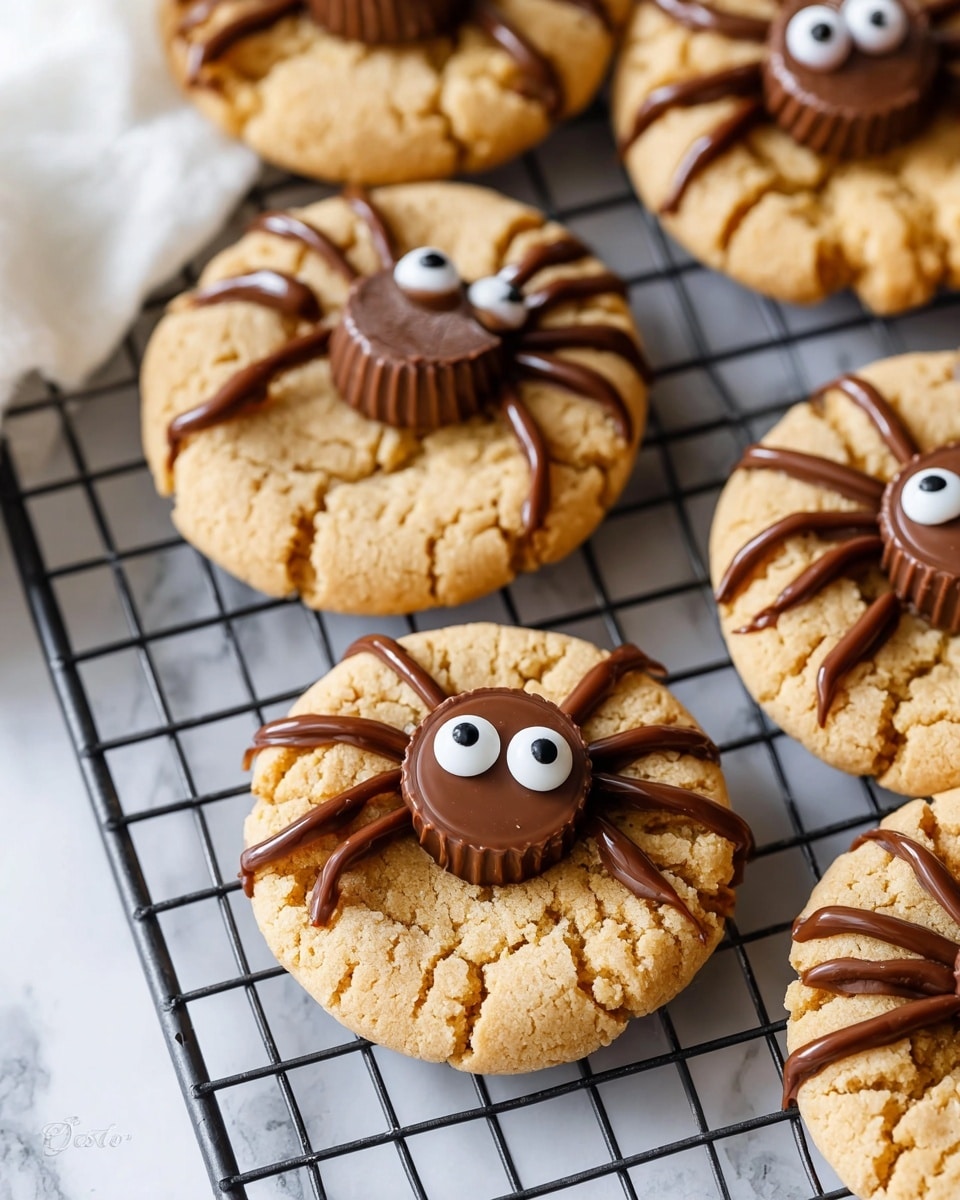
Step 8: Pipe Chocolate Legs and Add Candy Eyes
Melt your chocolate chips in 50% power increments in the microwave, stirring every 15 seconds until silky smooth. Pour into a small plastic bag, snip a tiny corner, and pipe spider legs stretching from the Reese’s cup. Dab some melted chocolate on the back of each candy eye and press them onto the cup—these eyes really bring your creepy crawlers to life! Let everything set before serving.
Pro Tips for Making Peanut Butter Spider Cookies Recipe
- Use No-Stir Peanut Butter: I learned the hard way that natural peanut butter can make dough too oily—stick to creamy, no-stir to keep cookies perfect.
- Chill Dough in Warm Climates: If your kitchen is hot, chilling the dough for 30 minutes helps prevent spreading, keeping your spiders tidy and cute.
- Don’t Overbake: These cookies are best when slightly soft in the center—pull them from the oven at light golden edges and allow carryover cooking to finish the job.
- Pipe Spider Legs with Confidence: If your chocolate hardens too fast, just rewarm gently—it’s easier to draw clean legs when the chocolate stays fluid.
How to Serve Peanut Butter Spider Cookies Recipe
Garnishes
I usually keep it simple with candy eyes and that mini Reese’s cup because they deliver such an adorable, professional look. But I’ve also sprinkled a little edible glitter once—my family went crazy for the sparkly effect paired with the spider legs!
Side Dishes
These cookies pair well with a cold glass of milk, a hot cup of coffee, or spiced cider if you’re going for that autumn vibe. I’ve also served them with a scoop of vanilla ice cream to make a playful dessert for little holiday guests.
Creative Ways to Present
Try arranging your Peanut Butter Spider Cookies Recipe on a platter with a web made of thin licorice strips or shredded coconut dyed black with food coloring. For Halloween parties, I’ve even placed them atop small cupcake “graves” with edible tombstone picks—kids love the spooky atmosphere!
Make Ahead and Storage
Storing Leftovers
Save any leftovers in an airtight container at room temperature for up to 5 days. I find the candy eyes and Reese’s cups hold up well, and the cookies stay chewy and fresh if not stacked too tightly.
Freezing
You can freeze the cookie dough balls for up to 3 months. Just pop the shaped dough on a tray, freeze until solid, then transfer to a freezer-safe container. When you’re ready, bake directly from frozen—just add a couple of extra minutes to the baking time.
Reheating
If you want warm cookies later, reheat them gently in the microwave for about 10–15 seconds. Be careful not to melt the chocolate decorations too much—warming just softens the cookie to that freshly baked texture I adore.
FAQs
-
Can I use crunchy peanut butter instead of creamy for this Peanut Butter Spider Cookies Recipe?
While you can use crunchy peanut butter, I recommend creamy for a smoother cookie dough and better overall texture. Crunchy peanut butter may introduce extra crunch and oil, which can affect how the cookies hold together.
-
Do I have to use mini Reese’s cups? Can I substitute something else?
Mini Reese’s cups are ideal for the spider body shape, but you can substitute small chocolate candies or even peanut butter cups cut into smaller pieces. Just make sure whatever you use can gently press into the cookie without melting too fast.
-
How long will these cookies stay fresh?
Stored in an airtight container at room temperature, these peanut butter spider cookies stay fresh for up to 5 days. Beyond that, they may begin to dry out, so freezing is your best bet for longer storage.
-
Can I make these cookies vegan?
If you want a vegan version, try swapping the butter for plant-based alternatives and use a flax or chia “egg” instead of a chicken egg. Keep in mind your cookie texture might vary a bit, but it’s definitely doable with some experimentation!
-
What’s the best way to avoid cookies spreading too much?
Chilling the dough for at least 30 minutes before baking really helps keep cookies from spreading, especially in warmer kitchens. Also, make sure your butter isn’t too soft, and use parchment paper for baking.
Final Thoughts
This Peanut Butter Spider Cookies Recipe has become one of my all-time favorites, not just because the cookies taste amazing, but because they turn the act of baking into a fun, memorable event. I love how the simple ingredients come together so beautifully, and how decorating each spider sparks so much creativity and joy. I hope you’ll give this recipe a try and watch it become a new classic in your kitchen, just like it has in mine!
Print
Peanut Butter Spider Cookies Recipe
- Prep Time: 15 minutes
- Cook Time: 10 minutes
- Total Time: 25 minutes
- Yield: 30 cookies
- Category: Cookies
- Method: Baking
- Cuisine: American
Description
These Peanut Butter Spider Cookies are a fun and festive treat perfect for Halloween or any occasion. Soft peanut butter cookies are topped with mini Reese’s cups, candy eyes, and chocolate spider legs, creating a spooky and delicious snack that’s sure to delight kids and adults alike.
Ingredients
Dry Ingredients
- 1 ¾ cup (218 g) all-purpose flour
- 1 teaspoon baking soda
- ¼ teaspoon salt
Wet and Sugars
- ½ cup (100 g) granulated sugar, plus more for rolling cookies in
- ½ cup (100 g) light brown sugar
- ½ cup (128 g) no-stir creamy peanut butter
- ½ cup (113 g or 1 stick) unsalted butter, room temperature
- 1 large egg, room temperature
- 1 teaspoon pure vanilla extract
Decorations
- 30 mini Reese’s cups, unwrapped
- ¼ cup chocolate chips
- Candy eyes
Instructions
- Preheat Oven and Prepare Baking Sheet: Preheat your oven to 375º F (190º C). Line a baking sheet with parchment paper and set it aside for later use.
- Mix Dry Ingredients: In a medium bowl, whisk together the all-purpose flour, baking soda, and salt. Set this mixture aside; it will be incorporated later.
- Cream Sugars and Fats: In the bowl of a stand mixer or a large bowl with a hand mixer, combine the granulated sugar, light brown sugar, unsalted butter, and creamy peanut butter. Beat these ingredients together until the mixture is light, fluffy, and well combined, about 2 minutes. Scrape down the sides of the bowl as needed to ensure even mixing.
- Add Egg and Vanilla: Beat in the large egg and vanilla extract until fully incorporated, about 30 seconds, making sure the mixture is smooth.
- Incorporate Dry Ingredients: With the mixer set to low speed, gradually add the dry flour mixture to the wet mixture. Beat just until everything is combined and no flour streaks remain. Be careful not to overmix, as this could make the cookies tough.
- Shape Cookies: Scoop full tablespoons of dough and roll them into roughly 1-inch balls. Roll each ball in additional granulated sugar to coat lightly. Place the coated dough balls 1 ½ inches apart on the prepared baking sheet to allow room for spreading.
- Bake Cookies: Bake the cookies in the preheated oven for about 10 minutes, or until the edges are lightly golden brown. Once baked, remove the cookies from the oven and let them cool on the baking sheet for about 3 minutes to firm up slightly.
- Add Reese’s Cups: After the brief cooling period, gently press one mini Reese’s cup into the center of each cookie. Be careful not to press too hard to avoid breaking the cookie. Immediately transfer the cookies to a wire rack to cool completely.
- Melt Chocolate Chips: Melt the chocolate chips in the microwave at 50% power. Stir every 15 seconds until the chocolate is smooth and fully melted.
- Decorate with Chocolate and Candy Eyes: Transfer the melted chocolate into a small plastic baggie and snip off one corner to create a piping bag. Pipe spider legs around the Reese’s cups on each cookie. Use a dab of melted chocolate to attach candy eyes onto the Reese’s cups to complete the spider look.
- Set Chocolate and Serve: Allow the chocolate to set completely before serving so that the decorations hold their shape. Enjoy your festive Peanut Butter Spider Cookies!
Notes
- Use creamy no-stir peanut butter such as Skippy All Natural for the best texture and ease of mixing.
- Candy eyes are readily available at grocery stores or craft stores, especially during the Halloween season.
- In warmer climates, chill the cookie dough for 30 minutes before baking to prevent spreading and maintain cookie shape.
- Store the cookies in an airtight container at room temperature for up to 5 days to keep them fresh.
- You can freeze the cookie dough for up to 3 months for future baking convenience.
Nutrition
- Serving Size: 1 cookie
- Calories: 152
- Sugar: 12g
- Sodium: 104mg
- Fat: 8g
- Saturated Fat: 3g
- Unsaturated Fat: 4g
- Trans Fat: 0.1g
- Carbohydrates: 18g
- Fiber: 1g
- Protein: 3g
- Cholesterol: 14mg


