

If you’re ready for a festive treat that’s as fun to make as it is to eat, you’re going to love this Peanut Butter Ball Pumpkins Recipe. These little pumpkin-shaped delights are perfect for fall gatherings, Halloween parties, or just a sweet snack that brings a smile to your face. I absolutely love how these turn out—creamy, sweet, and with just the right touch of peanut butter goodness wrapped in a cute pumpkin shape. Keep reading, and I’ll share all my tips to help you nail this recipe every time.
Why You’ll Love This Recipe
- Simple Ingredients: You probably already have everything in your pantry—no fancy shopping needed.
- Fun and Festive: The pumpkin shapes add a festive touch that’s perfect for fall celebrations.
- Kid-Friendly Activity: Rolling and shaping these balls is a fun kitchen project the whole family can enjoy.
- Perfect Size & Flavor: Bite-sized, rich peanut butter treats that hit the sweet spot without being overwhelming.

Ingredients You’ll Need
Each ingredient in this Peanut Butter Ball Pumpkins Recipe plays a key role in creating that ideal balance of texture and flavor. I love using creamy peanut butter for its smoothness—it makes the dough easy to work with and gives that classic flavor. When you choose powdered sugar, make sure it’s fresh for a silky finish. Let’s talk about a few other essentials you’ll want on hand before diving in.
- Butter: Softened butter gives richness and helps bind the mixture into a smooth dough.
- Creamy peanut butter: Creamy works best here for a smooth texture that’s easy to shape.
- Powdered sugar: This sweetens and thickens the dough perfect for rolling.
- Vanilla extract: Just a splash brightens all the flavors gently.
- Salt: A pinch balances the sweetness and enhances the peanut flavor.
- Orange gel food coloring: This gives your peanut butter balls that classic pumpkin-orange hue without changing the texture.
- Chocolate chips: Perfect for pumpkin stems, adding a touch of chocolatey contrast.
Variations
I love talking about variations because it means you can make this Peanut Butter Ball Pumpkins Recipe truly your own. Sometimes I swap in crunchy peanut butter for more texture or add a splash of cinnamon for fall spice. Feel free to make these yours based on what you and your family love.
- Crunchy Peanut Butter: I tried this once for extra texture, and the little peanut bits added a nice surprise inside the pumpkin.
- Nut-Free Alternative: Use sunflower seed butter to keep it safe for kids with allergies, and it still tastes delicious!
- Spiced-Up Version: Adding a pinch of cinnamon or pumpkin pie spice made these extra festive for a holiday party.
- Dark Chocolate Stem: Swap milk chocolate chips for dark chocolate for a richer flavor on top.
How to Make Peanut Butter Ball Pumpkins Recipe
Step 1: Cream Your Butter and Peanut Butter
Start with softened butter—you want it at room temperature to whip easily. In your stand mixer (or with a hand mixer), beat the butter and creamy peanut butter together until the texture is smooth and homogenous. I love doing this first because it ensures that creaminess that turns the dough fabulously smooth later on.
Step 2: Add the Powdered Sugar, Vanilla, and Salt
Next, add your powdered sugar, vanilla extract, and just a pinch of salt. Beat everything together until the mixture becomes thick enough to hold its shape—a stiff, dough-like consistency. I always scrape down the sides of the bowl here to make sure everything is well-combined, so no sugary pockets sneak into your balls.
Step 3: Color Your Dough Orange
Here’s where the fun really begins! Add orange gel food coloring bit by bit to the dough and mix until you hit that perfect pumpkin hue. I recommend using gel coloring because it intensifies color without watering down your dough. Don’t be shy to add a little more if you want a brighter orange—just mix well!
Step 4: Roll and Shape Your Pumpkins
Use about 2 teaspoons of dough per pumpkin, rolling it into smooth balls. Then, gently use a toothpick to press vertical lines around each ball to mimic pumpkin ridges. It sounds tricky, but it’s easier than you’d think—I usually rotate the ball slowly while pulling the toothpick gently from top to bottom.
Step 5: Add the Chocolate Stem and Chill
Press a chocolate chip upside down onto the top of each ball to act as the pumpkin stem. Pop your pumpkin balls in the fridge for about 15-20 minutes so they firm up nicely before serving. This chilling step is key for keeping their shape and improving that melt-in-your-mouth texture.
Pro Tips for Making Peanut Butter Ball Pumpkins Recipe
- Use Room Temperature Butter: I learned that starting with soft butter makes mixing a breeze and keeps the texture silky.
- Gel Food Coloring Is Your Friend: Unlike liquid food color, gel doesn’t add moisture and keeps the dough firm.
- Shape Gently: Be light with the toothpick lines—press too hard and the pumpkin shape can crack.
- Chill Before Serving: Refrigerating helps the balls hold their shape and enhances flavor melding.
How to Serve Peanut Butter Ball Pumpkins Recipe

Garnishes
I like to keep the pumpkin design simple with just the chocolate chip stem, but if you want to get fancy, a tiny mint leaf or a sliver of pretzel stick makes a charming stem alternative. A light dusting of cinnamon on top also adds a warm aroma that’s lovely for fall.
Side Dishes
Since these pumpkin balls are a sweet snack, I often serve them alongside fresh apple slices or even a tangy cream cheese dip for contrast. They’re also fantastic with a warm cup of chai or coffee to balance the richness.
Creative Ways to Present
For Halloween or Thanksgiving, I like arranging them on a rustic wooden board surrounded by fall leaves and mini gourds. Another fun idea is to present them in cupcake liners for easy serving at parties. They always get compliments when served this way!
Make Ahead and Storage
Storing Leftovers
These peanut butter pumpkins are best stored in an airtight container in the fridge. I usually keep mine for up to a week, and they hold up beautifully—no drying out or losing that creamy texture. Just make sure they’re not sitting out too long or the chocolate chips can soften.
Freezing
If you want to prep in advance, these freeze well. I place the pumpkin balls on a baking sheet lined with parchment, freeze until solid, then transfer them to freezer bags. When you’re ready to eat, just thaw in the fridge overnight. The texture remains fantastic, just like fresh!
Reheating
Reheating isn’t really necessary since these are best enjoyed chilled or at room temperature. But if you want them a bit softer, letting them sit out for 10-15 minutes is perfect. Avoid microwaving—it melts the chocolate stems and changes the texture.
FAQs
-
Can I use natural peanut butter for this recipe?
You can, but natural peanut butter has more oil which can make the dough a bit softer and harder to shape. If you do use natural peanut butter, chill the mixture slightly before rolling to get better control.
-
How long do Peanut Butter Ball Pumpkins last?
Stored properly in an airtight container in the fridge, they can last up to a week without losing freshness or flavor. For longer storage, freezing is your best bet.
-
What else can I use instead of chocolate chips for the pumpkin stem?
If you’re out of chocolate chips, mini pretzel sticks, small bits of green candy, or even clove buds make great alternatives for cute and tasty pumpkin stems.
-
Is this recipe kid-friendly?
Absolutely! Kids love rolling the dough into balls and decorating their own pumpkins. It’s a fun, hands-on activity that also introduces them to baking basics.
Final Thoughts
This Peanut Butter Ball Pumpkins Recipe holds a special place in my fall baking favorites. It’s so easy to pull together, and the kids always get a kick out of shaping pumpkins with me. Plus, each bite delivers that perfect combo of peanut butter and sweetness wrapped in a cute, seasonal look. If you’re looking for a simple, tasty, and super charming treat, I can’t recommend these enough. Go ahead—roll up your sleeves, get creative, and enjoy these little bites of autumn cheer with your favorite people!
Print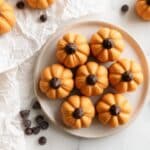
Peanut Butter Ball Pumpkins Recipe
- Prep Time: 30 minutes
- Cook Time: 0 minutes
- Total Time: 30 minutes
- Yield: 50 pumpkins
- Category: Dessert
- Method: No-Cook
- Cuisine: American
Description
These Peanut Butter Ball Pumpkins are a delightful no-bake treat perfect for fall celebrations and Halloween. Made with creamy peanut butter, powdered sugar, and butter, then colored orange and decorated with chocolate chips, these bite-sized sweets resemble cute miniature pumpkins. They are easy to prepare and require no cooking, making them a fun and festive dessert for any occasion.
Ingredients
Peanut Butter Balls
- 1/4 cup butter, softened
- 1 cup creamy peanut butter
- 2 cups powdered sugar
- 1 tsp vanilla extract
- 1 pinch salt
- orange gel food coloring, as needed
- 50 chocolate chips
Instructions
- Combine butter and peanut butter: In the bowl of a stand mixer, combine the softened butter and creamy peanut butter. Mix on medium speed until the mixture is smooth and well blended.
- Add powdered sugar, vanilla, and salt: Gradually add the powdered sugar, vanilla extract, and a pinch of salt to the peanut butter mixture. Continue mixing until a thick dough forms and is fully combined.
- Add orange gel food coloring: Add orange gel food coloring to the dough a little at a time, mixing thoroughly after each addition until you achieve a bright, pumpkin-like orange color.
- Form peanut butter balls: Portion out the dough, using about 2 teaspoons per ball. Roll each portion between your hands to form smooth, round balls.
- Shape and decorate pumpkins: Use a toothpick to gently press lines vertically into each ball to mimic the ridges of a pumpkin. Place a chocolate chip on top of each ball to represent the pumpkin’s stem.
- Serve and enjoy: Repeat the shaping and decorating with the remaining dough. Serve immediately or refrigerate until ready to enjoy.
Notes
- If the dough is too sticky to handle, refrigerate it for 15-20 minutes to firm up before rolling.
- You can adjust the intensity of the orange color by adding more gel food coloring as desired.
- Store the peanut butter ball pumpkins in an airtight container in the refrigerator for up to one week.
- For a nut-free alternative, try using sunflower seed butter.
Nutrition
- Serving Size: 1 pumpkin ball (approx. 12g)
- Calories: 85
- Sugar: 8g
- Sodium: 35mg
- Fat: 5g
- Saturated Fat: 2g
- Unsaturated Fat: 3g
- Trans Fat: 0g
- Carbohydrates: 9g
- Fiber: 1g
- Protein: 2g
- Cholesterol: 5mg
