

If you’re anything like me and have a serious soft spot for all things sweet and colorful, you’re going to adore this Pastel Sugar Cookie Sandwiches Recipe. These little delights aren’t just pretty to look at—they’re soft, buttery, and filled with the fluffiest vanilla cream you’ve ever tasted. Whether you’re after a fun treat for a special occasion or just want to brighten up your afternoon snack, this recipe is fan-freaking-tastic. I promise, once you make them, you’ll want to share the magic!
Why You’ll Love This Recipe
- Beautiful Pastel Colors: The gel food coloring lets you create soft, dreamy shades without making the dough sticky or runny.
- Perfectly Soft Cookies: These cookies are tender with just a hint of chew, the ideal base for sandwiching that luscious filling.
- Fluffy Vanilla Filling: The cream is light, sweet, and buttery, balancing the cookie perfectly without overwhelming it.
- Fun and Festive: These cookie sandwiches are a hit with kids and adults alike—ideal for birthdays, showers, or just a sweet pick-me-up.

Ingredients You’ll Need
All the ingredients you need are classic baking staples, but there are a couple of key tricks that make this Pastel Sugar Cookie Sandwiches Recipe stand out—like using gel food coloring for vivid pastels and balancing the filling so it’s just right.
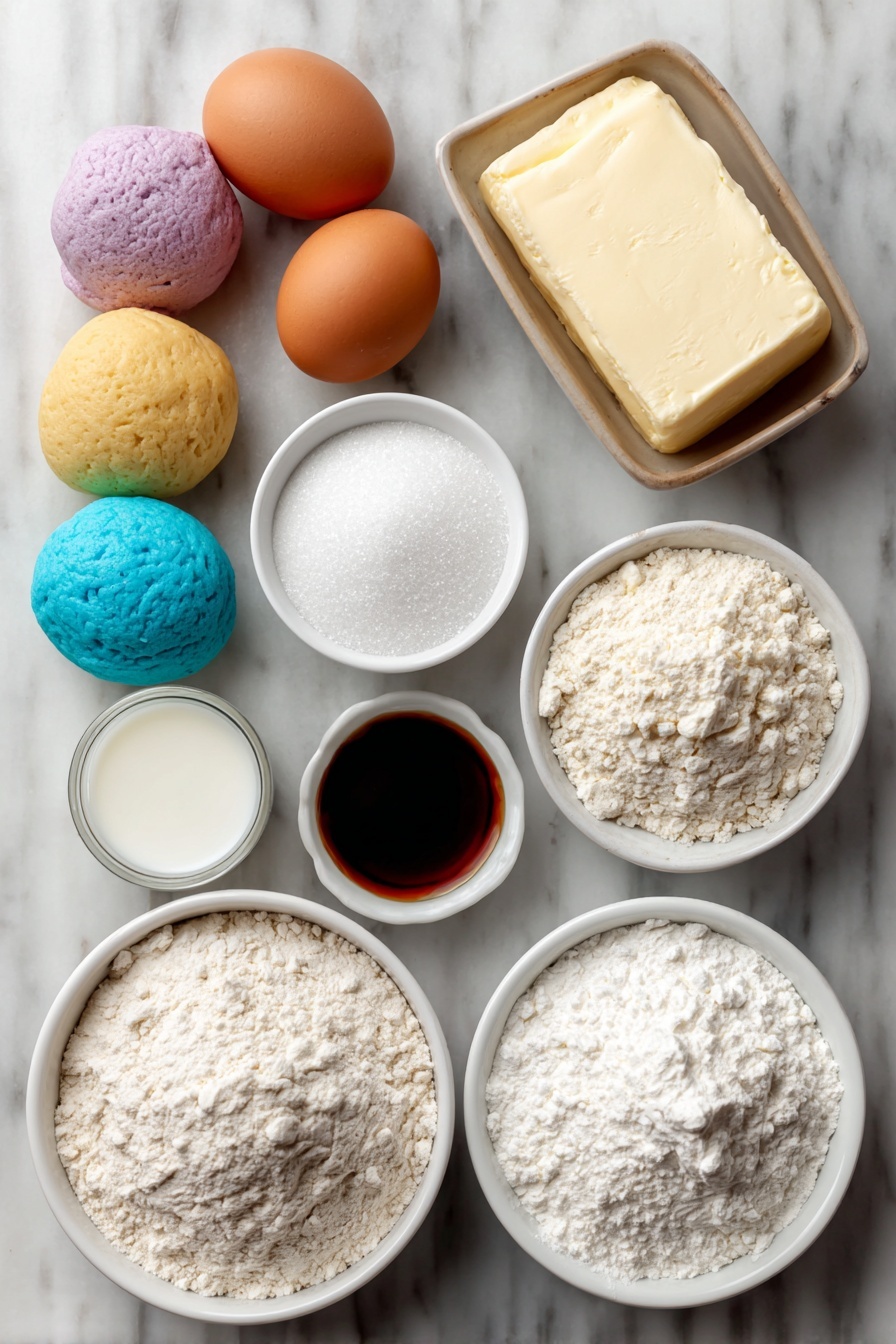
- Unsalted butter: Make sure it’s softened to room temperature for smooth mixing and rich flavor.
- Granulated sugar: The sweetness backbone for your cookies, it creams beautifully with butter.
- Egg: Adds moisture and helps bind everything together.
- Vanilla extract: A must-have for that warm, comforting flavor in both cookie and filling.
- All-purpose flour: The base for the dough, providing structure without making it tough.
- Baking soda & baking powder: These small leaveners keep the cookies soft and just a touch airy.
- Salt: Balances sweetness and enhances flavor.
- Milk: Helps loosen the dough slightly for the perfect soft texture.
- Gel food coloring: I recommend pastel pink, yellow, green, blue, and purple—you’ll see why when you make them!
- Powdered sugar: For a smooth, sweet vanilla filling.
- Heavy cream or milk: Adds silkiness to the filling, choose whichever you have on hand.
- Pinch of salt: Enhances the filling’s flavor, just like in the cookies.
Variations
I love how flexible this Pastel Sugar Cookie Sandwiches Recipe is—once you get the basics down, feel free to mix it up. Here are a few ways I’ve made it my own and ways you might enjoy customizing it yourself.
- Flavored Fillings: I once swapped out the vanilla filling for a lemon cream, and my family went crazy for that citrus twist—great for spring celebrations!
- Dairy-Free Option: Use a vegan butter and a plant-based milk for the dough and filling to keep it creamy and just as delicious.
- Seasonal Spices: Adding a pinch of cinnamon or nutmeg to the dough gives these cookie sandwiches a cozy vibe perfect for fall or winter.
How to Make Pastel Sugar Cookie Sandwiches Recipe
Step 1: Preheat and Prepare
First things first: preheat your oven to 350°F (175°C) and line a baking sheet with parchment paper. This keeps your cookies from sticking and helps them bake evenly. I always prep my baking sheet upfront—something I’ve learned after too many sticky cleanup moments!
Step 2: Make the Cookie Dough
In your mixing bowl, beat together softened butter and granulated sugar until it’s light and fluffy—this usually takes around 2 minutes. Then add in the egg and vanilla extract, mixing until everything’s well combined. Meanwhile, whisk together your dry ingredients—flour, baking soda, baking powder, and salt—in a separate bowl.
Gradually add the dry mix to the wet, mixing on low. The dough will feel thick but soft. Finally, stir in the milk to get the texture just right. If your dough feels stiff, a little extra milk helps; if too sticky, a quick chill in the fridge does wonders.
Step 3: Color and Divide
Now comes the fun part! Divide your dough into five equal portions. Using gel food coloring, knead a different pastel shade into each portion. Gel colors work best since they don’t change the dough’s texture—I’ve tried liquid colors and it just made the dough too soft.
Step 4: Shape and Bake
Scoop about 1 tablespoon of dough for each cookie and roll into a smooth ball. Place your dough balls on the lined baking sheet, giving them about 2 inches between each one. Bake for 8-10 minutes until the edges set and the tops crack slightly without browning.
I recommend letting the cookies cool on the tray for 5 minutes before moving them to a wire rack to cool completely—this keeps them delicate and prevents breaking.
Step 5: Make the Vanilla Filling
While your cookies cool, whip up the vanilla filling. Beat softened butter until super smooth, then gradually add powdered sugar. Mix in heavy cream (or milk), vanilla extract, and a pinch of salt, beating until fluffy and spreadable.
If the filling feels too thick, add a bit more cream; too thin, add more powdered sugar. I love this filling because it’s silky but holds its shape perfectly—so your sandwiches won’t get messy.
Step 6: Assemble Your Cookie Sandwiches
Match your cookies into pairs close in size. Using a piping bag or spoon, spread a generous dollop of filling on the flat side of one cookie. Top it with the second cookie, pressing gently to spread the filling evenly—but don’t squish them too much!
Let your cookie sandwiches sit for about 10 minutes to let the filling firm up slightly—this helps them hold together better when eating.
Pro Tips for Making Pastel Sugar Cookie Sandwiches Recipe
- Use Gel Food Coloring: It keeps the dough texture intact and prevents the pastel colors from becoming muddy or dull.
- Chill Dough If Needed: If your dough feels too soft to handle, refrigerate it for 15-20 minutes before shaping—it makes rolling easier.
- Don’t Overbake: Cookies will look slightly cracked on top; baking any longer risks a hard texture.
- Match Cookie Sizes: Pairing similar-sized cookies makes assembly easier and your sandwiches look neat and professional.
How to Serve Pastel Sugar Cookie Sandwiches Recipe

Garnishes
I like to dust these cookie sandwiches lightly with some extra powdered sugar before serving—it adds just a hint of elegance. Sometimes, I add a few edible glitter sprinkles on top for extra sparkle when serving at parties. It’s such a simple way to make them feel extra special!
Side Dishes
These cookies shine best as the star of the show, but when I want to pair them, I go for a simple glass of cold milk or a cup of hot tea. The mellow drinks balance the sweet pastel sandwiches perfectly.
Creative Ways to Present
For birthdays or baby showers, I’ve arranged these pastel cookie sandwiches stacked on tiered trays that match the theme colors. Another fun idea is slipping them into colorful cellophane bags tied with ribbons for party favors. Your guests will love how adorable—and tasty—they look!
Make Ahead and Storage
Storing Leftovers
I keep my cookie sandwiches in an airtight container at room temperature. They stay perfectly soft and fresh for up to 3 days. After that, I usually move them to the fridge, but be aware the frosting firms up more when chilled—so bring them back to room temp before serving for best texture.
Freezing
Freezing works great with this recipe! I separate the cookie pairs with parchment paper, wrap them individually in plastic wrap, then place all in a freezer-safe bag. When you want a tasty treat, just thaw in the fridge overnight and then at room temperature for about an hour—easy and convenient.
Reheating
If you prefer your cookies a bit softer after chilling, I pop mine in the microwave for about 10 seconds—not too long or the filling might get runny. This little trick brings back that fresh-from-the-oven feel in a snap.
FAQs
-
Can I use regular liquid food coloring instead of gel?
You technically can, but I don’t recommend it for this Pastel Sugar Cookie Sandwiches Recipe. Liquid colors add extra moisture, which can make your dough too soft and harder to handle. Gel coloring gives you vibrant pastels without changing the dough’s consistency.
-
How long do these cookie sandwiches stay fresh?
Stored properly in an airtight container at room temperature, these cookie sandwiches will stay fresh and delicious for up to 3 days. Refrigerating them extends their life up to a week, but I recommend bringing them back to room temp before serving for the best texture.
-
Can I make the dough ahead of time?
Absolutely! You can prepare the dough a day in advance and keep it wrapped tightly in the fridge. Just let it soften slightly before shaping and coloring. This can actually make rolling easier if your dough was initially too soft.
-
What’s the best way to pipe the vanilla filling?
I like to use a piping bag fitted with a round nozzle for neat, even layers of filling, but you can easily spread it with a small spoon or butter knife if you don’t have piping tools—just be generous and smooth!
Final Thoughts
This Pastel Sugar Cookie Sandwiches Recipe holds a special place in my heart because it combines everything I love about baking: colorful creativity, buttery sweetness, and a creamy filling that’s just dreamy. If you’re looking for a fun, approachable recipe that delights both the eyes and the taste buds, I can’t recommend these enough. Trust me, once you share these with friends and family, you’ll see those smiling faces and know it was totally worth the effort. Now, go bake some happiness!
Print
Pastel Sugar Cookie Sandwiches Recipe
- Prep Time: 30 minutes
- Cook Time: 10 minutes
- Total Time: 40 minutes
- Yield: 24 cookie sandwiches
- Category: Dessert
- Method: Baking
- Cuisine: American
- Diet: Vegetarian
Description
Delightful pastel sugar cookie sandwiches featuring soft, colorful sugar cookies filled with a creamy vanilla frosting. Perfect for celebrations or everyday treats, these sandwiches combine buttery cookies with a luscious filling in charming shades of pink, yellow, green, blue, and purple.
Ingredients
For the Sugar Cookies:
- 1 cup unsalted butter, softened
- 1 ½ cups granulated sugar
- 1 large egg
- 2 teaspoons vanilla extract
- 2 ¾ cups all-purpose flour
- 1 teaspoon baking soda
- ½ teaspoon baking powder
- ½ teaspoon salt
- 2 tablespoons milk
- Gel food coloring (pink, yellow, green, blue, and purple)
For the Vanilla Filling:
- ½ cup unsalted butter, softened
- 2 cups powdered sugar
- 2 tablespoons heavy cream or milk
- 1 teaspoon vanilla extract
- Pinch of salt
Instructions
- Preheat the Oven: Set your oven to 350°F (175°C) and line a baking sheet with parchment paper to prepare for baking the cookies.
- Make the Cookie Dough: Beat the softened butter and granulated sugar together in a large bowl until light and fluffy, about 2 minutes. Add the egg and vanilla extract, mixing until fully incorporated.
- Combine the Dry Ingredients: In a separate bowl, whisk the all-purpose flour, baking soda, baking powder, and salt. Gradually add this dry mixture to the wet ingredients on low speed. The dough will be thick but soft. Then add the milk and mix just until combined.
- Color the Dough: Divide the dough into five equal portions. Use gel food coloring to tint each portion a different pastel shade—pink, yellow, green, blue, and purple—kneading until the color is evenly distributed.
- Shape and Bake: Scoop approximately 1 tablespoon of dough per cookie and roll into smooth balls. Place them about 2 inches apart on the prepared baking sheet. Bake for 8-10 minutes until edges are set and tops look slightly cracked but not browned. Cool on the baking sheet for 5 minutes, then transfer to a wire rack to cool completely.
- Make the Vanilla Filling: Beat softened butter in a bowl until smooth. Gradually add powdered sugar, then mix in heavy cream or milk, vanilla extract, and a pinch of salt. Continue beating until fluffy and spreadable, adjusting consistency as needed.
- Assemble the Cookie Sandwiches: Pair cooled cookies by similar size. Spread a generous amount of vanilla filling on the flat side of one cookie using a piping bag or spoon. Top with the second cookie and gently press to spread filling evenly.
- Set Before Serving: Allow the assembled cookie sandwiches to rest for about 10 minutes so the filling can firm up slightly for the best texture.
Notes
- Use gel food coloring to achieve vibrant pastel colors without changing the dough’s texture.
- If the dough becomes too soft while handling, refrigerate it for 15-20 minutes before rolling.
- Store cookie sandwiches in an airtight container at room temperature for up to 3 days or refrigerate for up to one week.
- Let refrigerated cookies come to room temperature before serving for optimal texture.
Nutrition
- Serving Size: 1 cookie sandwich
- Calories: 190
- Sugar: 15g
- Sodium: 70mg
- Fat: 10g
- Saturated Fat: 6g
- Unsaturated Fat: 3g
- Trans Fat: 0g
- Carbohydrates: 22g
- Fiber: 0.5g
- Protein: 2g
- Cholesterol: 25mg


