
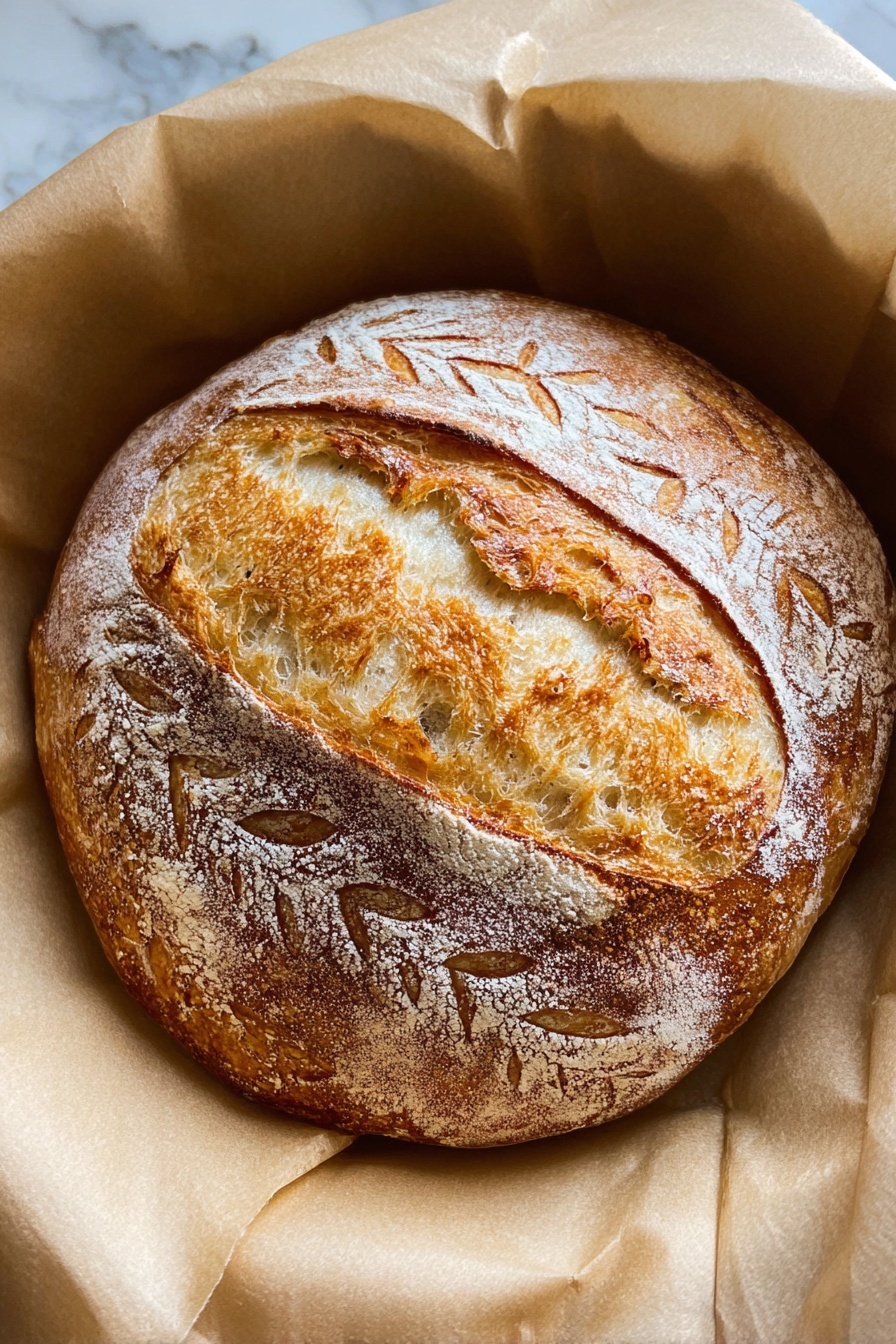
If you’re craving that perfect artisan loaf with a tangy twist, I’ve got a real treat for you: an Overnight Sourdough Bread Recipe that’s as simple as it is delicious. This recipe has become a go-to for me when I want that crusty, airy bread without the fuss of complicated steps. Stick around, and I’ll walk you through every part of this cozy kitchen ritual you’ll absolutely fall in love with.
Why You’ll Love This Recipe
- Simplicity Meets Flavor: You’ll only need a handful of ingredients and simple steps, but the flavor punches way above its weight.
- Hands-off Overnight Rise: Let your dough do the work while you sleep—minimal active time, maximum reward.
- Great Texture Every Time: Thanks to gentle folds and fermentation, you get that perfect chewy crumb with lovely air pockets.
- Perfect For All Skill Levels: Whether you’re a beginner or a seasoned baker, this recipe adapts well to your kitchen rhythm.

Ingredients You’ll Need
These ingredients might seem basic, but they work like magic together to create that wonderful sourdough character and texture. Having a lively sourdough starter is key, and using unbleached all-purpose flour keeps the crumb moist yet structured.

- Sourdough Starter: Use an active starter for best rise; I usually take mine right from the fridge without feeding to boost the tangy flavor.
- All-Purpose Flour: This flour provides the right balance of gluten development and tenderness.
- Salt: Essential to control yeast activity and flavor balance—don’t skip it!
- Water: Slightly warm water helps kickstart fermentation but avoid hot water or it can kill your starter.
Variations
I love that you can easily tweak this recipe based on what you have on hand or your taste preferences. Over time, I’ve played around with different flours and hydration levels—don’t be shy to experiment!
- Whole Wheat Flour: Swapping in up to 30% whole wheat adds a nutty depth—I personally adore the way it enhances the flavor without drying out the bread.
- Hydration Levels: If you like a chewier, more open crumb, try increasing water by a couple of tablespoons; just be prepared for stickier dough.
- Seed Mix: Toss in sunflower or sesame seeds during kneading for a crunchy surprise that my family constantly requests.
- Gluten-Free Blend: While trickier, substituting a gluten-free flour mix can work with adjustments—just expect a different texture and shorter rise times.
How to Make Overnight Sourdough Bread Recipe
Step 1: Mix and Rest Your Dough
The evening before you want to bake, combine your sourdough starter, flour, salt, and water in a bowl. I like to use my hands here—it feels more connected, and you can really tell when the dough comes together. It’ll be shaggy and wet, which is exactly what you want. Cover it loosely and let it rest for 15 minutes to hydrate the flour fully.
Step 2: Folding for Strength
After the first rest, fold the dough by grabbing one corner and folding it over the middle. Rotate and repeat about 15 folds. Wetting your hands keeps the dough from sticking—trust me, this is a game changer. Folding develops gluten, which sets the stage for that chewy bread you love. Let it rest another 15 minutes and repeat the fold once more before covering the bowl and leaving it out overnight.
Step 3: Morning Fold and Chill
When you wake up, your dough should have a lovely rise and those beautiful bubbles on top—that’s your yeast and bacteria hard at work. Now, gently loosen it from the bowl edges, lift the center with both hands, and tuck the edges underneath like wrapping a gift. Rotate and repeat this folding three times. Move your dough to a parchment-lined bowl sprinkled with flour, tuck in the ends again, dust the top with flour, and pop it in the fridge for about 5 hours. This cold ferment tightens the shape and deepens flavor.
Step 4: Preheat and Bake
About an hour before baking, preheat your oven to 500°F (I always use convection if mine has it) with a Dutch oven inside—that preheating trick gives your crust that irresistible crunch. Take your chilled dough out and score it with a sharp knife; I usually go for a long slash down the center and a few smaller slashes on the sides. Use the parchment paper to transfer it into the hot Dutch oven. Bake 25 minutes with the lid on, then remove the lid, reduce heat to 450°F, and bake for another 12–14 minutes to brown the crust beautifully.
Step 5: Cool Before Slicing
Once out of the oven, resist the temptation to slice right away—it’s tough, I know! Wait at least an hour for the crumb to set properly. I’ve learned the hard way that cutting too soon gives gummy bread. Trust me, this wait makes all the difference.
Pro Tips for Making Overnight Sourdough Bread Recipe
- Use Unfed Starter: I prefer this for a tangier loaf; feeding right before can mellow the flavor too much.
- Wet Your Hands When Folding: This simple step stops dough from sticking and keeps your folds smooth and effective.
- Dutch Oven Magic: Preheating your Dutch oven traps steam, creating that perfect crust every time.
- Don’t Rush Cooling: Waiting for the bread to cool sets the crumb and prevents gummy slices.
How to Serve Overnight Sourdough Bread Recipe

Garnishes
My favorite way to garnish slices is with a quick swipe of softened butter and a sprinkle of flaky sea salt—pure simplicity that highlights the bread’s flavor. If I’m feeling fancy, a drizzle of good olive oil and fresh herbs like rosemary adds a rustic touch that guests always ask about.
Side Dishes
This bread pairs spectacularly with just about everything—try it next to a hearty soup like tomato bisque or use it to scoop up a creamy hummus. On lazy weekends, I love turning slices into avocado toast topped with chili flakes and a squeeze of lemon.
Creative Ways to Present
For special occasions, I like to slice the loaf thick and serve it alongside a cheese board with spreads, olives, and fruits. Another fun idea is making mini open-faced sandwiches with colorful toppings—guests always get impressed by the rustic charm of homemade sourdough.
Make Ahead and Storage
Storing Leftovers
I wrap leftovers in a clean kitchen towel and store them in a paper bag at room temperature. This keeps the crust from getting soggy while maintaining a soft interior for up to 2 days—better than plastic wrap, in my experience.
Freezing
If I have extra loaves, I slice and freeze them in a zip-top bag separated by parchment to prevent sticking. This way, I can toast slices straight from the freezer and enjoy fresh, crunchy bread whenever I want.
Reheating
Reheating in a toaster oven or under the broiler for a minute or two revives that crusty exterior and soft crumb inside. Avoid microwaving if you want to preserve the crunch; I learned that lesson the hard way on a busy morning!
FAQs
-
Can I use whole wheat flour instead of all-purpose in this Overnight Sourdough Bread Recipe?
Absolutely! You can replace up to 30% of the all-purpose flour with whole wheat to add more flavor and nutrients. Keep in mind whole wheat flour absorbs more water, so you might want to adjust hydration slightly by adding an extra tablespoon or two of water. The crumb may be a bit denser but still delicious.
-
Do I need to feed my starter right before using it in this recipe?
Not necessarily! I usually use my starter straight from the fridge without feeding for this recipe because it adds a lovely tang and depth to the bread. However, if your starter is sluggish or hasn’t been refreshed in a while, giving it a feed 8-12 hours before baking can improve rise and activity.
-
Why does the recipe call for folding the dough multiple times?
Folding helps develop gluten strength gently without heavy kneading, which is especially useful for wet doughs like sourdough. It also redistributes yeast and bacteria, promoting even fermentation and better crumb structure with those prized air pockets.
-
Can I make this sourdough bread in a regular oven without a convection setting?
Yes, you can! Just increase the baking temperature slightly or bake a few minutes longer. The Dutch oven creates steam regardless, so your crust will still develop nicely. Keep an eye on it and adjust times based on how your oven performs.
-
What if my dough seems too wet or sticky?
Wet, sticky dough is actually normal for this recipe. Use wet hands when folding to keep the dough from sticking and avoid adding extra flour, which can make the bread dense. Over time, as you fold, the dough will become more elastic and easier to handle.
Final Thoughts
This Overnight Sourdough Bread Recipe has truly changed the way I bake at home. It’s approachable but yields stunning results that impress family and friends alike. Baking this loaf has become one of my favorite quiet kitchen rituals, and I can’t wait for you to try it out and make it your own. Trust me, once you get that smell of fresh sourdough wafting through your home, you’ll never want store-bought bread again.
Print
Overnight Sourdough Bread Recipe
- Prep Time: 40 minutes
- Cook Time: 40 minutes
- Total Time: 18 hours 20 minutes
- Yield: 12 servings
- Category: Bread
- Method: Baking
- Cuisine: Artisan, American
- Diet: Vegetarian
Description
This easy overnight sourdough bread recipe yields a beautifully rustic loaf with a tangy flavor and a perfect crust. Using a simple mix of sourdough starter, all-purpose flour, salt, and water, this method involves an overnight fermentation and no-knead folding technique to develop structure and airy texture. The dough is baked in a Dutch oven to create a crispy, artisan-style crust and tender crumb, making it a perfect homemade bread choice for any baker.
Ingredients
Ingredients
- 90 grams sourdough starter
- 520 grams all-purpose flour
- 12 grams salt
- 1 7/8 cups water
Instructions
- Mix Ingredients: The night before baking, combine 520 grams of flour, 12 grams of salt, and 90 grams of sourdough starter in a bowl. Pour in 1 7/8 cups of water and use your hands to mix the dough together. The dough will be quite wet and not smooth, which is expected.
- Initial Rest and Fold: Cover the bowl with a towel and let the dough rest for 15 minutes. After resting, perform about 15 folds by taking a corner of the dough and folding it over itself, rotating the bowl as you go. Wet your hands slightly to prevent sticking. This develops gluten structure despite the wet dough.
- Second Rest and Fold: Cover the dough again and let it rest for another 15 minutes. Repeat the folding process once more, cover, and then leave the dough to rise overnight at room temperature.
- Prepare for Morning Folding: The next morning, the dough will have risen and show air bubbles on top, indicating good fermentation. Line another bowl with parchment paper and dust flour on the bottom to hold the dough after folding.
- Final Fold and Refrigeration: Wet your hands and loosen the dough from the bowl edges. Lift the middle and tuck ends underneath, rotating the bowl quarter turns after each tuck. Do this process three times total. Transfer the shaped dough carefully to the prepared bowl with parchment, tuck ends underneath, sprinkle the top with flour, and refrigerate for 5 hours.
- Preheat Oven and Dutch Oven: Preheat your oven to 500°F, preferably on convection mode. Place the Dutch oven inside while it heats to get it very hot for baking.
- Score and Bake: Remove dough from fridge. Using a sharp knife or razor, score the top of the dough with your desired pattern. Transfer the dough with parchment paper directly into the hot Dutch oven. Cover with the lid and bake for 25 minutes.
- Remove Lid and Continue Baking: After 25 minutes, remove the Dutch oven lid, reduce oven temperature to 450°F, and bake for an additional 12-14 minutes until the crust is deeply golden and crisp.
- Cool: Remove the bread from the oven and let it cool briefly in the Dutch oven until it is safe to handle. Then transfer the bread to a wire rack to cool completely for about 1 hour before slicing to enjoy.
Notes
- You can use other flours, but it is recommended to keep a large portion of all-purpose flour for best texture.
- Adjust baking times to get your preferred crust color. Longer covered baking produces a lighter crust, while less time with lid off gives a softer crust.
- Using unfed starter imparts a more sour flavor. Feeding your starter 8-12 hours before use is optional depending on taste preference.
Nutrition
- Serving Size: 1 slice (approx. 60g)
- Calories: 180
- Sugar: 0.3g
- Sodium: 220mg
- Fat: 1.5g
- Saturated Fat: 0.2g
- Unsaturated Fat: 1.0g
- Trans Fat: 0g
- Carbohydrates: 37g
- Fiber: 2g
- Protein: 6g
- Cholesterol: 0mg


