
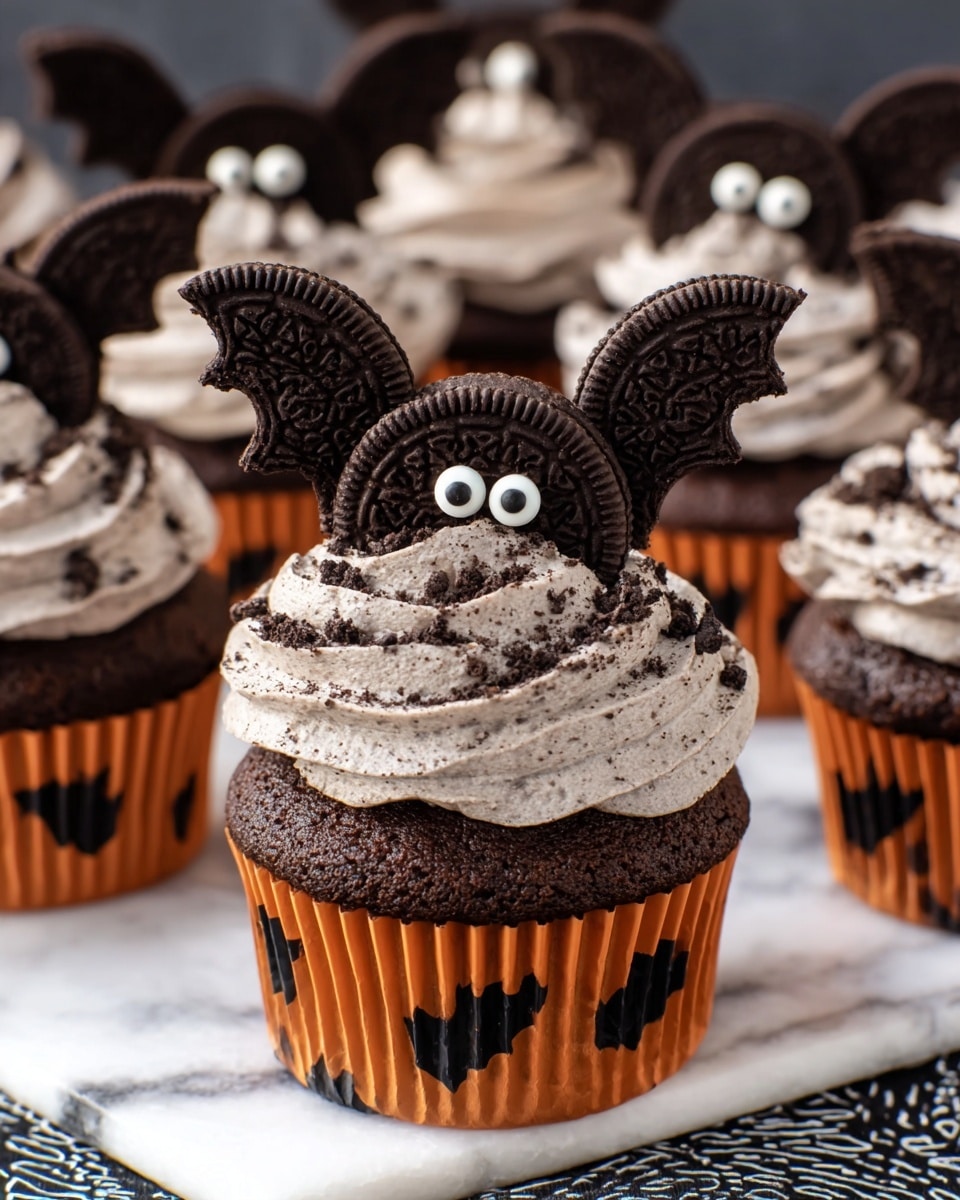
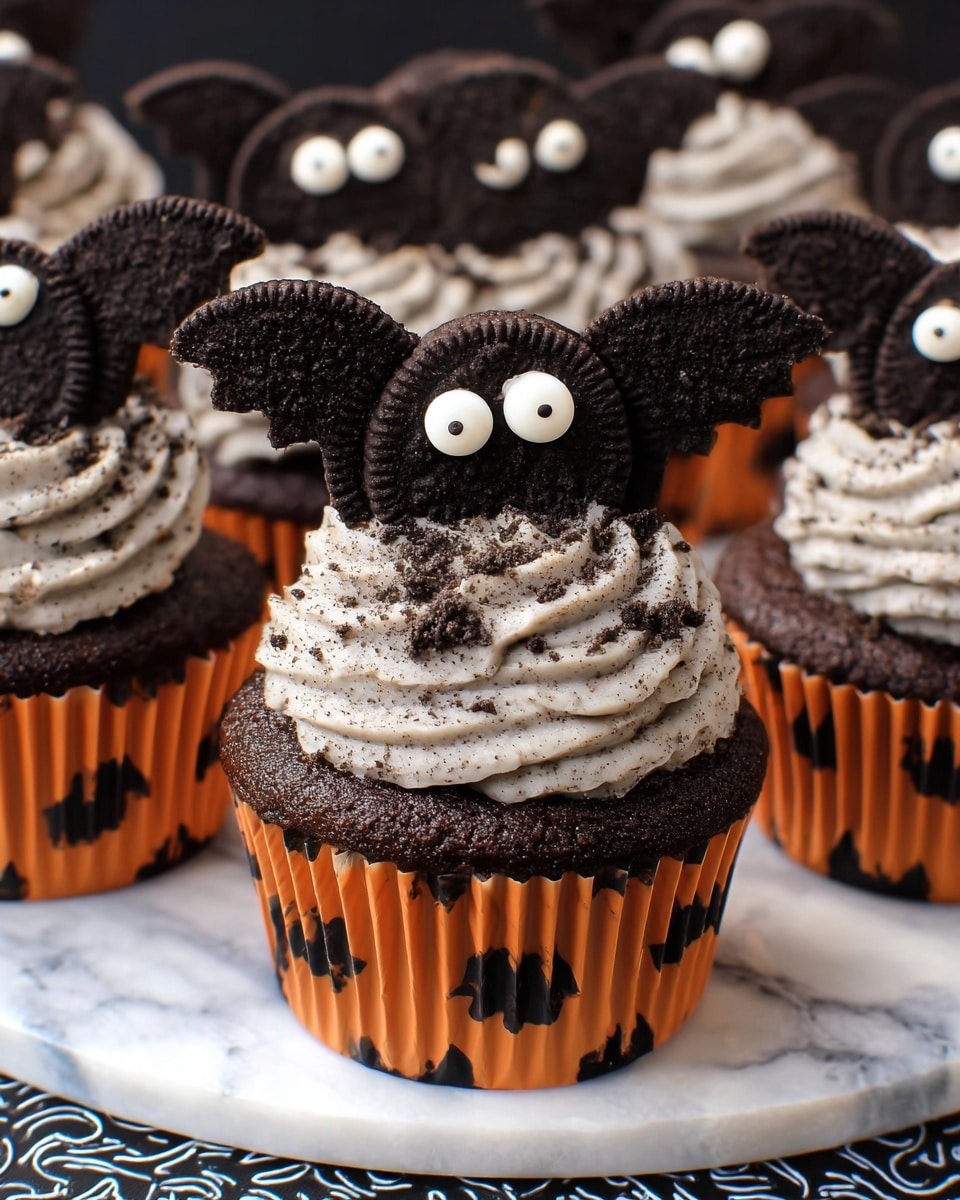
If you’re on the hunt for a fun, spooky, and absolutely adorable treat, you’ve got to try this Oreo Bats Recipe. It’s one of those delightful little snacks that’s perfect for Halloween parties, a kid-friendly activity, or just pressing play on some creativity in your kitchen. I absolutely love how this turns out because it’s not only easy but also totally irresistible—the perfect balance of chocolate, cream, and a bit of whimsy. Stick with me, and I’ll walk you through every little step to make these batty delights come alive!
Why You’ll Love This Recipe
- Fun and Festive: These Oreo bats bring instant Halloween vibes without any spooky skills needed.
- Simple Ingredients: You probably already have everything in your pantry (or can grab it quickly).
- Kid-Friendly Activity: I love involving my nieces and nephews; it keeps their hands busy and excitement high.
- Customizable and Creative: You can easily swap candies or add your own twist for a personal touch.

Ingredients You’ll Need
One reason I enjoy this Oreo Bats Recipe is the way the ingredients all work together to create that perfect bat shape and texture—crispy cookies, smooth chocolate, and just the right amount of cream. When shopping, look for Double Stuffed Oreos if you want an easier, creamier bat body, and choose candy eyes that have good “stickability” for best results.
- Oreos: Double Stuffed Oreos make this so much easier, but classic Oreos work too if you adjust the filling.
- Snack-sized Hershey bars: Perfect for cutting into little ears; a regular one-size bar wouldn’t quite work as well.
- Chocolate melting wafers: These are your glue—smooth, melt easily, and hold the bat wings and eyes in place beautifully.
- Candy eyes: A bit of personality goes a long way, so choose cute or spooky ones depending on your vibe.
Variations
I’m a big fan of mixing things up based on who I’m making the Oreo Bats Recipe for and what ingredients I have on hand. This recipe is surprisingly flexible, so don’t hesitate to get creative and make it your own!
- Peanut Butter Twist: I once swapped candy eyes for tiny peanut butter chips when making these with my allergy-conscious friend—and no one missed a beat!
- White Chocolate Variation: Use white chocolate melting wafers instead of dark for a spooky ghost-bat effect that’s perfect for a different color palette.
- Seasonal Candy Swap: Try mini marshmallows or jellybeans for eyes to match different holidays or themes.
- Healthier Bats: Use dark chocolate bars and sugar-free candy eyes for a less sweet bite that still delivers on fun.
How to Make Oreo Bats Recipe
Step 1: Prep the Ears
Start by unwrapping your Hershey bars and cutting each one into four smaller bars. Here’s the trick I discovered: use a sharp knife to carefully carve out little triangles from those pieces—these will be your bat ears. Keep the triangles small and pointy for that authentic bat look. A serrated knife works wonders if you don’t want to squish the chocolate as you cut.
Step 2: Work on Oreo Wings and Filling
Now, separate all your Oreos—24 total. If you’re not using Double Stuffed Oreos, this is the fun part: scrape the cream from half the cookies and add it to the other half. It gives your bats a thicker, gooey middle that’s unbeatable. Next, grab your serrated knife again and carefully slice the cookie sides that don’t have frosting in half—these will transform into bat wings. I always cut a couple extra halves just to have backups in case any break.
Step 3: Assemble Your Bats
Press the tiny chocolate ears into the cream filling at the top—this makes your bats look instantly spooky and adorable at the same time. Then, gently push the cookie wing halves into the sides of the Oreo at a slight angle. If your bats feel a bit wobbly, melt some chocolate wafers and dab it where needed to glue wings and ears in place.
Step 4: Seal and Add Eyes
Add a small drop of melted chocolate to the center of the cookie and gently place another cookie without frosting on top—this seals your bat so it holds together without squishing the cream. The last step is where the magic happens: using a toothpick, dot some melted chocolate on the back of each candy eye and attach them to the front of the bat. Those eyes really bring your Oreo bats to life!
Pro Tips for Making Oreo Bats Recipe
- Use a Serrated Knife: I learned that this type of knife is the key for clean cuts without crumbling your Oreos or chocolate.
- Double Stuff Makes a Difference: Skipping the cream remix step with Double Stuffed Oreos is a huge time-saver and still super tasty.
- Keep Chocolate Wafers Warm: Melt only a small batch at a time so it doesn’t harden before you need it to secure wings and eyes.
- Gentle Hands are Essential: Pressing cookie halves and ears too hard can break them, so take your time assembling for best results.
How to Serve Oreo Bats Recipe
Garnishes
I like to place a tiny dusting of powdered sugar around the plate to mimic “moonlight” and make the Oreo bats pop on a dark platter. Sometimes I add a few edible glitter sprinkles to make the eyes shine even more at night—kids get a real kick out of that little sparkle.
Side Dishes
These bats pair fantastically with a scoop of vanilla ice cream or a warm mug of hot chocolate. When I serve them at gatherings, I like to offer caramel popcorn on the side to keep the spooky-sweet theme going strong.
Creative Ways to Present
During Halloween, I’ve laid out Oreo bats perched on small branches or twigs around black lace doilies for a creepy vibe. For a birthday party, putting these bats in mini cupcake liners decorated like pumpkins creates a fun “bat cave” effect that’s sure to impress your guests.
Make Ahead and Storage
Storing Leftovers
If you’ve got leftovers (and you probably will!), store your Oreo bats in an airtight container at room temperature. I leave them on parchment paper to avoid sticking together; they last beautifully for about two to three days without losing their shape or taste.
Freezing
Freezing Oreo bats is totally possible! I wrap them individually in parchment and place them inside a freezer-safe container. When I thaw them, I let them sit out a bit to avoid condensation that can make wings soggy. They hold up surprisingly well for a couple of weeks.
Reheating
Since these are no-bake treats, reheating isn’t necessary. But if your chocolate looks a bit dull after storage, a short blast of gentle heat (like a warm room or indirect sunlight) will help bring back that shiny finish without melting your bat’s wings off.
FAQs
-
Can I use regular Oreos instead of Double Stuffed for the Oreo Bats Recipe?
Absolutely! Regular Oreos work fine, but I recommend scraping the cream from half the cookies and adding it to the others to thicken the filling. Double Stuffed Oreos save you this step because they already have extra cream, making your bat bodies nice and plump.
-
What if I don’t have candy eyes—can I make my own?
Great question! You could use small white and black icing dots to create eyes. I’ve also used mini chocolate chips or even drawn eyes on small white fondant circles using edible markers. Just make sure whatever you use sticks well with the melted chocolate “glue.”
-
How do I prevent the wings from falling off the Oreo bats?
Melted chocolate wafers are your best friend here—they act like edible glue. Dab a little on the edge where the wing meets the body and hold it in place for a few seconds. Also, handle the wings gently while assembling to avoid cracking.
-
Can I make these in advance for a party?
Yes! You can make Oreo bats the day before your event and store them in an airtight container at room temperature. Just wait to add the candy eyes on the day of serving so they stay perfectly attached and fresh-looking.
Final Thoughts
Making this Oreo Bats Recipe reminds me of those fun moments in my childhood when Halloween was all about creative treats and silly fun. It’s simple, sweet, and brings a smile every single time I whip it up. You’ll enjoy how easy it is to make these little critters—and how impressed your friends and family will be when you serve them. Trust me, once you try this, it’ll become a seasonal favorite you look forward to every year. So grab those Oreos and chocolate bars, and let’s make some bats!
Print
Oreo Bats Recipe
- Prep Time: 30 minutes
- Cook Time: 0 minutes
- Total Time: 30 minutes
- Yield: 12 bats
- Category: Dessert
- Method: No-Cook
- Cuisine: American
Description
These adorable Oreo Bats are a fun and spooky treat perfect for Halloween or any festive occasion. Made by creatively transforming Oreo cookies with chocolate ears, wings, and candy eyes, they offer a delicious and visually striking snack that combines creamy filling with rich chocolate and crunchy cookies.
Ingredients
Cookies
- 24 Oreo cookies
Chocolate
- 2-3 snack-sized Hershey bars
- ½ cup chocolate melting wafers
Decorations
- 24 candy eyes
Instructions
- Prepare the chocolate ears: Unwrap three Hershey chocolate bars and cut each into four smaller bars. Carefully use a sharp knife to cut three triangle shapes from each smaller bar to form bat ears.
- Separate and prepare Oreos: Separate the 24 Oreo cookies. To increase the cream filling on 12 of them, transfer the cream from the other 12 cookies if using regular Oreos. Skip this if you are using Double Stuffed Oreos as they already have thicker frosting.
- Cut cookie halves for wings: Use a serrated knife to carefully cut 12 of the cookie sides without any frosting in half, creating 24 wings. Keep the extra 12 halves aside in case some break during assembly.
- Assemble ears and wings: Press two small chocolate triangles into the top of each Oreo’s cream filling for ears. Then, angle two cookie halves into the sides of the Oreo to resemble bat wings. Use melted chocolate wafers to secure wings and ears if needed.
- Stack cookies: Add a drop of melted chocolate to the cream center, then gently place another cookie without frosting on top and press gently to sandwich the bat wings and ears securely.
- Attach candy eyes: Using a toothpick, apply melted chocolate to the back of each candy eye and carefully glue them onto the front of the assembled Oreos to complete the bat face.
Notes
- If some wings break while cutting, use the extra halves set aside for replacements.
- Double Stuffed Oreos are recommended for easier assembly since they have extra cream filling.
- Melt chocolate wafers carefully in short bursts in the microwave, stirring frequently to prevent burning.
- Allow assembled bats to set at room temperature for the melted chocolate to harden before handling or serving.
Nutrition
- Serving Size: 1 bat
- Calories: 180
- Sugar: 18g
- Sodium: 120mg
- Fat: 9g
- Saturated Fat: 5g
- Unsaturated Fat: 3g
- Trans Fat: 0g
- Carbohydrates: 24g
- Fiber: 1g
- Protein: 2g
- Cholesterol: 5mg


