
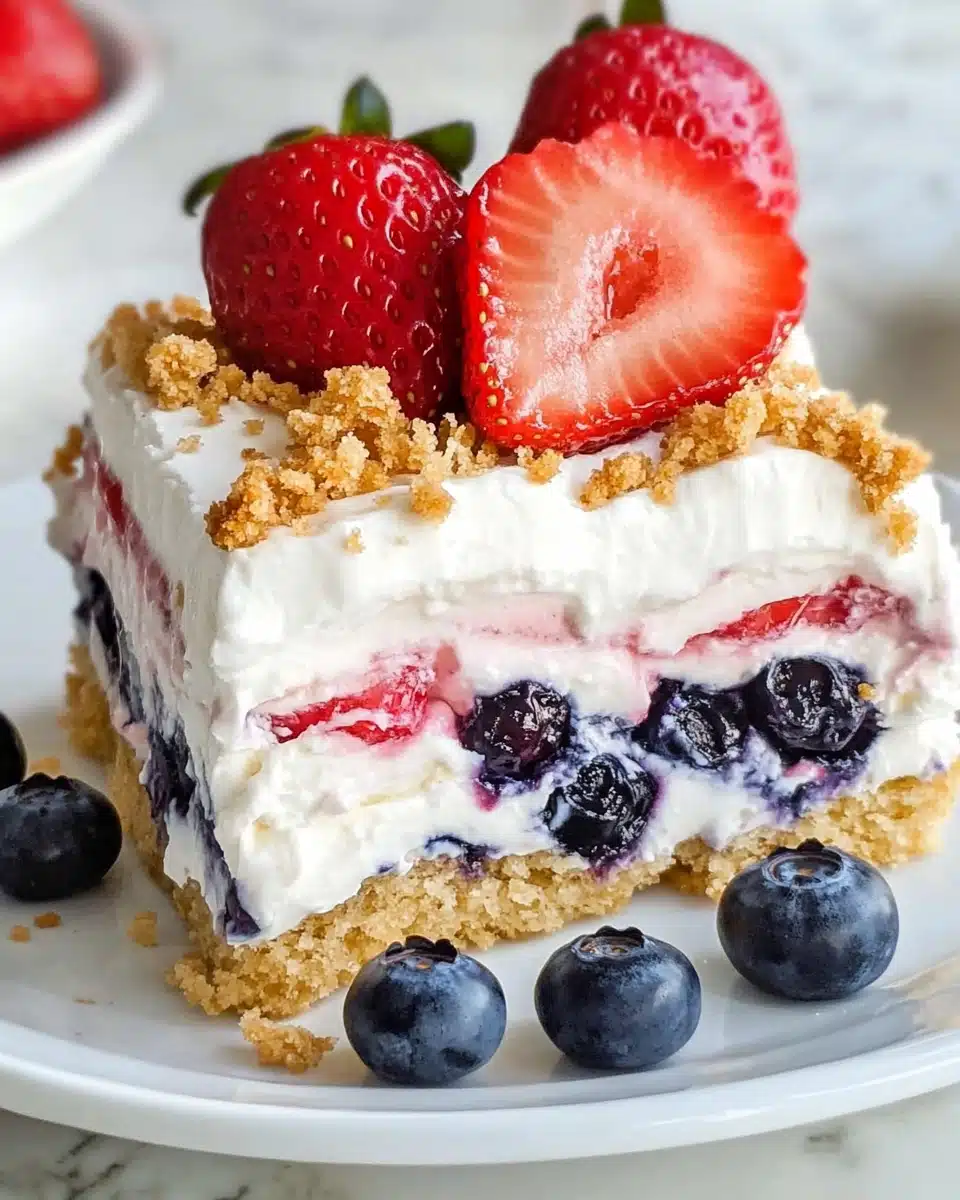
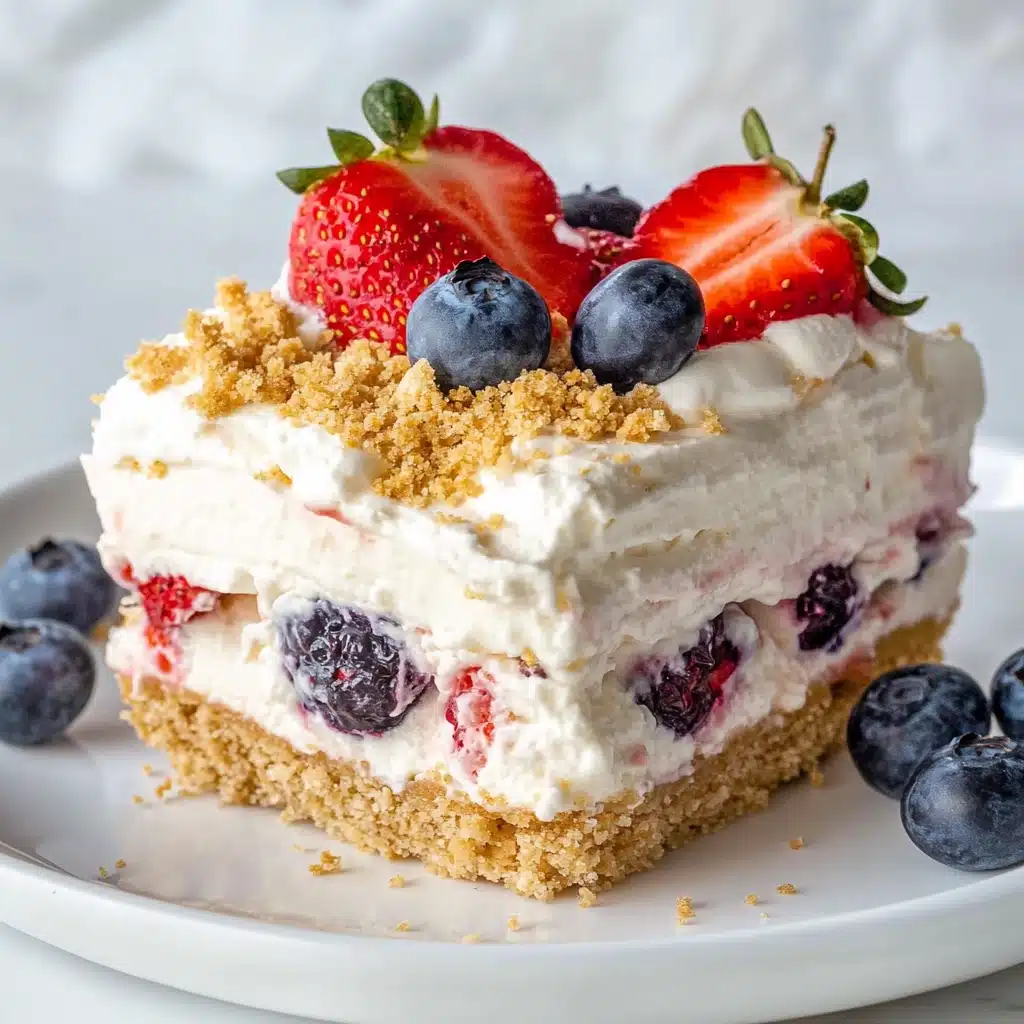
Berry season celebrations just aren’t complete without something stunning, simple, and totally irresistible—enter No-Bake Berry Lush! Imagine layers of creamy cheesecake filling, juicy fresh berries, and a buttery vanilla wafer crumb base, all coming together in a dessert that requires exactly zero oven time. This recipe is one of those crowd-pleasers I find myself making on repeat, and I promise: you’re about to fall in love.
Why You’ll Love This Recipe
- No-Bake Magic: You won’t even have to turn the oven on, making this treat a summertime staple (and perfect for last-minute parties!).
- Lusciously Creamy & Fruity: Each layer brings a delightful contrast—creamy cheesecake filling, soft cookies, fluffy whipped topping, and bursts of fresh, juicy berries.
- Gorgeous Presentation: This dessert looks festive and irresistible straight from the fridge, with vibrant berries on top and beautiful layers when sliced.
- Make-Ahead Friendly: No-Bake Berry Lush tastes even better after a little chill time, so you can prep it in advance and focus on enjoying your get-together.

Ingredients You’ll Need
One of the best things about No-Bake Berry Lush? The ingredient list is delightfully short and familiar, but each component adds its own delicious element—crunch, creaminess, sweetness, or a hit of fresh tang. Here’s what brings the magic together:
- Vanilla Wafer Cookies: These form the buttery, sweet base—plus, a few extra for crumbling on top adds texture!
- Butter: Melted butter holds your cookie crumbs together and brings rich flavor to every bite.
- Cream Cheese: For a tangy, creamy layer that mimics classic cheesecake (let it soften for smoothest results).
- Powdered Sugar: This dissolves perfectly in the filling and sweetens without any graininess.
- Vanilla Extract: Just a splash for depth and warmth through the creamy layers.
- Whipped Topping: Fluffy and stable, it keeps the filling dreamy and light—plus, makes for a gorgeous top layer.
- Fresh Berries: Use a colorful assortment of strawberries, blueberries, raspberries, or blackberries for juicy bursts of flavor and visual wow-factor.
Variations
No-Bake Berry Lush is the ultimate blank canvas, so feel free to play! You can tweak the ingredients to suit your cravings, diet, or simply what’s in your fridge. Here are some fun ideas to get you started:
- Cookie Swap: Try graham crackers or chocolate wafer cookies for a different flavor vibe in the crust.
- Lighter Version: Use reduced-fat cream cheese, light whipped topping, and fewer cookies for a lighter treat that’s still incredibly satisfying.
- Go Nuts: Add a thin layer of toasted sliced almonds or chopped pecans between the layers for delightful crunch.
- Dairy-Free: Substitute non-dairy cream cheese and coconut whipped topping—plus, gluten-free cookies—to make it allergy-friendly.
How to Make No-Bake Berry Lush
Step 1: Crush and Press the Cookie Base
Start by placing your vanilla wafer cookies into a large ziptop bag. Gently crush them with a rolling pin until they’re fine, sandy crumbs—this part’s surprisingly therapeutic! Pour the crumbs into your baking pan, add the melted butter, and stir well. Press the mixture down to make a firm, even layer. This buttery base will hold everything together and give each bite that wonderful cookie crunch.
Step 2: Mix Up the Creamy Cheesecake Layer
In a mixing bowl, beat together the softened cream cheese with powdered sugar and vanilla until completely smooth—go for silky, lump-free perfection here! Gently fold in one container of whipped topping, keeping things light and airy. This heavenly mixture will be the star of your layers, bringing both creaminess and sweetness.
Step 3: Slice Berries and Assemble Your Layers
Wash and dry your berries thoroughly; slice any larger strawberries to make sure every bite is easy to eat. Now for the fun part: spread half of the cream cheese filling evenly over the cookie crust, then scatter on half of the berries. Repeat with the remaining filling and berries for glorious color and texture in every slice.
Step 4: Top, Chill, and Serve
Smooth half of the remaining whipped topping over the very top. If you like, crumble a few more vanilla wafer cookies for a crunchy finish. Cover and refrigerate for at least one hour (longer is even better!) so everything sets up and flavors meld. When you’re ready, slice and serve up your No-Bake Berry Lush—admire those pretty layers!
Pro Tips for Making No-Bake Berry Lush
- Ultra-Smooth Filling: Always let your cream cheese fully soften to room temperature—it blends up dreamy, never lumpy!
- Berry Prep Secrets: Pat berries dry after rinsing so excess moisture doesn’t make layers watery or soggy.
- Chill Time Is Magic: For clean slices and the best flavor meld, let No-Bake Berry Lush chill for several hours or even overnight.
- Layer Like a Pro: If you want the prettiest presentation, reserve some perfect berries for decorating the very top just before serving.
How to Serve No-Bake Berry Lush
Garnishes
For a truly show-stopping finish, top your No-Bake Berry Lush with a few whole berries, a sprinkle of lemon zest, or even a little drizzle of honey. A handful of crushed vanilla wafer cookie crumbs or a dusting of powdered sugar looks gorgeous, too—go with whatever speaks to you and makes your dessert feel extra special.
Side Dishes
Since No-Bake Berry Lush is fruity and creamy, I love pairing it with a bright citrus salad or refreshing iced tea. For a truly celebratory dessert table, add other picnic classics like lemon bars, shortbread cookies, or even a tangy homemade sorbet—the tartness balances all that berry sweetness beautifully.
Creative Ways to Present
If you’re hosting a party, try spooning the layers into individual clear cups or mason jars for adorable single servings. Mini parfaits are perfect for potlucks! Alternatively, cut generous squares and plate them with a little mint leaf on top for a simple but elegant touch.
Make Ahead and Storage
Storing Leftovers
Cover the pan tightly with plastic wrap or a reusable lid and refrigerate any leftovers. No-Bake Berry Lush stays fresh and delicious for up to 3 days—though it rarely lasts that long in my house!
Freezing
You can freeze No-Bake Berry Lush for up to one month, though the berries may soften a bit upon thawing. For best results, wrap well and thaw overnight in the fridge before serving. It makes a great make-ahead treat for busy times (hello, holiday brunches!).
Reheating
No reheating needed—just let any frozen pieces thaw gently in the refrigerator. Serve cold, straight from the fridge, for the dreamiest creamy layers and fresh berry pop.
FAQs
-
Can I use frozen berries instead of fresh?
You can, but be sure to thaw them completely and drain off any extra juice to avoid making the layers soggy. Fresh berries hold their shape and color best, especially for the final presentation.
-
Can I make No-Bake Berry Lush ahead of time?
Absolutely! In fact, letting the dessert chill for several hours (or overnight) helps the flavors blend and the layers set, making it easier to slice and serve.
-
What berries work best in this recipe?
A mix of strawberries, blueberries, raspberries, and blackberries looks beautiful and provides a burst of different flavors, but use your favorites or whatever looks best at the market for a personalized touch.
-
Does No-Bake Berry Lush travel well for potlucks or picnics?
Yes! As long as it stays chilled (use a cooler if needed), the dessert holds up beautifully. Assemble it in a sturdy container and add any decorative toppings just before serving for best results.
Final Thoughts
If you’re hunting for a dessert that’s stunning, simple, and bound to get rave reviews, I can’t recommend this No-Bake Berry Lush enough. It’s become a beloved recipe in my kitchen, and I hope it brings all the same smiles, “oohs,” and “aahs” to your table. Enjoy every creamy, berry-filled bite!
Print
No-Bake Berry Lush Recipe
- Prep Time: 20 minutes
- Cook Time: 0 minutes
- Total Time: 1 hour 20 minutes
- Yield: 6 servings
- Category: Dessert
- Method: No-Bake
- Cuisine: American
- Diet: Vegetarian
Description
Indulge in the delightful flavors of summer with this easy No-Bake Berry Lush dessert. Layers of creamy goodness, fresh berries, and a buttery cookie crust make this a perfect treat for any occasion.
Ingredients
Cookies:
- 35 vanilla wafer cookies
- 5 tablespoons butter, melted
Cream Cheese Mixture:
- 8 oz cream cheese, softened
- 1 cup powdered sugar
- 1 1/2 teaspoons vanilla extract
- 2 (8 oz) containers whipped topping, thawed
Additional:
- 2 lbs fresh berries
Instructions
- Prepare Cookie Crust: Place cookies in a large ziptop bag and crush into crumbs with a rolling pin. Transfer crumbs to an 8-inch square baking pan. Add melted butter and stir to combine. Press mixture firmly into pan.
- Prepare Cream Cheese Mixture: In a large mixing bowl, combine cream cheese, powdered sugar, and vanilla. Beat with an electric mixer until smooth. Gently fold in one container of whipped topping.
- Assemble Layers: Slice larger berries if desired. Spread half of the cream cheese mixture over the cookie crumbs, then layer half of the berries. Repeat the layers.
- Final Touches: Top with the remaining whipped topping and crumble additional cookies over the top, if desired. Chill until ready to serve, at least 1 hour. Enjoy!
Notes
- You can use a mix of your favorite berries such as strawberries, blueberries, raspberries, or blackberries.
- Feel free to customize the sweetness by adjusting the amount of powdered sugar in the cream cheese mixture.
- This dessert can be made a day ahead and stored in the refrigerator.
Nutrition
- Serving Size: 1 serving
- Calories: 380
- Sugar: 28g
- Sodium: 240mg
- Fat: 25g
- Saturated Fat: 15g
- Unsaturated Fat: 8g
- Trans Fat: 0g
- Carbohydrates: 36g
- Fiber: 3g
- Protein: 4g
- Cholesterol: 55mg

