

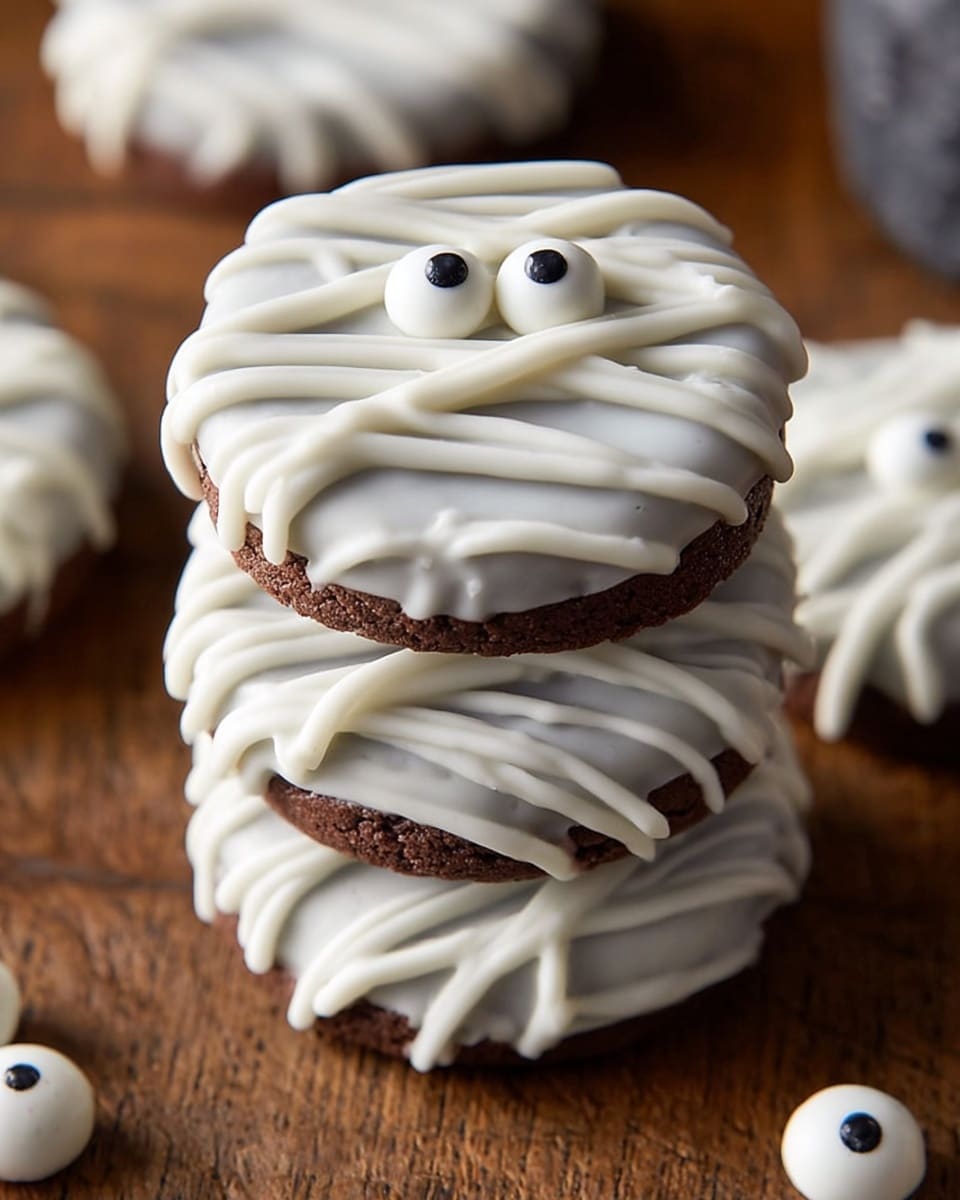
If you’re looking for a quick and adorable treat that’s guaranteed to make everyone smile, you’re going to fall in love with this Mummy Oreos Recipe. I absolutely love how these festive cookies come together with simple ingredients and give off such a fun, spooky vibe. Whether it’s for a Halloween party or just a playful snack, these mummy Oreos are show-stoppers that are surprisingly easy to whip up. Let’s dive into how you can make these in your own kitchen—and trust me, your family and friends will go crazy for them!
Why You’ll Love This Recipe
- Simple Ingredients: No need to hunt down fancy stuff—just Oreos, white chocolate, and candy eyes.
- Quick to Make: From melting the chocolate to the last drizzle, it takes under 30 minutes to prep.
- Kid-Friendly & Festive: Perfect for Halloween gatherings or even school parties—everyone loves a cute spooky snack!
- Customizable: You can easily switch up the eyes or chocolate colors to match any party theme.

Ingredients You’ll Need
These ingredients work perfectly together to create that classic mummy look with a sweet twist. When I shop for white chocolate chips, I usually opt for good quality ones because they melt smoother and taste creamier—which really makes the difference.
- White chocolate chips: Easy to melt and stick to Oreos; adding coconut oil helps with a silky finish.
- Coconut oil: Just a small amount to smooth out the melted chocolate and help with coating.
- Oreo cookies: Classic chocolate sandwich cookies are best—they hold up nicely when dipped.
- Candy eyes: These give the mummies their character; you can find them in most baking or craft stores around Halloween.
Variations
I love how flexible the Mummy Oreos Recipe is, so I often switch up elements based on what I have on hand or the occasion. Feel free to get creative here!
- Chocolate coating: Swap white chocolate for milk or dark chocolate if you prefer a richer taste—just adjust the candy eyes colors for contrast.
- Flavored Oreos: Try pumpkin spice or mint-flavored Oreos to add a seasonal twist to the treat.
- Candy decorations: Instead of candy eyes, mini M&Ms or edible pearls work great for eyes or extra accents if you want more color.
- Healthier option: Use yogurt-covered Oreos and dark chocolate drizzle if you want to tone down the sweetness a bit.
How to Make Mummy Oreos Recipe
Step 1: Melt the White Chocolate Perfectly
Start by combining your white chocolate chips and coconut oil in a microwave-safe bowl. Microwave at half power for 1 minute, then stir gently but thoroughly. It might not all be melted at this point, so pop it back in for 30-second intervals, stirring after each, until it’s silky smooth. I discovered that melting at half power prevents the chocolate from scorching and keeps it nice and creamy.
Step 2: Dip and Coat Each Oreo
Grab one Oreo at a time and dunk it into the melted white chocolate. Use a fork to flip it over and coat all sides—this helps the chocolate fully cover the cookie without making a mess. When you lift the Oreo out, gently tap the fork against the bowl’s edge to shake off excess chocolate. Then, place your chocolate-covered Oreo on parchment paper to set.
Step 3: Add the Candy Eyes
While the coating is still wet, place two candy eyes close together near the top center of each Oreo. This little detail really brings your mummy to life—my kids always insist on helping with this part because it’s so fun and easy!
Step 4: Create the Mummy Wrapping Drizzle
Take any leftover melted chocolate and scoop it into a small ziplock bag. Snip a tiny corner off to create a piping effect, and drizzle the chocolate back and forth across the Oreos, mimicking the mummy’s bandage wrapping. This is the step that turns simple dipped Oreos into these adorably spooky mummies.
Step 5: Let Them Set Completely
Give your Mummy Oreos about 15-20 minutes at room temperature to fully set, or pop them in the fridge if you’re in a hurry. Once firm, they’re ready to serve—or store for later.
Pro Tips for Making Mummy Oreos Recipe
- Use Half-Power Melting: Melting chocolate too fast can burn it—half power prevents that and keeps the texture silky.
- Work Quickly with Eyes: Add candy eyes right after dipping so they stick before the chocolate hardens.
- Drizzle With Care: When piping the drizzle, a small hole on the bag tip gives you more control and prettier lines.
- Avoid Over-Dipping: If your Oreos sit in chocolate too long, they can get soggy—dip swiftly and shake off excess.
How to Serve Mummy Oreos Recipe
Garnishes
I like to keep it simple with these mummies—just the candy eyes do the trick—but you can sprinkle some edible glitter or a pinch of crushed peppermint around for extra flair. For a spooky vibe, a little dusting of cocoa powder or black food coloring speckles works great too.
Side Dishes
Pair these sweet treats with a warm cup of hot chocolate or a glass of milk—it’s the perfect combo. If you’re doing a Halloween spread, some pumpkin-shaped sugar cookies or caramel apple slices complement these Mummy Oreos beautifully.
Creative Ways to Present
One year, I arranged these on a platter surrounded by cobweb decorations and used spooky cupcake liners to hold each cookie. Kids loved picking their “mummies” off the ghostly web! You could also stick them on lollipop sticks and wrap with a bit of tissue for a mummy “pops” effect—fun for parties or classroom treats.
Make Ahead and Storage
Storing Leftovers
I store leftover Mummy Oreos in an airtight container at room temperature—typically, they last up to 3 days before the chocolate starts to lose its sheen or the Oreos soften. For best texture, keep them away from humidity and heat.
Freezing
Freezing works surprisingly well if you need to prep in advance. Just layer the cookies with parchment paper in between and store them in a sealed container. When you’re ready, thaw at room temperature—it keeps that coating shiny and crisp.
Reheating
Since these are cookies coated in chocolate, I don’t recommend reheating in the microwave. If you want them a bit softer, just let them sit at room temperature for 10-15 minutes. They’re perfect as-is, no warm-up needed!
FAQs
-
Can I use different types of chocolate for the Mummy Oreos Recipe?
Absolutely! While white chocolate is classic for the mummy wrapping effect, you can use milk or dark chocolate depending on your taste preference. Just keep in mind that candy eyes might not pop as much on darker coatings, so consider using contrasting decorations.
-
How do I prevent the chocolate from seizing when melting?
Make sure to melt the chocolate slowly at half power and stir frequently. Adding a bit of coconut oil helps create a smooth consistency. Avoid any moisture contact with the chocolate, as even a small drop of water can cause it to seize.
-
Can I prepare Mummy Oreos in advance?
Yes! You can make these a day or two ahead. Store them airtight at room temperature or in the fridge and add the drizzle just before serving if you want them freshest. They also freeze well if you need to prep earlier, just thaw fully before serving.
-
Where can I find candy eyes?
Candy eyes are usually found at craft stores, baking aisles during Halloween season, or online. If you can’t find them, you can make your own by piping tiny dots of white chocolate with a miniature dot of dark chocolate on top.
Final Thoughts
When I first made this Mummy Oreos Recipe, I was amazed at how such a simple idea could bring so much joy and laughter, especially with the little candy eyes staring back at us. It’s a fun kitchen project you can do with kids or friends, and the results are just plain adorable. Plus, you get to eat your creativity! I hope you’ll enjoy making these as much as I do—trust me, your next spooky party just found its perfect snack.
Print
Mummy Oreos Recipe
- Prep Time: 20 minutes
- Cook Time: 2 minutes
- Total Time: 22 minutes
- Yield: 12 servings
- Category: Dessert
- Method: Microwaving
- Cuisine: American
Description
Mummy Oreos are a fun and spooky treat perfect for Halloween or any themed party. These sweet snacks feature Oreo cookies dipped in creamy white chocolate, decorated with candy eyes and drizzled to resemble mummy wrappings. Quick and easy to make, they add a playful touch to your dessert table.
Ingredients
Ingredients
- 2 cups white chocolate chips
- 1 tsp coconut oil
- 12 Oreo cookies
- 24 candy eyes
Instructions
- Melt the Chocolate: Add the white chocolate chips and coconut oil to a small microwave-safe bowl and microwave at half power for 1 minute. Stir as much as you can to begin melting the chocolate.
- Continue Melting: Microwave in additional 30-second increments at half power, stirring between each, until the chocolate is completely smooth and melted.
- Dip the Oreos: Drop one Oreo at a time into the melted white chocolate. Use a fork to flip the Oreo over, ensuring it is fully coated on all sides with the chocolate.
- Drain Excess Chocolate: Lift the Oreo out of the chocolate using the fork, then gently tap the fork on the edge of the bowl to allow any excess chocolate to drip back into the bowl.
- Place to Set: Transfer the coated Oreo onto a piece of parchment paper to set.
- Add Candy Eyes: Place two candy eyes close together on each Oreo to give the appearance of mummy eyes.
- Let Set: Allow the chocolate to set completely at room temperature or in the refrigerator.
- Drizzle Wrappings: Scoop any remaining melted white chocolate into a ziplock bag or melt additional chocolate as needed. Snip a small corner of the bag and drizzle the chocolate over the Oreos to mimic mummy wrappings.
Notes
- If the chocolate starts to harden while drizzling, warm it gently to soften again.
- Use parchment or wax paper to prevent sticking during setting.
- You can store Mummy Oreos in an airtight container at room temperature for up to 3 days.
- For easier candy eye placement, use tweezers or place the eyes immediately after dipping before the chocolate hardens.
- Substitute white chocolate chips with almond bark or candy melts if preferred.
Nutrition
- Serving Size: 1 Oreo
- Calories: 160
- Sugar: 20g
- Sodium: 85mg
- Fat: 7g
- Saturated Fat: 5g
- Unsaturated Fat: 1.5g
- Trans Fat: 0g
- Carbohydrates: 22g
- Fiber: 1g
- Protein: 1g
- Cholesterol: 5mg


