
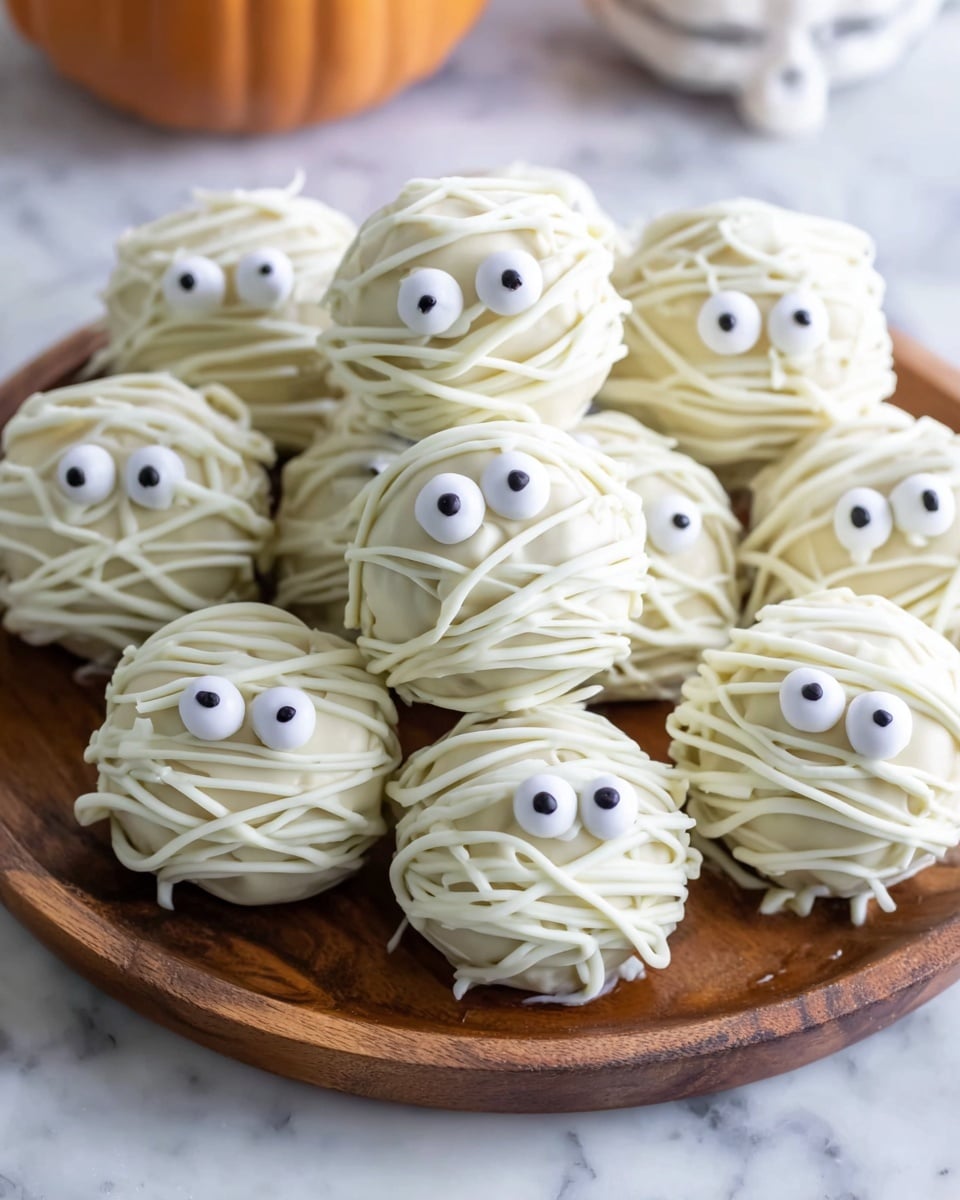
If you’re looking for a fun, spooky treat that’s as adorable as it is delicious, you’re going to absolutely love this Mummy Cake Pops Recipe. These little bundles of creamy, chocolatey goodness wrapped up like mummies are sure to be a hit at any party or just for a sweet snack at home. I remember the first time I made them, and how my family went crazy over the fun design combined with that perfect Oreo cream cheese center—seriously, they’re a total crowd-pleaser. Stick around, because I’m going to share everything you need to know to get these perfect every single time.
Why You’ll Love This Recipe
- Mess-Free Assembly: No baking required—just mix, chill, and dip, which makes this Mummy Cake Pops Recipe super easy for busy days.
- Perfect for Kids: The spooky eyeball sprinkles and white chocolate “bandages” turn these treats into a fun hands-on activity for little bakers (and adults too!).
- Rich, Creamy Flavor: The combination of crushed Oreos and cream cheese creates a luscious base that’s irresistible.
- Customizable: You can switch up the sprinkles, drizzle, or cookie choice to suit your occasion or taste preferences.

Ingredients You’ll Need
These ingredients come together beautifully to give you that creamy, sweet, and crunchy texture I love in mummy cake pops. Using full-fat cream cheese is key for consistency, and quality white chocolate really makes the coating silky smooth.
- Oreos: Classic Oreos crushed give that perfect chocolate cookie base, and you want them finely ground for even mixing.
- Cream cheese: Full-fat and softened to room temperature so it blends smoothly with the Oreo crumbs.
- White chocolate chips or chopped white chocolate: High-quality chocolate melts easier and provides a nicer finish.
- Vegetable or canola oil: Added to the chocolate to thin it out for easy dipping and shiny coating.
- Eyeball sprinkles: These little sprinkles are the star of the show and give your mummy cake pops their playful look.
Variations
I like to think of this Mummy Cake Pops Recipe as a fun canvas for creativity. Depending on who I’m making them for, I’ve switched up the cookie base, decoration style, and even the chocolate coating to keep things fresh and exciting. You can absolutely put your own spin on these guys.
- Dark Chocolate Twist: I tried coating the cake pops in melted dark chocolate instead of white for a richer, less sweet option. It still looks great with white icing “bandages” piped on top.
- Nut-Free Version: Swap out the vegetable oil for a light olive oil if you have allergy concerns while keeping the chocolate glossy.
- Vegan Adaptation: Use dairy-free cream cheese and vegan white chocolate chips to make a plant-based version—I’ve tested this and it works surprisingly well!
- Halloween Party Style: Add orange or black candy melts drizzled on top for an extra festive flair my kids loved last time.
How to Make Mummy Cake Pops Recipe
Step 1: Crush and Combine for the Perfect Base
Start by pulsing your Oreo cookies in a food processor until they’re broken down into fine crumbs. Don’t rush here—uniform crumbs really help your cake pops hold together better. If you’re without a processor, no worries: put the Oreos in a ziplock bag and crush them with a rolling pin or a heavy bottle—just be gentle so you don’t end up with big chunks. Then add the softened cream cheese and pulse until it looks like wet dough. If the cream cheese isn’t mixing well, cut it into smaller pieces before adding. This step sets the creamy texture that makes these pops irresistible.
Step 2: Shape, Chill, and Freeze
Use a 1 Tbsp cookie scoop or spoon to portion the dough into uniform balls. This keeps your mummy pops even-sized and pretty, which I find makes everything easier when dipping. Line them on parchment paper and pop them in the freezer for about 30 minutes until firm but not frozen solid. This chilling phase is crucial—it helps the cake pops stay intact when dipped later.
Step 3: Melt, Thin, and Coat with Chocolate
Get your white chocolate melting gently in short bursts (I do 15 seconds at a time) and stir constantly so it doesn’t scorch. Stir in the oil to thin it out. This makes the chocolate coating smooth and glossy, which I swear gives these pops their professional look. Dip the chilled Oreo balls one at a time, gently pressing them into the chocolate to coat fully. Use forks to lift and tap off excess chocolate—this helps keep the coating even and neat. While the chocolate is still wet, press two cute eyeball sprinkles onto each ball to bring those mummy faces to life.
Step 4: Add the Finishing Touch – Chocolate Bandages
Pop the remaining white chocolate into a small piping bag, warm it just until mostly melted, then snip a tiny corner and drizzle it over each mummy cake pop to create the signature bandage lines. I discovered this little trick the first time I made these—it really elevates the look from “cookie ball” to “adorable mummy.” Let them set in the fridge for at least 15 minutes before storing.
Pro Tips for Making Mummy Cake Pops Recipe
- Keep Them Cold: If your cake pops start to soften during dipping, just pop them back in the freezer for 5-10 minutes before continuing.
- Oil Your Chocolate: Adding vegetable or canola oil thins the chocolate and keeps it silky smooth—trust me, it makes coating so much easier.
- Uniform Size: Using a cookie scoop helps keep all your mummy pops a similar size, which not only looks nicer but ensures even chilling and dipping.
- Alternative Eyes: Out of eyeball sprinkles? Melt a bit of dark chocolate and pipe tiny dots for eyes—it’s a quick, effective hack.
How to Serve Mummy Cake Pops Recipe

Garnishes
For a festive touch, I love adding a light dusting of edible glitter or using colored sugar sprinkles around the base to create a little “spooky graveyard” vibe. You could also use shredded coconut tinted with green food coloring for a grassy effect if you’re serving these at a Halloween party.
Side Dishes
These cake pops pair beautifully with a warm cup of spiced apple cider or a creamy hot chocolate. If you’re throwing a Halloween party, mini pumpkin muffins or caramel popcorn make excellent sides that your guests will love alongside these treats.
Creative Ways to Present
I’ve had tons of fun presenting these mummy cake pops stuck into pumpkins or foam blocks covered with black fabric to look like they’re popping out of the dark. You can also tie small raffia bows around the sticks for a cute, rustic look or serve them in a jar decorated with Halloween-themed stickers.
Make Ahead and Storage
Storing Leftovers
I always store leftover mummy cake pops in an airtight container in the fridge to keep that cream cheese filling fresh. I found that they stay perfectly moist and delicious for up to a week. Just make sure they’re completely set before storing to keep the chocolate coating intact.
Freezing
If you want to prep in advance, these freeze really well! Place them on a parchment-lined tray first to freeze individually so they don’t stick together, then transfer them to a sealed container or freezer bag. When you’re ready, thaw them in the fridge overnight for best texture and flavor.
Reheating
Since these are cream cheese-based with a chocolate coating, I don’t recommend microwaving them directly. Instead, take them out of the fridge 15-20 minutes before serving so they can come to room temperature slightly—this softens the cream cheese just perfectly without melting the chocolate.
FAQs
-
Can I use other cookies besides Oreos for this recipe?
Absolutely! While Oreos provide a classic flavor and great texture for mummy cake pops, you can experiment with other chocolate sandwich cookies or even flavored cookies to customize your pops. Just be sure to crush them finely and adjust cream cheese amounts slightly if needed for the right dough consistency.
-
How long do mummy cake pops stay fresh?
Stored in an airtight container in the fridge, mummy cake pops stay fresh for up to one week. Because they contain cream cheese, it’s best not to keep them at room temperature for more than a few hours.
-
What if I don’t have a piping bag for drizzling the chocolate?
No worries! You can use a Ziplock bag and snip a tiny corner off to drizzle the chocolate. It works just as well and makes cleanup easy.
-
Can I make these mummy cake pops dairy-free?
Yes, swap the cream cheese for a dairy-free alternative and use vegan white chocolate chips. I’ve tried this variation and found the flavor lovely, though the texture might be a bit softer.
Final Thoughts
This Mummy Cake Pops Recipe has become one of my go-to treats whenever I want to impress friends or keep the kids entertained in the kitchen. It’s simple, quick, and just pure fun to make—and the best part is how delicious they turn out every time. Whether it’s for Halloween or just a treat-yourself moment, I wholeheartedly recommend giving these little mummies a try. You’ll find yourself coming back to this recipe again and again, just like I have!
Print
Mummy Cake Pops Recipe
- Prep Time: 5 minutes
- Cook Time: 15 minutes
- Total Time: 20 minutes
- Yield: 30 treats
- Category: Dessert
- Method: No-Cook
- Cuisine: American
Description
These adorable Mummy Cake Pops are a fun and spooky treat perfect for Halloween or any festive occasion. Made with crushed Oreo cookies mixed with cream cheese, then dipped in creamy white chocolate and decorated with cute eyeball sprinkles, they’re easy to make and irresistibly delicious. With no baking required, these bite-sized delights combine rich cookie flavor with smooth chocolate and a playful presentation that kids and adults will love.
Ingredients
Mummy Cake Pops
- 36 classic Oreo cookies – centers and all (400g)
- 1 cup (8 oz) full-fat cream cheese, room temperature (226g)
- 3 cups good-quality white chocolate chips or chopped white chocolate (525g)
- 2 tsp vegetable or canola oil (12g)
- 60 small eyeball sprinkles
Instructions
- Prepare the base mixture: Line a large, flat plate with parchment paper and set aside. Place 36 Oreo cookies in a food processor and pulse until broken down into fine, uniform crumbs. Add 1 cup of full-fat cream cheese and pulse until fully combined into a wet dough consistency. Scrape mixture as needed.
- Form cake pops: Using a 1 Tbsp cookie scoop, form about 30 uniform balls from the Oreo-cream cheese mixture. Place them onto the parchment-lined plate and freeze for 30 minutes to chill and firm up.
- Melt white chocolate: Melt 2 cups (350g) of white chocolate in a short, wide, heat-proof glass by heating in 15-second intervals stirring between until smooth. Stir in 2 tsp vegetable or canola oil to thin the chocolate for easier coating.
- Coat cake pops: Remove half of the chilled Oreo balls from the freezer. Dip each ball into the melted white chocolate, fully coating it. Use a fork to lift and tap off excess chocolate, then transfer back onto the parchment paper. Quickly press two eyeball sprinkles onto each coated ball while the chocolate is still wet. Repeat with remaining balls in batches.
- Decorate with drizzle: Place the remaining 1 cup of white chocolate chips into a small piping or Ziplock bag. Warm in the microwave in 15-second intervals until mostly melted, then gently massage to melt any lumps. Cut a small tip opening and drizzle the white chocolate over each cake pop to mimic mummy bandages.
- Set and store: Let the coated cake pops sit at room temperature for a few hours or place in the fridge for about 15 minutes to allow the chocolate to set. Store them in an airtight container in the fridge for up to one week.
Notes
- This recipe yields approximately 30 mummy cake pops using a 1 Tbsp scoop per pop. Adjust the size to increase or decrease yield.
- If cake pops soften during dipping, refreeze briefly or reheat the white chocolate for easier coating.
- A 1 Tbsp cookie scoop ensures uniformly sized cake pops for best appearance.
- If eyeball sprinkles are unavailable, use melted dark chocolate to create eyes.
- Refrigerate the cake pops for 15 minutes after coating to help the chocolate fully set before storing.
- Keep cake pops in an airtight container in the fridge for up to one week to maintain freshness.
Nutrition
- Serving Size: 1 cake pop
- Calories: 150
- Sugar: 15g
- Sodium: 70mg
- Fat: 9g
- Saturated Fat: 5g
- Unsaturated Fat: 3g
- Trans Fat: 0g
- Carbohydrates: 16g
- Fiber: 1g
- Protein: 2g
- Cholesterol: 15mg


