
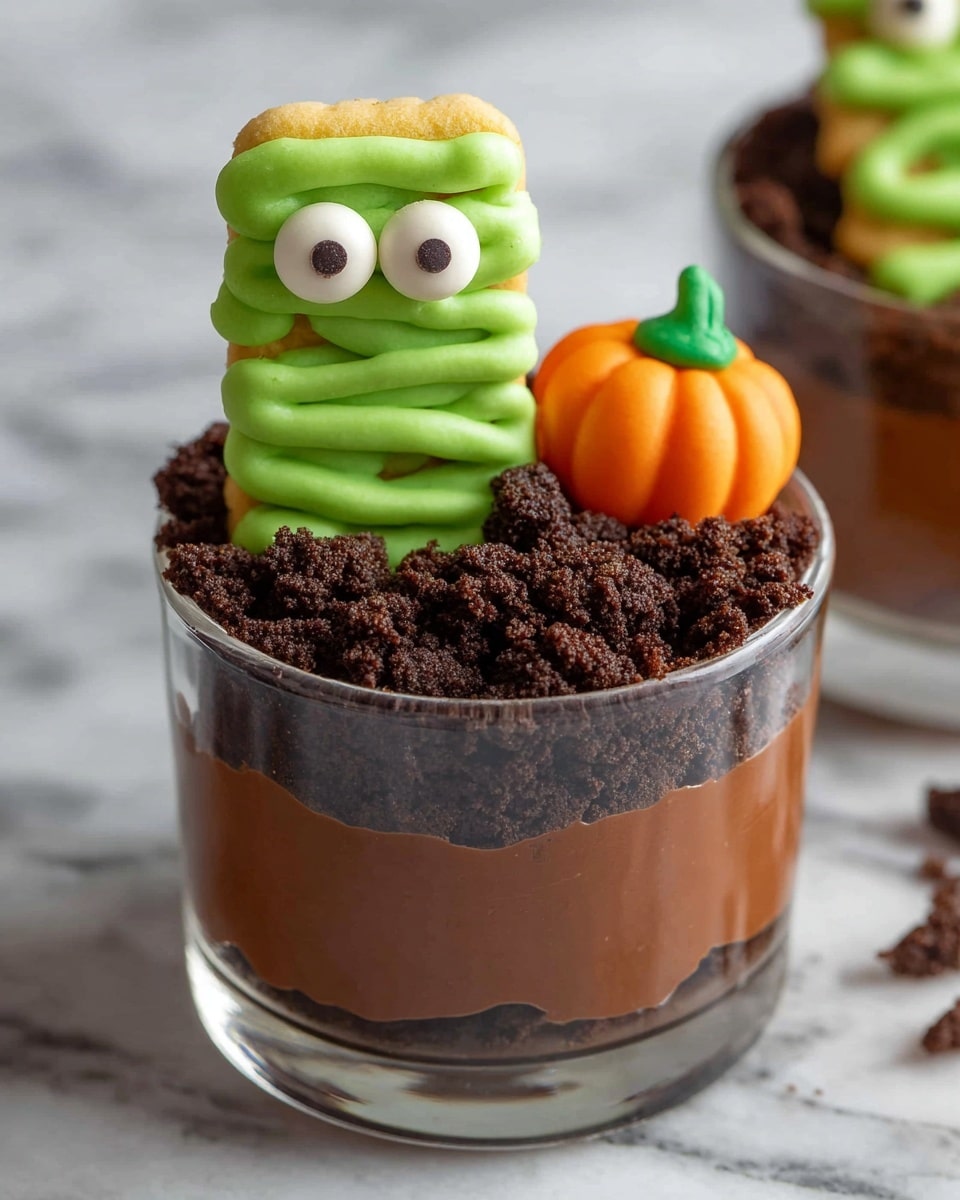
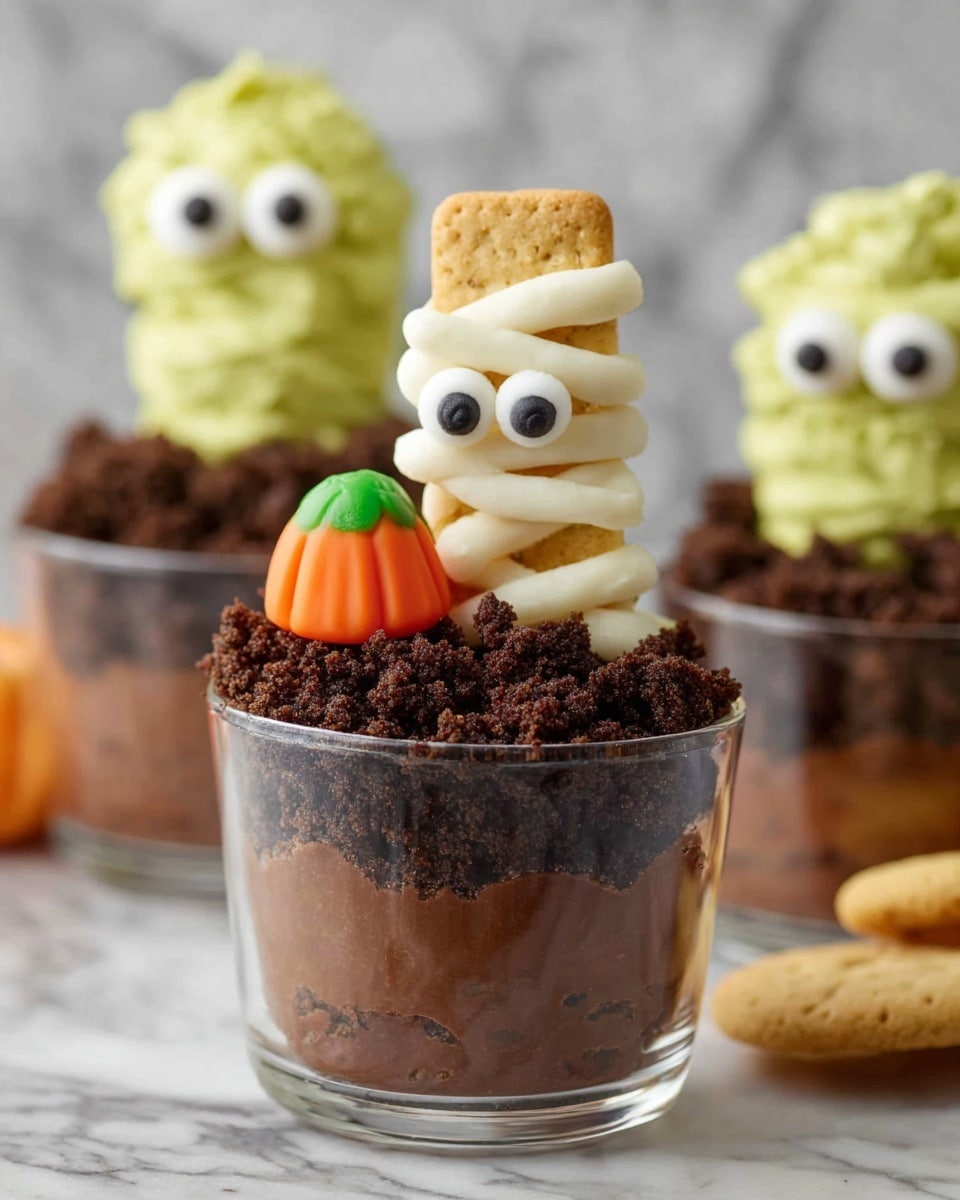
If you’re looking to wow the kids (and let’s be honest, adults too) this Halloween season, the Mummy and Monster Dirt Cups Recipe is an absolute must-try. These whimsical treats combine creamy chocolate pudding, crunchy cookie “dirt,” and spooky little mummies and monsters perched on top — it’s basically a party in a cup that everyone goes wild for. I love this recipe because it’s fun to make, easy enough to whip up on a school night, and instantly turns any dessert into a playful, festive masterpiece. Stick with me, and I’ll show you all the tips and tricks to get these just right!
Why You’ll Love This Recipe
- Kid-Friendly Fun: The spooky cookie toppers are a huge hit with kids, making dessert exciting and interactive.
- Simple Ingredients: You’ll find everything easily at your local grocery store without hunting for anything exotic.
- Quick Assembly: Once the spooky cookies set, the dessert comes together in minutes – perfect last-minute treats.
- Eye-Catching Presentation: These cups look impressive but require zero complicated skills – anyone can do it!

Ingredients You’ll Need
The magic happens when silky chocolate pudding meets the crunch of crushed cookies and those charming mummies and monsters made from candy-coated shortbread. Here’s everything you need to create the perfect balance of creamy, crunchy, and spooky.
- Walkers Shortbread Fingers: These buttery cookies make the perfect mummy and monster base because of their shape and texture.
- White candy melts or almond bark: This is what you’ll use to create the mummy wraps; easy to melt and pipe.
- Green candy melts: Perfect for coloring the monster cookies with a fun, creepy vibe.
- Sugar eyeballs: These little guys bring your monsters and mummies to life—don’t skip them!
- Instant chocolate pudding mix: The base for your creamy dirt, easy to prepare with cold milk.
- Cold nonfat milk: Use cold milk for pudding to set perfectly without lumps.
- Crushed chocolate cookies: I recommend Walker’s Scottie Dogs for a rich chocolate “dirt” effect, but any crunchy chocolate cookie works.
Variations
I love how you can make this recipe your own! Whether you’re working around allergies or just want to mix up the theme, there’s a way to tweak these dirt cups to fit your style.
- Non-Dairy Option: I swapped out regular milk for almond or oat milk once and it worked great for the pudding consistency.
- Color Switch-Up: Instead of green candy melts for monsters, I’ve used orange or purple for a different Halloween flair—super fun and eye-catching!
- Healthier Cookies: If you prefer, try whole grain or gluten-free cookies for the “dirt” to suit dietary needs without losing the crunch.
- Extra Toppings: Sometimes I toss mini chocolate chips or rainbow sprinkles on the “dirt” layer for added texture and fun.
How to Make Mummy and Monster Dirt Cups Recipe
Step 1: Create Your Mummies and Monsters
First things first, get your scary little creatures ready! Lay your Walkers Shortbread Fingers on parchment or wax paper on a cookie sheet—this keeps everything tidy. Melt your white and green candy melts separately according to the package directions. If the candy is a bit thick, add a teaspoon of shortening or oil to smooth it out—that’s a trick I discovered after some failed piping attempts.
Transfer the melted candy to sandwich bags, snip a tiny corner, and pipe the candy onto the cookies. For mummies, go with white candy and zigzag to mimic bandages. For monsters, coat the cookie in green and add some fun details—maybe little claws or fur-like lines. Don’t forget to stick your sugar eyeballs on before the candy sets—you want those eyes to pop!
Pop the tray into the fridge for about an hour so the candy sets firm. I’ve learned that patience here means you won’t ruin the delicate decorations when assembling the cups later.
Step 2: Whip Up the Chocolate Pudding “Dirt”
While your spooky cookies chill, mix up the pudding. Just follow the instant chocolate pudding box instructions: whisk the dry pudding mix with cold nonfat milk until smooth and thick. It sets up quickly, usually within a few minutes. For best success, whisk vigorously to avoid lumps – I usually use a hand whisk and keep at it until it feels velvety smooth.
Step 3: Assemble the Dirt Cups
Grab your serving cups (either glass or plastic if you want to make cleanup easy). Start by spooning in a generous layer of pudding. Then top with a thick layer of crushed chocolate cookies to create the “dirt.” Here’s where the magic comes in: gently nestle a mummy or monster cookie on top of each cup. The crunch of cookies combined with the creamy pudding is the ultimate treat.
Save the unassembled cups in the fridge and only add the decorated cookies just before serving to keep the mummies and monsters crisply intact.
Pro Tips for Making Mummy and Monster Dirt Cups Recipe
- Smooth Candy Melts: Adding a little shortening helps the candy melt easier and pipes more cleanly without clumps.
- Eyeball Placement: Add sugar eyeballs while the candy is still wet, so they stick properly without sliding off.
- Cookie Crush Consistency: Aim for chunks instead of powder when crushing cookies – the texture makes the “dirt” more realistic and delicious.
- Assembly Timing: Keep decorated cookies separate until serving to avoid sogginess and preserve that perfect crunch.
How to Serve Mummy and Monster Dirt Cups Recipe
Garnishes
My favorite garnish is adding a little extra sugar eyeball or two peeking out of the cookie dirt, just to amp up the creepy effect. Sometimes I sprinkle a tiny pinch of edible glitter for some “magic dust” sparkle or toss a few mini chocolate chips on top of the dirt layer for a little crunch contrast.
Side Dishes
I usually serve these with a light snack like apple slices dipped in peanut butter or a simple fruit salad — that way the dessert remains the star without too much heaviness on the side. Plus, fresh fruit balances out the sweetness beautifully.
Creative Ways to Present
One time, I used mini clear mason jars and tied a little orange ribbon around each for a festive touch at a kids’ party. Another idea is layering the pudding, cookie dirt, and crushed candy corn for colorful layers beneath the mummies and monsters. If you’re feeling extra crafty, use small cookie cutters to cut the shortbread fingers into bats or witches for themed parties.
Make Ahead and Storage
Storing Leftovers
You can store the pudding and cookie layers in sealed cups in the fridge for up to 2 days, but remember to keep the decorated shortbread cookies separate to preserve their crunch and appearance. When you’re ready to serve, add the mummies and monsters fresh — they’ll look and taste their best this way.
Freezing
I don’t recommend freezing assembled dirt cups because the pudding texture changes, and your cookie toppers might get soggy once thawed. However, you can freeze the individual shortbread cookies (uncoated) for up to a month and decorate them after thawing for fresh treats anytime.
Reheating
Since these are served cold and rely on creamy pudding, reheating isn’t necessary. I like to prep everything chilled for maximum freshness and texture. If you happen to store assembled cups a bit too long, just stir the pudding gently to restore smoothness before serving.
FAQs
-
Can I use homemade pudding instead of instant for this Mummy and Monster Dirt Cups Recipe?
Absolutely! Homemade pudding works beautifully here and adds a personal touch. Just make sure it’s thick enough to hold up under the cookie dirt. Chill it well before assembling, so it sets nicely in the cups.
-
How long can I make the cookies ahead of time for decorating?
You can decorate the shortbread fingers up to 24 hours in advance and keep them in an airtight container in the fridge. This is great for spreading out your prep, especially if you have kids helping out!
-
What’s the best way to crush the chocolate cookies for the “dirt”?
I prefer smashing cookies in a zip-top bag with a rolling pin so you get a mix of fine crumbs and little chunks for authentic texture. Avoid over-processing, which can leave your dirt powdery and less fun.
-
Can I make this recipe gluten-free?
Yes! Just swap out the Walkers Shortbread Fingers and chocolate cookies for your favorite gluten-free versions. The rest of the ingredients are naturally gluten-free, and your spooky monsters will be just as tasty.
-
How do I keep the candy melts from getting clumpy?
Melting candy melts gently in short bursts (like 20-30 seconds) in the microwave and stirring well between helps prevent clumps. Adding a teaspoon of vegetable shortening or coconut oil can also thin the candy, making it easier to pipe smoothly.
Final Thoughts
I absolutely love how this Mummy and Monster Dirt Cups Recipe brings a bit of magic and fun to any Halloween gathering. When I first made these, my whole family went crazy for both the look and the taste — especially the kids who loved helping decorate the cookies. The best part? It’s so easy and doesn’t require any fancy baking skills, which means you get to enjoy more time with your loved ones instead of stressing in the kitchen. Give this a try and watch your dessert table transform into a spooky delight that everyone will keep asking for year after year!
Print
Mummy and Monster Dirt Cups Recipe
- Prep Time: 30 minutes
- Cook Time: 0 minutes
- Total Time: 1 hour 30 minutes
- Yield: 6 servings
- Category: Dessert
- Method: No-Cook
- Cuisine: American
- Diet: Vegetarian
Description
Mummy and Monster Dirt Cups are a fun and spooky dessert perfect for Halloween parties or festive gatherings. These creative treats feature chocolate pudding topped with crushed chocolate cookies resembling dirt, and are decorated with whimsical mummy and monster cookies made by piping colorful candy melts. Easy to assemble and delightfully creepy, these dirt cups are sure to be a hit with kids and adults alike.
Ingredients
Cookies for Decoration
- 8 Walkers Shortbread Fingers
- 1 cup White candy melts or almond bark (for mummies)
- 1 cup Green candy melts (for monsters)
- 16 Sugar eyeballs
Dirt Cups
- 1 (3.4 ounce) box instant chocolate pudding mix
- 2 cups cold nonfat milk
- 9 crushed chocolate cookies (1 box Chocolate Walkers Scottie Dogs or similar)
Instructions
- Prepare Monster and Mummy Cookies: Lay the shortbread fingers out on a parchment- or wax-paper-lined cookie sheet. Melt the white and green candy melts separately according to package directions, adding shortening or oil if needed for smooth melting. Transfer melted candy into sandwich bags and cut off a tip for piping. Use white candy to pipe mummy wrap designs onto some cookies and green candy to pipe monster designs onto others. Add sugar eyeballs while the candy is still wet to create the eyes. Chill the decorated cookies in the refrigerator until the candy sets.
- Make Chocolate Pudding: Prepare the instant chocolate pudding by combining the pudding mix with the cold nonfat milk as directed on the box. Mix until thickened and smooth.
- Assemble Dirt Cups: Spoon prepared pudding into serving cups or glass dishes. Sprinkle a layer of crushed chocolate cookies on top to simulate dirt. Place one decorated monster or mummy cookie on top of each cup as a festive garnish. For easy cleanup, plastic cups can also be used.
- Chill and Serve: Store the assembled dirt cups in the refrigerator, but add the monster and mummy cookies just before serving to keep them crisp.
Notes
- To help the candy melts melt smoothly, adding a small amount of vegetable shortening or light oil is recommended.
- Store assembled dirt cups in the refrigerator but place the decorated cookies on top only right before serving to prevent them from becoming soggy.
- Use plastic cups for easy transport and cleanup when serving at parties.
- Customize cookie designs by adding different candy decorations or colors for more variety.
Nutrition
- Serving Size: 1 serving
- Calories: 280
- Sugar: 28g
- Sodium: 150mg
- Fat: 10g
- Saturated Fat: 6g
- Unsaturated Fat: 3g
- Trans Fat: 0g
- Carbohydrates: 40g
- Fiber: 2g
- Protein: 4g
- Cholesterol: 10mg
