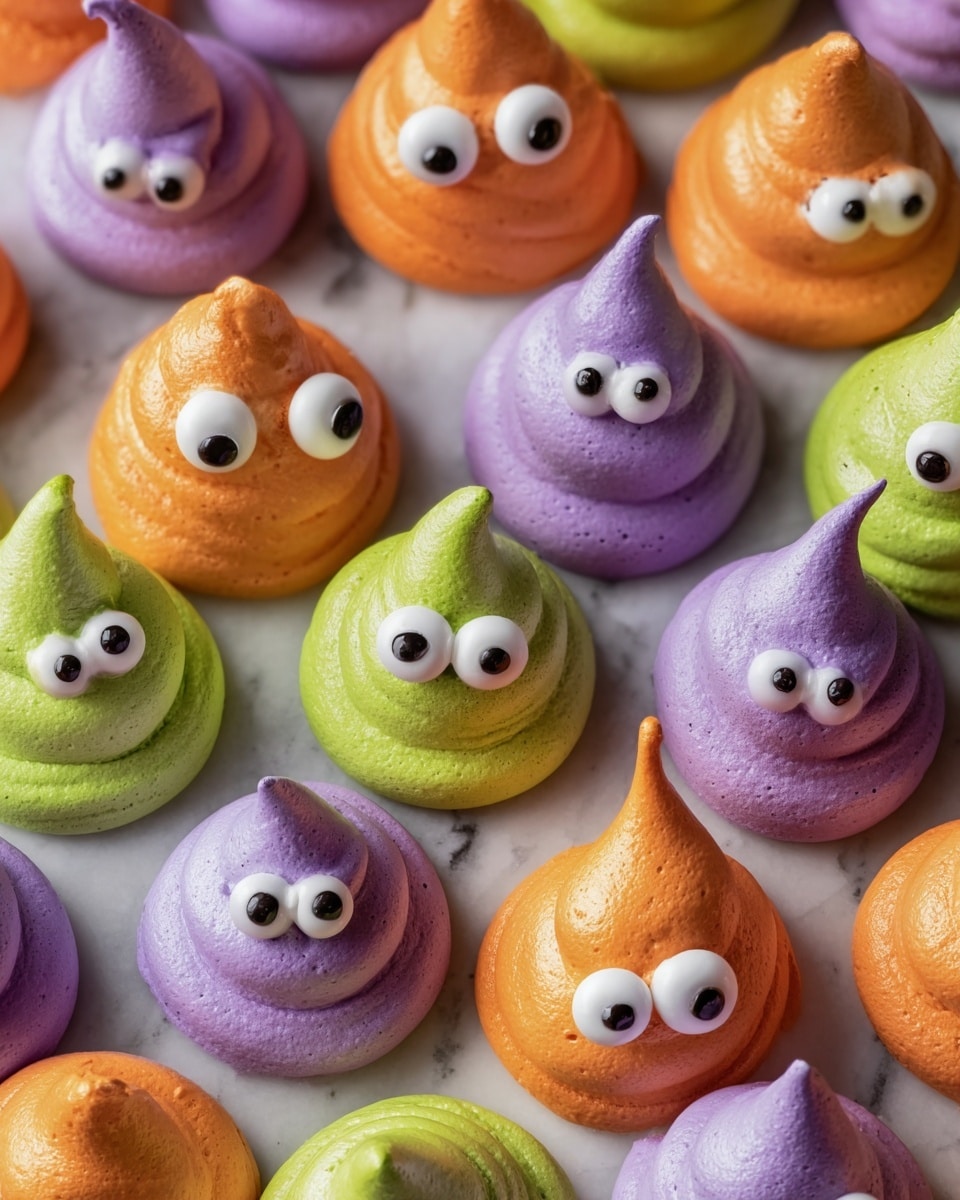
If you’re looking for a show-stopping sweet treat that’s as fun to make as it is to eat, then you’ve got to try this Monster Meringues Recipe. I absolutely love how these colorful, giant meringue “monsters” turn out – they’re crunchy on the outside with that perfect chewy center, and those playful candy eyes just bring them to life. When I first made them, I couldn’t believe how easy they were and how they brightened up any dessert table. Ready to whip up your own batch? Let’s dive in!
Why You’ll Love This Recipe
- Spectacularly Fun: You get these quirky, colorful meringues that bring so much joy to both kids and adults.
- Simple Ingredients: Just a handful of pantry staples that you probably already have on hand.
- Impressive Texture: A crunchy outside with a soft, chewy center that’s irresistible.
- Customizable Creativity: You can mix and match colors and shapes to create your own monster army!

Ingredients You’ll Need
These ingredients work together beautifully to create the perfect meringue texture and that fabulous glossy finish. I suggest using room-temperature egg whites—it helps get the fluffiest peaks. Also, superfine sugar dissolves better, resulting in a smoother meringue.
- Egg whites: Use fresh, large eggs and let the whites come to room temperature for better volume.
- Cream of tartar: Optional, but it really helps stabilize the egg whites and keep your meringue from collapsing.
- Superfine caster or granulated sugar: Go for superfine if possible — it dissolves faster and helps create that glossy finish.
- Vanilla or almond extract: Adds a subtle flavor boost, but don’t overdo it—just a hint is enough.
- Gel food coloring: Neon orange, purple, and green make these monsters pop visually — plus, gel coloring won’t affect your meringue’s stability like liquid colors can.
- Candy eyes: For that monster look! They’re fun and instantly turn these treats into little edible creatures.
Variations
I love that you can totally personalize the Monster Meringues Recipe based on your mood or the occasion. I usually stick to these bright colors, but sometimes I add swirls or mix in some cocoa powder for a chocolate twist. The fun part is making each monster your own creation.
- Chocolate Monster: Add 1-2 tablespoons of cocoa powder to the meringue before whipping for a mocha flavor your family adored last Halloween.
- Fruit Flavored: Try swapping the vanilla extract for a little lemon or orange zest to brighten up the flavors during springtime.
- Mini Monsters: For bite-sized fun, pipe smaller meringues and stack candy eyes to create tiny monster faces, perfect for parties.
- Vegan Version: Use aquafaba (chickpea liquid) instead of egg whites and follow the same process; I’ve tried this with great success!
How to Make Monster Meringues Recipe
Step 1: Prepare Your Workspace and Ingredients
Start by preheating your oven to a very low 200°F (93°C). Line a large baking sheet with parchment paper or a silicone mat—this will prevent your meringues from sticking and make removal a breeze. Before whipping, ensure your bowl and whisk are squeaky clean and grease-free; I discovered that even the slightest grease can ruin your meringue’s rise. A quick wipe with a vinegar-moistened paper towel does the trick.
Step 2: Whip the Egg Whites and Add Cream of Tartar
Whisk 4 large room-temperature egg whites on medium speed until you see small bubbles covering the surface — that’s your signal to add the cream of tartar (if using). Keep going until you reach soft peaks that leave visible tracks. This stage takes patience but trust me, it’s worth it for that stable base.
Step 3: Gradually Add Sugar and Extract
Adding sugar bit by bit is a game-changer. Toss in 1 tablespoon at a time while mixing on medium-low speed, giving each addition time to dissolve. This helps create glossy, stiff peaks that hold their shape perfectly. When your meringue is almost stiff, add your vanilla or almond extract and keep whipping until stiff, shiny peaks form.
Step 4: Color the Meringue
Scoop about a third of your meringue into a separate bowl and blend in a good squirt of green gel food coloring — just enough to tint it evenly. Then, transfer to a piping bag fitted with a large round tip (or snip the end for a ¾ inch opening). Repeat for neon purple and orange. I like how the gel coloring keeps the meringue stable, unlike liquid colors that risk making it too runny.
Step 5: Pipe Your Monster Meringues
Pipe dollops onto your baking sheet. I mix up the dollop sizes and layer a few to give some monsters extra height—this creates a fun variety of “creatures.” Since these won’t spread in the oven, you can space them about an inch apart. It’s like making your own little monster parade!
Step 6: Bake Low and Slow
Place your tray on the middle oven rack and bake for 2 hours. Then turn the oven off and keep the meringues inside for another hour. This gradual cooling step slows cracking and keeps a chewy center. If they feel too soft when cool, pop them back in for an extra hour. You’ll know they’re ready when they easily peel off the parchment and feel dry to the touch.
Step 7: Add Candy Eyes and Finish
Once cooled completely, it’s time to bring your monsters to life! Dab a little melted white chocolate on each meringue and stick on candy eyes — I usually add between one and three depending on how quirky I want the monster to look. They’ll hold for days and up to two weeks stored in an airtight container at room temperature.
Pro Tips for Making Monster Meringues Recipe
- Clean Equipment: I learned the hard way that any grease in your bowls or whisks will prevent the whites from whipping properly—wipe down with vinegar just to be safe.
- Room Temperature Egg Whites: Separating eggs cold but whipping them at room temp really helps maximize volume and ease of whipping.
- Slow Sugar Addition: Adding sugar slowly is the key to achieving those glossy stiff peaks that hold their shape well.
- Low and Slow Baking: I always keep the oven low and leave the meringues in after turning off the heat—it reduces cracking and gives that chewy texture.
How to Serve Monster Meringues Recipe
Garnishes
I love adding quirky candy eyes because it instantly transforms these into playful monsters. Sometimes I’ll drizzle a bit of melted chocolate or sprinkle colored sugar to give them extra personality. If you’re feeling festive, edible glitter or tiny sprinkles add a fun sparkle that kids adore.
Side Dishes
Monster Meringues are a perfect light snack or party treat, so I often serve them alongside fresh berries for a splash of juiciness, or even a scoop of vanilla ice cream for some contrasting creaminess. A cup of hot cocoa or coffee completes the cozy monster-munching experience.
Creative Ways to Present
For Halloween or kid’s parties, I love arranging the meringues on a platter and stacking them like little monster towers. You can also set up a “decorate your own monster” station with extra candy eyes, sprinkles, and edible markers to let guests get creative. It’s always a big hit!
Make Ahead and Storage
Storing Leftovers
Store your meringues in an airtight container at room temperature. I’ve found they keep beautifully for up to two weeks if kept dry. Just be sure to avoid humid environments because moisture can soften them too much.
Freezing
If you’re making monster meringues ahead, they freeze like a dream! Place them in a zip-top bag or airtight container separated by parchment paper to prevent sticking. When you want to enjoy, just thaw at room temperature for about 30 minutes.
Reheating
I usually don’t reheat meringues, but if you want to freshen them a bit, pop them in a low oven (around 200°F) for 5-10 minutes to crisp the shell again. Be careful not to leave them too long, or they can dry out completely.
FAQs
-
Can I use liquid food coloring instead of gel for Monster Meringues Recipe?
It’s best to avoid liquid food coloring because the extra moisture can destabilize your meringue, making it less likely to hold stiff peaks and pipe properly. Gel food coloring is more concentrated with less liquid, so it keeps the meringue’s structure intact.
-
Why isn’t my meringue forming stiff peaks?
Common culprits include grease on your bowl or whisk, egg whites that are too cold or include yolk traces, or adding sugar too quickly. Make sure your equipment is clean, whites are at room temperature, and add sugar gradually. Also, using cream of tartar can help stabilize your meringue.
-
How long can I store Monster Meringues?
Stored properly in an airtight container at room temperature, your monster meringues will last up to two weeks without losing their texture or flavor.
-
Can I make Monster Meringues Recipe vegan?
Yes! Aquafaba, which is the liquid from canned chickpeas, whips up similarly to egg whites. Use it as a one-to-one substitute for egg whites, and follow the same process for adding sugar and coloring. It’s a fantastic vegan alternative.
Final Thoughts
I’m genuinely thrilled every time I pull these Monster Meringues Recipe out of the oven – they always feel festive, whimsical, and just the right kind of sweet. Whether you’re baking for a party, a holiday, or just to treat yourself, these meringues are a fabulous way to add some extra fun to your kitchen adventures. Give it a go and don’t be afraid to get a little creative with your colors and shapes. I promise you, your family and friends will go crazy over these delightful monsters!