
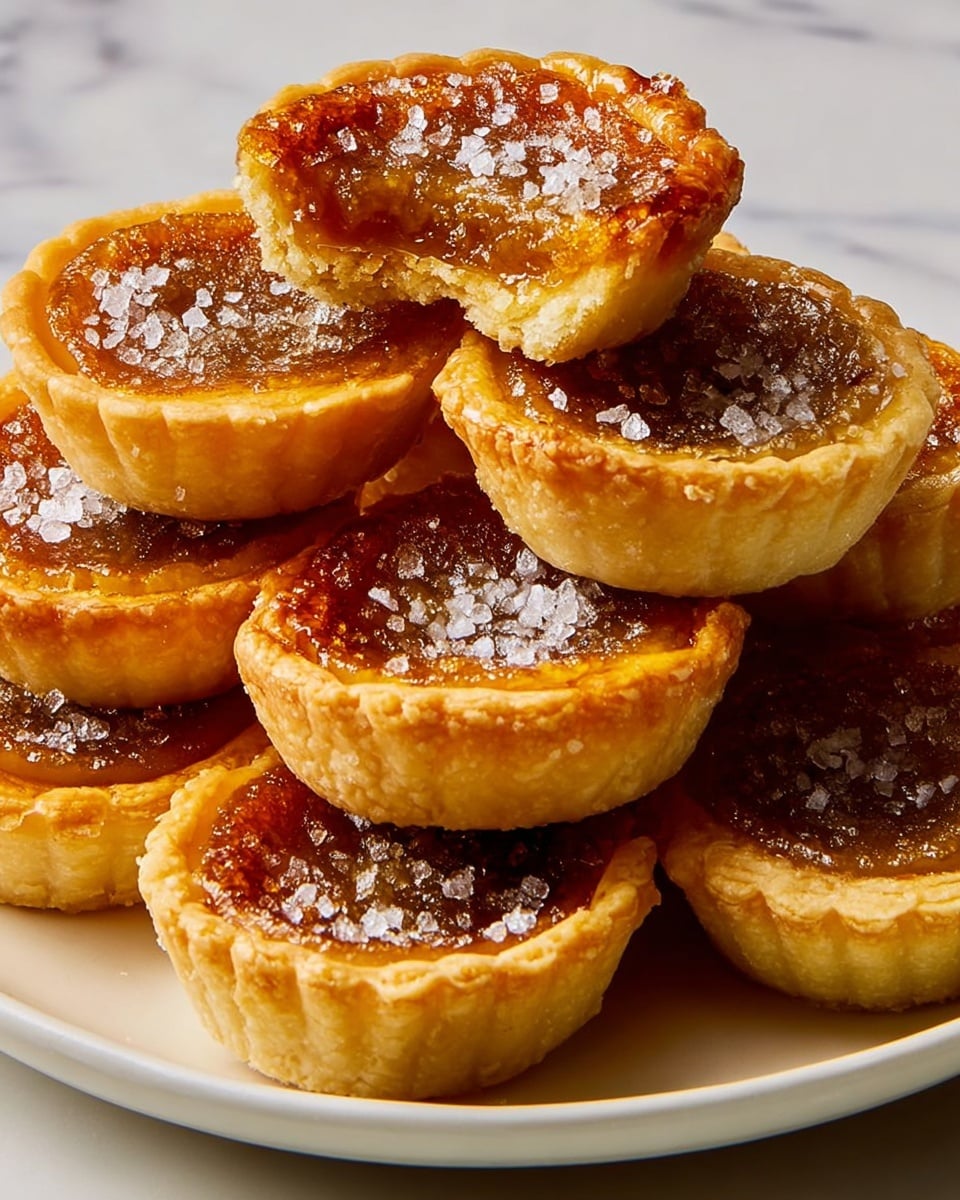
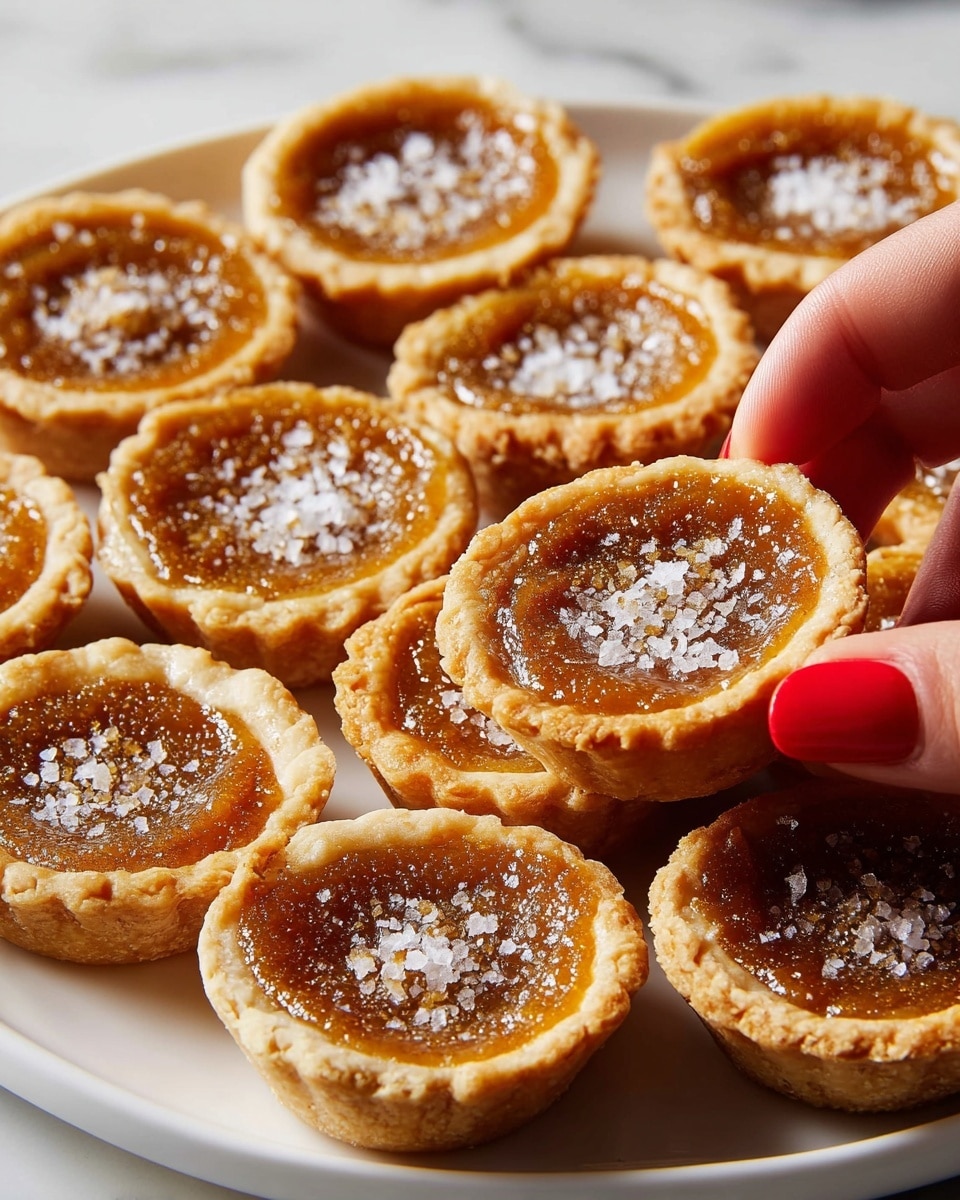
I absolutely love this Mini Salted Maple Pies Recipe because it perfectly delivers that cozy, buttery crust paired with a rich, nutty maple filling that has just the right hint of saltiness. Whether you’re hosting a brunch, looking for an easy dessert to impress at a potluck, or craving a warm treat on a chilly afternoon, these little pies hit the spot every time. They’re bite-sized, fuss-free, and packed with flavor—what’s not to love?
When I first tried this recipe, I was amazed at how simple ingredients came together to create something so special. You’ll find that the browned butter adds this deep, toasty aroma that elevates every bite, and sprinkling flaky sea salt on top brings out the sweetness beautifully. Trust me, once you make these Mini Salted Maple Pies, they’ll quickly become a go-to whenever you want to wow your friends or family with minimal effort.
Why You’ll Love This Recipe
- Perfect Balance of Flavors: The sweetness of maple syrup paired with flaky sea salt gives each bite a delightful contrast.
- Made with Easy Ingredients: You don’t need fancy pantry items—most are staples you probably have on hand or can grab easily.
- Great for Any Occasion: Whether it’s a casual snack or a holiday dessert, these mini pies always get rave reviews.
- Make-Ahead Friendly: The filling can be prepped a day early, making your baking day much less stressful.

Ingredients You’ll Need
These ingredients work seamlessly together to create a flaky crust and a luscious, browned butter-maple filling. If you’re using store-bought dough, it saves time without sacrificing flavor, and the little touches like cornmeal in the filling really add texture and depth.
- All-purpose flour: Great for dusting your work surface so the dough doesn’t stick while you roll it out.
- Store-bought or homemade pie dough: I’ve done this both ways and honestly, store-bought works beautifully and saves time.
- Unsalted butter: Essential for browning and controlling the salt level in your filling.
- Large egg: Helps bind the filling and gives a silky texture.
- Dark brown sugar: Adds a deep molasses flavor which is crucial for that caramelized note in the filling.
- Maple syrup: I prefer darker grades because their flavor is bolder and richer, which really makes a difference here.
- Heavy cream: Brings creaminess to the filling and balances the sweetness perfectly.
- Cornmeal: A small touch that gives a subtle grit and structure—don’t skip it!
- Kosher salt: Enhances all the flavors, especially important in a recipe that balances sweet and salty.
- Pure vanilla extract: Just a bit for warmth and complexity.
- Flaky sea salt: The crowning touch for that irresistible sweet-salty finish.
Variations
I love encouraging creativity, so don’t hesitate to personalize this Mini Salted Maple Pies Recipe. You can easily adjust the sweetness, experiment with different crusts, or add fun mix-ins to make it your own.
- Nutty Twist: I sometimes sprinkle chopped pecans or walnuts on the filling before baking for an extra crunch and flavor boost.
- Vegan Option: You can swap butter with vegan butter and use a flax egg instead; I’ve tried this and the texture remains lovely.
- Spiced Variation: Adding a pinch of cinnamon or nutmeg to the filling warms up the flavor, great for fall vibes when I need a little seasonal flair.
- Gluten-Free Crusts: Using a gluten-free pie dough mix works well here and gives everyone a chance to enjoy these pies.
How to Make Mini Salted Maple Pies Recipe
Step 1: Roll out your dough and cut rounds
Start by lightly flouring your surface to prevent sticking, then roll out one round of your pie dough until it’s about 1/8 inch thick—thin enough to be crisp when baked but still sturdy. Use a fluted cutter or a drinking glass around 3 1/4 inches in diameter to cut out six even rounds. I find that keeping these rounds uniform helps everything bake evenly, so take your time here. Repeat the process with the second round of dough.
Step 2: Line the muffin tin and chill
Gently press each dough round into the cups of a standard 12-cup muffin tin, making sure to tuck the dough into every corner so your crust has nice edges. This step is key for that perfect pie shape. Pop the tin into the freezer for about 15 minutes to firm up the dough—this helps prevent shrinking or bubbling in the oven later on.
Step 3: Blind-bake the crusts
Before baking, preheat your oven to 400°F (200°C) and prick the bottom of each crust a few times with a fork—this stops it from puffing up. Bake until the crusts look dry on the bottom and the edges turn a light golden color, about 5 to 7 minutes. Let them cool to the touch, then lower your oven temperature to 350°F for the next step.
Step 4: Brown the butter and mix filling
In a small saucepan over medium heat, melt your butter and keep cooking it gently while stirring frequently until it turns golden brown and fills your kitchen with that amazing nutty aroma—usually about 4 minutes. This is one of my favorite parts because it makes the filling so rich. Allow the butter to cool for 5 to 10 minutes, then transfer it to a large mixing bowl. Add the egg, brown sugar, maple syrup, heavy cream, cornmeal, kosher salt, and vanilla extract. Whisk everything together until smooth and well combined.
Step 5: Fill crusts and bake
Spoon about 4 teaspoons of your luscious maple filling into each pre-baked crust cup. Make sure not to overfill or it might spill over during baking. Bake at 350°F for 12 to 15 minutes, or until the filling is bubbly and has golden edges. The first time I baked these, I eagerly watched the oven window because the aroma was irresistible! Once out, immediately sprinkle flaky sea salt on top for that perfect finishing touch.
Step 6: Cool completely before serving
Let the pies cool fully before you try to pop them out of the tin or serve. This sets the filling and makes them easier to handle. If you cut corners here like I did once (impatient as I was), the filling can be a bit messy or too soft. Patience with cooling really pays off for these delightful mini treats.
Pro Tips for Making Mini Salted Maple Pies Recipe
- Keep Dough Cold: Chilling the dough before baking helps maintain its shape and prevents sogginess.
- Don’t Skip Browning Butter: This step adds a richer, nuttier flavor that really makes these pies stand out.
- Use Flaky Sea Salt on Top: It creates a crunchy texture contrast and amplifies the maple sweetness.
- Watch Your Bake Times: Overbaking can dry out the filling, so keep a close eye from 12 minutes onwards.
How to Serve Mini Salted Maple Pies Recipe
Garnishes
I usually keep it simple with a generous sprinkle of flaky sea salt right after baking, but sometimes I like to add a tiny dollop of whipped cream or a light dusting of cinnamon sugar when serving for an extra touch of indulgence. Those garnishes make them feel a little more special when I’m serving guests.
Side Dishes
These mini pies pair perfectly with a hot cup of coffee or spiced chai. For brunch, I often serve them alongside fresh fruit or a yogurt parfait to balance the sweetness. My family also loves them after a cozy dinner with a simple scoop of vanilla ice cream.
Creative Ways to Present
I’ve tried arranging these mini pies on a rustic wooden board lined with parchment paper for casual gatherings, and for holidays, I like to use decorative cupcake liners in the muffin tins to add color and flair. For even more fun, sprinkle some finely chopped toasted nuts over the salt for a gourmet look that always impresses visitors.
Make Ahead and Storage
Storing Leftovers
I store leftovers in an airtight container in the fridge—these mini pies keep well for up to 3 days without losing their charm. Just be sure they’re fully cooled first to avoid soggy crusts. When I’ve done this, the texture stays surprisingly crisp and the filling remains soft and flavorful.
Freezing
Freezing works nicely if you want to prep ahead. I freeze the fully baked pies on a tray first, then transfer them into a freezer-safe bag. They can be stored for up to 2 months. When you’re ready to enjoy, just thaw in the fridge overnight and warm gently before serving.
Reheating
To reheat, I like to use a low oven (around 300°F) for 5-7 minutes to bring back the crispness of the crust without drying out the filling. Microwaving is tempting but can make the crust chewy, so the oven method is worth the extra minute or two.
FAQs
-
Can I make the pie dough from scratch for this Mini Salted Maple Pies Recipe?
Absolutely! While using store-bought pie dough saves time and works wonderfully, homemade dough adds that extra personal touch and flaky texture. Just be sure your dough is chilled well before rolling out and cutting, which helps maintain the structure during baking.
-
What can I substitute for cornmeal in the filling?
If you don’t have cornmeal, you can use finely ground almond meal or skip it altogether, though the filling might be slightly less textured. Cornmeal provides a subtle grit that helps thicken and add interest to the filling.
-
How important is the browned butter step?
Browning the butter is key for adding depth and nutty richness to the filling. It transforms the flavor from ordinary to extraordinary. I wouldn’t skip it if you want those classic mini salted maple pies flavors to shine through.
-
Can I prepare the filling ahead of time?
Yes! You can make the filling up to one day in advance and keep it refrigerated in an airtight container. When ready, give it a quick whisk before spooning it into the baked crusts and proceeding with baking.
-
How do I prevent the crust from getting soggy?
Blind-baking the crusts before adding the filling is essential to a crisp base. Also, chilling the dough before baking and baking at the right temperature helps the crust firm up and not absorb too much moisture from the filling.
Final Thoughts
These Mini Salted Maple Pies truly hold a special place in my recipe box because they’re such a delightful mix of simple ingredients and sophisticated flavor. Baking them feels like a little celebration every time, especially when I see how quickly they disappear! Whether you’re making them for a quiet weekend treat or a festive gathering, I’m confident you’ll love how they turn out—so go ahead, give this recipe a try and enjoy some sweet, salty magic in every bite.
Print
Mini Salted Maple Pies Recipe
- Prep Time: 30 mins
- Cook Time: 25 mins
- Total Time: 55 mins
- Yield: 12 mini pies
- Category: Dessert
- Method: Baking
- Cuisine: American
Description
These Mini Salted Maple Pies are delicate and buttery with a rich, golden browned butter filling infused with maple syrup and a touch of sea salt. Perfectly portioned in a muffin tin, these delightful treats combine flaky crusts with a sweet, nutty filling for an irresistible dessert or special snack.
Ingredients
Pie Dough
- All-purpose flour, for dusting
- 1 (14.1-oz.) package store-bought pie dough or 2 batches homemade pie dough (for 2 crusts)
Filling
- 3 Tbsp. unsalted butter
- 1 large egg
- 1/3 cup (71 g) packed dark brown sugar
- 1/4 cup maple syrup (preferably dark)
- 1 Tbsp. heavy cream
- 2 tsp. cornmeal
- 1/2 tsp. kosher salt
- 1/4 tsp. pure vanilla extract
- Flaky sea salt, for sprinkling
Instructions
- Prepare pie dough rounds: On a lightly floured surface, roll out one round of pie dough to 1/8″ thick. Using a 3 1/4″ fluted cutter or drinking glass, cut out 6 rounds. Repeat with remaining dough to yield 12 rounds total.
- Shape crusts: Press each dough round into the cups of a standard 12-cup muffin tin, ensuring the dough is tucked neatly into all corners of each cup. Place the tin in the freezer and chill for 15 minutes to firm up.
- Prebake crusts: Arrange an oven rack in the center and preheat the oven to 400°F. Use a fork to prick the bottom of each dough-lined cup several times to prevent bubbling. Bake for 5 to 7 minutes until the crust bottoms are dry and the edges turn a light golden color. Remove from oven and let cool until just cool to the touch. Then reduce oven temperature to 350°F for filling bake.
- Make browned butter: While crusts bake, melt butter in a small saucepan over medium heat. Reduce heat to medium-low and stir frequently until the butter turns golden brown and releases a nutty aroma, about 4 minutes. Remove from heat and allow to cool for 5 to 10 minutes.
- Mix filling: Transfer the browned butter to a large bowl. Add the egg, dark brown sugar, maple syrup, heavy cream, cornmeal, kosher salt, and vanilla extract. Whisk vigorously until the mixture is smooth and fully combined.
- Fill crusts: Spoon approximately 4 teaspoons of the maple filling into each prebaked pie crust cup, distributing evenly.
- Bake mini pies: Place the filled muffin tin back into the oven and bake at 350°F for 12 to 15 minutes, or until the filling is bubbly and golden around the edges. Remove from the oven and immediately sprinkle flaky sea salt on top of each mini pie. Allow pies to cool completely in the tin.
- Make ahead tip: The filling can be prepared up to one day in advance. Store it in an airtight container in the refrigerator until ready to use.
Notes
- Using dark maple syrup intensifies the rich flavor of the filling.
- Chilling the dough-lined tin before baking helps the crust hold its shape and prevents shrinking.
- Pricking the crust bottoms prevents bubbling and uneven baking.
- Be careful not to burn the browned butter; remove it from heat once it turns golden and smells nutty.
- Sprinkling flaky sea salt just after baking enhances the sweet-savory balance.
- If preferred, homemade pie dough can be used instead of store-bought.
- Mini pies can be stored in an airtight container at room temperature for up to 2 days or refrigerated for longer freshness.
Nutrition
- Serving Size: 1 mini pie
- Calories: 180
- Sugar: 10g
- Sodium: 130mg
- Fat: 10g
- Saturated Fat: 5g
- Unsaturated Fat: 4g
- Trans Fat: 0g
- Carbohydrates: 20g
- Fiber: 1g
- Protein: 2g
- Cholesterol: 40mg

