
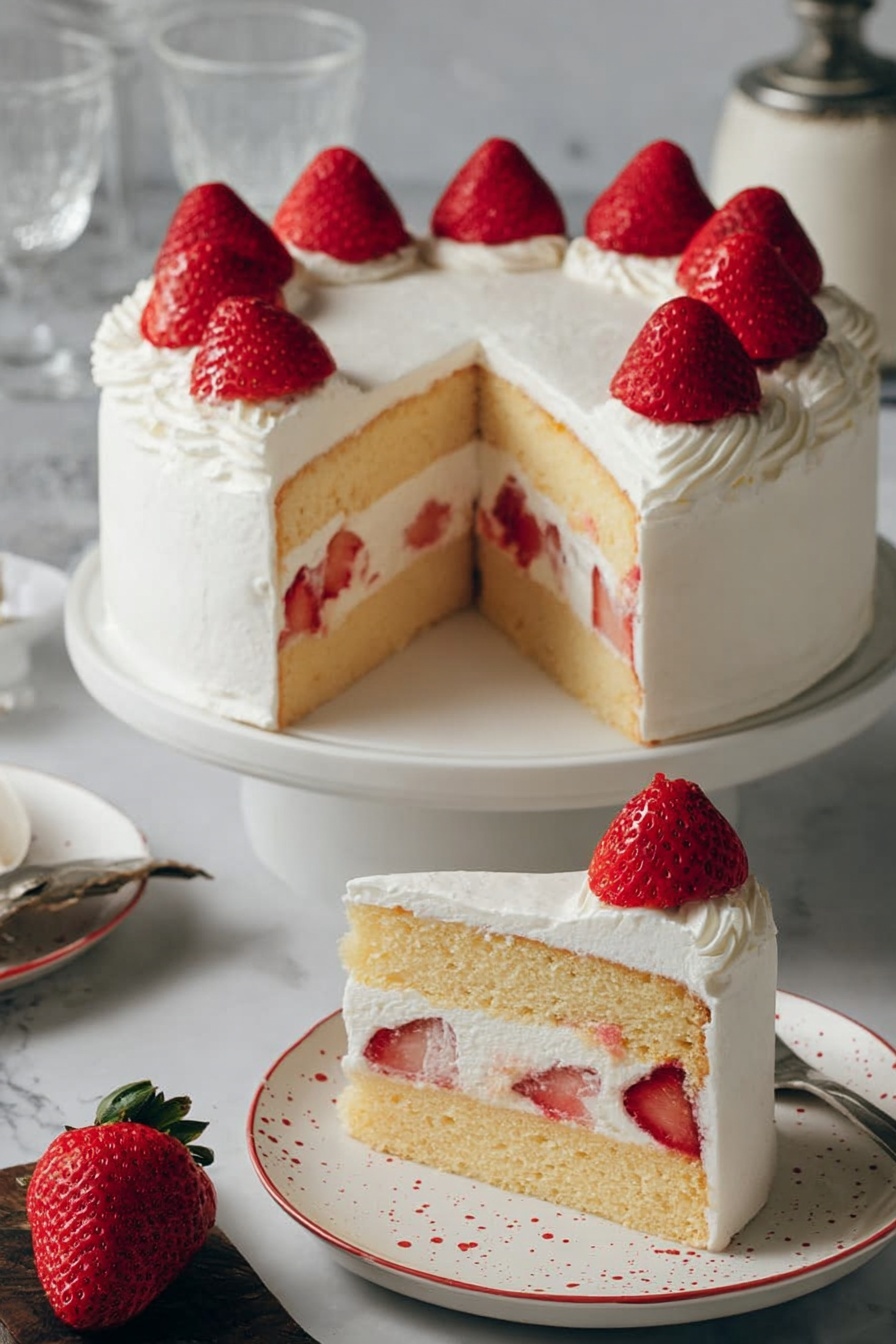
If you’re craving something light, fluffy, and bursting with fresh flavor, you’re in for a treat with this Japanese Strawberry Cake Recipe. I absolutely love how this cake combines tender sponge layers with silky whipped cream and juicy strawberries—it’s like a little cloud of happiness in every bite. Whether you’re celebrating a special moment or just want to wow your taste buds, this recipe will definitely become a favorite you’ll want to make over and over.
Why You’ll Love This Recipe
- Light and Moist Texture: The sponge cake is so airy and tender, it melts in your mouth without feeling heavy.
- Fresh Strawberry Flavor: Macerating the strawberries with sugar releases their natural sweetness, giving the cake a bright, juicy bite.
- Elegant Presentation: It looks deceptively fancy, perfect for impressing guests while actually being quite straightforward to make.
- Flexible Decorating: Whipped cream frosting is simple but can be styled beautifully, letting you personalize every cake.

Ingredients You’ll Need
The beauty of this Japanese Strawberry Cake Recipe lies in its simple, fresh ingredients working in harmony. Each component is straightforward, but together they build a wonderfully balanced cake. When shopping, try to pick the freshest strawberries you can find—they really make the difference!

- Whole Milk: Adds moisture and richness to the sponge, making the texture tender.
- Unsalted Butter: Keeps flavors clean and lets you control the saltiness.
- Cake Flour: Light and finely milled, perfect for that delicate crumb.
- Egg Yolks & Egg Whites: Separated for better structure and fluffiness in the cake.
- Sugar (caster preferred): Helps create a light meringue and sweetens the cake layers.
- Strawberries: Fresh and juicy for both the filling and decoration.
- Heavy Whipping Cream: Whipped for a smooth, creamy frosting that complements the cake texture.
- Confectioners Sugar: Keeps the whipped cream stable and smooth without graininess.
- Gelatin (Optional): Helps stabilize the whipped cream if you’d like it to hold longer without weeping.
- Cold Water: Used to bloom the gelatin.
- Sugar and Hot Water for Cake Syrup: Keeps the cake moist and adds a subtle sweetness.
Variations
I love how versatile this Japanese Strawberry Cake Recipe can be. I’ve experimented a bit and found some tweaks that really let you make this your own, whether you’re after something lighter, more decadent, or allergen-friendly.
- Use Stabilized Whipped Cream: Adding gelatin helps the frosting hold up better for parties or warmer climates—I’ve done this for outdoor summer celebrations and it works like a charm.
- Dairy-Free Version: Try substituting coconut cream for heavy cream and vegan butter in the cake; it’s not classic, but it’s surprisingly delicious.
- Flavor Infusions: I sometimes add a splash of vanilla or a bit of lemon zest to the cream for an extra pop of flavor.
- Berry Mix: Swap some strawberries with raspberries or blueberries to mix things up when strawberries aren’t at their peak.
How to Make Japanese Strawberry Cake Recipe
Step 1: Prepare the Sponge Batter with Care
Start by lining your 8” cake pan with parchment paper—this trick makes removing the cake so much easier later. Don’t skip the water bath: baking the cake in a water bath at a low 325°F temperature ensures the sponge comes out moist and delicate without browning too much. When mixing, be gentle; fold the beaten egg whites into yolks carefully to keep the batter airy—a light hand here is what makes the final cake so fluffy.
Step 2: Macerate the Strawberries for Maximum Sweetness
While the cake cools, slice fresh strawberries and sprinkle with sugar to let them release their juices. It’s amazing how this simple maceration brings out such natural sweetness and juiciness that perfectly balances the whipped cream. I like to reserve the syrupy liquid left behind—it adds subtle strawberry flavor when you brush it on the cake layers.
Step 3: Whip Up That Perfect Cream
Whipped cream is the star here, and whipping it to soft or firm peaks depending on your preference will give you that luscious texture. If you want your cream to hold shape longer, melting a bit of gelatin into the cream is a game changer, but it’s totally optional. Just keep an eye not to over whip, or the cream might start to separate—and nobody wants that!
Step 4: Assemble with Love and Attention
This is where it all comes together. Cutting the cake into thin even layers can feel intimidating, but marking your slices with toothpicks helps a ton. Brush each layer with syrup to keep things moist—the strawberry-soaked syrup adds a subtle fruity sweetness. Spread cream, layer in the strawberries, and finish with a smooth frosting layer using an offset spatula. If you want to get fancy, use the leftover cream to pipe decorative swirls on top. It’s so rewarding to see it come alive!
Pro Tips for Making Japanese Strawberry Cake Recipe
- Water Bath Magic: Don’t skip the water bath—this gentle baking method is key to that soft, tender crumb the cake is famous for.
- Egg Whites Folding: Always fold egg whites gently but thoroughly to avoid deflating your mixture; a few visible streaks are okay, but no big lumps!
- Strawberries Matter: Choose ripe, fragrant strawberries—sometimes the variety you pick affects your cake’s whole flavor experience.
- Cake Slicing: Use toothpicks as guides when slicing; it makes cutting thin, even layers less scary and far more precise.
How to Serve Japanese Strawberry Cake Recipe

Garnishes
I usually keep it simple by decorating the top with whole fresh strawberries—because honestly, they look gorgeous and taste great. Sometimes I add a few mint leaves or a light dusting of powdered sugar for a bit of extra elegance. It’s all about highlighting the cake’s bright, fresh character.
Side Dishes
This cake pairs wonderfully with a light cup of green tea or a subtly sweet iced tea to complement the creaminess. If you’re serving brunch, simple fresh fruit or a small scoop of vanilla ice cream makes a lovely partner without overpowering the delicate flavors.
Creative Ways to Present
For celebrations, I like using a rotating cake stand so I can pipe whipped cream rosettes all around the sides and top, adding little strawberry slices between them for a stunning effect. Layering the strawberries in a spiral on top creates a lovely visual centerpiece that always impresses! On casual days, a simple smooth finish and a few berries scattered on top are just as beautiful.
Make Ahead and Storage
Storing Leftovers
I keep leftover cake covered loosely with plastic wrap or in an airtight container in the fridge. It stays fresh for 2–3 days, though the strawberries might start to soften a bit. I always recommend enjoying it sooner rather than later since the whipped cream is best fresh.
Freezing
Freezing this cake isn’t ideal because the whipped cream and fresh strawberries don’t thaw well—they tend to get watery or lose texture. But, if you need to freeze, wrap it tightly and consume within a week. Just expect a slightly softer texture after thawing.
Reheating
You really don’t want to reheat this cake since it’s best served chilled or at room temperature. If it’s been refrigerated, letting it sit out for about 30 minutes to an hour helps the cream soften up and the flavors shine through better.
FAQs
-
Can I use frozen strawberries for the Japanese Strawberry Cake Recipe?
While fresh strawberries are ideal for this recipe due to their texture and flavor, you can use frozen strawberries if you thaw and drain them well first. Keep in mind that frozen berries release more juice and might make the cake a little wetter. Macerate them with sugar to help control moisture.
-
How do I stabilize the whipped cream for this cake?
You can stabilize whipped cream by dissolving 3/4 teaspoon of gelatin in 2 tablespoons of cold water, heating it until melted, and then softly folding it into the whipped cream just before it reaches soft peaks. This prevents it from weeping or losing shape, especially for warmer environments.
-
What’s the best way to slice the cake into layers?
Mark the height with toothpicks all around the cake as guides, then use a serrated knife to gently saw through the cake layers evenly. Taking your time here makes assembling much easier and more precise.
-
Can I avoid using a water bath when baking?
The water bath is key for the delicate cake texture and even baking. Without it, the cake risks drying out or browning too quickly. If you don’t have one, try baking at a lower temperature and check often, but results won’t be quite as fluffy and tender.
Final Thoughts
I remember the first time I made this Japanese Strawberry Cake Recipe—I was blown away by how effortlessly elegant it looked and how incredibly light it tasted. It’s that perfect balance of fluffy cake, fresh berries, and sweet cream that everyone loves, including my family who always asks for seconds. Give this recipe a try and I promise you’ll enjoy every step and bite just as much as I have. It’s a little piece of joy you can bring to any day!
Print
Japanese Strawberry Cake Recipe
- Prep Time: 1 hour
- Cook Time: 1 hour 30 minutes
- Total Time: 3 hours 30 minutes
- Yield: 8 servings
- Category: Dessert
- Method: Baking
- Cuisine: Japanese
- Diet: Vegetarian
Description
This Japanese Strawberry Cake is a delicate, light, and fluffy sponge cake layered with fresh macerated strawberries and whipped cream frosting. The cake is baked in a water bath to achieve its signature moist and tender crumb. Perfect for celebrations, this elegant dessert balances the sweetness of strawberries with cloud-like cream, offering a refreshing and visually stunning treat.
Ingredients
Cake
- 80 g (1/3 cup) whole milk
- 50 g (3 1/2 tablespoons) unsalted butter
- 75 g (1/2 cup + 1/2 tablespoon) cake flour
- 4 large egg yolks
- 4 large egg whites
- 70 g (5 1/2 tablespoons) sugar (caster sugar if available)
Strawberries
- 12 oz to 1 lb (340 g to 450 g) strawberries, divided
- 1 1/2 teaspoons sugar
Whipped Cream Frosting
- 280 g (10 oz) heavy whipping cream
- 2 tablespoons confectioners sugar
- 3/4 teaspoon gelatin (Optional)
- 2 tablespoons cold water (Optional)
Cake Syrup
- 2 tablespoons sugar
- 3 tablespoons hot water
Instructions
- Prepare the cake base: Cut parchment paper to fit the bottom of an 8-inch round cake pan and line the pan. Preheat the oven to 325°F (160°C). Prepare a water bath by using a high-walled pan that fits your cake pan, and boil water for it. If using springform or removable-bottom pan, wrap with foil to prevent leaks.
- Make the batter: Combine milk and butter in a heatproof bowl and microwave until melted; stir to combine. Sift cake flour into the mixture and gently mix until smooth. Add egg yolks and mix until evenly combined.
- Beat egg whites: In a clean bowl or stand mixer, beat egg whites at medium-high speed until frothy. Gradually add sugar while continuing to beat until glossy, medium peaks form.
- Incorporate egg whites: Fold 1/4 of the beaten whites into the yolk mixture until smooth. Pour this mixture back into the remaining egg whites and fold gently until just smooth, avoiding overmixing and large egg white pieces.
- Bake the cake: Pour batter into the lined cake pan, drop the pan twice from 5 inches height to remove large bubbles. Place the pan in the water bath, add an inch of hot water around it, and bake for 1 hour 30 minutes until a skewer comes out clean and cake pulls away from sides. Do not open the oven before 1 hour.
- Cool the cake: Run a knife along the pan edge, flip the cake onto a cooling rack, and let it cool completely.
- Prepare macerated strawberries: Slice 8 oz (225 g) strawberries into 1/4 inch slices. Toss with sugar and let sit for 1 to 2 hours until glossy. Remove strawberries, reserve the soaking liquid.
- Make cake syrup: Stir sugar with hot water until dissolved. Optionally, add reserved strawberry liquid for extra flavor and a slight pink hue.
- Prepare the whipped cream: For stabilized cream (optional), bloom gelatin in cold water for 5 minutes, then melt it gently. Whip heavy cream and confectioners sugar until very soft peaks. Mix a scoop of cream into melted gelatin, then combine with the rest of the cream and whip briefly until soft peaks form, avoiding overwhipping. For regular cream, simply whip cream and sugar to firm peaks.
- Assemble the cake: Measure cake height, mark cutting points with toothpicks, and slice off the browned top. Cut the cake horizontally into two even layers. Place the bottom layer on a cake stand, brush with syrup. Invert the top layer, brush with syrup as well.
- Add cream and strawberries: Spread a thin layer of whipped cream over the bottom layer, arrange macerated strawberries evenly, then cover with another thin layer of cream. Top with the second cake layer, aligning carefully.
- Finish frosting: Apply cream on top and around the sides, smoothing with an offset spatula. Add an additional thicker layer of cream on top and sides. Optionally, pipe extra cream for decoration.
- Decorate and chill: Decorate the cake with remaining strawberries. If using stabilized cream, refrigerate uncovered for at least 30 minutes to set. If using regular cream, serve immediately or refrigerate and serve within a few hours.
- Serving: Slice the cake using a serrated knife after chilling. For the best texture with stabilized cream, allow the cake to return to room temperature for about an hour before serving.
Notes
- If you do not have a spinning cake stand, use an inverted bowl or cake pan with a flat plate or removable pie pan bottom on top to simulate one.
- Be cautious not to overmix the batter or egg whites to maintain fluffiness.
- Do not open the oven during the first hour of baking to prevent the cake from collapsing.
- Stabilized cream helps maintain shape for longer display times but should be whipped shortly before decorating.
- The strawberry soaking liquid can be added to the cake syrup for enhanced flavor, but it may tint the cake layers pink slightly.
Nutrition
- Serving Size: 1 slice (about 1/8 of cake)
- Calories: 320 kcal
- Sugar: 25 g
- Sodium: 50 mg
- Fat: 20 g
- Saturated Fat: 13 g
- Unsaturated Fat: 6 g
- Trans Fat: 0 g
- Carbohydrates: 28 g
- Fiber: 1 g
- Protein: 5 g
- Cholesterol: 135 mg


