
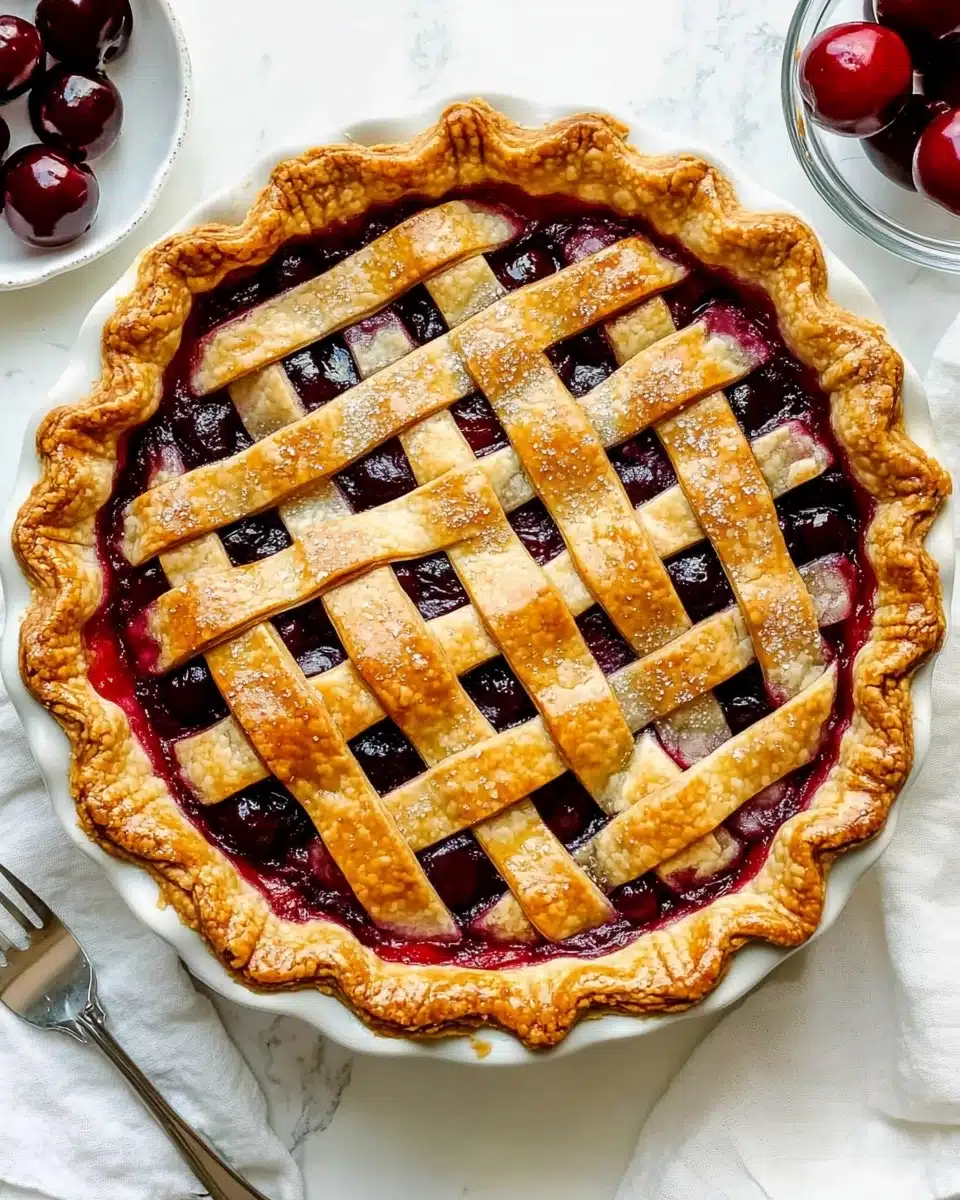
There’s just something magical about a slice of homemade cherry pie: tender, flaky crust encasing a ruby-red tart-sweet cherry filling bursting with juicy flavor! This Homemade Cherry Pie Recipe captures everything you love about summer and cozy baking in every irresistible bite.
Why You’ll Love This Recipe
- Juicy, Flavorful Cherries: This recipe lets the natural taste of fresh cherries shine—each bite is packed with fruit-forward goodness.
- Perfectly Flaky Crust: The all-butter (or homemade) crust bakes up golden and tender, providing the ultimate foundation for that luscious filling.
- Easily Customizable: With simple swaps for the cherries and tweakable sweetness, you can tailor your pie to any palate or season.
- Bake-Ahead Friendly: From make-ahead dough to freezer-friendly pie, this one is perfect for planning ahead for holidays or summer gatherings.

Ingredients You’ll Need
The beauty of this Homemade Cherry Pie Recipe is in its simplicity. Every ingredient brings something special—crisp layers, a gooey, jewel-toned filling, and just the right hint of brightness and warmth.
- Homemade Pie Crust or All Butter Pie Crust: You’ll need two crusts—one for the bottom and one for the classic lattice top. Go homemade for the best flavor, or use a trusted store-bought crust to save time.
- Fresh Cherries (4½ cups, halved and quartered): The star of the show! Use a mix of halved and quartered sweet cherries (or a blend of sweet and tart) for unbeatable texture and flavor.
- Granulated Sugar (⅔ cup): Just enough sweetness to balance out the tang—increase slightly for tart cherries if you like it sweeter.
- Cornstarch (¼ cup): This is your secret weapon for a luscious, sliceable filling that isn’t runny.
- Lemon Juice (1 Tbsp): A splash brightens up every note of cherry with a subtle citrus zing.
- Pure Vanilla Extract (1 tsp): Adds cozy, rich undertones that round out the filling.
- Almond Extract (¼ tsp): Just a whisper of almond takes the flavor from classic to unforgettable.
- Cold Unsalted Butter (1 Tbsp, cubed): Dotted over the filling to add extra richness and silkiness.
- Egg Wash (1 large egg + 1 Tbsp milk): The secret to a golden, shiny, bakery-style top crust.
- Optional: Coarse Sugar for sprinkling: A simple finishing touch that gives sparkle and sweet crunch.
Variations
The Homemade Cherry Pie Recipe is easy to personalize, so don’t be shy—play with flavors, fillings, and crusts to make it all your own or fit any dietary need.
- Mixing Cherry Varieties: Try half dark sweet cherries and half Rainier or even tart cherries for a deeper, more complex flavor.
- Frozen Cherries Option: No fresh cherries? Frozen works perfectly! Add them straight from the freezer, no need to thaw—just keep an eye on the bake time, which may be slightly longer.
- All-Butter, Gluten-Free, or Store-Bought Crust: Use your favorite ready-made crusts, or try a gluten-free pie dough to suit your needs.
- Spiced Cherry Pie: Add a pinch of cinnamon or a dash of cardamom for warmth and spice in every slice.
How to Make Homemade Cherry Pie Recipe
Step 1: Prepare the Pie Dough
Whether you’re making your own all-butter pie crust or using a trusted store-bought option, start by preparing the dough according to the recipe instructions. For homemade dough, let it chill for at least two hours in the fridge. The cold dough is important for that famously flaky, tender crust—trust me, it’s worth the wait!
Step 2: Make the Cherry Filling
In a large bowl, gently stir together your fresh cherries, sugar, cornstarch, lemon juice, vanilla, and almond extract. Cover this fruity mixture and let it chill in the refrigerator while you roll out the bottom crust. This sets the foundation for that gorgeously thick and glossy cherry layer inside your pie.
Step 3: Roll Out the Bottom Crust & Assemble the Pie
On a floured surface, roll out one disk of pie dough into a 12-inch round. Carefully fit it into your 9-inch pie dish, pressing it gently into place. Using a slotted spoon, scoop the cherry mixture (just the cherries!) into the crust; set aside the remaining juice.
Step 4: Reduce the Juices
Pour the reserved cherry juices into a small saucepan and cook over low heat for about 3–4 minutes, stirring gently, until slightly thickened. Allow it to cool for five minutes, then drizzle over the cherries in the pie shell. Gently toss—don’t worry if the reduction thickens; that’s exactly what helps bind the filling. Dot the cold butter pieces on top of the cherries and place the pie in the fridge while you roll out the top crust.
Step 5: Lattice the Top Crust
Take your second disk of chilled dough and roll it out into another 12-inch round. Cut the dough into wide and narrow strips to create a beautiful lattice pattern. Weave them over and under one another for that classic bakery look, then press the ends into the bottom crust and crimp the edges. A sprinkle of coarse sugar over the egg-washed top makes for a truly dazzling finish!
Step 6: Bake and Cool
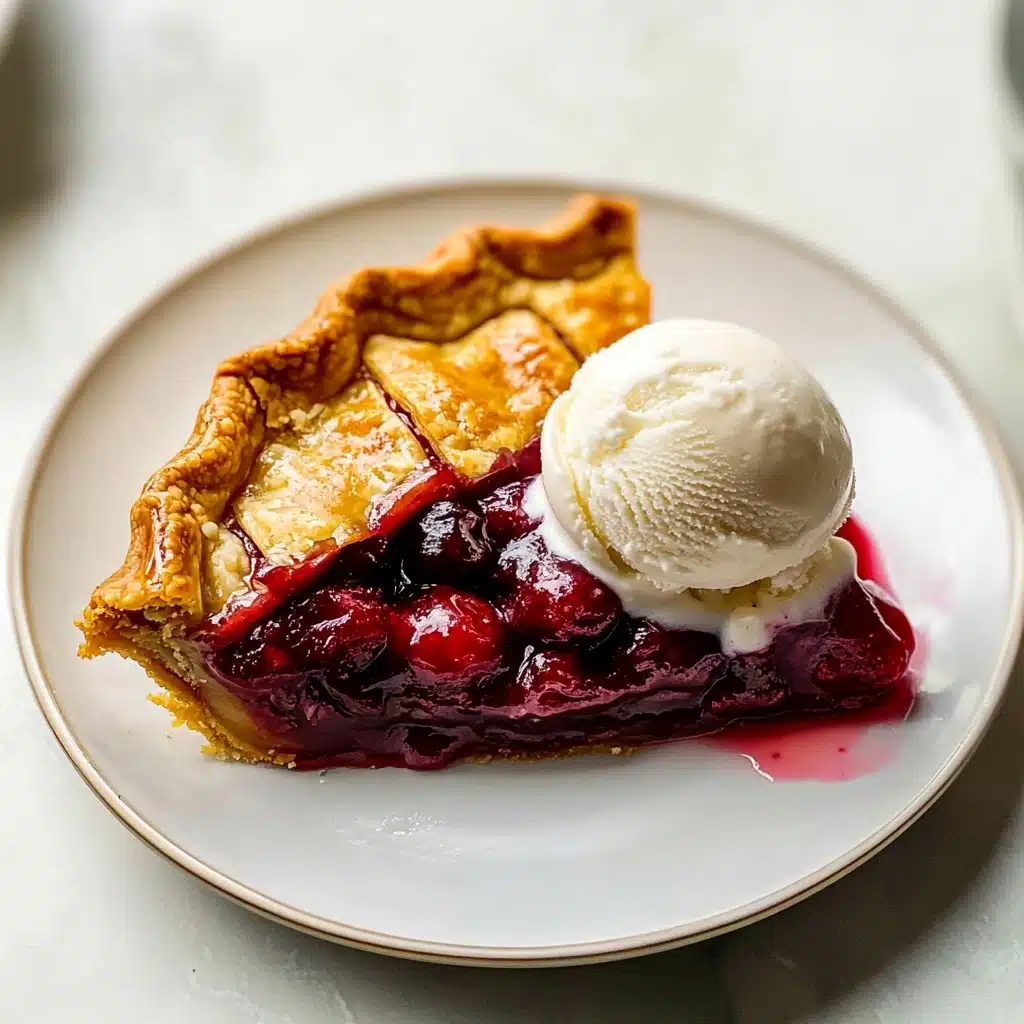
Brush the lattice and edges with your egg wash and, if desired, dust with coarse sugar. Chill the pie for 20–30 minutes while you preheat your oven to 400°F (204°C). Place your pie on a baking sheet (to catch bubbling juices!) and bake for 20 minutes. Then, reduce the oven to 375°F (190°C) and bake another 30–40 minutes, covering the edges if they brown quickly. You’ll know it’s done when the filling bubbles and the crust is golden. Let cool at least 3–4 hours for the filling to set—if you slice warm, it will be delicious but extra juicy!
Pro Tips for Making Homemade Cherry Pie Recipe
- Cherry Prep Magic: Halve and quarter your cherries—this extra step keeps the filling packed and prevents a runny pie.
- Cold Dough Is Crucial: Always chill your pie dough and assembled pie before baking for maximum flakiness and minimal shrinkage.
- Juice Reduction Secret: Don’t skip reducing the leftover cherry juice on the stovetop—this trick gives you that dreamy, sliceable filling.
- Edge Protection: Use a pie shield or foil for the last half of baking so the crust develops color without burning.
How to Serve Homemade Cherry Pie Recipe
Garnishes
I love serving my cherry pie with a generous scoop of vanilla ice cream right on top—the contrast of warm pie and cool ice cream is pure bliss. A dollop of freshly whipped cream or even a sprinkling of toasted sliced almonds adds extra flair and a touch of elegance.
Side Dishes
This Homemade Cherry Pie Recipe is wonderful as the sweet finale to any meal, but it especially shines alongside light summer salads, barbecued meats, or as part of a dessert buffet at family gatherings and picnics. Don’t be surprised if it disappears first!
Creative Ways to Present
For special occasions, bake individual mini pies in ramekins for adorable single servings, or try cutting decorative shapes (think hearts or stars) from the crust for a festive touch. Arrange slices on a rustic wooden board with a scatter of fresh cherries and a dusting of powdered sugar for that “straight-from-the-bakery” look.
Make Ahead and Storage
Storing Leftovers
Leftover pie? Lucky you! Just cover tightly and store it in the refrigerator. It keeps beautifully for up to five days—meaning you can sneak a late-night forkful whenever the craving strikes.
Freezing
This Homemade Cherry Pie Recipe is wonderfully freezer-friendly. You can freeze the entire baked pie (cooled and wrapped well) for up to three months—just thaw overnight in the refrigerator before serving. You can also freeze the pie dough or even the prepared filling separately if you want to assemble later.
Reheating
To enjoy your pie warm, cover it loosely with foil and heat in a 300°F (150°C) oven for about 10–15 minutes. This refreshes the crust and brings out that glorious just-baked aroma—perfect if you want your ice cream to melt a little extra.
FAQs
-
Can I use frozen cherries for this Homemade Cherry Pie Recipe?
Absolutely! You can use frozen cherries—just halve or quarter them while they’re still frozen, then proceed as written. There’s no need to thaw beforehand, though your baking time may be a few minutes longer. Be sure to reduce the juices as directed for the perfect texture.
-
Why is my cherry pie filling runny?
Usually, a runny filling happens when the pie hasn’t cooled long enough or if the juices weren’t reduced before adding to the filling. Always cool your pie for at least three hours so the filling sets completely, and make sure to cook down the leftover juice as described—it makes all the difference!
-
What’s the best way to get a golden, shiny pie crust?
An egg wash (a beaten egg with a splash of milk) brushed over the crust before baking gives your pie that signature golden color and beautiful sheen. For extra sparkle and a sweet crunch, sprinkle coarse sugar over the top right before baking.
-
How do I make this Homemade Cherry Pie Recipe gluten-free?
You can swap in your favorite gluten-free pie dough for both the base and lattice. The filling itself is naturally gluten-free, thanks to the cornstarch, so you’re all set—just keep an eye on dough texture as you roll and crimp.
Final Thoughts
Trust me, nothing says “made with love” like this Homemade Cherry Pie Recipe cooling on your kitchen counter. Gather those sweet, juicy cherries and enjoy a truly showstopping dessert—one that’s perfect for sharing, celebrating, and making warm memories. Happy baking!
Print
Homemade Cherry Pie Recipe
- Prep Time: 3 hours
- Cook Time: 55 minutes
- Total Time: 7 hours
- Yield: 8-10 servings
- Category: Dessert
- Method: Baking
- Cuisine: American
- Diet: Vegetarian
Description
Indulge in the sweet and tangy flavors of this Homemade Cherry Pie. With a buttery, flaky crust and a luscious cherry filling, this classic dessert is perfect for any occasion.
Ingredients
Homemade Pie Crust:
- Homemade Pie Crust or All Butter Pie Crust (both recipes make 2 crusts, 1 for bottom and 1 for top)
Filling:
- 4 and 1/2 cups halved & quartered pitted fresh cherries (see note)
- 2/3 cup (135g) granulated sugar
- 1/4 cup (28g) cornstarch
- 1 Tablespoon (15ml) lemon juice
- 1 teaspoon pure vanilla extract
- 1/4 teaspoon almond extract
- 1 Tablespoon (14g) cold unsalted butter, cut into small cubes
- egg wash: 1 large egg beaten with 1 Tablespoon (15ml) milk
- optional: coarse sugar for sprinkling on crust
Instructions
- The crust: Prepare either pie crust recipe through step 5. The pie dough needs to chill in the refrigerator for at least 2 hours before using.
- Make the filling: In a large bowl, stir the cherries, sugar, cornstarch, lemon juice, vanilla, and almond extract together until thoroughly combined. Cover the filling and place in the refrigerator as you roll out the pie dough (or for up to 24 hours).
- Roll out the chilled pie dough: On a floured work surface, roll out one of the discs of chilled dough (keep the other one in the refrigerator). Turn the dough about a quarter turn after every few rolls until you have a circle 12 inches in diameter. Carefully place the dough into a 9-inch pie dish. Tuck it in with your fingers, making sure it is smooth.
- Pour the leftover juice into a small saucepan. Cook over low heat, stirring, until juice has slightly reduced and thickened, about 3–4 minutes. Cool for 5 minutes, then pour over cherries in filling. Dot the pieces of cold butter on top of the filling. Place the pie in the refrigerator while you roll out the top crust.
- Arrange the lattice: Remove the other disc of pie dough from the refrigerator. Roll the dough into a circle 12 inches in diameter. Using a pastry wheel, sharp knife, or pizza cutter, cut the dough into strips. Carefully thread the strips over and under one another. Press the edges of the strips into the bottom pie crust edges to seal.
- Brush with egg wash: Lightly brush the top and edges of the pie crust with egg wash. Sprinkle the top with coarse sugar, if using. Place the pie in the refrigerator for 20–30 minutes while your oven preheats.
- Bake the pie: Preheat oven to 400°F (204°C). Place the pie onto a large baking sheet and bake for 20 minutes. Reduce the temperature to 375°F (190°C) and bake for an additional 30–40 minutes or until the top crust is golden brown and the filling juices have been bubbling up.
- Cool and serve: Remove pie from the oven and cool for at least 3–4 hours before slicing and serving. Store leftovers in the refrigerator.
Notes
- Make Ahead / Freezing Instructions: Prepare the pie in full 1 day in advance. The pie crust dough can be stored in the refrigerator for up to 5 days or in the freezer for up to 3 months. Baked pie freezes well for up to 3 months.
- Special Tools: Cherry Pitter, Glass Mixing Bowl, Rolling Pin, Pie Dish, Pastry Wheel or Pizza Cutter, Pastry Brush, Pie Crust Shield, Cooling Rack
- Cherries: You need about 1.5 lbs of cherries for this recipe. Cut half of the cherries into halves and the remaining half into quarters.
Nutrition
- Serving Size: 1 slice
- Calories: Approximately 320
- Sugar: Approximately 25g
- Sodium: Approximately 150mg
- Fat: Approximately 12g
- Saturated Fat: Approximately 6g
- Unsaturated Fat: Approximately 4g
- Trans Fat: 0g
- Carbohydrates: Approximately 50g
- Fiber: Approximately 3g
- Protein: Approximately 4g
- Cholesterol: Approximately 35mg


