
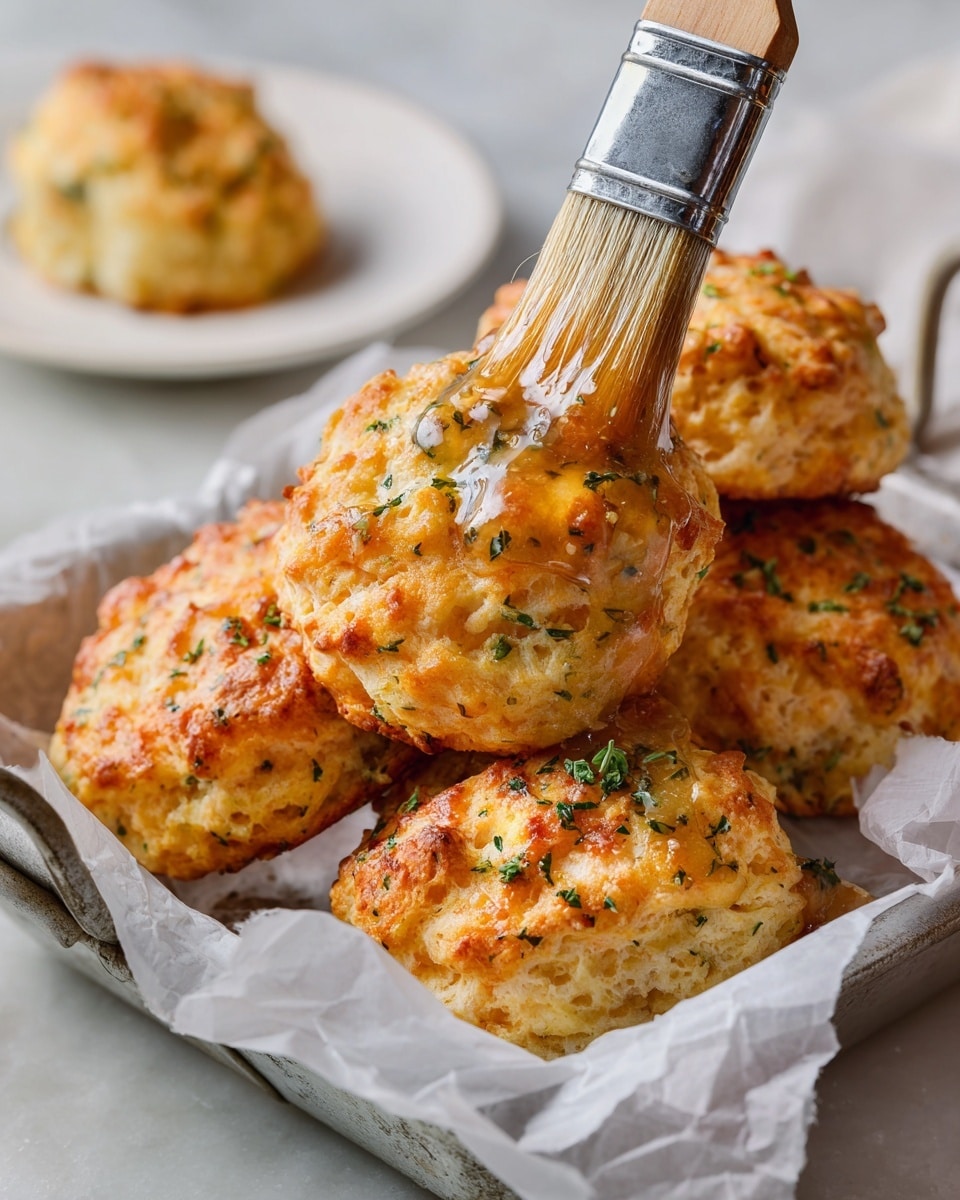
If you’re looking for a warm, comforting treat that your whole family will rave about, then you’ve got to try this Homemade Cheesy Garlic Biscuits Recipe. I absolutely love how these biscuits come out soft and fluffy on the inside, with a golden cheesy crust and just the right hit of garlic. When I first tried this recipe, I was amazed at how simple ingredients could come together to make something so irresistibly flavorful. Keep reading because I’m going to share my tricks and tips so you can nail these mouthwatering biscuits perfectly every single time.
Why You’ll Love This Recipe
- Simplicity: Uses basic pantry staples you likely already have on hand.
- Cheesy Garlic Flavor: Combines sharp cheddar and garlic for a bold, delicious taste that’s never overpowering.
- Perfect Texture: Crispy on the outside, tender and fluffy inside every time.
- Quick and Easy: Ready in just about 30 minutes, making it a great last-minute side or snack.

Ingredients You’ll Need
Every ingredient here plays an important role to deliver that perfect biscuit texture and flavor. I always recommend using the freshest sharp cheddar cheese you can find because it makes all the difference. Also, cold butter and cold buttermilk are key—they help create those flaky layers you’ll love digging into.
- All-purpose flour: Provides the structure for your biscuits. If you want fluffier biscuits, make sure not to overmix.
- Baking powder: The leavening agent that makes these biscuits rise and become airy.
- Garlic powder: Adds that subtle, savory garlic punch without overpowering the biscuits.
- Fine sea salt: Enhances all the flavors. Using fine salt blends better in the dough.
- Cold unsalted butter: The secret to a tender, flaky biscuit! Cold butter creates pockets of steam that puff up the dough.
- Sharp cheddar cheese: I love the bite and richness it brings. Shred it fresh for the best melt and flavor.
- Buttermilk: Makes the dough tender and adds a slight tang that complements the cheese beautifully.
- Unsalted butter (for brushing): Melted and infused with garlic and parsley, this finishing touch takes the biscuits to the next level.
- Dried parsley: Adds a pop of color and a hint of fresh herb flavor when mixed into the butter.
Variations
One of the reasons I keep coming back to this Homemade Cheesy Garlic Biscuits Recipe is because it’s so versatile. You can easily make it your own with some simple tweaks. Experimenting with different cheeses or herbs can make it fun for all seasons or occasions.
- Cheese swap: Try using mozzarella or pepper jack for a milder or spicier twist—I personally love sharp cheddar for that classic boldness.
- Herb boost: Fresh rosemary or thyme mixed into the dough or butter makes these biscuits pop with a wonderful aroma.
- Dairy-free option: I’ve replaced buttermilk with almond milk plus a splash of lemon juice and used vegan butter for dairy-free biscuits that still impress.
- Extra garlic: For garlic lovers like me, adding a minced clove or two into the butter brush gives extra garlicky goodness.
How to Make Homemade Cheesy Garlic Biscuits Recipe
Step 1: Prep Your Oven and Pan
Start by preheating your oven to 425°F (220°C). While it’s heating up, line a large baking sheet with parchment paper to keep your biscuits from sticking and make clean-up a breeze. I like to get this ready first, so when your dough is mixed, it’s go-time!
Step 2: Mix the Dry Ingredients and Cut in Butter
In a large bowl, whisk together the flour, baking powder, garlic powder, and salt. Here’s where I discovered a trick: using a pastry blender to cut in the cold butter until it resembles pea-sized crumbs creates those flaky layers that make a biscuit unforgettable. If you don’t have a pastry blender, use two forks or your hands—but be sure to work quickly to keep the butter cold.
Step 3: Add Cheese and Buttermilk
Stir in the shredded sharp cheddar cheese evenly through the flour and butter mix. Then pour in the very cold buttermilk. Use a wooden spoon or spatula to mix just until combined—don’t overmix or the biscuits might turn out tough. The batter will be sticky, and that’s exactly how you want it!
Step 4: Drop and Bake
Drop the dough by scant 1/4-cup scoops onto your prepared baking sheet. Space them out so they have room to puff up. Bake for about 16 to 17 minutes until the tops are golden brown and smell heavenly. I love watching that golden crust form—it feels like magic in the making.
Step 5: Brush with Garlic Butter and Serve Warm
While the biscuits are baking, mix together the melted butter, dried parsley, and garlic powder. When the biscuits come hot out of the oven, brush each one generously with this garlic butter. This finishing touch keeps them moist and gives that extra layer of flavor that makes these biscuits kind of addictive. Serve them warm, and trust me, everyone will be asking for seconds.
Pro Tips for Making Homemade Cheesy Garlic Biscuits Recipe
- Keep Ingredients Cold: I learned that cold butter and cold buttermilk mean the difference between flaky biscuits and flat biscuits.
- Don’t Overmix the Dough: Stir until just combined to keep your biscuits tender, not dense.
- Use Freshly Shredded Cheese: Pre-shredded cheese often has additives that prevent melting well, so I always shred mine fresh.
- Brush Right After Baking: Applying the garlic butter immediately locks in moisture and maximizes that garlicky flavor.
How to Serve Homemade Cheesy Garlic Biscuits Recipe

Garnishes
For a simple but pretty touch, I like sprinkling a little extra chopped fresh parsley or chives on top after brushing with garlic butter. A light dusting of Parmesan on top before baking also adds a nice savory crunch if you want to elevate the presentation.
Side Dishes
These biscuits pair beautifully with hearty meals. My family loves them alongside classic fried chicken, creamy soups like tomato or broccoli cheddar, and even with a fresh garden salad for a comforting dinner. They can even hold their own as a snack with a dab of honey or jam if you want a sweet and savory combo.
Creative Ways to Present
I once baked these biscuits in mini muffin tins for a Thanksgiving appetizer platter, which made them perfectly bite-sized and easy to share. Another time, I layered them with slices of ham and cheese and popped them briefly under the broiler for a quick cheesy garlic biscuit melt—an instant crowd-pleaser!
Make Ahead and Storage
Storing Leftovers
If you have leftovers, I store them in an airtight container at room temperature. They’re best eaten within two days for maximum freshness, but if you want them softer, wrap them in a damp paper towel and microwave briefly to revive their softness.
Freezing
I often freeze these biscuits right after baking and cooling. I wrap them tightly in foil and place them in a freezer bag. When I’m ready, I just thaw at room temperature and warm them in the oven at 350°F for 10-12 minutes—they taste almost as fresh as when made that day.
Reheating
To reheat, I prefer the oven because it keeps that crispy crust intact. Preheat your oven to 350°F and warm the biscuits for about 10 minutes. You can brush with a little extra butter before popping them back in for added moisture and flavor.
FAQs
-
Can I use self-rising flour instead of all-purpose flour and baking powder?
You can, but since self-rising flour already contains baking powder and salt, you’ll want to adjust the recipe by omitting the baking powder and reducing the salt to avoid over-leavening or too much saltiness. I recommend sticking to all-purpose flour for consistent results, especially if you’re new to the recipe.
-
What’s the best cheese to use in this Homemade Cheesy Garlic Biscuits Recipe?
Sharp cheddar is my favorite because of its bold flavor that cuts through the garlic and butter richness. However, feel free to experiment with gouda, Monterey Jack, or even a blend for a unique taste. Just make sure it’s a good melting cheese.
-
Can I make these biscuits vegan or dairy-free?
Absolutely! Use dairy-free butter and substitute the buttermilk with a plant-based milk plus an acid like lemon juice or vinegar for tang. For the cheese, there are great vegan cheese shreds available that melt nicely; just be sure to choose one without starch fillers for the best texture.
-
How do I make sure my biscuits come out flaky?
Keep your butter very cold and cut it in until pea-sized crumbs. Also, avoid overworking the dough when you add buttermilk. Baking at a high temperature like 425°F helps create a good oven spring too. I discovered that those combined steps gave me fluffy, flaky biscuits every time!
Final Thoughts
This Homemade Cheesy Garlic Biscuits Recipe will quickly become one of your go-to comfort foods—I promise. There’s something so satisfying about pulling these golden, cheesy, garlicky biscuits out of the oven, brushing them with butter, and sharing them with people you care about. Whether you’re making them for a special occasion or a cozy weeknight dinner, they bring that warm, homemade charm every time. I encourage you to give this recipe a try and watch it become a family favorite in your home too.
Print
Homemade Cheesy Garlic Biscuits Recipe
- Prep Time: 15 minutes
- Cook Time: 17 minutes
- Total Time: 32 minutes
- Yield: 12 biscuits
- Category: Side Dish
- Method: Baking
- Cuisine: American
Description
These homemade cheesy garlic biscuits are soft, flaky, and bursting with sharp cheddar cheese and a hint of garlic. Perfectly golden and brushed with a flavorful garlic parsley butter, they make an irresistible side for any meal or a savory snack on their own.
Ingredients
For the biscuits:
- 2 cups (254 grams) all-purpose flour
- 2 teaspoons baking powder
- 1/2 teaspoon garlic powder
- 1/4 teaspoon fine sea salt
- 6 tablespoons (85 grams) cold unsalted butter, cubed
- 1 1/4 cups (6 ounces / 170 grams) sharp cheddar cheese, shredded
- 3/4 cup (178 ml) buttermilk, very cold
For the butter:
- 3 tablespoons (43 grams) unsalted butter, melted
- 1/2 teaspoon dried parsley
- 1/2 teaspoon garlic powder
Instructions
- Preheat oven and prepare baking sheet: Preheat the oven to 425°F (220°C) and line a large baking sheet with parchment paper to prevent sticking and ensure even baking.
- Mix dry ingredients and cut in butter: In a large bowl, whisk together the flour, baking powder, garlic powder, and salt. Use a pastry blender to cut the cold, cubed butter into the flour mixture until it resembles pea-sized crumbs. This step creates a flaky texture.
- Add cheese and buttermilk: Stir in the shredded sharp cheddar cheese. Then add the very cold buttermilk and gently stir just until the dough comes together, being careful not to overmix to keep the biscuits light.
- Shape and bake biscuits: Drop the dough by scant 1/4-cup portions onto the prepared baking sheet, spacing them apart. Bake in the preheated oven until the biscuits are golden brown and cooked through, approximately 16 to 17 minutes.
- Prepare garlic butter and brush biscuits: While the biscuits bake, combine the melted butter, dried parsley, and garlic powder. Immediately upon removing the biscuits from the oven, brush them generously with the garlic butter to infuse flavor and add moisture.
- Serve warm: Serve the biscuits warm for the best taste and texture, making them a perfect accompaniment to any meal or a delicious snack on their own.
Notes
- Use cold butter for flakier biscuits.
- Do not overmix the dough to keep the biscuits tender.
- Brush the biscuits immediately after baking for optimal flavor absorption.
- Sharp cheddar cheese adds a bold flavor but feel free to substitute with your favorite cheese.
- Store leftovers in an airtight container and reheat in the oven for crispiness.
Nutrition
- Serving Size: 1 biscuit
- Calories: 190
- Sugar: 1 g
- Sodium: 280 mg
- Fat: 12 g
- Saturated Fat: 7 g
- Unsaturated Fat: 4 g
- Trans Fat: 0.3 g
- Carbohydrates: 15 g
- Fiber: 1 g
- Protein: 5 g
- Cholesterol: 30 mg


