
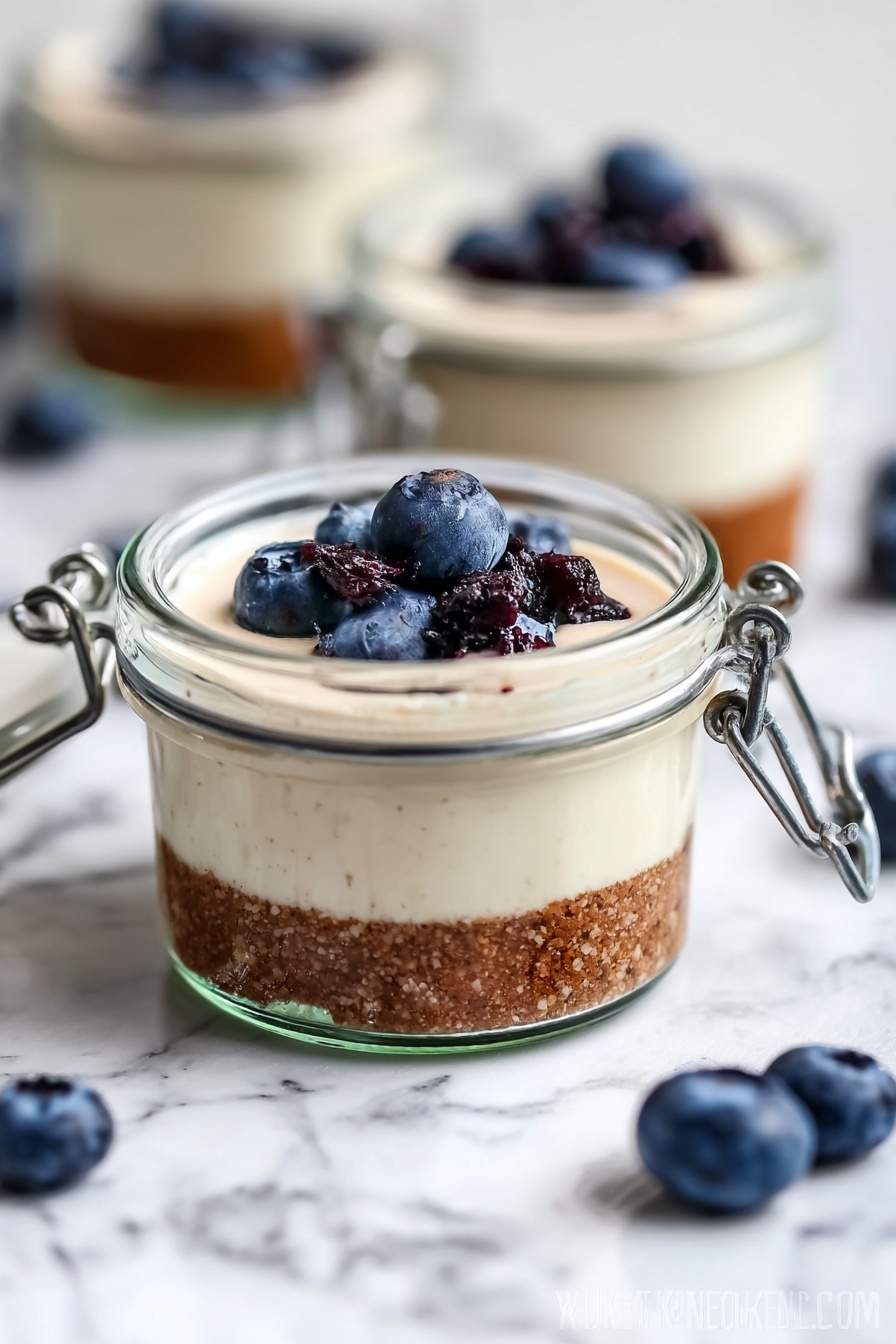
If you’re looking for a delicious way to satisfy your sweet tooth while keeping things healthy and packed with protein, you’re going to love this High Protein Cheesecake Jars Recipe. I absolutely love how these little jars come together—creamy, flavorful, and perfectly portioned. Plus, they’re a breeze to make, which means you can whip them up for an easy snack or a guilt-free dessert anytime. Trust me, once you try this, you’ll want to have them on hand all the time!
Why You’ll Love This Recipe
- High Protein Boost: Using cottage cheese, fat-free cream cheese, and protein powder packs these jars with muscle-friendly protein without sacrificing flavor.
- Easy & Quick: No baking required! You can have these creamy jars ready in under 15 minutes, perfect for busy days or last-minute treats.
- Customizable & Fun: Whether you want classic or chocolate, fresh fruits or jam toppings, you control the flavor and sweetness easily.
- Portion Controlled: Serving in jars makes it simple to keep your portions in check while still treating yourself.

Ingredients You’ll Need
Each ingredient here plays a special role in balancing flavor, texture, and nutrition. I’ve learned that picking quality keto graham crackers and a flavorful protein powder really take this from good to amazing.
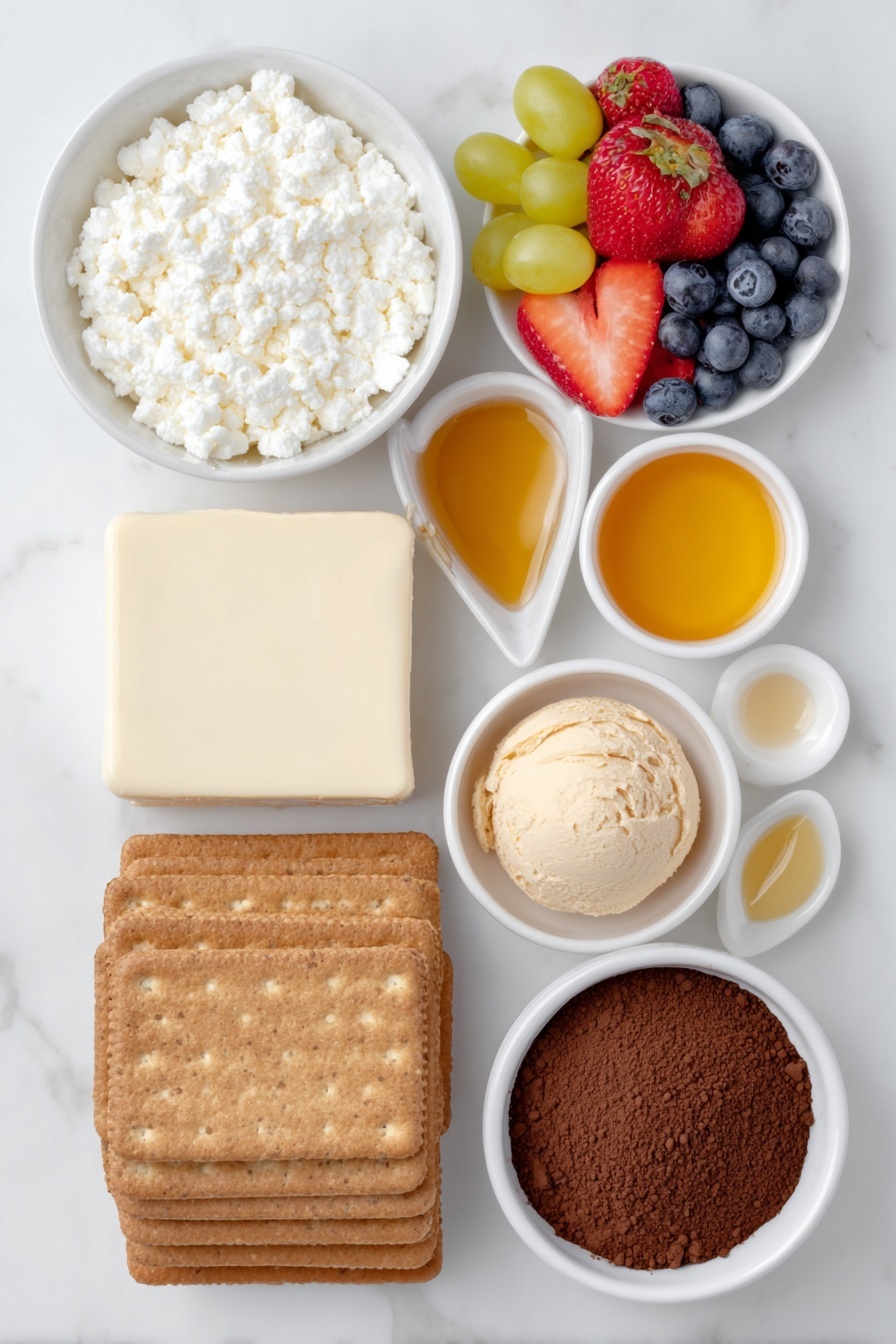
- Cottage Cheese: It adds creaminess and protein, so choose one that’s smooth and fresh for the best texture.
- Fat-Free Cream Cheese: Provides the traditional cheesecake tang without the extra fat.
- Protein Powder (Vanilla Salted Caramel recommended): Gives texture and a protein punch—flavor matters here, so pick one you love!
- Sugar-Free Maple Syrup: Sweetens without the sugar spike—look for one that’s smooth and not too overpowering.
- Vanilla Extract: Adds that warm, comforting aroma and depth of flavor.
- Keto Graham Crackers: These form the crust, so pick a crumbly, flavorful brand to get that perfect base.
- Butter (melted): Helps bind the graham cracker crust and adds richness.
- Fresh Fruits & Blueberry Jam (toppings): Fresh berries brighten the jars, while jam adds a sweet, slightly tart finish.
- Cocoa Powder (for chocolate version): If you’re craving a chocolate twist, a tablespoon of cocoa powder mixed into the filling does wonders!
Variations
I love playing around with this High Protein Cheesecake Jars Recipe to suit whatever mood I’m in or to accommodate my family’s preferences—you can totally make it your own.
- Chocolate Cheesecake Jars: When I first tried adding cocoa powder, it transformed the whole dish into a rich, chocolatey delight without messing with the protein content.
- Berry Swirl: Mixing fresh mashed berries or a little bit of sugar-free jam into the filling before layering creates a gorgeous marbled effect and fresh flavor.
- Nutty Crunch: Adding chopped nuts like pecans or almonds on top gives a satisfying crunch contrast to the creamy filling.
- Dairy-Free Version: Although I haven’t tried it personally, substituting with dairy-free cream cheese and plant-based protein powder could work for vegan friends.
How to Make High Protein Cheesecake Jars Recipe
Step 1: Blend Your Cheesecake Filling
Start by adding the cottage cheese, fat-free cream cheese, protein powder, sugar-free maple syrup, and vanilla extract to a blender or food processor. I like to blend until super smooth—sometimes this takes about a minute or two. Don’t forget to scrape down the sides with a spatula halfway through blending to make sure everything gets really creamy and well mixed. This step determines the silky texture of your cheesecake filling, so don’t rush it!
Step 2: Crush the Graham Crackers for Your Crust
Once your filling is ready, toss the keto graham crackers into your blender or food processor. You can do this in a couple batches if your blender is small. Pulse until you get fine crumbs—kind of like sand. Transfer the crumbs into a bowl and mix with the melted butter until the crumbs stick together just a bit. This helps form a nice base that holds up well under the creamy filling.
Step 3: Assemble Your Jars
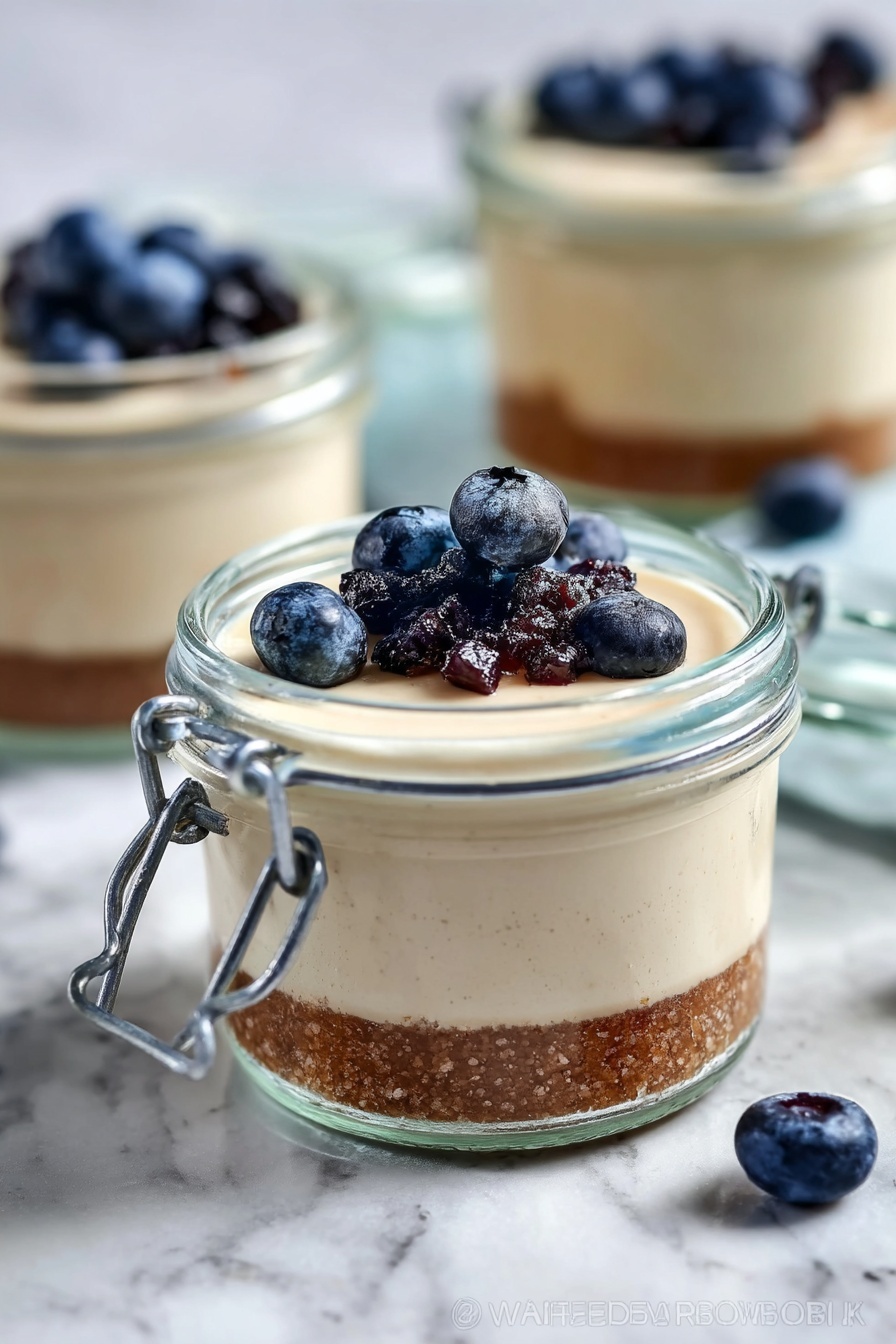
Spoon a layer of the graham cracker crust into the bottom of each jar or serving glass. Press it down gently to create an even base. Then, carefully layer the cheesecake filling on top, smoothing it out with a spoon. I usually get about 4 servings out of this recipe, but you can adjust jar size to fit your needs perfectly.
Step 4: Chill and Add Your Favorite Toppings
Refrigerate your jars for at least 1 to 2 hours so the filling firms up nicely and the flavors meld together. Before serving, top with fresh fruit, a dollop of blueberry jam, or even a sprinkle of nuts or shaved chocolate. The toppings add freshness and a pop of color that makes the jars look as fabulous as they taste.
Pro Tips for Making High Protein Cheesecake Jars Recipe
- Smooth Filling Trick: Blending for extra time and scraping the sides ensures your cheesecake filling is silky and lump-free every single time.
- Crust Crunch Balance: Don’t overmix the cracker crumbs and butter, or you’ll lose that delightful crumbly texture in the crust.
- Sweetener Selection: If your protein powder isn’t very sweet, adjust your maple syrup to taste so the dessert isn’t bland.
- Chilling Patience: I’ve learned that giving the jars plenty of chilling time makes the flavors deepen and the texture more set—it’s worth the wait!
How to Serve High Protein Cheesecake Jars Recipe
Garnishes
I always go for fresh berries like blueberries or sliced strawberries—the tartness balances the creamy richness beautifully. Sometimes I add a little spoonful of blueberry jam for a touch of sweetness and glossy finish. If I’m feeling fancy, a few dark chocolate shavings or chopped nuts on top take these jars to the next level.
Side Dishes
These cheesecake jars are wonderful on their own as a protein-packed snack, but I’ve also paired them with a simple green salad for a light lunch or with a cup of herbal tea as an afternoon treat. They’re perfect when you want a sweet bite without the guilt.
Creative Ways to Present
The first time I made these for a dinner party, I layered the jars with alternating fruit compotes and even served some with whipped Greek yogurt swirls on top. Using small mason jars and tying a pretty ribbon around each one made all the guests feel special. Mini spoons tied with cinnamon sticks also added a cozy touch—perfect for holiday gifting.
Make Ahead and Storage
Storing Leftovers
After making these cheesecake jars, I keep leftovers refrigerated in airtight jars or containers. They stay fresh and creamy for up to 3 days, which is great for grabbing a quick protein-packed dessert or snack during the week.
Freezing
Freezing cheesecake jars can be a little tricky because the texture may change slightly, but I’ve found that freezing without toppings works best. Just thaw overnight in the fridge before serving and add fresh fruit or jam after thawing for the best taste and consistency.
Reheating
Since these jars are served chilled, reheating isn’t really necessary or recommended. If you prefer them softer, just let the jars sit at room temperature for 10-15 minutes before digging in.
FAQs
-
Can I use regular sugar instead of sugar-free maple syrup?
Absolutely! You can swap in regular maple syrup or honey if you prefer. Just keep in mind it will add more sugar and calories, so adjust amounts to your taste and dietary goals.
-
What kind of protein powder works best?
I recommend using a flavored whey or plant-based protein powder that you enjoy—Vanilla Salted Caramel is my favorite. Avoid unflavored powders as they can make the filling taste bland.
-
Can I make this recipe vegan or dairy-free?
You could experiment with dairy-free cream cheese alternatives and plant-based protein powders, but since cottage cheese is a major protein source here, the texture and protein content will be different. I haven’t tried this myself but would love to hear if you do!
-
How long do these jars keep in the fridge?
Generally, they stay fresh for up to 3 days in an airtight container. Beyond that, the texture might start to change, so I recommend enjoying them within that timeframe.
Final Thoughts
This High Protein Cheesecake Jars Recipe has become one of my go-to picks whenever I crave something sweet but want to stay on track with my fitness goals. It’s creamy, satisfying, and you feel good enjoying it knowing you’re powering your body with quality protein. Give it a try and I promise you’ll get hooked on these little jars of goodness. Plus, they’re so simple and fun to make, it’s like a mini celebration in your kitchen every time you do!
Print
High Protein Cheesecake Jars Recipe
- Prep Time: 15 minutes
- Cook Time: 0 minutes
- Total Time: 1 hour 15 minutes
- Yield: 4 servings
- Category: Dessert
- Method: No-Cook
- Cuisine: American
- Diet: Low Fat
Description
These High Protein Cheesecake Jars are a delightful and nutritious dessert option that combines creamy cheesecake filling with a crunchy keto graham cracker crust. Sweetened with sugar-free maple syrup and flavored with vanilla, these jars can be customized with fresh fruits or a chocolate version by adding cocoa powder. Perfect for a protein-packed treat, they are easy to prepare and served chilled.
Ingredients
Cheesecake Filling
- 1 1/4 cup cottage cheese
- 1 cup fat-free cream cheese
- 1/2 cup vanilla salted caramel protein powder
- 1/4 cup sugar-free maple syrup
- 2 tsp vanilla extract
Graham Cracker Crust
- 6 keto graham crackers
- 1 tbsp melted butter
Toppings
- fresh fruits (such as berries)
- blueberry jam (optional)
Chocolate Cheesecake Variation
- 1 tbsp cocoa powder
Instructions
- Prepare the Cheesecake Filling: In a blender or food processor, combine the cottage cheese, fat-free cream cheese, protein powder, sugar-free maple syrup, and vanilla extract. Blend until the mixture is completely smooth and creamy, scraping down the sides as needed to ensure everything is well-mixed.
- Crush the Graham Crackers: Place the keto graham crackers into the blender or food processor in batches if required. Pulse until the crackers are finely crushed into a crumb-like texture.
- Mix Crumbs with Butter: Transfer the graham cracker crumbs to a bowl. Add the melted butter and mix thoroughly until the crumbs are evenly coated and slightly clumpy to form the crust base.
- Assemble the Jars: Spoon a layer of the graham cracker crust dust into the bottom of each jar or serving dish. Then, add the prepared cheesecake filling on top of the crust layer.
- Chill to Set: Refrigerate the assembled cheesecake jars for 1-2 hours to allow the flavors to meld and the filling to fully set.
- Add Toppings and Serve: Once chilled, top each jar with fresh fruits of your choice and optionally a spoonful of blueberry jam. Serve chilled and enjoy your high-protein cheesecake jars.
- Chocolate Variation: For the chocolate version, blend 1 tbsp of cocoa powder into the cheesecake filling until smooth. Adjust sweetness with additional sweetener if desired, then proceed with assembling the jars as usual.
Notes
- The chocolate cheesecake variation involves adding cocoa powder to the filling for a rich chocolate flavor.
- Use keto-friendly graham crackers to keep the crust low in carbs.
- Ensure the cream cheese is softened for easier blending and smoother filling texture.
- Refrigeration time helps the cheesecake to firm up; do not skip this step for best results.
- Fresh fruits like strawberries, blueberries, or raspberries complement the cheesecake nicely and add natural sweetness.
- This dessert is great for meal prepping and can be stored in the refrigerator for up to 3 days.
Nutrition
- Serving Size: 1 jar (approx. 150g)
- Calories: 220 kcal
- Sugar: 3g
- Sodium: 150mg
- Fat: 8g
- Saturated Fat: 3g
- Unsaturated Fat: 4g
- Trans Fat: 0g
- Carbohydrates: 15g
- Fiber: 3g
- Protein: 25g
- Cholesterol: 20mg


