
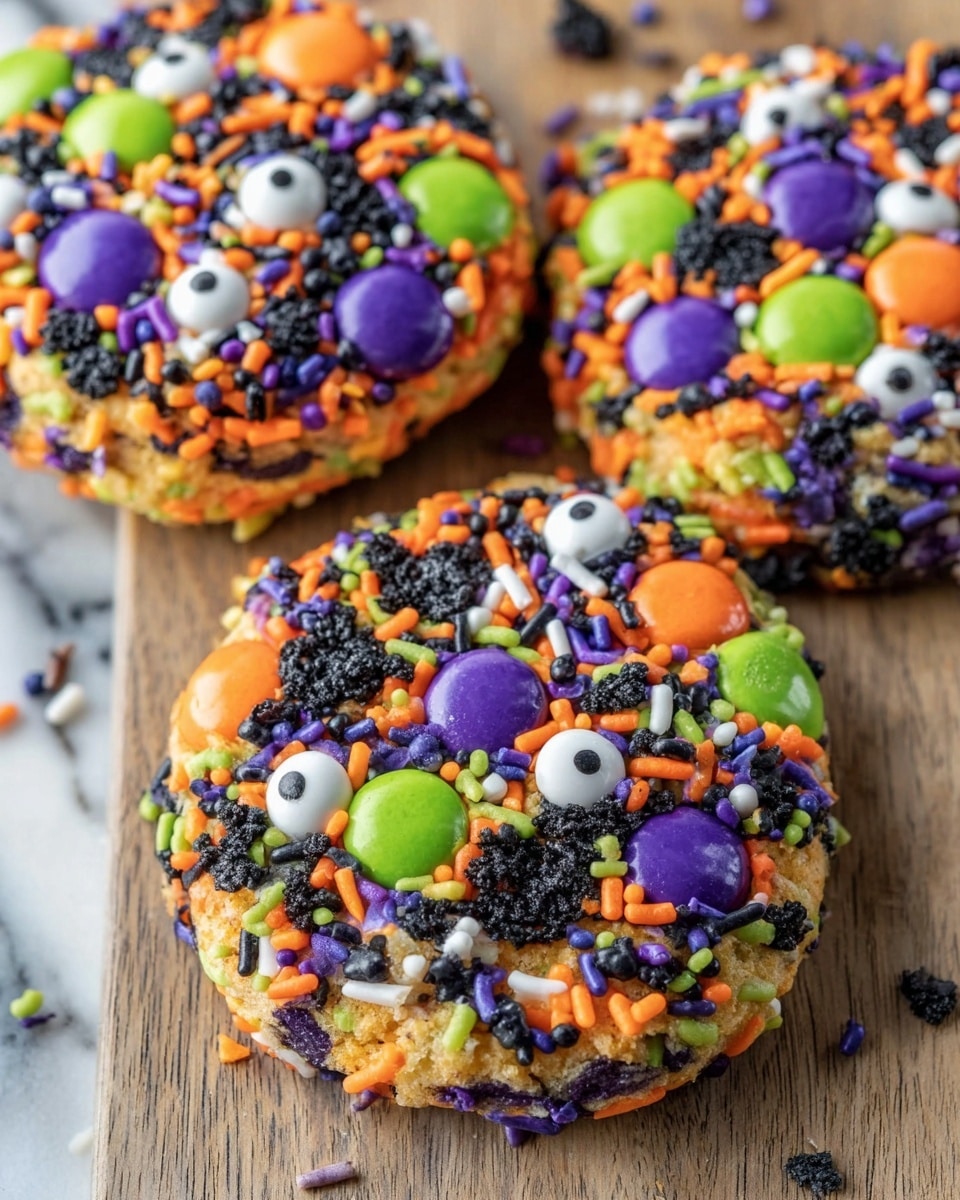
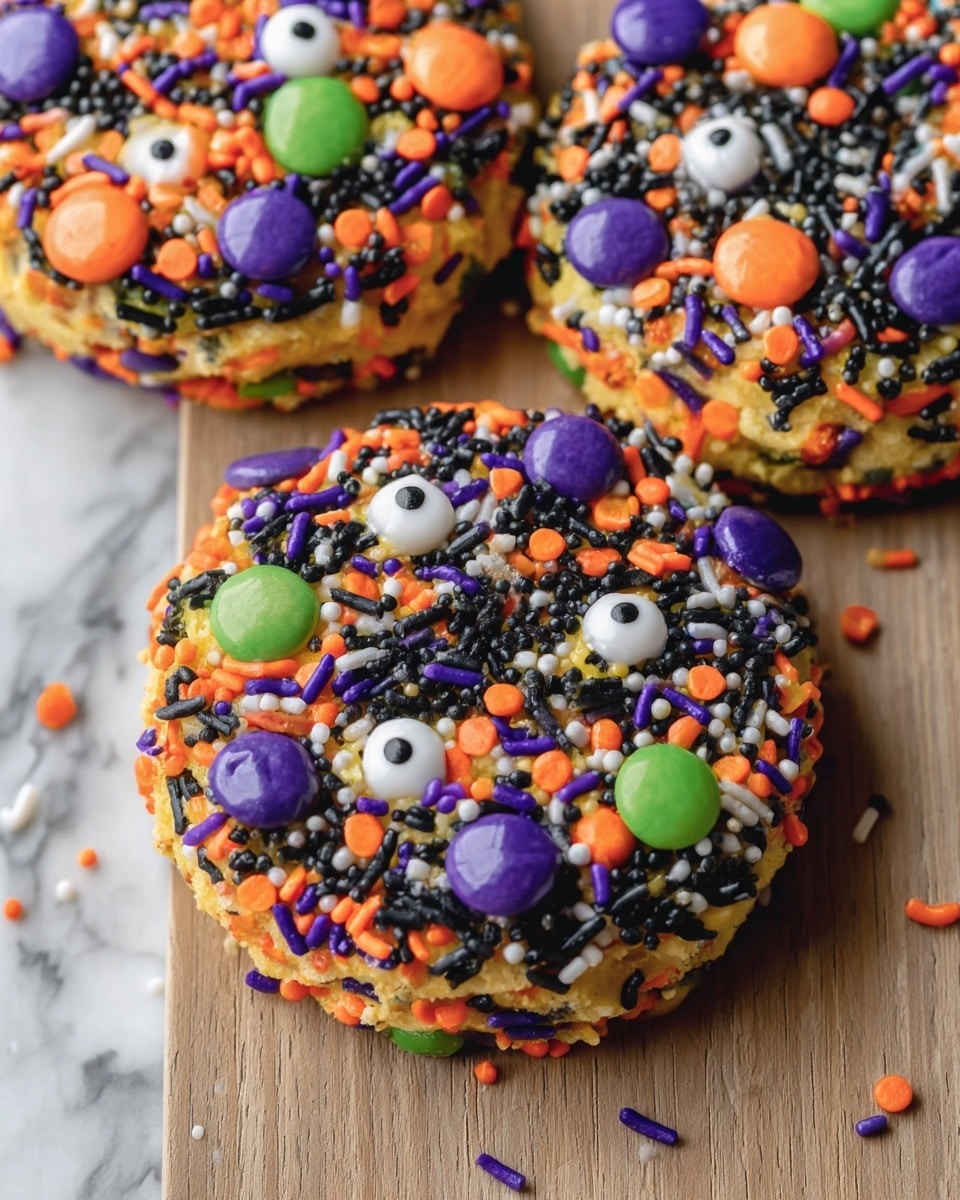
If you’re anything like me and love adding a little festive fun to your baking, then this Halloween Sugar Cookies with Sprinkles Recipe is going to be your new go-to. I absolutely love how these cookies come out with their vibrant swirls and that perfect crunch on the edges, just bursting with colorful sprinkles that scream Halloween. Whether you’re hosting a spooky party or want to delight the kids with a seasonal treat, you’ll find this recipe is simple, playful, and seriously delicious.
Why You’ll Love This Recipe
- Vibrant and Fun: The neon food coloring swirled into these cookies makes them super festive and fun to look at.
- Perfect Texture: Crispy edges with soft, chewy centers—exactly what you want in sugar cookies.
- Easy to Make: Even though the dough is crumbly at first, the step-by-step method ensures success every time.
- Customizable: You can tweak the colors, sprinkles, or even add white chocolate chips for an extra treat.

Ingredients You’ll Need
These ingredients come together to give you that classic sugar cookie taste, with the buttery richness and just the right balance of sweetness. I always grab good quality butter and fresh vanilla extract for the best flavor—trust me, it makes a difference!
- Unsalted butter: Using unsalted allows you to control the salt level perfectly, plus it creams smoother with sugars.
- Brown sugar: Adds a warm, caramel note that deepens the cookie’s flavor.
- White sugar: Helps give the cookies that classic sweetness and crisp texture.
- Egg: Acts as a binder and adds moisture for softness inside the cookie.
- Vanilla extract: The flavor highlight that brings all the ingredients together beautifully.
- All-purpose flour: The foundation for structure; be sure to measure correctly for perfect texture.
- Salt: Balances the sweetness and enhances flavors.
- Baking powder: Gives a little lift so the cookies don’t spread too thin.
- White chocolate chips (optional): I toss these in for extra melty pockets of sweetness—totally worth it!
- Neon green, orange, and purple food coloring: These are essential for that unmistakable Halloween vibe.
- Assorted Halloween sprinkles: The fun, crunchy decorations that take these cookies over the top.
Variations
I love making this recipe my own by swapping up colors and sprinkles each year, or sometimes I skip the white chocolate chips if I’m short on time. You can totally tailor these cookies to your taste, and I encourage you to get creative!
- Food Coloring Variations: Last year, I tried pastel shades instead of neon for a more subtle look—and my family still adored them.
- Sprinkle Swap: Instead of Halloween sprinkles, try red and green sprinkles for Christmas, or pink and red for Valentine’s Day!
- Gluten-Free Option: I’ve switched to my favorite gluten-free flour blend with great results—just double-check your baking powder is gluten-free.
- Skip the Chips: Leaving out white chocolate chips gives a cleaner sugar cookie flavor if you prefer simplicity.
How to Make Halloween Sugar Cookies with Sprinkles Recipe
Step 1: Cream Butter and Sugars Until Fluffy
Start by grabbing a large mixing bowl and your electric mixer. Combine the softened unsalted butter with both brown and white sugars. I like to cream these together for about 3-4 minutes—this creates a light, fluffy base that helps the cookies rise nicely. It also makes the dough smooth and easy to work with.
Step 2: Add Egg and Vanilla for Moisture and Flavor
Once your butter and sugar are perfectly creamed, beat in the egg and vanilla extract until everything is well combined. You’ll notice the mixture becomes creamier and more cohesive, which is exactly what you want.
Step 3: Mix Dry Ingredients Then Combine
In a separate bowl, mix together the flour, baking powder, and salt. Gradually add this to your wet mixture and mix until just combined. The dough might seem crumbly at this stage—that’s normal! Don’t overmix; you want a tender cookie, not tough.
Step 4: Add White Chocolate Chips and Divide Dough
If you’re using white chocolate chips, fold them in gently now. Then divide the dough into three equal portions—totally eyeballing it or using a kitchen scale if you want to be exact works fine.
Step 5: Color the Dough and Get Hands-On
Now comes the fun part! Add one food color to each portion of dough. Since the dough is crumbly, I always use my hands to gently knead each color in until it’s uniform. It’s a bit messy, but trust me, the tactile feedback helps get those vibrant hues just right. Be sure to wash your hands thoroughly between colors to keep them pure.
Step 6: Create Swirled Cookie Balls
Take small bits from each colored dough portion and roll them together into a ball. The colors should swirl beautifully without fully blending together—like a little Halloween tie-dye! Flatten each ball slightly and repeat until you have about 12 cookies.
Step 7: Coat in Sprinkles and Chill
Roll the tops and sides of each cookie in your Halloween sprinkles for that festive crunch. Place them on a greased cookie sheet, then pop the tray into the fridge for at least 30 minutes. This chilling step is super important—it prevents the cookies from spreading too much, keeping them thick and beautiful.
Step 8: Bake and Add Final Sprinkles
Preheat your oven to 375°F (190°C). Bake the cookies for 12-14 minutes until the edges are lightly golden. As soon as they come out of the oven, check for any spots that seem bare and press a few extra sprinkles on. Let them cool on the sheet for 5 minutes, then transfer to a wire rack to cool completely.
Pro Tips for Making Halloween Sugar Cookies with Sprinkles Recipe
- Hands-On Coloring: I’ve found that using your hands to knead color into this crumbly dough works way better than a mixer—it helps distribute the dye evenly and brings the dough together.
- Don’t Skip Chilling: When I first tried skipping the fridge step, my cookies spread out too much and lost their shape—so definitely chill for at least 30 minutes!
- Use Parchment or Silicone Mats: Lining your baking sheet really helps keep cookies from sticking and promotes even baking.
- Add Sprinkles Right After Baking: The cookies are still warm and slightly soft when they come out of the oven—pressing on sprinkles at this moment helps them adhere perfectly without breaking apart.
How to Serve Halloween Sugar Cookies with Sprinkles Recipe
Garnishes
I like to keep it simple and sprinkle extra colored sugar or mini candy pumpkins on top just before serving. Sometimes a light drizzle of melted white chocolate adds a pretty finishing touch and extra sweetness that my kids go crazy for.
Side Dishes
These cookies pair perfectly with a cold glass of milk or a warm cup of spiced apple cider. For a Halloween party platter, add some caramel popcorn or pumpkin-shaped marshmallows to round out the spooky snack spread.
Creative Ways to Present
I’ve enjoyed presenting these cookies on a tiered cake stand surrounded by fake cobwebs and mini plastic spiders for Halloween gatherings. Another fun idea: package them in clear cellophane bags tied with orange and black ribbons to give as festive homemade gifts.
Make Ahead and Storage
Storing Leftovers
Once completely cooled, I store these cookies in an airtight container at room temperature. They stay fresh and soft for up to 5 days, though in my house, they rarely last that long!
Freezing
If I want to get ahead, I freeze these cookies in an airtight container or freezer-safe bags for up to 3 months. When I’m ready to enjoy, I just let them thaw on the counter for about an hour and they taste as fresh as day one.
Reheating
To warm up leftovers, I pop a couple of cookies in the microwave for about 10 seconds or place them in a preheated oven at 300°F for 5 minutes. This softens them up without drying them out—a little warmth really revives that just-baked magic.
FAQs
-
Can I use gel food coloring instead of liquid?
Absolutely! Gel food coloring works really well because it’s more concentrated, meaning you can get those vibrant colors without adding extra liquid that could change the dough consistency.
-
What if my dough feels too dry or crumbly?
This dough is supposed to be crumbly at first, but when you knead in the food coloring, it should come together nicely. If it’s still too dry, try adding a teaspoon of milk or water very gradually until it holds.
-
Can I make these cookies dairy-free?
Yes! Swap out the butter for a dairy-free margarine or coconut oil substitute and verify your white chocolate chips are dairy-free or omit them altogether for a safe, tasty alternative.
-
How do I prevent the sprinkles from falling off?
Rolling the cookie dough in sprinkles before chilling helps them stick well. Adding extra sprinkles immediately after baking while the cookies are still warm helps secure them too. Avoid touching the decorated area too much to keep sprinkles intact.
Final Thoughts
I can’t recommend this Halloween Sugar Cookies with Sprinkles Recipe enough—these cookies bring so much joy with their fun colors, sweet flavor, and that irresistible sprinkle crunch. They’ve become a Halloween tradition in my home that kids and adults alike look forward to. So roll up your sleeves, grab those vibrant food colors, and bake some festive magic that everyone will love. You won’t regret it, and your kitchen will smell amazing too!
Print
Halloween Sugar Cookies with Sprinkles Recipe
- Prep Time: 20 minutes
- Cook Time: 12 minutes
- Total Time: 32 minutes
- Yield: 12 cookies
- Category: Dessert
- Method: Baking
- Cuisine: American
- Diet: Vegetarian
Description
Celebrate Halloween with these festive and colorful Halloween Sugar Cookies swirled with neon green, orange, and purple dough, topped with spooky Halloween sprinkles. These soft and chewy cookies are perfect for parties or treats for kids and adults alike. Optionally add white chocolate chips for extra sweetness, and enjoy a fun baking experience with vibrant colors and delicious flavors.
Ingredients
Cookie Dough
- 1/2 cup unsalted butter, softened
- 3/4 cup packed brown sugar
- 1/4 cup white sugar
- 1 egg
- 1 teaspoon vanilla extract
- 2 cups all purpose flour
- 1/2 teaspoon salt
- 1/2 teaspoon baking powder
- 1/2 cup white chocolate chips (optional)
Color and Decoration
- Neon green, orange, and purple food coloring
- Assorted Halloween sprinkles
Instructions
- Cream Butter and Sugars: In a large bowl, use an electric mixer to cream together the softened butter, brown sugar, and white sugar until the mixture becomes fluffy. This step ensures the cookies will have a light texture.
- Mix in Egg and Vanilla: Beat in the egg and vanilla extract into the creamed mixture until well combined, forming the base of your cookie dough.
- Add Dry Ingredients: Slowly add the all-purpose flour, baking powder, and salt to the wet ingredients. Mix until just combined. The dough will be very crumbly at this point.
- Add White Chocolate Chips (Optional): Stir in white chocolate chips if using, distributing them evenly throughout the dough for added flavor and texture.
- Divide and Color Dough: Divide the dough into 3 equal portions. Add neon green food coloring to one portion, orange to the second, and purple to the third. Use your hands to thoroughly mix each portion until the color is uniform, washing hands between colors to prevent mixing.
- Shape Cookies: Take a small amount from each colored dough and roll them together to form a ball. Flatten the ball slightly to create a cookie with a beautiful swirled effect. Repeat until you have 12 cookies.
- Add Sprinkles: Roll the top and sides of each cookie ball in Halloween sprinkles to coat them fully, adding festive texture and color.
- Chill Dough: Place the cookies on a greased cookie sheet and refrigerate for at least 30 minutes. This chilling step is essential to prevent spreading during baking and to achieve thick cookies.
- Preheat Oven: While chilling the dough, preheat the oven to 375°F (190°C).
- Bake Cookies: Bake the chilled cookies in the preheated oven for 12-14 minutes. Watch for the edges to be set and cookies to be lightly golden.
- Final Decoration: Once out of the oven, add more sprinkles to any spots that look bare for additional festive appeal.
- Cool: Let the cookies cool on the baking sheet for 5 minutes, then transfer to a wire rack to cool completely before serving.
Notes
- Line your baking pan with parchment paper or silicone baking mats to help cookies bake evenly and prevent spreading.
- Do not skip the chilling step to ensure thick, well-shaped cookies that do not spread too much during baking.
- Customize with any food coloring or sprinkles to adapt this recipe for any season or occasion.
- Once completely cooled, store cookies in an airtight container at room temperature for up to 5 days.
- To make gluten free, substitute the all-purpose flour with a gluten-free blend and verify baking powder is gluten free.
- Freeze baked cookies in an airtight container or freezer bag for up to 3 months; thaw at room temperature before serving.
Nutrition
- Serving Size: 1 cookie
- Calories: 140
- Sugar: 10g
- Sodium: 90mg
- Fat: 6g
- Saturated Fat: 3.5g
- Unsaturated Fat: 2g
- Trans Fat: 0g
- Carbohydrates: 20g
- Fiber: 0.5g
- Protein: 2g
- Cholesterol: 25mg


