
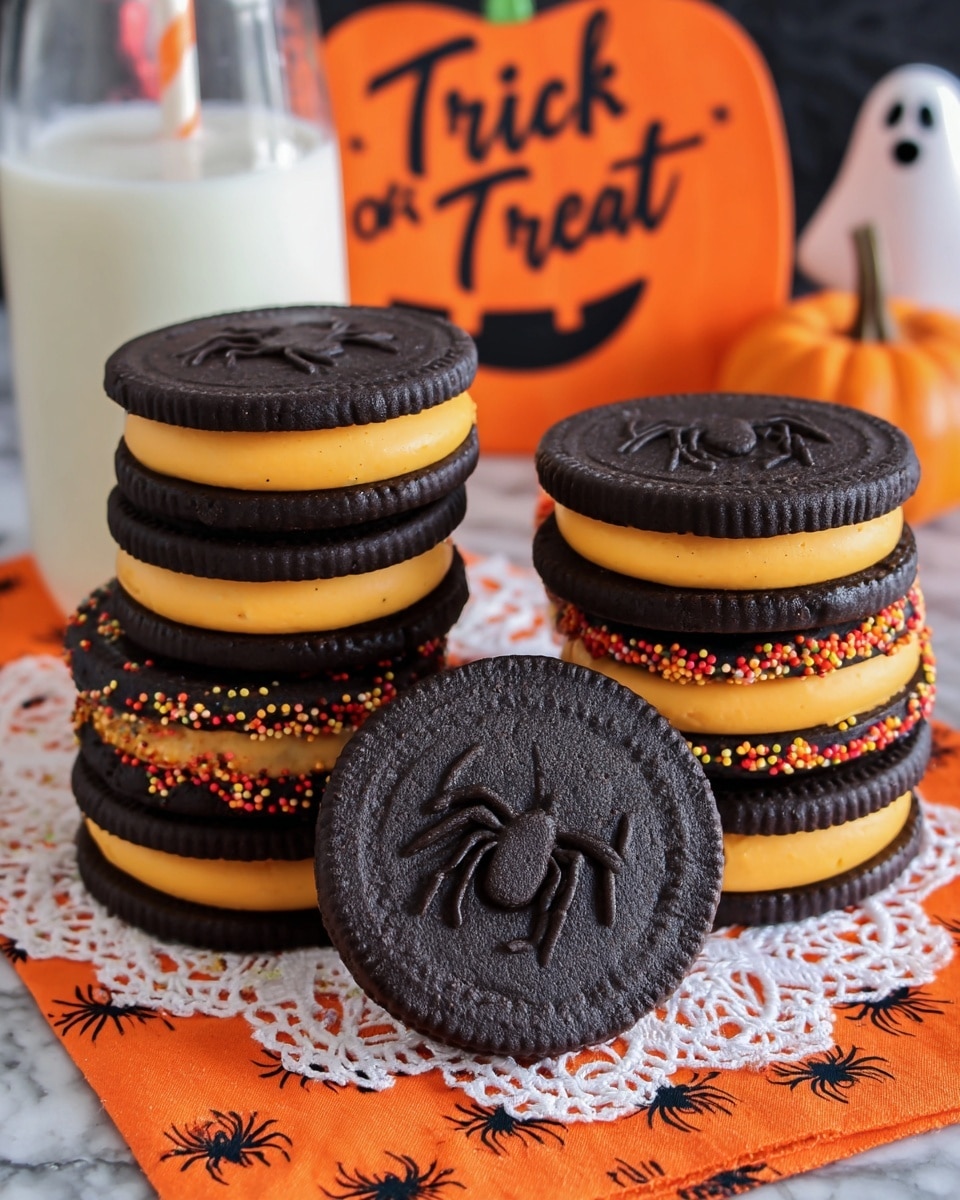
If you’re looking for a fun, festive, and absolutely delicious treat to wow your friends at your next spooky bash, this Halloween Oreo Cookies Recipe is exactly what you need. I absolutely love how these cookies turn out—chocolatey, soft, and filled with vibrant orange frosting that screams Halloween vibes. Stick with me, and I’ll share all the secrets to making these crowd-pleasers that never last long on my kitchen counter!
Why You’ll Love This Recipe
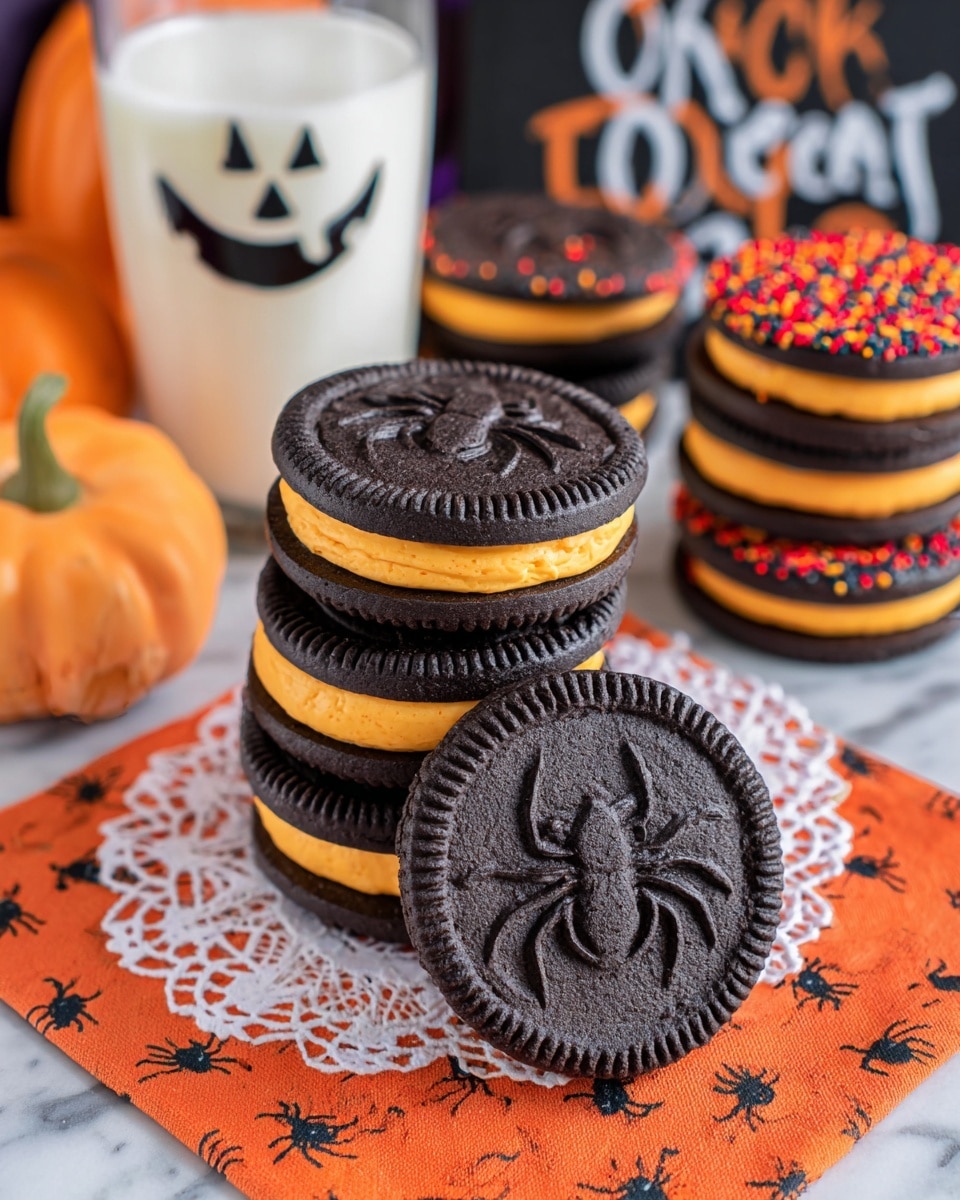
- Perfect Halloween Aesthetic: The black cookies paired with bright orange frosting are the ultimate seasonal eye candy.
- Simple Ingredients: You don’t need anything fancy—just staples you probably have on hand.
- Tender, Cocoa-Rich Cookies: The black cocoa powder gives these cookies a rich flavor that’s more sophisticated than your average chocolate cookie.
- Fun and Customizable: You can add sprinkles, stamps, or adjust frosting colors for personal flair.

Ingredients You’ll Need
These ingredients come together beautifully to create that perfect balance of rich chocolate cookie and creamy, citrusy-fun frosting. Here’s a little guide so you know exactly what to eyeball when shopping or scavenging your pantry.
- Unsalted butter: It’s key to use unsalted so you control the saltiness; plus, soften it to room temperature for smooth mixing.
- Powdered sugar: This gives the frosting and cookie dough its signature sweetness and silky texture—don’t swap it for granulated sugar here.
- Vanilla extract: The secret ingredient that amps up flavor subtly in both dough and frosting.
- Salt: Just a pinch enhances the chocolate without overpowering.
- All-purpose flour: The base of the cookies—make sure it’s fresh and measured properly for the best texture.
- Black cocoa powder: This is the magic behind that spooky black color and deep cocoa flavor; don’t substitute it with regular cocoa powder.
- Vegetable shortening: Adds structure and creaminess to the frosting where butter alone wouldn’t cut it.
- Orange gel coloring: A little goes a long way; gel coloring ensures that vibrant, intense orange without thinning your frosting.
Variations
One of the best things about this Halloween Oreo Cookies Recipe is how easy it is to tailor it to your style. Over time, I’ve found some fun variations to mix things up—don’t be shy about experimenting!
- Peanut Butter Filling: I once swapped the orange frosting for a creamy peanut butter frosting, and my family went crazy for it—especially kids who love that nutty twist.
- Spooky Flavors: Add a dash of cinnamon or pumpkin pie spice to the cookie dough for a seasonal kick that pairs beautifully with the cocoa.
- Gluten-Free Version: I’ve experimented with almond flour and gluten-free blends—it works if you tweak the baking time and chill the dough longer.
- Color Variations: Sometimes I use purple or green gel food coloring instead of orange for an extra eerie effect on the frosting.
How to Make Halloween Oreo Cookies Recipe
Step 1: Creamy Butter and Sugar Base
Start by beating together the softened unsalted butter and powdered sugar until the mixture feels light and fluffy—this usually takes about 3-4 minutes with an electric mixer. I found this step is crucial because it sets the tone for a tender cookie. After that, mix in the vanilla extract and salt thoroughly. You’ll notice the flavor already starts to come alive here, so don’t rush!
Step 2: Mixing the Dry Ingredients
In a separate bowl, whisk together the all-purpose flour and black cocoa powder. This ensures the cocoa is evenly distributed and avoids clumps that could mess with your cookie’s texture. Slowly add this dry mix into the butter mixture—you can’t just dump it all in or you might end up with flour clouds in your kitchen! Mix on low speed until the dough just comes together.
Step 3: Chill, Roll, and Cut
Gather the dough into a ball and split it into two equal halves. Wrap each half tightly in plastic wrap, then pop them into the fridge for about 30 minutes. This chilling step backs you up with the best rolling experience—less sticky, easier to handle.
Once chilled, preheat your oven to 350°F. Roll out one dough ball between two sheets of wax paper to about ¼ inch thick. I like using wax paper because it keeps the dough from sticking and cuts down on cleanup. Use a 2-inch round cookie cutter to cut out your circles. Don’t toss the scraps; reroll them gently and cut more shapes until you have around 12 circles.
Step 4: Bake to Perfection
Place your cookie circles on a nonstick baking sheet. If you want to add some spooky markings or Halloween designs, this is the time to gently press cookie stamps on top. Then, chill the entire baking sheet for about 10 minutes while you repeat the rolling and cutting with the second dough ball. Doing this extra step helps the cookies hold their shape during baking—they won’t spread like crazy.
Bake for 11-12 minutes. When you take them out, let the cookies cool on the hot pan for 5 minutes. This resting period firms them up so you can move them without breaking before transferring to a wire rack to cool completely.
Step 5: Whip Up the Spooky Frosting
Beat together the softened butter and vegetable shortening until creamy, then mix in vanilla extract. Gradually add powdered sugar and continue beating until the frosting is smooth and fluffy. Here’s a trick I discovered: adding the orange gel coloring a little at a time with a toothpick helps you get the perfect vibrant shade without over-coloring or thinning the frosting.
Spoon the frosting into a piping bag fitted with an icing tip #10 for that classic swirled look. Pipe frosting onto half the cooled cookies. Place the remaining cookies on top and gently press down to evenly spread the filling. For a final festive touch, roll the edges of your sandwich cookies in orange and black sprinkles—trust me, it’s worth the extra step!
Pro Tips for Making Halloween Oreo Cookies Recipe
- Chilling Dough is Key: Don’t skip resting the dough—this prevents spreading and keeps those spooky cookie shapes crisp.
- Use Black Cocoa Powder: I’ve tried regular cocoa, but black cocoa is a game-changer for the dark color and rich flavor you want.
- Work Quickly With Frosting: Pipe the frosting as soon as you’re done coloring it to keep vibrant colors and avoid it drying out.
- Avoid Overbaking: Taking cookies out as soon as edges are set guarantees soft centers and a better cookie texture overall.
How to Serve Halloween Oreo Cookies Recipe
Garnishes
I usually top the edges of my finished sandwich cookies with festive sprinkles—orange, black, and sometimes a little shimmer glitter if I’m feeling fancy. I find that sprinkles add a fun texture and make these cookies perfectly party-ready. You can also experiment with tiny edible googly eyes for an extra creep factor kids love.
Side Dishes
These cookies pair surprisingly well with a simple glass of cold milk or a hot cup of pumpkin spice latte to keep things cozy. For a party spread, I like serving them alongside candy corn, caramel apples, or mini pumpkin muffins for a sweet Halloween spread that’s sure to impress.
Creative Ways to Present
Once, I arranged a batch of these Halloween Oreo Cookies around a faux cauldron filled with orange sherbet punch—it was an instant hit and adorable centerpiece. You could also stack them on a tiered cake stand or package them individually in clear bags tied with black and orange ribbons as spooky party favors!
Make Ahead and Storage
Storing Leftovers
I store leftover Halloween Oreo Cookies in an airtight container at room temperature, and honestly, they stay fresh for about 3-4 days. If you’re making them ahead for a party, prepping the cookies and frosting separately works great—just frost them the day you’ll serve.
Freezing
I’ve frozen unfilled cookie disks in a single layer inside a freezer-safe bag for up to a month—just thaw them at room temp before frosting. Freezing the assembled sandwiches isn’t my favorite since the frosting texture changes, but if you must, freeze them without sprinkles for best results.
Reheating
If your leftover cookies feel a little stiff, a quick 5-second zap in the microwave softens them nicely without melting the frosting. Just keep an eye so they don’t get too warm—you want that perfect bite!
FAQs
-
Can I use regular cocoa powder instead of black cocoa powder in this Halloween Oreo Cookies Recipe?
You can substitute regular cocoa powder, but keep in mind it will make the cookies lighter in color and slightly less intense in chocolate flavor. Black cocoa powder is what gives these cookies their signature dark, almost black hue, perfect for Halloween flair.
-
How do I prevent the cookies from spreading too much during baking?
Chilling the dough before rolling out is crucial. Also, chilling the cookie shapes on the baking sheet before popping them in the oven keeps their shape crisp and pretty. Avoid over-creaming butter and sugar, which can cause too much air in the dough and lead to spreading.
-
Can I prepare these cookies ahead of time for a Halloween party?
Absolutely! The dough can be made and refrigerated up to 2 days in advance, or even frozen for longer storage. You can bake the cookies a day ahead and store them in an airtight container, then pipe on the frosting the day of your event for the freshest look and taste.
-
What tips do you have for getting the frosting color just right?
Use gel-based food coloring rather than liquid—you’ll get a vibrant color without thinning the frosting. Add it slowly with a toothpick and mix well, stopping when you reach your desired shade. This method prevents over-coloring and ensures smooth texture.
-
Can I make these cookies vegan or dairy-free?
With a few tweaks, yes! Swap the butter for a plant-based alternative and use a vegan shortening for the frosting. You may also need to experiment with binders and flavors to get the texture right, but it’s definitely doable for those with dietary restrictions.
Final Thoughts
This Halloween Oreo Cookies Recipe holds a special place in my heart because it combines my love for festive treats with simple, approachable baking. It’s my go-to when I want to impress family or friends with a homemade dessert that feels both classic and fun. I hope you give it a try—you’ll enjoy the rich cocoa flavor, smooth orange frosting, and all the smiles it brings around your kitchen table. Trust me, once you make these, they’ll become a Halloween tradition you look forward to every year!
Print
Halloween Oreo Cookies Recipe
- Prep Time: 15 minutes
- Cook Time: 11 minutes
- Total Time: 56 minutes
- Yield: 10 sandwich cookies
- Category: Dessert
- Method: Baking
- Cuisine: American
Description
Delight your Halloween celebrations with these spooky Halloween Oreo Cookies. Soft, cocoa-infused cookies sandwich a smooth, vibrant orange frosting, perfectly capturing the festive spirit with a rich chocolate flavor and a fun, colorful twist.
Ingredients
For the Cookies
- ½ cup unsalted butter, softened
- ½ cup powdered sugar
- 1 teaspoon vanilla extract
- ¼ teaspoon table salt
- 1 cup all-purpose flour (120g)
- 2 tablespoons black cocoa powder
For the Frosting
- ¼ cup unsalted butter, softened
- ¼ cup vegetable shortening
- ½ teaspoon vanilla extract
- 1 ¾ cup powdered sugar
- orange gel coloring
Instructions
- Prepare the cookie dough: Beat the softened butter and powdered sugar together until creamy. Add vanilla extract and salt, mixing again to combine the flavors evenly.
- Incorporate dry ingredients: Whisk the all-purpose flour and black cocoa powder together, then slowly add this to the butter mixture, blending until a dough forms.
- Chill the dough: Gather the dough into a ball, cut it in half, and wrap each in plastic wrap. Refrigerate for 30 minutes to firm up.
- Preheat the oven: Set your oven to 350°F (175°C) to prepare for baking the cookies.
- Roll and cut the cookies: Place one dough ball between two sheets of wax paper and roll out to ¼ inch thickness. Use a 2-inch round cookie cutter to cut out circles. Reroll scraps to make a total of 12 circles.
- Stamp and chill: Arrange the cookie circles on a nonstick baking sheet. If desired, gently press cookie stamps onto the tops for festive designs. Refrigerate the pan while you repeat rolling and cutting with the second dough ball.
- Bake the cookies: Bake for 11-12 minutes. After removing from the oven, cool the cookies on the hot pan for 5 minutes before transferring to a wire rack to cool completely.
- Prepare the frosting: Beat the softened butter, vegetable shortening, vanilla extract, and powdered sugar until smooth and creamy. Add orange gel coloring dropwise with a toothpick until the desired vibrant color is achieved.
- Assemble the sandwich cookies: Spoon the frosting into a piping bag fitted with icing tip #10. Swirl the frosting onto half of the cooled cookies. Top with the remaining cookies and gently press to spread the frosting evenly. Optionally, roll the edges in sprinkles for added festive flair.
- Storage: Store the assembled sandwich cookies in a loosely sealed container to keep them fresh.
Notes
- Black cocoa powder provides a deeper, richer chocolate flavor and an intense color perfect for Halloween treats.
- If you don’t have black cocoa powder, regular unsweetened cocoa powder can be used but the cookies will be lighter in color.
- Use wax paper between dough and rolling pin to prevent sticking and for easy transfer.
- Refrigerating the dough and cookie sheets helps maintain the cookie shape during baking.
- Feel free to customize the frosting color with other gel food colors to match your Halloween theme.
- Store cookies at room temperature for up to 3 days or refrigerate for longer freshness.
Nutrition
- Serving Size: 1 sandwich cookie
- Calories: 180
- Sugar: 14g
- Sodium: 50mg
- Fat: 9g
- Saturated Fat: 4g
- Unsaturated Fat: 4g
- Trans Fat: 0g
- Carbohydrates: 22g
- Fiber: 1g
- Protein: 1g
- Cholesterol: 15mg


