
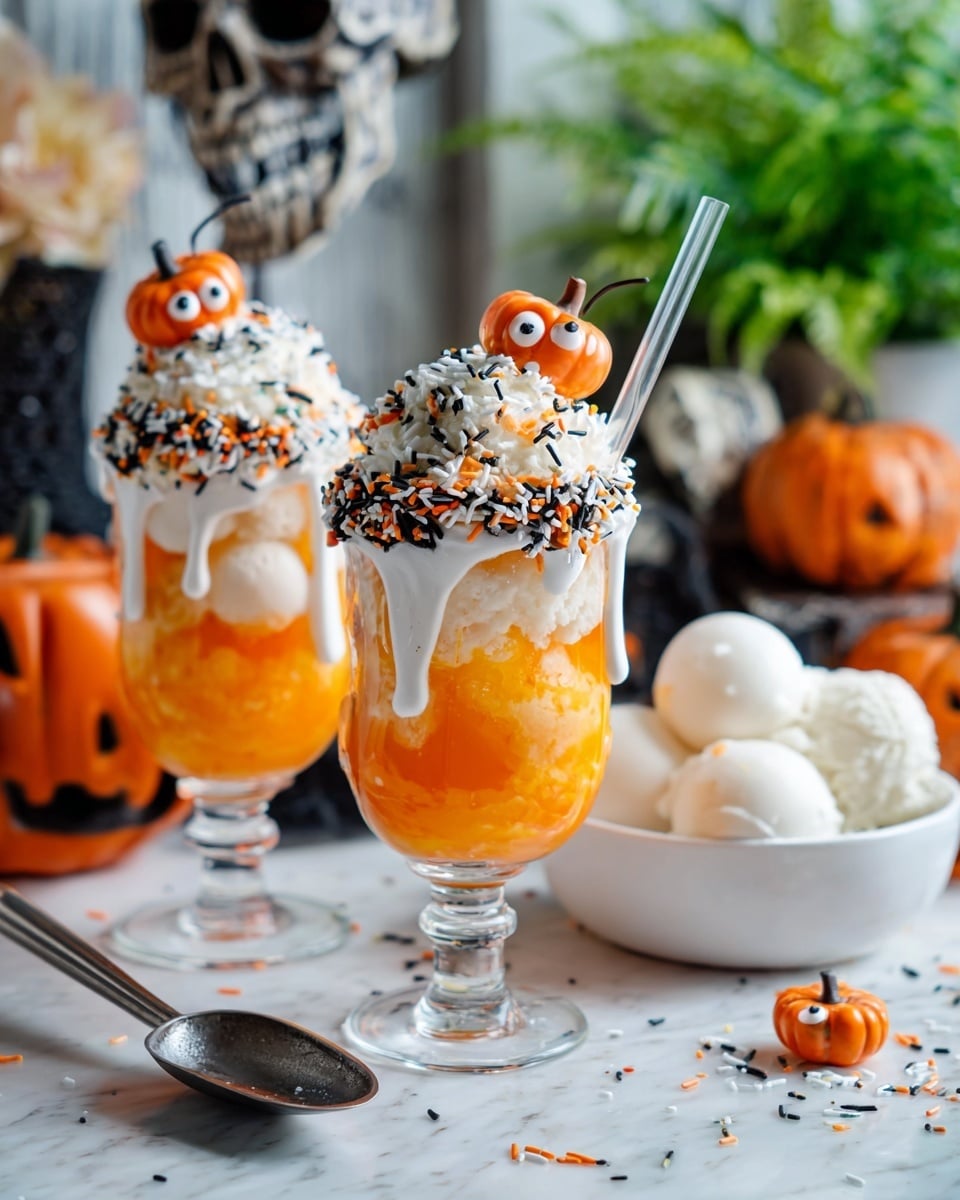
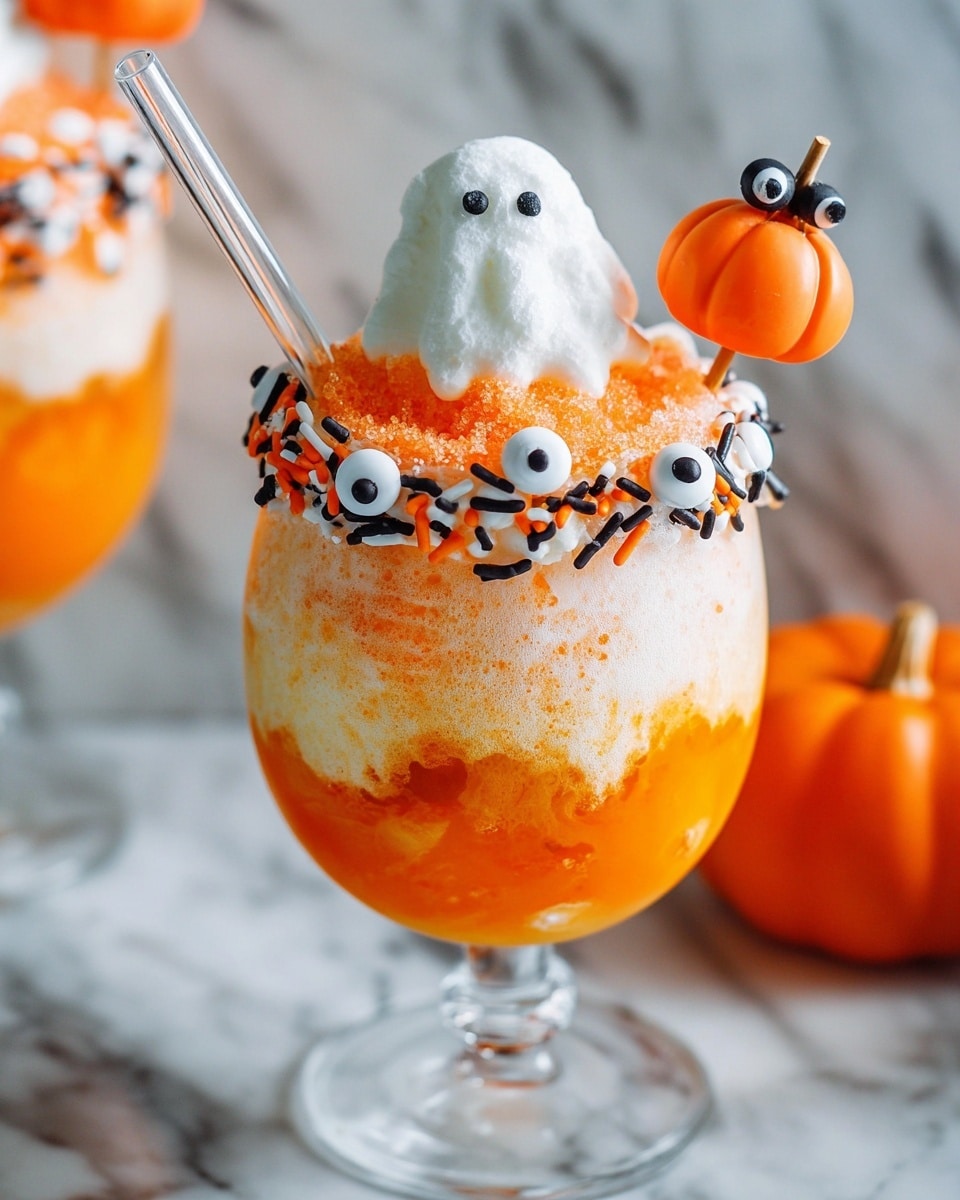
If you’re looking to add a spooky, sweet twist to your Halloween celebrations, this Halloween Ice Cream Floats Recipe is an absolute must-try. It’s simple, fun, and delivers that perfect blend of creamy vanilla ice cream with fizzy orange soda – plus some festive decorations that really bring the Halloween vibes alive. Trust me, you’ll be making this every October once you see how fan-freaking-tastic it turns out!
Why You’ll Love This Recipe
- Effortless Festive Fun: You can whip this up in just five minutes, no complicated prep involved.
- Perfect Crowd-Pleaser: My family goes crazy for how the fizzy soda and creamy ice cream play together.
- Customizable and Kid-Friendly: You can switch up the sprinkles and garnishes to suit your party’s vibe.
- Visually Stunning: That icing drip around the glass makes it look like something straight out of a Halloween party spread.

Ingredients You’ll Need
The ingredients for this Halloween Ice Cream Floats Recipe are surprisingly simple but come together to create an amazing taste and presentation. I usually keep my eye out for fresh orange soda and those fun Halloween sprinkles that make it special.
- Icing white writing: This is key to creating those eye-catching drips around the glass rim; the thicker, the better for texture.
- Sprinkles Halloween-themed: Look for candy eyes or any spooky sprinkles—these add a playful look that kids and adults love alike.
- Orange soda chilled: Make sure it’s nice and cold to keep the float refreshing and help the ice cream last longer.
- Vanilla ice cream: Classic vanilla balances the citrusy soda perfectly—go for good quality for the creamiest float.
Variations
I love mixing things up depending on the crowd or my mood. This Halloween Ice Cream Floats Recipe is super versatile, so don’t hesitate to get creative with flavors or toppings—it’s all about making it your own!
- Use grape soda instead of orange soda: I tried this once, and the dark purple gave the float a wicked cool “witch’s brew” look. Plus, the flavor is a fun twist for the taste buds.
- Swap vanilla ice cream for pumpkin spice: For a more seasonal vibe, pumpkin spice ice cream adds warmth and extra holiday flair that really pleases pumpkin lovers.
- Dairy-free option: Use coconut or almond milk-based vanilla ice cream to keep it vegan-friendly without sacrificing creaminess.
- Add edible glitter or colored sugar: This is my go-to for making floats a little more magical and dazzling when hosting parties.
How to Make Halloween Ice Cream Floats Recipe
Step 1: Create the Spooky Drip Glass Rim
Start with a clean and completely dry glass—this is crucial for the icing to stick properly. Using your white writing icing, carefully pipe it around the top edge of the glass. The trick is to go slow, pausing longer in some spots to build up thicker drips that run down the side. It’s like painting with frosting, so take your time and enjoy it! If the icing feels too stiff, I’ve found that briefly warming the pouch in hot water helps it drip smoothly without losing control.
Step 2: Sprinkle on the Halloween Decorations
While the icing is still wet and sticky, quickly sprinkle on your Halloween-themed candy eyes and any spooky sprinkles you like. The contrast of the white icing and colorful sprinkles makes it look so festive. This step is a crowd-pleaser with kids watching and getting excited about their floats coming to life.
Step 3: Add the Vanilla Ice Cream
Once your glasses have their spooky rims, scoop the vanilla ice cream into each glass, filling about three-quarters full. I use a small cookie scoop to keep the sizes consistent, and it just looks prettier that way. The ice cream is the creamy star of the float, so don’t be shy about filling it up.
Step 4: Pour in the Chilled Orange Soda
Now for the fizzy fun! Slowly pour the chilled orange soda into each glass, filling only halfway at first. The soda will fizz and foam up over the ice cream, so pouring slowly helps control the eruption. Once the fizz settles, you can carefully add more soda to fill the glass. This gives the float that bubbly, vibrant look that makes it feel like a Halloween party in a glass.
Step 5: Garnish and Serve Immediately
Add some festive straws and little candy pumpkins or candy corn for that extra touch. I’ve learned that ice cream floats are best enjoyed fresh, right after assembling—otherwise, the ice cream starts melting and the soda goes flat. So plan to make these just before your party or treat time for maximum impact.
Pro Tips for Making Halloween Ice Cream Floats Recipe
- Get the Icing Consistency Right: Warm your icing pouch in hot water so it flows easily but isn’t too runny—that balance makes for perfect drips.
- Pour Slowly to Control Foam: Pour the soda gently over the ice cream in stages to avoid overflow and a sticky mess.
- Use Clear Glassware: It really helps the colors pop and makes the drips and sprinkles look even more festive.
- Serve Immediately: Avoid soggy floats by assembling right before serving—trust me, it makes all the difference.
How to Serve Halloween Ice Cream Floats Recipe
Garnishes
I personally love topping these floats with a few candy pumpkins or candy corn for that pop of color and seasonal charm. Festive straws with stripes or spooky patterns take it up a notch and make sipping way more fun for the kids and adults alike.
Side Dishes
Since these floats are a sweet treat on their own, I like pairing them with easy Halloween finger foods like caramel popcorn, pumpkin-shaped cookies, or mini grilled cheese sandwiches. The floats complement those savory or crunchy bites perfectly without overwhelming anyone.
Creative Ways to Present
One of my favorite presentation ideas is serving these floats in mini Mason jars with little Halloween-themed gift tags tied around the neck. It instantly turns a simple float into a party favor everyone wants to grab. You could also freeze gummy worms into the ice cream ahead of time for a spooky surprise in every sip.
Make Ahead and Storage
Storing Leftovers
Since ice cream floats are best fresh, leftovers don’t hold up well once soda is added. However, if you have leftover ice cream or soda, store them separately in airtight containers in the fridge or freezer to keep them fresh for the next float session.
Freezing
I’ve found that freezing the ice cream ahead of time makes the float creamier and lasts longer when served. But avoid freezing the whole float once assembled because the soda goes flat and the texture suffers.
Reheating
Since this is a cold dessert, reheating isn’t really applicable. If you have leftover soda or melted ice cream, just enjoy them chilled separately or use in recipes like milkshakes for zero waste.
FAQs
-
Can I make the Halloween Ice Cream Floats Recipe ahead of time?
It’s best to assemble the floats right before serving to prevent the ice cream from melting and soda from going flat. You can prep the glasses with icing and sprinkles ahead, but add ice cream and soda last minute.
-
What if I don’t have orange soda?
You can use any citrus-flavored soda like lemon-lime or even grape soda for an interesting color and flavor variation. Just make sure it’s chilled for the best float experience.
-
Can I use store-bought sprinkles or should I get Halloween-themed ones?
Store-bought sprinkles work just fine if you don’t have themed ones. But Halloween-themed sprinkles, especially candy eyes, add charm and make your floats look extra festive and fun.
-
How do I prevent the icing from melting or running too much?
Adjust the icing’s temperature—warm it to make it drip easily, and chill the glasses quickly after icing to set the drips. Keeping it slightly thicker helps create those perfect drips without the mess.
-
Is this recipe kid-friendly?
Absolutely! Kids love the combination of sweet ice cream, fizzy soda, and fun decorations. Just supervise to avoid sticky spills and encourage careful sipping with straws.
Final Thoughts
This Halloween Ice Cream Floats Recipe has become one of my absolute favorites for celebrations—it’s simple, wonderfully nostalgic, and the perfect way to wow guests with minimal fuss. I love how the fizzy soda contrasts with that creamy ice cream and the spooky decorations really seal the deal. If you want a no-brainer dessert that feels special and festive, this one’s for you. Go ahead, gather your ingredients, and get ready to impress your family and friends with this delightful Halloween treat!
Print
Halloween Ice Cream Floats Recipe
- Prep Time: 5 minutes
- Cook Time: 0 minutes
- Total Time: 5 minutes
- Yield: 1 serving
- Category: Beverage
- Method: No-Cook
- Cuisine: American
Description
Celebrate Halloween with these spooky and fun Halloween Ice Cream Floats, featuring creamy vanilla ice cream, fizzy orange soda, and festive Halloween-themed decorations. Perfect for a quick and delightful treat that’s both visually entertaining and deliciously refreshing.
Ingredients
Decorations
- 3 Tablespoons icing white writing
- 1 Teaspoon Halloween-themed sprinkles
- candy eyes (as needed)
Main Ingredients
- 6 Ounces orange soda, chilled
- ¾ Cup vanilla ice cream
Instructions
- Prepare the Glass: Take a clean, completely dry glass. Use the white writing icing to slowly pipe around the top edge, allowing the icing to drip down the sides in varied lengths to create a spooky effect.
- Add Sprinkles: While the icing is still wet, carefully sprinkle Halloween-themed sprinkles and candy eyes onto the drips to decorate the glass rim.
- Add Ice Cream: Scoop the vanilla ice cream into the glass using a small cookie scoop or spoon, filling it about three-quarters full.
- Pour Orange Soda: Slowly pour chilled orange soda into the glass, filling it halfway first to allow the soda to fizz and foam. Once the foaming subsides, gently add more soda until the glass is full.
- Garnish and Serve: Add festive straws and optional garnishes such as candy pumpkins or candy corn. Serve immediately to enjoy the ice cream float at its best.
Notes
- If the white writing icing is too thick to drip nicely, warm it briefly in hot water to loosen it. If it’s dripping too much, chill the glasses in the refrigerator or use a fan to speed up setting.
- A 12-ounce glass is ideal for serving; adjust ingredient amounts accordingly if using different sized glasses.
- This recipe makes one serving. Multiply ingredients to prepare more floats for a party or group.
- Ice cream floats should be served immediately before the ice cream melts to maintain the best texture and flavor.
Nutrition
- Serving Size: 1 float (approx. 12 oz)
- Calories: 220
- Sugar: 30g
- Sodium: 60mg
- Fat: 7g
- Saturated Fat: 4.5g
- Unsaturated Fat: 2g
- Trans Fat: 0g
- Carbohydrates: 35g
- Fiber: 0g
- Protein: 3g
- Cholesterol: 20mg
