
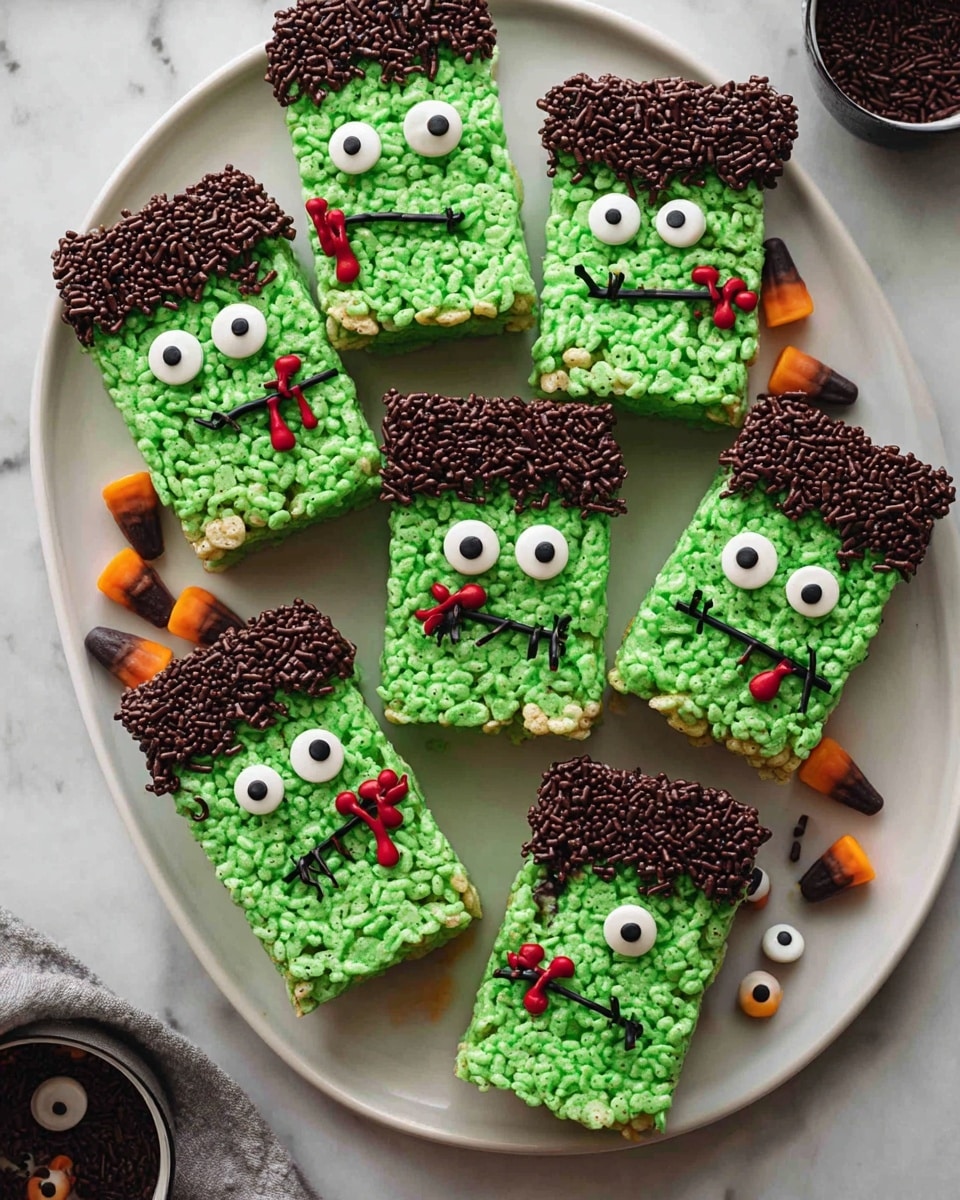
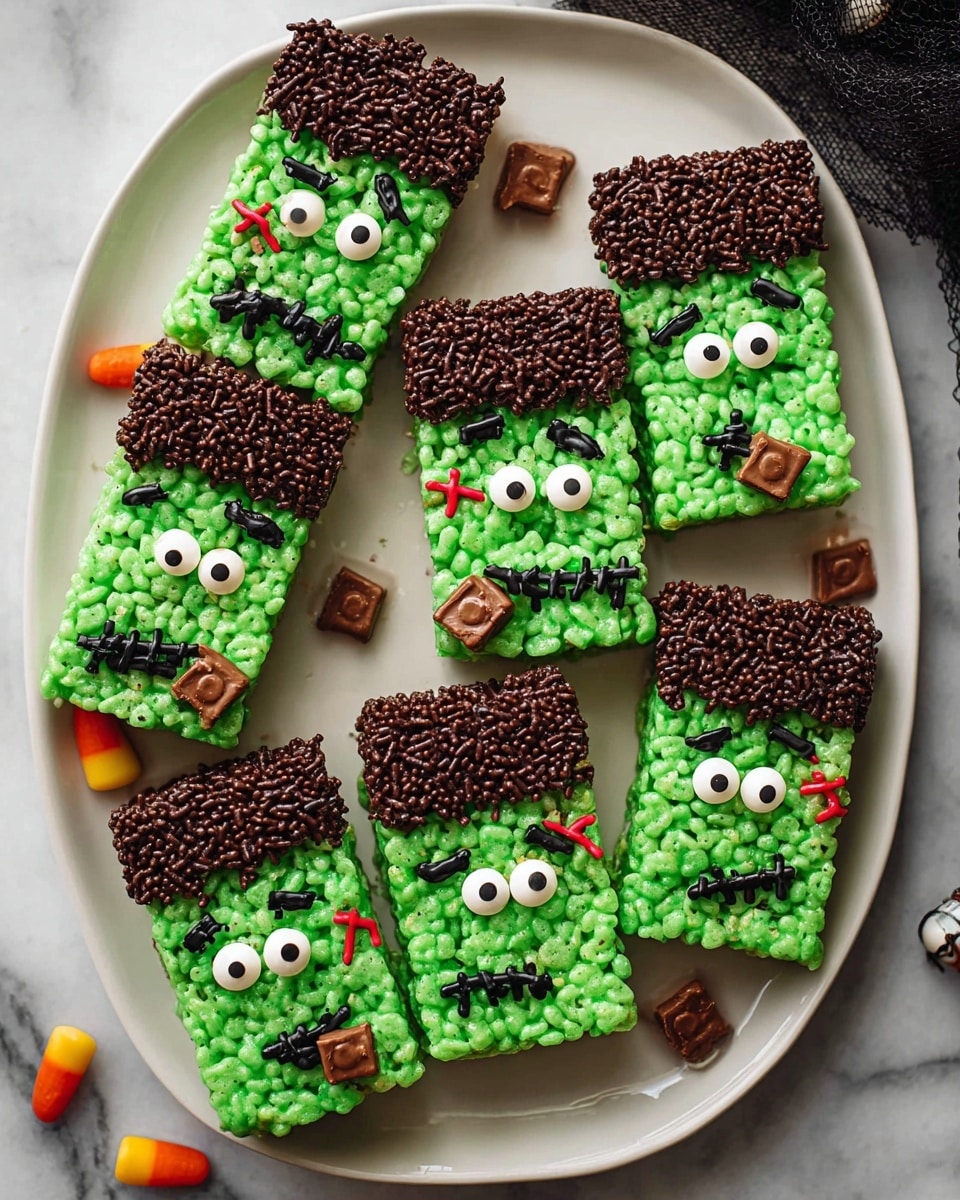
If you’re looking for a fun, spooky, and totally delicious treat to wow your friends and family this season, you’re in the right place! I absolutely love this Halloween Frankenstein’s Rice Krispies Treats Recipe because it’s as playful as it is tasty — fluffy green marshmallow cereal squares decked out like the iconic Frankenstein’s monster. Trust me, whether it’s for a Halloween party or just a weekend bake with the kids, these treats bring smiles and sticky fingers all around.
Why You’ll Love This Recipe
- Fun and Festive: It transforms classic Rice Krispies treats into a show-stopping Halloween treat your guests will adore.
- Super Simple Ingredients: No fancy, hard-to-find items here; mostly pantry staples with a few fun add-ons.
- Kid-Friendly Activity: Decorating the Frankenstein faces is a blast for little hands and creative minds.
- Customizable Design: You can easily adjust colors or decorations based on your party theme or what you have on hand.

Ingredients You’ll Need
This recipe merges classic Rice Krispies treats with vibrant green marshmallow magic and fun Halloween decorations. When shopping, I like to grab candy eyeballs and writing gel in advance because those finishing touches really make the treats come alive.
- Nonstick baking spray: Essential for easy cleanup and to keep treats from sticking to the pan.
- Unsalted butter: Using unsalted lets you control the saltiness; it melts perfectly for the marshmallow base.
- Mini marshmallows: These melt evenly and give that classic gooey texture.
- Kosher salt: Just a pinch balances the sweetness.
- Green food coloring: The star of the show for our Frankenstein look — make sure it’s bright and fun!
- Rice Krispies cereal: The crispy foundation that brings crunch to the softness.
- Semisweet chocolate chips: Melt these for dipping and attaching fun decorations.
- Chocolate sprinkles: Adds texture and a little spooky flair.
- Candy eyeballs: So cute and creepy — they really give personality to Frankenstein.
- Reese’s Minis Unwrapped: Perfect as little neck bolts. Peanut butter and chocolate combo = winner!
- Black writing gel: For adding stitches, mouths, and signature Frankenstein details.
- Red writing gel (optional): Adds a playful “bloody” effect if you want to amp up the Halloween vibe.
Variations
I love when recipes feel customizable, and this Halloween Frankenstein’s Rice Krispies Treats Recipe definitely fits the bill — it’s one of those flexible sweets where you can swap out ingredients or tweak decorations based on what you have or your dietary needs.
- Gluten-Free Option: Use gluten-free crispy rice cereal to make sure everyone at your party can enjoy the treats.
- Dairy-Free Version: I’ve swapped butter for coconut oil and used dairy-free marshmallows with great success for friends who avoid dairy.
- Color Variations: For a different monster theme, try purple or bright orange food coloring to create other Halloween characters.
- Nut-Free Substitute: Replace Reese’s Minis with small sugar cubes or square candies if you’re serving nut-sensitive guests.
How to Make Halloween Frankenstein’s Rice Krispies Treats Recipe
Step 1: Prep Your Pan and Melt Butter
Start by spraying the bottom and sides of a 13 x 9-inch pan with nonstick baking spray — this prep step makes cleanup so much easier and stops your treats from sticking. Then, melt 4 tablespoons of unsalted butter in a large pot over medium-low heat. This slow melt prevents burning and preps a smooth base for the marshmallows. I like to keep the heat gentle here; rushing this step can scorch the butter and give a bitter taste.
Step 2: Add Marshmallows, Salt, and That Perfect Green Color
Once the butter is melted, toss in 10 ounces of mini marshmallows and a pinch of kosher salt. Stir gently until the marshmallows melt completely and the mixture is smooth and glossy. This part reminds me of making homemade fudge — patience is key! Now, the fun part: add green food coloring a little at a time, stirring until you get a bright, Frankenstein-green color that makes you smile. I usually start with 15-20 drops, then add more if needed. Remember, the marshmallow base lightens as it dries, so don’t be shy with the coloring.
Step 3: Fold in the Rice Krispies Cereal
Remove your pot from heat, then gently fold in 5 cups of Rice Krispies cereal. You want to coat every piece with the gooey green marshmallow goodness — I like to use a sturdy spoon and fold carefully so the cereal stays crispy and fluffy. This step is satisfying but moves quickly because the marshmallows start setting — so have your pan ready!
Step 4: Press, Cool, and Cut
Transfer your sticky green mixture to the prepared pan. To avoid sticky fingers, grease your hands or use a piece of parchment paper to press the treats down evenly and firmly. Then, let them stand at room temperature for 15 minutes to set up nicely. Once cool, flip them out onto a cutting board, slice the rectangle in half lengthwise, then cut each half into 5 pieces crosswise — ten Frankenstein treats ready for decorating!
Step 5: Melt Chocolate and Get Decorating
Place 8 ounces of semisweet chocolate chips in a microwave-safe glass measuring cup or bowl. Microwave in 30-second bursts, stirring in between, until the chocolate is silky smooth. This method prevents overheating and seizing — a little stirring between rounds truly saves your chocolate from turning grainy. Then dunk one end of each treat in the melted chocolate, set them on parchment paper, and quickly sprinkle with chocolate sprinkles before it sets.
Step 6: Add the Eyes, Neck Bolts, and Final Details
Use the remaining melted chocolate as glue to attach candy eyeballs right onto the treat’s face and place Reese’s Minis as neck bolts on the sides. Once these are attached, grab your black writing gel and draw Frankenstein’s signature stitches and goofy mouths. Feeling daring? Add a touch of red writing gel for “blood” — this little detail brings the treats to life in the cutest, eeriest way. When I first made these with my niece, she loved painting on the “scars” with the gel — so much fun!
Pro Tips for Making Halloween Frankenstein’s Rice Krispies Treats Recipe
- Don’t Rush the Melting: Low heat and patience prevent burnt butter or scorched marshmallows, which can ruin taste.
- Green Color Boost: Add food coloring gradually since the mixture darkens as it cools, but you want a vibrant green from the start.
- Use Greased Hands or Parchment: Pressing with lightly oiled hands or a sheet of parchment stops the sticky marshmallow from becoming a mess.
- Chocolate Precision: Stir chocolate frequently during melting, so it stays smooth and shiny without burning or seizing.
How to Serve Halloween Frankenstein’s Rice Krispies Treats Recipe
Garnishes
I keep it simple with candy eyeballs and Reese’s Minis for that classic Frankenstein vibe, but sometimes I add tiny edible silver balls or edible glitter for extra sparkle at Halloween parties. The black and red writing gels definitely bring personality and character to each treat, and kids get a kick out of “drawing” their monster faces.
Side Dishes
These treats pair wonderfully with warm apple cider or a cold glass of milk. For a full-on spooky snack table, I often add popcorn balls drizzled with dark chocolate or some savory pumpkin-spiced nuts to balance the sweetness.
Creative Ways to Present
For parties, I like to line a black tray with orange tissue paper and arrange the Frankenstein treats like a little monster army. Sometimes I’ve skewered them on sticks to make “Rice Krispies Frankenstein pops” for easier hand-held fun. Wrapping each piece with a cello bag tied with a green ribbon turns them into perfect party favors.
Make Ahead and Storage
Storing Leftovers
Once decorated and fully set, I store leftovers in an airtight container at room temperature — they keep well for about 3 to 4 days. Just between you and me, though? The first day they’re freshest, so try to savor them quickly!
Freezing
I’ve frozen these treats before by wrapping them tightly in plastic wrap and placing them in a freezer-safe bag. They freeze happily for up to a month. When ready to enjoy, thaw them overnight in the fridge — I recommend decorating fresh after thawing to maintain the best appearance and texture.
Reheating
Reheating isn’t really necessary since these treats are best enjoyed at room temperature. But if they’ve gotten a little hard, you can soften them by microwaving in 10- to 15-second bursts—just be cautious or they’ll get soggy quickly!
FAQs
-
Can I use regular marshmallows instead of mini ones in this Halloween Frankenstein’s Rice Krispies Treats Recipe?
Absolutely! Regular marshmallows will work just fine — you might just need to cut them in half or give them a bit more time to melt evenly. Mini marshmallows tend to melt faster and more smoothly, but in a pinch, regular size works too.
-
How do I get the green marshmallow color so vibrant without affecting taste?
I recommend using gel food coloring instead of liquid because it provides more intense color without adding extra liquid, which could affect the texture. Adding the color bit by bit after your marshmallows melt allows you to control the shade perfectly.
-
Can I make these treats without chocolate or candy decorations?
You can! The base green Rice Krispies treats are delicious on their own. But the chocolate dip and decorations are what make it undeniably Frankenstein-like and extra fun. For a simpler version, feel free to skip or substitute decorations with other small candies or icing.
-
What’s the best way to transport these treats to a party?
Place the treats in a single layer inside a sturdy container lined with parchment or wax paper to prevent sticking. If stacking is necessary, separate layers with parchment paper. Keep them cool and avoid direct sunlight to keep chocolate decorations intact.
Final Thoughts
This Halloween Frankenstein’s Rice Krispies Treats Recipe has become such a favorite for me because it’s cheerful, easy, and incredibly tasty all at once. It’s that perfect mix of childhood nostalgia and spooky fun with a grown-up twist. I hope you try these out and enjoy making (and munching!) them just as much as my family and I do every fall. Seriously, once you start making these, they become a Halloween tradition you won’t want to skip.
Print
Halloween Frankenstein’s Rice Krispies Treats Recipe
- Prep Time: 30 minutes
- Cook Time: 5 minutes
- Total Time: 50 minutes
- Yield: 10 servings
- Category: Dessert
- Method: Stovetop
- Cuisine: American
Description
Celebrate Halloween with these fun and festive Frankenstein’s Monster Rice Krispies Treats! Made with crispy cereal coated in bright green marshmallow, dipped in chocolate, and decorated with candy eyes, peanut butter cups, and writing gels for spooky details, these treats are perfect for parties or Halloween-themed snacks.
Ingredients
Base Ingredients
- Nonstick baking spray
- 4 tablespoons unsalted butter
- 10 ounces mini marshmallows (5-1/2 cups)
- Pinch kosher salt
- Green food coloring, enough to make the mixture bright green
- 5 cups Rice Krispies cereal
Decoration Ingredients
- 8 ounces semisweet chocolate chips
- ¼ cup chocolate sprinkles
- 20 candy eyeballs
- 20 Reese’s Minis unwrapped
- Black writing gel
- Red writing gel (optional)
Instructions
- Prepare Pan: Spray the bottom and sides of a 13 x 9-inch pan with nonstick baking spray to prevent sticking.
- Melt Butter: In a large pot over medium-low heat, melt the 4 tablespoons of unsalted butter until fully liquefied.
- Add Marshmallows and Color: Add 10 ounces of mini marshmallows and a pinch of kosher salt to the melted butter. Stir continuously until the marshmallows are fully melted and smooth. Add green food coloring gradually until the mixture reaches a bright green color, mixing thoroughly.
- Mix with Cereal: Remove the pot from heat. Add 5 cups of Rice Krispies cereal and stir until every piece is completely coated with the green marshmallow mixture.
- Transfer to Pan: Transfer the sticky mixture into the prepared pan. Use a piece of parchment paper or greased hands to press the mixture evenly against the bottom of the pan. Allow to stand at room temperature for 15 minutes to set.
- Cut Treats: Turn the set mixture out onto a cutting board. Cut the rectangle in half lengthwise, then cut each half into 5 pieces crosswise, making 10 treats total.
- Melt Chocolate: Place 8 ounces of semisweet chocolate chips in a microwave-safe glass measuring cup or bowl. Microwave in 30-second intervals, stirring between each, until smooth and fully melted.
- Dip and Decorate: Dip one end of each treat into the melted chocolate and place on parchment paper. Immediately sprinkle the chocolate with chocolate sprinkles for texture.
- Add Candy Details: Use the remaining melted chocolate to attach 20 candy eyeballs and 20 Reese’s Minis (as neck bolts) to the treats.
- Finish with Writing Gel: Use black writing gel to draw mouths and stitches on the treats. Optionally, use red writing gel to add a bit of “blood” for extra spooky effect.
Notes
- Use parchment paper or greased hands to prevent the sticky rice krispies mixture from sticking when pressing into the pan.
- Adjust green food coloring incrementally to reach desired brightness without overpowering flavor.
- Microwave chocolate in short intervals to avoid burning and ensure smooth melting.
- For safer handling, allow melted chocolate to cool slightly before dipping to maintain the right consistency.
- Store treats in an airtight container at room temperature to maintain freshness for up to 2 days.
Nutrition
- Serving Size: 1 treat (approx. 1/10 of recipe)
- Calories: 220
- Sugar: 18g
- Sodium: 95mg
- Fat: 10g
- Saturated Fat: 6g
- Unsaturated Fat: 3g
- Trans Fat: 0g
- Carbohydrates: 30g
- Fiber: 1g
- Protein: 2g
- Cholesterol: 15mg


