
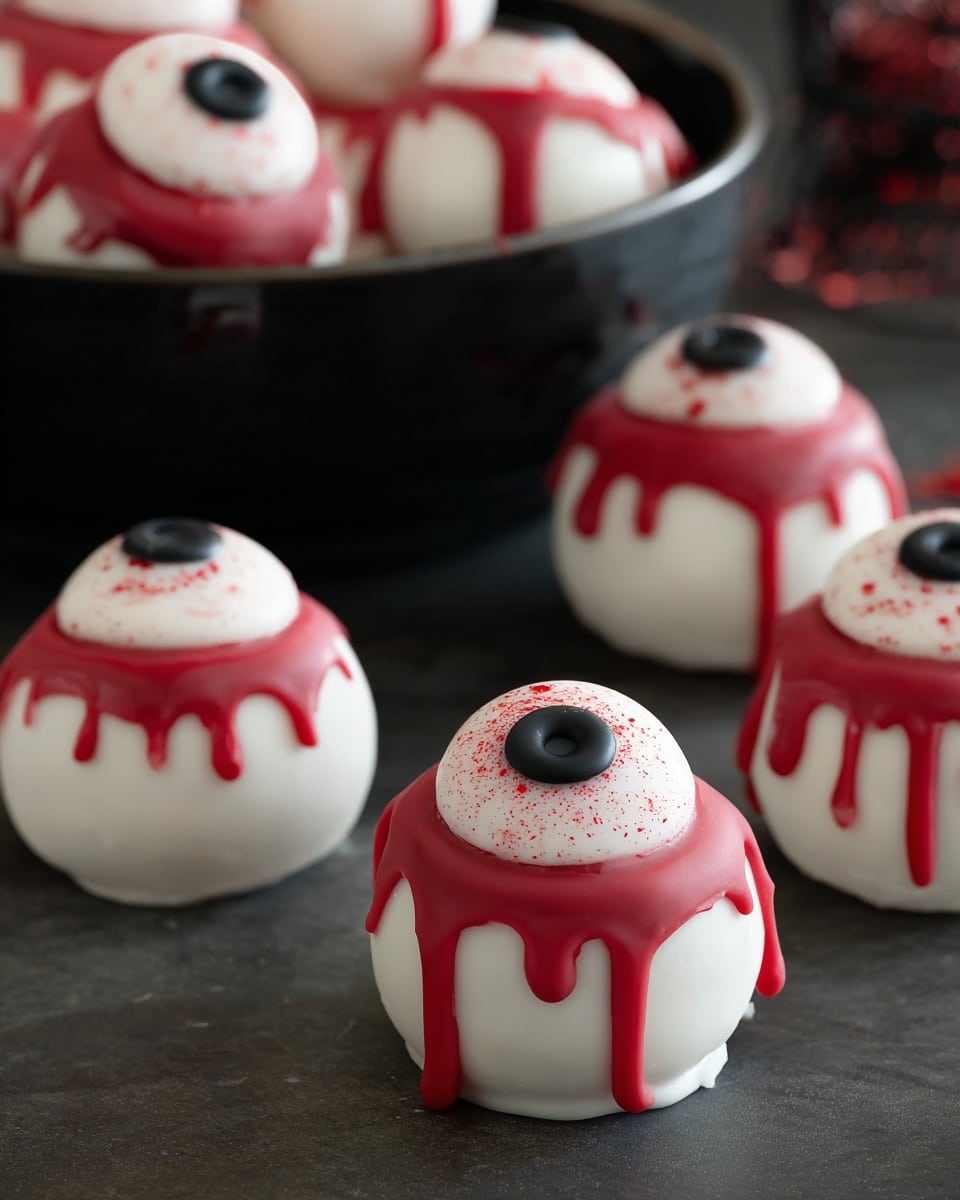
If you’re on the hunt for a show-stopping, spooky treat this season, this Halloween Eyeballs Recipe is going to be your new best friend. I absolutely love how these creepy yet adorable peanut butter truffles turn out, and trust me—they’re not as complicated as they look. Whether you’re planning a Halloween party or just want a festive twist on a classic sweet, you’ll find that these eyeball treats bring the perfect mix of fun and deliciousness.
Why You’ll Love This Recipe
- Simple Ingredients: You likely have most of these pantry staples on hand, making this recipe easy and convenient.
- Fun and Festive: The candy eyeballs and red gel create spooky visuals perfect for Halloween parties or trick-or-treat snacks.
- No-Bake Convenience: No oven needed—just a bit of chilling and dipping, which makes prep stress-free.
- Customizable: You can easily tweak flavors or decorations to suit your personal taste or dietary needs.

Ingredients You’ll Need
The ingredients in this Halloween Eyeballs Recipe work together to create a creamy, rich peanut butter center coated in smooth white chocolate with a fun, spooky finish. When shopping, look for good-quality peanut butter and candy melting wafers, as these will make your truffles taste and look their best.
- Unsalted butter: Softened for easy mixing and to keep the flavor balanced.
- Creamy peanut butter: Adds richness and a classic flavor everyone loves.
- Marshmallow creme: Helps bind the filling with a slight sweetness and fluffiness.
- Vanilla extract: Just a touch brightens up the flavors wonderfully.
- Table salt: Even a pinch enhances the overall taste and balances the sweetness.
- Powdered sugar: Creates that soft dough texture and adds necessary sweetness.
- White candy melting wafers: These melt smoothly for coating the candies—try to pick wafers with a clean flavor.
- Red sparkle gel: Perfect for making convincing “bloodshot” veins on your eyeballs.
- Large candy eyes: The star of the show! You want something with personality to bring these eyeballs to life.
Variations
One of the things I adore about this Halloween Eyeballs Recipe is how easy it is to make it your own. I’ve played around with different coatings and fillings, and you can definitely customize it to suit your preferences or dietary restrictions.
- Chocolate coating: I’ve swapped out the white candy wafers for milk or dark chocolate before—and it gives the eyeballs a richer, less sweet flavor.
- Nut allergy friendly: Try sunflower seed butter in place of peanut butter; it works surprisingly well and keeps the texture creamy.
- Spicy twist: Adding a pinch of cayenne or cinnamon to the filling gives your eyeballs a surprising kick that my family swears by.
- Extra decorative: Sometimes I add edible glitter or colored sprinkles around the eyeballs for a sparkling effect that wows the kiddos.
How to Make Halloween Eyeballs Recipe
Step 1: Mix the Peanut Butter Filling
Start by beating together the softened unsalted butter, creamy peanut butter, marshmallow creme, vanilla extract, and a pinch of salt until smooth and creamy. This part is key for a smooth texture—make sure everything is well combined before you slowly add the powdered sugar. Gradually stir the powdered sugar into the mix until it forms a soft, pliable dough that you can roll. If it feels too sticky, sprinkle in a little more powdered sugar, but not too much—you want it soft, not dry.
Step 2: Shape and Chill Your Eyeballs
Roll the peanut butter mixture into 36 even balls—this makes sure your eyeballs are all the same size and bake evenly in the fridge. I like using a small cookie scoop to keep sizes consistent. Place them on a wax paper-lined tray and pop them into the fridge for at least 30 minutes. This chilling step is crucial for getting the balls firm enough to dip into the chocolate without breaking apart.
Step 3: Dip and Decorate
Melt your white candy melting wafers following the package directions—usually, a microwave in short bursts with stirring works best to avoid burning. Use a toothpick to dip each peanut butter ball into the melted white chocolate, fully coating them. Set them back onto the wax paper-lined tray. I found that covering the toothpick hole with a dab of extra melted chocolate seals the coating nicely and prevents cracks.
Once the coating sets a bit, squeeze a small circle of red sparkle gel on the top of each eyeball, then gently press one candy eye onto the gel. Use a toothpick to drag the red gel down the sides from the center, creating eerie “bloodshot” veins. Let everything set completely before handling.
Pro Tips for Making Halloween Eyeballs Recipe
- Use Room Temperature Ingredients: Softened butter and creamy peanut butter blend more easily, giving you a smooth filling without lumps.
- Chill Like a Pro: Don’t skip refrigerating the balls; this keeps them firm during dipping and prevents meltdowns.
- Be Gentle when Decorating: Press candy eyes lightly to avoid cracking the white coating beneath.
- Temperature Control for Melting Chocolate: Melt wafers slowly and stir often to prevent overheating and clumping.
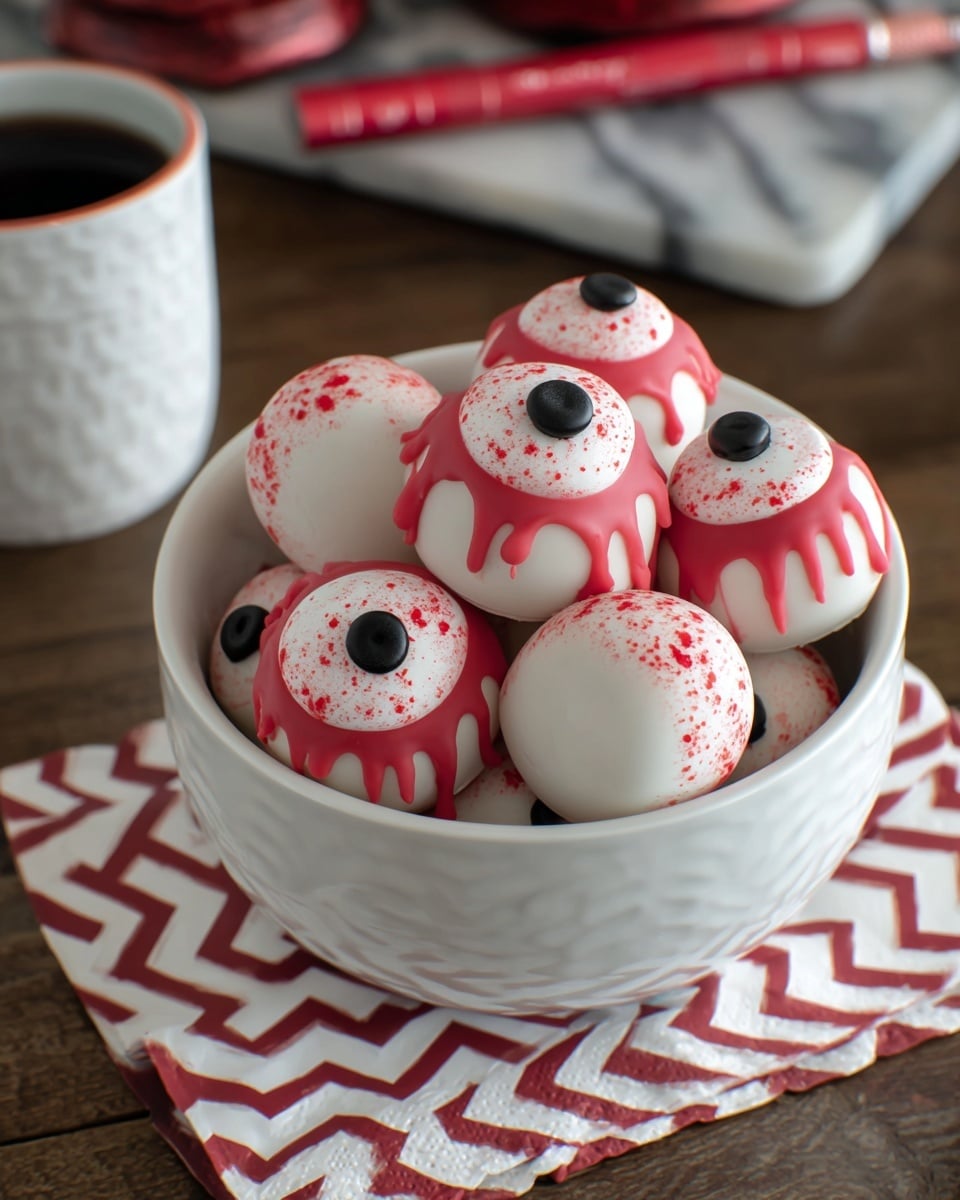
How to Serve Halloween Eyeballs Recipe
Garnishes
I love adding a bit of edible glitter around the edges of these eyeballs for a touch of shine, or placing them on a bed of crushed black cookie crumbs to mimic “dirt” for an extra creepy vibe. Sometimes a little green gel around the eyeball’s edges adds a slimy look that my kids go crazy for.
Side Dishes
Pair these eyeballs with a platter of popcorn mixed with candy corn and pretzels for a sweet-salty combo, or serve alongside some spooky cupcakes and pumpkin spice lattes for a complete Halloween treat spread.
Creative Ways to Present
One Halloween, I arranged these eyeballs on a black serving tray lined with red tissue paper and scattered plastic spiders around them. It was a hit! You can also stack them in a clear jar for a quirky grab-and-go display, or even place them on cupcake toppers for a fun edible decoration.
Make Ahead and Storage
Storing Leftovers
I store any leftover Halloween eyeballs in a loosely sealed container in the refrigerator—they keep well for up to a week. You want to keep them cool but not airtight to maintain the coating’s crispness without moisture buildup.
Freezing
These eyeballs freeze beautifully. I wrap them individually in parchment paper and place them in a freezer-safe container. When I’m ready to serve, I thaw them overnight in the fridge. They hold their shape and taste almost as fresh as the day I made them.
Reheating
Since these are no-bake truffles, you won’t need to heat them. Just bring them to room temperature before serving to get the best chewy, creamy texture. If warm, the filling softens delightfully without melting the chocolate coating.
FAQs
-
Can I use natural peanut butter for the Halloween Eyeballs Recipe?
Natural peanut butter tends to be oilier and less creamy, which can affect the texture of your filling. If you prefer natural, you might want to chill the mixture longer or add a little extra powdered sugar to help it firm up.
-
What’s the best way to melt the candy wafers without them clumping?
Heat the wafers in short 15-20 second bursts in the microwave, stirring well in between. This slow melting prevents burning or clumps, giving you smooth chocolate perfect for dipping.
-
Can the Halloween Eyeballs Recipe be made gluten-free?
Absolutely! Double-check that your candy eyes and candy wafers are labeled gluten-free. The rest of the ingredients naturally don’t contain gluten.
-
How long do the Halloween Eyeballs stay fresh?
Stored in the fridge, they stay fresh for about a week. For longer storage, freezing is your friend and keeps them delicious for up to a month.
Final Thoughts
This Halloween Eyeballs Recipe feels like a little kitchen magic every time I make it. There’s just something so satisfying about biting into these creamy, sweet, and slightly spooky treats. I’ve made them with friends and family year after year, and every time, they’re a huge hit. You don’t need fancy skills to pull these off, just a little patience, and a sense of fun. So go ahead—grab your ingredients, roll some eyeballs, and get ready to impress your guests with a Halloween treat that’s both creepy and utterly delicious.
Print
Halloween Eyeballs Recipe
- Prep Time: 45 minutes
- Cook Time: 0 minutes
- Total Time: 45 minutes
- Yield: 35 eyeballs
- Category: Dessert
- Method: No-Cook
- Cuisine: American
Description
These Halloween Eyeballs are a fun and spooky treat made with a creamy peanut butter and marshmallow filling, coated in white candy melts, and decorated with candy eyes and red gel to create a realistic eyeball effect. Perfect for Halloween parties or festive snacks, they combine sweet and creamy flavors with a playful presentation.
Ingredients
Filling
- 6 tablespoons unsalted butter, softened
- ½ cup creamy peanut butter
- ¼ cup marshmallow creme
- ½ teaspoon vanilla extract
- Pinch of table salt
- 2 cups powdered sugar
Coating and Decoration
- 1 – 10 ounce bag white candy melting wafers
- 1 – 2 ounce tube red sparkle gel
- 35 large candy eyes
Instructions
- Prepare the Filling: Beat together the softened butter, creamy peanut butter, marshmallow creme, vanilla extract, and a pinch of salt until the mixture is smooth and creamy.
- Add Powdered Sugar: Gradually incorporate the powdered sugar into the mixture, mixing continuously until a soft, pliable dough forms.
- Shape the Balls: Roll the dough into 36 even balls. Place them on a wax paper-lined tray and refrigerate for at least 30 minutes to firm up.
- Melt the Candy Wafers: Melt the white candy melting wafers according to the package directions until smooth and ready for dipping.
- Dip the Peanut Butter Balls: Using a toothpick, dip each peanut butter ball into the melted white chocolate coating until fully covered, then place on a wax paper-lined tray. Cover the toothpick hole with additional melted white chocolate to seal. Let them set until firm.
- Decorate the Eyeballs: Apply a circle of red sparkle gel on the top of each coated ball. Immediately place a candy eyeball on top and gently press down to adhere.
- Create the Veins: Use a toothpick to drag the red gel down the sides of each eyeball to mimic blood vessels. Allow the gel to set completely.
- Store the Eyeballs: Once set, store the Halloween eyeballs in a loosely sealed container to keep them fresh.
Notes
- For best results, refrigerate the peanut butter balls until firm before dipping to prevent melting or distortion.
- You can use gel food coloring instead of red sparkle gel if unavailable, but the sparkle gel adds a realistic shine.
- These treats should be stored in a cool place to prevent the white candy coating from melting.
- If you want larger or smaller eyeballs, adjust the amount of dough rolled accordingly, but keep in mind the coating and candy eyes sizing.
- Use a wax paper-lined tray to prevent sticking and for easy cleanup.
Nutrition
- Serving Size: 1 eyeball
- Calories: 150
- Sugar: 18g
- Sodium: 65mg
- Fat: 8g
- Saturated Fat: 4g
- Unsaturated Fat: 3.5g
- Trans Fat: 0g
- Carbohydrates: 18g
- Fiber: 1g
- Protein: 3g
- Cholesterol: 15mg


