
If you’re looking to wow your friends and family this spooky season, you’re going to flip over this Halloween Donuts Recipe. These aren’t just any donuts – they’re festively fun, super colorful, and crazy easy to whip up even if you don’t consider yourself a decorating pro. Trust me, I loved how these turned out the first time I made them, and I know you’ll get the same excited feedback when you share them at your Halloween party or just because!
Why You’ll Love This Recipe
- Simple & Fun Decorating: You don’t need fancy skills—just dip, pipe, and press on candy eyes to create these adorable monsters and mummies.
- Versatile Donuts: Use glazed, filled, or chocolate donuts to suit your taste or what’s easy to grab at the store.
- Great for Parties & Kids: My family goes crazy for them every year, and kids love joining the decorating fun.
- No-Fuss Ingredients: Easy to find candy melts, frosting, and sprinkles make these donuts a stress-free project with big impact.

Ingredients You’ll Need
These Halloween donuts mix familiar and easy-to-find ingredients with festive decorative touches. When I shop for candy melts, I look for good quality ones that melt smoothly without too much added oil, so the coating stays just right. Also, grabbing a variety of candy eyes and sprinkles makes the fun creations pop even more.
- Glazed Donuts or Bars: Soft and sweet canvas, great for dipping and decorating.
- Filled Glazed Donuts: Adds surprise flavors inside; I love those with jelly or cream filling for a fun contrast.
- Purple Candy Melts: Eye-catching color perfect for monster donuts; melts easily with coconut oil.
- Green Candy Melts: Essential for Frankenstein and monster hues; use refined coconut oil to keep flavors neutral.
- Bright White Candy Melts: Great for mummy bandages and spiderweb decorations; thick enough for neat piping.
- Refined Coconut Oil or Shortening: Helps candy melts achieve the perfect dip and drizzle consistency without flavor interference.
- Candy Eyes (various sizes): Must-haves! They bring life to your donuts and a good range of sizes makes decorating easier.
- Sprinkles of choice: Adds extra texture and seasonal flair—get creative with colors and shapes!
- Black Frosting: Great for writing and detailing Frankenstein’s hair and mouth; premade frosting saves time.
- Red Decorating Food Gel Icing: Adds creepy accents, like Dracula’s blood drip—small touches make a big difference.
- Plastic Fangs and Spiders: Fun edible props to amp up Halloween vibes on your donuts.
- Piping Bags and Tips (#104, #8, #3): These tools help create detailed decorations; if you don’t have them, small zip-top bags with a tiny snip work in a pinch.
Variations
I like to switch things up depending on the crowd and what treats I have on hand. Donuts are pretty forgiving, so feel free to experiment—you could make vegan versions, swap colors for other holidays, or simplify the decorating for a last-minute treat.
- Vegan or Allergy-Friendly: I once used dairy-free donuts and vegan candy melts; the texture held up well and the kids didn’t notice a difference.
- Spooky Color Swaps: Instead of green candy melts, purple or orange work great—perfect if you don’t have some colors on hand or want to match your decor.
- Healthier Twists: You can garnish with freeze-dried fruit or use natural food coloring in homemade glazes if you want to lighten it up a bit.
- Mini Donuts: Making these on mini donuts is super cute and finger-friendly for kids at parties.
How to Make Halloween Donuts Recipe
Step 1: Prepare Your Workspace
Line one or two baking sheets with parchment paper. This is where your decorated donuts will dry, so you don’t want any sticking. I always prep this surface first—it keeps you organized and speeds up the whole process.
Step 2: Melt the Candy Melts With Care
For each color batch, melt the candy melts with about a tablespoon of refined coconut oil or shortening. I heat mine in 30-second bursts at 50% power in the microwave, stirring between intervals. One trick I discovered is to take it out when a few small lumps remain, then let it sit for a minute—the residual heat melts the rest without risking burning or clumps. If the mixture seems too thick, add coconut oil a teaspoon at a time. This is key because you want that perfect dip-and-drizzle consistency without it running off too thin.
Step 3: Decorate Monster Donuts
Dip your glazed or filled donuts face down into the purple or green candy melts, then quickly press on the candy eyes and sprinkle on your chosen sprinkles before the coating sets. Place them gently on your parchment-lined sheet to dry. Pro tip: Work quickly here so the candy eyes don’t slide off.
Step 4: Frankenstein Donuts Detailed Decor
After dipping your filled donuts in green candy melts and setting the candy eyes, let them dry for about 3-5 minutes. Next, use black frosting in two piping bags—with a #8 tip for thick “hair” and a #3 tip for the smaller “mouth” and “stitches.” I love how this adds personality and a bit of spooky charm. Keep a damp cloth nearby for quick wipe-downs if your lines get messy.
Step 5: Create Mummy Donuts
Using bright white candy melts, melt and fill a piping bag with a #104 tip. Attach candy eyes with a bit of melted candy on their backs for a secure hold. Then, pipe bandage-like strips by starting with two lines around the eyes, followed by crisscrossed lines all over the donut to mimic mummy wrappings. I like to keep my candy melts slightly thicker here—it helps the bandages hold their shape and not just run together into a blob.
Step 6: Dracula Donuts and Spooky Details
Press plastic fangs gently into the center of glazed donuts to give them that vampire bite. Attach candy eyes with a dab of black frosting, then pipe on “hair” with black frosting using the #8 tip. For the scary blood effect, add some red decorating gel around the teeth—it’s such a fun little touch that always gets a reaction!
Step 7: Spiderweb Donuts
Dip into chocolate-frosted donuts or start with chocolate ones. Melt bright white candy melts for piping concentric circles on top using a #3 tip. Then, use a toothpick to drag lines from the center of the circles out to create spiderweb effects. Top with plastic spiders to complete your creepy-crawly treats.
Pro Tips for Making Halloween Donuts Recipe
- Melting Candy Melts Right: Patience is everything here—heat slowly and stir often to avoid lumps or burnt bits.
- Use Refined Coconut Oil: It won’t add coconut flavor, which keeps your donuts tasting sweet and clean.
- Keep a Wet Cloth Nearby: Great for wiping off frosting tips or fixing small mistakes quickly.
- Don’t Overload Donuts: Too much liquid candy melts can make your decorations slide—moderate thickness is key.
How to Serve Halloween Donuts Recipe
Garnishes
I usually add extra candy eyes or edible glitter sparingly just before serving for an eye-catching finish. Some years, I throw in mini marshmallows or edible spider rings kids love grabbing, which turns eating donuts into a full Halloween experience.
Side Dishes
To round out the spooky spread, I serve hot apple cider or pumpkin spice lattes alongside these donuts—it’s the perfect cozy combo. For savory contrast, crispy bacon or cheese sticks work surprisingly well with the sweet donuts.
Creative Ways to Present
I love arranging these donuts on a black cake stand or a Halloween-themed platter with faux spider webs and small pumpkins scattered around. Another hit is presenting each donut on a mini paper plate with Halloween motifs or inside cupcake liners for easy grab-and-go treats at parties.
Make Ahead and Storage
Storing Leftovers
I keep leftover decorated donuts in an airtight container at room temperature for up to 2 days. Avoid refrigerating if possible because it can make the donut a bit dense and the candy melts may sweat. If your kitchen is warm, a cool dry spot is best.
Freezing
Try freezing undecorated donuts if you want to prep ahead—freeze them in airtight bags. Once thawed, decorate them fresh for best results. I don’t recommend freezing the decorated donuts since the candy melts might lose their shine or soften.
Reheating
If you want that fresh-baked softness, warm your leftover donuts in the microwave for about 10 seconds before serving. Just a little heat brings back some of that fresh charm without melting your decorations.
FAQs
-
Can I use homemade donuts for this Halloween Donuts Recipe?
Absolutely! Using homemade donuts adds a personal touch and allows you to customize flavors, but the decorating steps remain the same. Just make sure your donuts have cooled completely before decorating so the candy melts don’t melt off.
-
What if I don’t have candy melts—can I use chocolate instead?
You can use white or colored melting chocolates, but candy melts generally have stabilizers that help keep the decorations smooth and firm at room temperature. If using regular chocolate, add a bit of shortening and keep your donuts cool while drying to avoid smudging.
-
How long can I store decorated Halloween donuts?
Decorated donuts are best enjoyed within 1-2 days. Store them in an airtight container at room temperature away from humidity to keep decorations intact and freshness up.
-
Any tips for piping neat lines on donuts?
Practice on parchment paper before piping directly on your donuts. Keep your piping bags steady and don’t squeeze too hard to avoid thick blobs. Also, make sure your candy melts or frosting are the right consistency—not too runny or stiff.
Final Thoughts
This Halloween Donuts Recipe quickly became one of my go-to festive projects because it strikes that perfect balance between cute and spooky without requiring hours in the kitchen. I absolutely love how much personality each donut gets with just a few candy eyes and a little frosting detail—plus the smiles you get when you serve them are priceless. Give it a try this season, and I’m confident you’ll find this recipe as charming and fun as I do, turning your Halloween celebrations into a sweetly memorable affair!
Print
Halloween Donuts Recipe
- Prep Time: 10 minutes
- Cook Time: 0 minutes (melting candy melts done in microwave)
- Total Time: 30 minutes
- Yield: 36 Donuts
- Category: Dessert
- Method: No-Cook
- Cuisine: American
Description
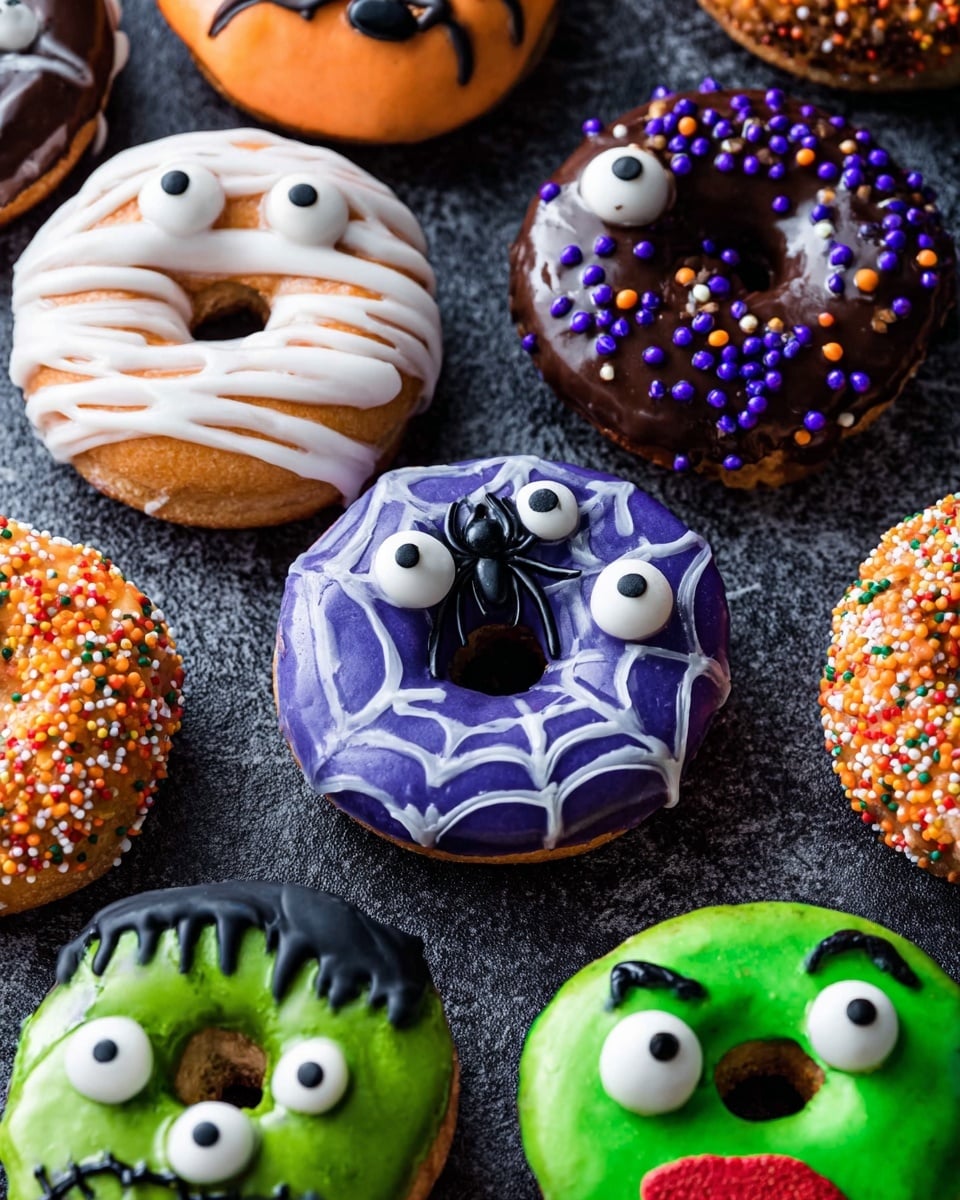
Celebrate Halloween with these festive and fun Halloween Donuts! Featuring a variety of spooky designs like Monsters, Frankenstein, Mummies, Dracula, and Spiderwebs, these decorated donuts are perfect for parties or a seasonal treat. Using colorful candy melts, candy eyes, black frosting, and creative piping techniques, you can transform glazed and chocolate-frosted donuts into adorable and creepy Halloween-themed desserts.
Ingredients
Monster Donuts
- ½ Dozen Glazed Donuts or Bars
- ½ Dozen Filled Glazed Donuts
- 6 oz Purple Candy Melts
- 6 oz Green Candy Melts
- 2-4 tbs Refined Coconut Oil or Shortening
- Candy Eyes (various sizes)
- Sprinkles of choice
Frankenstein Donuts
- ½ Dozen Filled Donuts or Bars
- 2-4 tbs Refined Coconut Oil or Shortening
- 6 oz Green Candy Melts
- 12 Candy Eyes
- 1-2 cups Black Frosting
Mummy Donuts
- ½ Dozen Glazed Donuts
- 2-6 tbs Refined Coconut Oil or Shortening
- 12 oz Bright White Candy Melts
- 12 Candy Eyes
Dracula Donuts
- ½ Dozen Glazed Donuts
- 1-2 cups Black Frosting
- 12 Candy Eyes
- 6 Plastic Fangs
- Red Decorating Food Gel Icing
Spiderweb Donuts
- ½ Dozen Chocolate Frosted Donuts
- 6 oz Bright White Candy Melts
- 2-4 tbs Refined Coconut Oil or Shortening
- 6 Plastic Spiders
Additional Items
- Piping Bags
- #104 Piping Tip
- #8 Piping Tip or a 7mm Writing Tip
- #3 Piping Tip
Instructions
- Prepare Work Surface: Line one or two baking sheets with parchment paper. Place each decorated donut on these sheets to dry and set after decorating.
- Make Monster Donuts: Melt purple and green candy melts separately with 1 tablespoon of refined coconut oil or shortening each. Heat in the microwave at 50% power for 30 seconds intervals, stirring in between, until melted and smooth. If thick, add more coconut oil by the teaspoon to adjust consistency. Dip each donut face down into the candy melts, gently press on candy eyes and sprinkle with your choice of sprinkles. Place dipped donuts on baking sheets to dry.
- Make Frankenstein Donuts: Melt green candy melts with 1 tablespoon of refined coconut oil or shortening using the same microwave method. Dip donuts face down and place on lined baking sheets. Press on 12 candy eyes per batch, then allow donuts to dry for 3-5 minutes. Meanwhile, fill two piping bags with black frosting: one with a #8 writing tip for the hair and the other with a #3 tip for mouth and stitches. Pipe on hair, mouth, and stitches accordingly.
- Make Mummy Donuts: Melt white candy melts with 1 tablespoon of refined coconut oil or shortening in the microwave at 50% power in 30 second intervals, stirring until smooth. Pour candy melts into a piping bag fitted with a #104 tip. Attach candy eyes to the donuts by putting a bit of melted candy on the back of each eye. Pipe white candy melt strips across the donut to create the mummy ‘bandages’, starting with two lines around the eyes and crisscrossing thereafter for a layered effect.
- Make Dracula Donuts: Press plastic fangs halfway closed into the center of each glazed donut. Use black frosting on the back of candy eyes to attach them to the donut. Pipe hair with black frosting using a #8 piping tip. Add red edible gel icing around the teeth to simulate blood for a spooky effect.
- Make Spiderweb Donuts: Melt white candy melts with 1 tablespoon of refined coconut oil or shortening as before. Fill into a piping bag with a #3 tip. Pipe concentric circles of white candy melts onto chocolate frosted donuts, then use a toothpick or skewer to drag lines outward from the center to create a spiderweb effect. Decorate with plastic spiders on each donut.
Notes
- Candy Melts: Different brands melt differently; refined coconut oil is preferred as it doesn’t add coconut flavor, though shortening works well too.
- Mummy Donuts: Keep candy melts slightly thick to create distinct bandage strips; too thin candy melts will blend and lose the mummy look.
- Black Frosting: Use homemade chocolate buttercream with black food gel or premade black frosting tubes for convenience.
- Nutrition estimates vary based on decoration choices and donut types.
Nutrition
- Serving Size: 1 Donut
- Calories: 250
- Sugar: 18g
- Sodium: 150mg
- Fat: 15g
- Saturated Fat: 9g
- Unsaturated Fat: 5g
- Trans Fat: 0g
- Carbohydrates: 28g
- Fiber: 1g
- Protein: 2g
- Cholesterol: 20mg
