
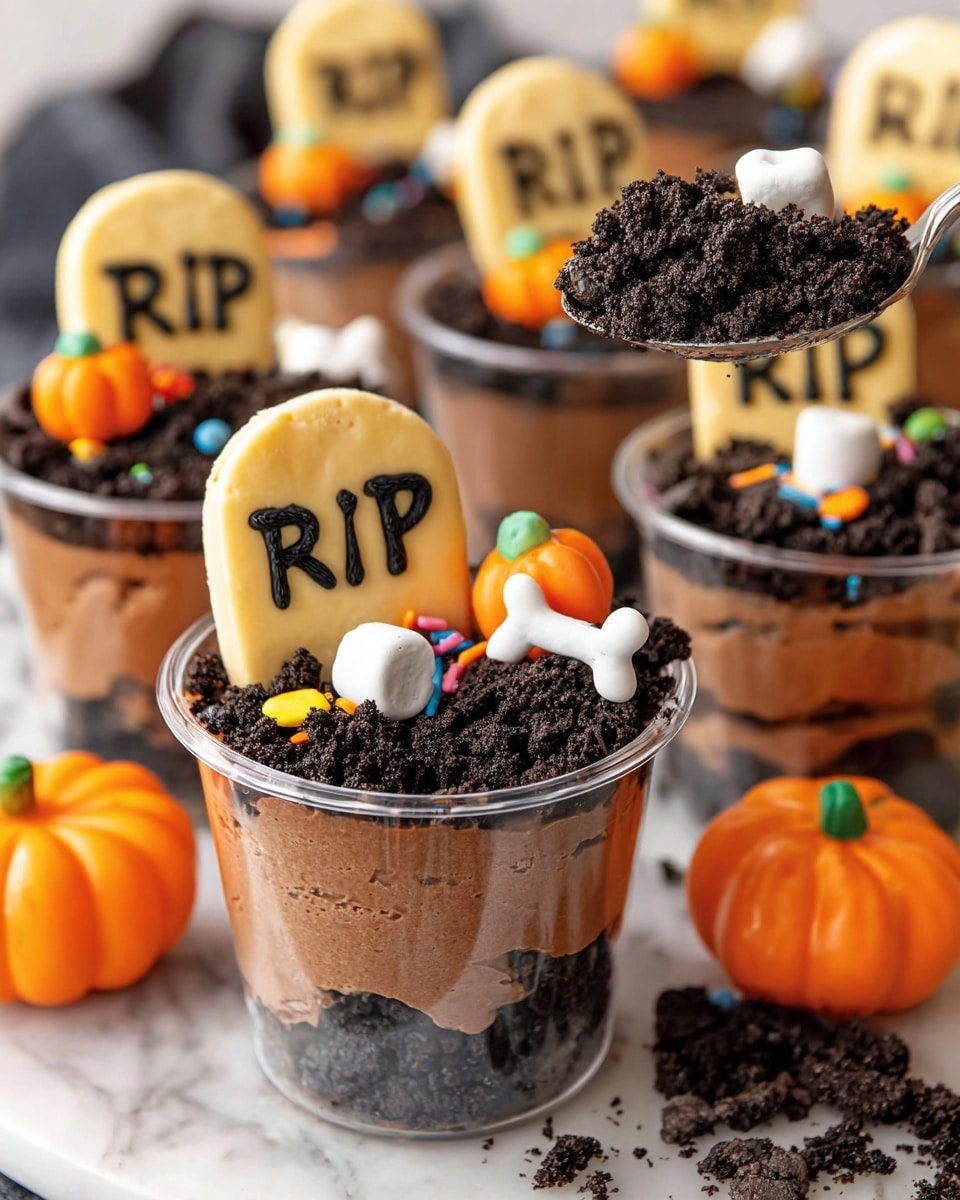
If you’re looking for a spooky, fun dessert that’s also super easy to whip up, you’ve just hit the jackpot with this Halloween Dirt Cups Recipe. I absolutely love how this turns out every single year—it’s the perfect combo of creamy chocolate pudding, crunchy Oreo “dirt,” and cute Halloween-themed decorations. Trust me, once you make these, you’ll want to whip up a batch for every fall gathering or just a cozy night in!
Why You’ll Love This Recipe
- Impressively Easy: You don’t need to be a pro baker to bring these creepy cups to life—they come together quickly and with minimal fuss.
- Kid-Friendly Fun: Decorating with spooky candies and little tombstone cookies is a blast for kids and adults alike.
- Make Ahead Magic: You can prep these a day in advance, which means less stress on party day or Halloween evening.
- Perfectly Themed & Delicious: The Oreo crumbs look just like dirt, but the rich chocolate pudding and creamy layers keep everyone coming back for more.

Ingredients You’ll Need
These ingredients work together to create that iconic “dirt cup” look with layers of creamy pudding and crunchy Oreo crumbs. When shopping, you’ll want to grab family-sized packages of Oreos to ensure plenty of crumbs for layering and decorating.
- Oreos: Go for the classic sandwich cookies—they crush perfectly into crumbly “dirt.”
- Milk: Essential for smooth pudding; whole milk gives the best creamy taste.
- Instant Chocolate Pudding Mix: The quick base of many chocolate desserts—you’ll find this in the baking aisle.
- Frozen Whipped Topping: Adds lightness and fluffiness to your pudding; thaw before mixing.
- Chocolate Syrup: Divided between the pudding and the crumb mixture, it adds a moist chocolatey punch.
- Milano Cookies: Fun to decorate with black icing—they make spooky little tombstones.
- Black Decorator Icing: Perfect for writing “RIP” on the Milano cookies or other spooky decorations.
- Ghost Peeps: Adorable ghost-shaped marshmallows that bring extra Halloween charm.
- Pumpkin Candies & Halloween Sprinkles: These add that festive pop of color and theme on top of your dirt cups.
Variations
What I love about this Halloween Dirt Cups Recipe is how flexible it is—you can mix things up to suit your crowd or dietary needs. Don’t hesitate to try your own spin on it!
- Dairy-Free: Swap out dairy milk and whipped topping for almond or coconut milk varieties and a non-dairy whipped topping—I do this for some friends and it’s just as delicious!
- Extra Crunch: Add crushed pretzels or candy bones on top for a fun twist—my family goes crazy for the salty-sweet combo.
- Spooky Themes: Instead of ghosts and pumpkins, try gummy worms or edible eyeballs for a creepier presentation.
- Mini Pudding Cups: Make bite-sized versions using mini cups or even hollowed-out mini pumpkins for a fun centerpiece!
How to Make Halloween Dirt Cups Recipe
Step 1: Whip Up the Chocolate Pudding Base
Start by mixing the instant pudding mix with 4 cups of milk in a large bowl. Whisk it vigorously for about 2-3 minutes until it thickens a bit, then let it rest for 5 minutes to set. This step is crucial for that smooth, creamy texture. After it’s set, gently fold in the thawed whipped topping to lighten the mixture. I discovered this trick enhances the pudding’s creaminess without making it too sweet.
Step 2: Stir in Chocolate Syrup for That Extra Yum
Add half of your chocolate syrup to the pudding mixture. Stir just enough to create streaks of chocolate running through the pudding—not fully blending it in. This gives a beautiful look and boosts flavor. Cover and chill the pudding until you’re ready to assemble your dirt cups.
Step 3: Crush the Oreos into Dirt-Like Crumbs
Using a food processor or blender, crush the Oreos in batches until you get something that genuinely looks like dirt—fine, crumbly, but with some texture. If you don’t have a processor, popping them in a zipbag and bashing away with a rolling pin works fine too. Transfer the crumbs to a large bowl to get ready for layering.
Step 4: Layer Up Your Dirt Cups
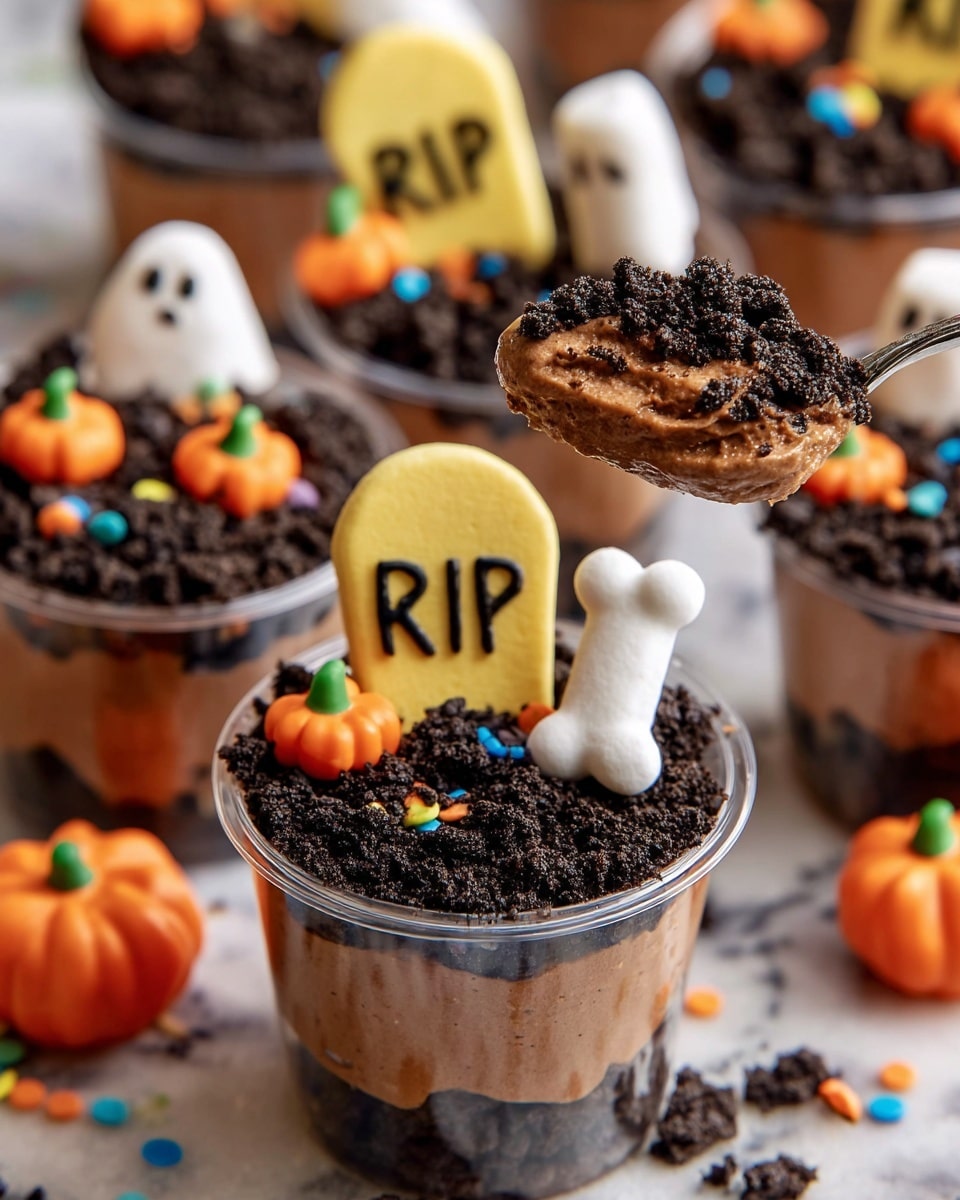
Grab your dessert cups—about 9 ounces works best—and start with a 2-tablespoon layer of Oreo crumbs. Follow with roughly ¼ cup of the chocolate pudding, then repeat the Oreo dirt layer and pudding once more. Add a final tablespoon of crumbs on top. Trust me, the layering makes the texture contrast so satisfying to dig into.
Step 5: Make the “Freshly Dug Grave” Topping
Mix the remaining Oreo crumbs with the leftover chocolate syrup until clumpy and moist—that’s your “freshly dug grave” topping. Add Milano cookies decorated with “RIP” in black icing, ghost Peeps, pumpkin candies, and Halloween sprinkles on the tops of your cups. This finishing touch is what always gets the “oohs” and “aahs” from friends!
Step 6: Chill and Serve
You can serve these right away or refrigerate until party time. Just a heads-up—I recommend adding the cookie crumbs and candy decorations right before serving to keep everything looking fresh and crunchy. Enjoy watching everyone dive in!
Pro Tips for Making Halloween Dirt Cups Recipe
- Use Cold Ingredients: Chilling the milk and whipped topping beforehand helps your pudding set up better and stay creamy longer.
- Don’t Overmix Pudding and Syrup: Stirring just enough to streak the chocolate syrup keeps the pudding visually interesting and more decadent.
- Crush Oreos Carefully: Avoid turning the Oreos into powder—some chunkiness adds great texture and looks more like real dirt.
- Add Toppings Last Minute: To prevent soggy “dirt,” always add cookie crumbs and candies right before serving.
How to Serve Halloween Dirt Cups Recipe
Garnishes
I’m a sucker for decorating with Milano cookies turned into Tombstones—they look fantastic with “RIP” piped in black icing. Adding ghost-shaped Peeps is my go-to playful touch. Pumpkins and Halloween sprinkles are optional but really up the fun factor visually. I’ve even added gummy worms crawling on top for an extra fright!
Side Dishes
Since these are sweet and rich, I pair them with lighter sides like fresh fruit platters or crunchy veggie trays at parties. If it’s more casual, a big bowl of popcorn or some salty chips balances the chocolate nicely.
Creative Ways to Present
For extra fun, I’ve served these dirt cups inside small pumpkins hollowed out as natural dessert cups, and once I used mini flower pots lined with parchment for a garden-themed Halloween party. Use clear cups so everyone can see layers clearly—it makes the presentation extra spooky and enticing!
Make Ahead and Storage
Storing Leftovers
Any leftover dirt cups should be covered tightly with plastic wrap or stored in an airtight container in the fridge. The Oreo crumbs will soften a bit over time, but I’ve learned you can refresh them by sprinkling some extra crushed Oreos on top just before serving again.
Freezing
I haven’t found freezing dirt cups works well because of the layered pudding and whipped topping—they tend to separate and lose that creamy texture once thawed. For best results, I recommend enjoying them fresh within a day or two.
Reheating
Since this is a chilled dessert, I skip reheating altogether. Just give leftovers a good stir and maybe freshen the top with crushed Oreos for the best experience.
FAQs
-
Can I make Halloween Dirt Cups Recipe in advance?
Absolutely! You can assemble most of the layers a day ahead and keep them refrigerated. Just hold off on adding the Oreo crumbs and decorations on top until right before serving to keep them crisp.
-
What if I don’t have a food processor to crush Oreos?
No worries! Place Oreos in a sealed plastic bag and crush them using a rolling pin, heavy pan, or even a meat mallet until they reach a crumbly consistency resembling dirt.
-
Can I use homemade chocolate pudding instead of instant mix?
Yes! Homemade pudding works just as well and brings a fresh homemade taste, but keep it chilled and thick enough to hold the layers well.
-
Are there vegan options for Halloween Dirt Cups Recipe?
Definitely! Use non-dairy milk, dairy-free pudding alternatives, and coconut-based whipped toppings. Just double-check that your Oreos and decorations fit your dietary preferences.
-
How many servings does this recipe make?
This recipe yields about 18 cups, perfect for sharing at Halloween parties or family gatherings.
Final Thoughts
Honestly, making this Halloween Dirt Cups Recipe has become a joyful little tradition in my kitchen and at every fall party I attend. It’s fun, a little bit spooky, and irresistibly delicious—plus, it’s super forgiving, so you’ll have no trouble nailing it even if you’re just a casual baker. Give it a go and watch how quickly these disappear; they’re guaranteed to be a Halloween hit with your family and friends!
Print
Halloween Dirt Cups Recipe
- Prep Time: 30 minutes
- Cook Time: 0 minutes
- Total Time: 30 minutes
- Yield: 18 servings
- Category: Dessert
- Method: No-Cook
- Cuisine: American
- Diet: Vegetarian
Description
Halloween Dirt Cups are a fun and festive no-bake dessert perfect for Halloween parties. Layers of crushed Oreo cookies and creamy chocolate pudding are combined to create a dirt-like effect, then decorated with spooky Milano cookies, ghost Peeps, pumpkin candies, and Halloween sprinkles for a playful and delicious treat that’s sure to delight kids and adults alike.
Ingredients
Base and Pudding:
- 2 (19 ounce) family size packages of Oreos
- 4 cups milk
- 2 (3 ounce) packages instant chocolate pudding mix
- 16 ounces frozen whipped topping, thawed
- 1 cup chocolate syrup, divided
Decorations:
- Milano cookies
- Black decorator icing
- Ghost Peeps
- Pumpkin candies
- Halloween sprinkles
Instructions
- Make the pudding: In a large bowl, mix the instant chocolate pudding mix with 4 cups of milk. Whisk vigorously for 2-3 minutes until smooth and then allow it to stand for 5 minutes to thicken. Fold in the thawed whipped topping gently until well combined.
- Add chocolate syrup to pudding: Pour ½ cup of the chocolate syrup into the pudding mixture and stir a few times just until streaky. Cover the pudding and chill it in the refrigerator until ready to assemble the dirt cups.
- Crush the Oreos: Place Oreo cookies in a food processor or blender and pulse to crush into fine crumbs resembling dirt. You’ll need to process the cookies in batches. Transfer the crumbs to a large bowl.
- Assemble the dirt cups: Using approximately 9-ounce cups, start by adding 2 tablespoons of Oreo crumbs as the base. Follow with ¼ cup of the chocolate pudding. Add another layer of Oreo crumbs, then another layer of pudding. Finish with 1 tablespoon of Oreo crumbs on top.
- Prepare moist cookie crumb layer: Mix the remaining ½ cup of chocolate syrup into the leftover Oreo crumbs to create a clumpy, moist dirt mixture. Set aside for decoration.
- Decorate the cups: Use black decorator icing to write “RIP” on Milano cookies and place some on top of the dirt cups. Add ghost Peeps to some cups. Spoon the clumpy cookie crumb mixture over the top of the cups to resemble freshly dug graves. Garnish with mini pumpkin candies and Halloween sprinkles.
- Serving and storage: Serve immediately or refrigerate until ready to serve. If refrigerated, add decorative cookie topping just before serving to prevent sogginess.
Notes
- Use disposable plastic cups about 9 ounces in size, small mason jars, or any similar-sized cups for assembling the dirt cups.
- Prepare the dirt cups up to 1 day in advance and refrigerate. Avoid making them earlier than that to prevent the Oreo layers from softening too much.
- Add cookie and candy decorations only just before serving to maintain texture and appearance.
- Store leftovers covered in the refrigerator; Oreo layers may soften but can be refreshed by adding a fresh layer of crushed Oreos before serving again.
Nutrition
- Serving Size: 1 cup (approximately 150g)
- Calories: 310
- Sugar: 28g
- Sodium: 210mg
- Fat: 16g
- Saturated Fat: 9g
- Unsaturated Fat: 5g
- Trans Fat: 0g
- Carbohydrates: 38g
- Fiber: 2g
- Protein: 3g
- Cholesterol: 15mg

