

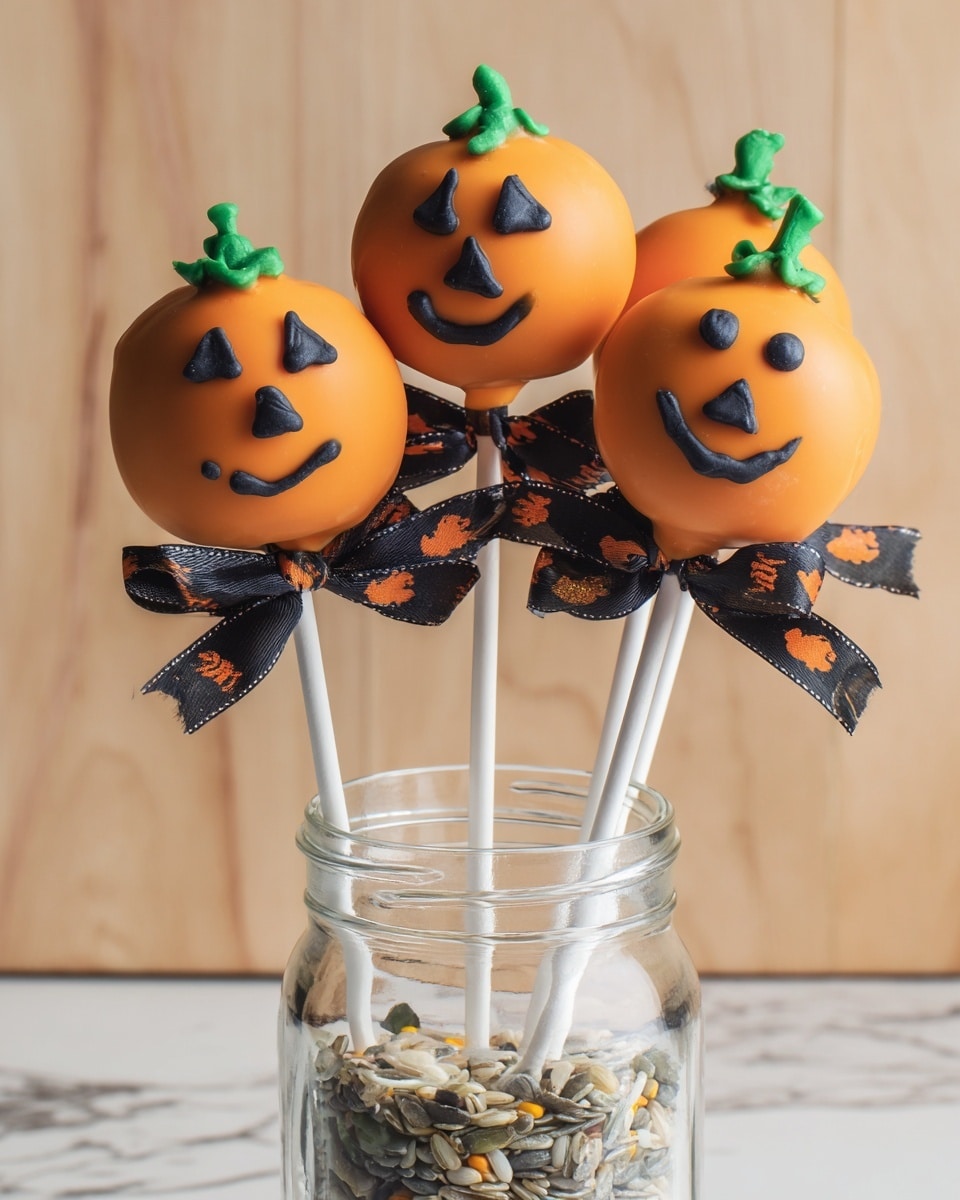
If you’re looking for a seriously fun and festive treat to wow your friends and family this fall, you’ve got to try this **Halloween Cake Pops Recipe**. I absolutely love how these little guys turn out—moist, chocolatey, and perfectly bite-sized for all sorts of spooky decorating. When I first tried making cake pops, I struggled to get the cake and frosting to the right consistency, but with this recipe and a couple of easy tricks I’ll share, you’ll find that your pops come together smoothly and are a total crowd-pleaser.
Why You’ll Love This Recipe
- Perfectly Moist Cake: This chocolate cake base stays wonderfully tender, which is key for cake pops that don’t crumble.
- Simple Buttercream Frosting: The frosting binds the cake crumbs just right without getting too soft or too stiff.
- Creative Decoration Options: You can customize with orange candy melts, green and black food coloring, and fun Halloween touches.
- Great for Parties and Gifts: These cake pops are perfect for sharing or even packing up as spooky treats for friends and neighbors.

Ingredients You’ll Need
I love that these ingredients are mostly pantry staples with a couple of fun additions for the Halloween vibe. Having good quality cocoa and fresh eggs really makes a difference in the cake’s richness, and using candy melts for decoration gives you that vibrant pop of color that’s impossible to resist.
- Cocoa Powder: Use unsweetened natural cocoa for a deep chocolate flavor that pairs perfectly with the sugar and butter.
- Boiling Water: This step helps bloom the cocoa powder, intensifying the chocolate taste and making the cake super moist.
- Butter: Softened, unsalted butter works best for both the cake and the frosting for an even texture and flavor.
- Sugar: Granulated sugar adds sweetness and helps with the cake’s crumb structure.
- Eggs: They provide structure and moisture; make sure they’re fresh for the best results.
- Vanilla Extract: Enhances all the flavors in the cake and frosting with its warm, sweet aroma.
- All-Purpose Flour: Standard flour for that balanced texture—avoid substituting with self-rising or whole wheat for this one.
- Baking Soda: Gives lift and helps the cake rise without becoming too dense.
- Salt: Just a pinch to balance sweetness and brighten the flavors.
- Milk: Adds moisture and keeps the batter smooth and easy to work with.
- Sour Cream: This is my secret ingredient for extra moisture and a slight tang that cuts through the sweetness.
- Salted Butter (for frosting): Adds richness and a creamy texture in the buttercream.
- Icing Sugar: Super fine sugar to keep your frosting silky smooth.
- Heavy Cream: Helps adjust your frosting consistency so it’s firm enough to hold the pops together but not too stiff.
- Orange Candy Melts: For that perfectly festive coating, plus they’re easy to work with and come in bright, fun colors.
- Confectioners Sugar: Useful for decorating details.
- Green Food Coloring Gel: For spooky stems or accents.
- Black Food Coloring Gel or Food Writer: Ideal for drawing faces or details on your Halloween cake pops.
Variations
One of my favorite things about this Halloween Cake Pops Recipe is how easy it is to customize. Whether you want to switch up flavors, colors, or even make them allergy-friendly, there’s plenty of room to play around and make this recipe your own.
- Flavor Swaps: I’ve swapped cocoa for pumpkin spice mix before and added cream cheese frosting instead of buttercream—so yummy and super festive!
- Dietary Tweaks: For dairy-free options, try using coconut oil in place of butter and a plant-based milk; just remember the texture might be slightly different.
- Decorating Styles: Some years my kids love creepy spider webs using piped black icing while other times we go full-on cute with candy eyes and little pumpkins.
- Difficulty Levels: If you want to keep it simple, just dip the cake balls in candy melts and skip the intricate decorations—they’ll still be a hit!
How to Make Halloween Cake Pops Recipe
Step 1: Bake the Perfect Moist Chocolate Cake
Start by heating your oven to 350ºF and prepping a 9×13 inch baking pan with grease and flour. The trick here is mixing the cocoa with boiling water first—this intensifies that deep chocolate flavor and helps the cake stay moist. Once it’s cool, beat the softened butter and sugar until fluffy. Adding eggs one at a time ensures everything emulsifies nicely, giving the cake a tender crumb. Combine your dry ingredients in a separate bowl, then add them alternately with the milk and sour cream to the butter mixture. Pour into your pan and bake for about 30 to 40 minutes, or until a wooden pick comes out clean. I always test early to avoid overbaking. Let the cake cool completely before moving on.
Step 2: Whip Up a Creamy Buttercream Frosting
Using softened salted butter, whip it with a paddle beater or mixer until fluffy—this usually takes a few minutes but it’s worth it. Gradually add in your icing sugar along with vanilla and 5 to 6 tablespoons of heavy cream. For cake pops, you want your frosting a tad firmer than you might use for spreading on a cake, so don’t rush adding the cream—add slowly! The frosting acts like a glue here, so getting the consistency right is half the battle for perfectly shaped pops.
Step 3: Mix Cake and Frosting, Then Form Pops
Once your cake is cooled, crumble it into fine crumbs in a large bowl. This part always feels so satisfying for me—like playing with edible sand! Add the buttercream frosting a little at a time, mixing gently with your hands or a sturdy spoon until the mixture holds together but isn’t too wet. Here’s what I discovered: overly moist mixtures make your cake balls fall apart, and too little frosting makes them dry and crumbly. Once it’s perfect, roll the mixture into 1.5-inch balls and place on a parchment-lined tray. Chill in the fridge for at least 1 hour so they’re firm and ready to dip.
Step 4: Dip and Decorate Your Halloween Cake Pops
Melt your orange candy melts in short bursts in the microwave, stirring between to avoid burning. Dip each cake ball carefully, tapping off excess candy coating to keep your pops neat. Insert a lollipop stick and let them set standing up—if your melt is too thick, warm it up a little more for smooth coating. Once dry, use green and black food coloring gels or food writers to decorate spooky faces, stems, or fun Halloween designs. I love how the vivid orange contrasts with the black details—it really gets everyone in the spooky spirit!
Pro Tips for Making Halloween Cake Pops Recipe
- Use Room Temperature Ingredients: Butter and eggs at room temp blend better, giving you a smoother batter and frosting.
- Don’t Overmix Cake and Frosting: Mix just enough to combine so your pops hold shape but stay tender and moist.
- Chill Before Dipping: This keeps cake balls firm and prevents mess when coating with candy melts.
- Decorate with Confidence: Use good quality food coloring gels for vibrant, long-lasting colors and practice designs on parchment first.
How to Serve Halloween Cake Pops Recipe
Garnishes
I like to sprinkle a bit of edible glitter or crushed Halloween-themed candies for extra sparkle. Tiny candy eyes, sprinkles in black and orange, or even piped royal icing accents can instantly elevate your cake pops from cute to creepy. Plus, kids tend to love helping decorate, so setting out bowls of different garnishes makes for a super fun activity.
Side Dishes
Serve these Halloween cake pops alongside a cozy batch of hot apple cider or a frothy pumpkin spice latte to complete the fall vibe. At parties, I like pairing them with fruit skewers or cheese platters to balance the sweetness.
Creative Ways to Present
For Halloween, I’ve tried arranging cake pops standing tall in a pumpkin-shaped container filled with candy corn. You could also wrap each pop in cellophane bags tied with black and orange ribbons for gifting. Another fun idea is placing them on “graveyard” dirt pudding cups for a spooky effect—these little touches make your Halloween spread extra memorable!
Make Ahead and Storage
Storing Leftovers
Once fully decorated and dry, you can store cake pops in an airtight container in the fridge for up to 5 days. I learned to layer them carefully with parchment in between so they don’t stick or get crushed.
Freezing
If you want to make them ahead for a party, freezing works great! After dipping and drying, wrap each pop individually in plastic wrap and then place in a freezer-safe container. They keep beautifully for up to a month. Just thaw in the fridge overnight before serving.
Reheating
Technically, you don’t want to warm cake pops too much or the frosting and coating could melt or get sticky. Instead, I recommend bringing frozen pops to room temperature slowly in the fridge and serving chilled or at room temp. This keeps their perfect texture intact.
FAQs
-
Can I use a box cake mix for this Halloween Cake Pops Recipe?
Absolutely! While homemade cake gives you more control over moisture and flavor, a good-quality chocolate box mix works well too. Just remember to adjust the amount of frosting you mix in since box cakes can be drier or moister depending on brand.
-
What’s the best way to keep cake pops from falling off the sticks?
Dip the tip of each stick in melted candy coating before inserting it into the cake ball, then chill them before fully dipping. Chilling firms them up so they’re more secure, and the candy acts as glue to hold everything together.
-
How do I fix frosting that’s too soft or too hard for cake pops?
If your frosting is too soft, add more icing sugar, a tablespoon at a time, until it firms up. If it’s too hard, add a teaspoon of heavy cream or milk at a time and mix until it reaches a pliable but firm consistency.
-
Are cake pops gluten-free or can they be made that way?
Traditional recipes use all-purpose flour, which contains gluten. However, you can adapt this Halloween Cake Pops Recipe using gluten-free flour blends; just make sure the blend is a 1:1 substitute to achieve similar texture. It might take some experimenting with moisture levels.
Final Thoughts
I hope you give this Halloween Cake Pops Recipe a try this season because it really is such a delightful way to celebrate the spooky season with something homemade and fun. I’ll never forget the first time my family saw these popping out of a pumpkin-shaped container—they couldn’t stop eating them! Once you get the hang of the process, it’s surprisingly quick and super creative. Plus, the smiles on everyone’s faces are priceless. Happy baking and spooky decorating, my friend!
Print
Halloween Cake Pops Recipe
- Prep Time: 1 hour
- Cook Time: 30 minutes
- Total Time: 1 hour 30 minutes
- Yield: 50 cake pops
- Category: Dessert
- Method: Baking
- Cuisine: American
Description
Delightfully festive Halloween Cake Pops made from moist chocolate cake and rich buttercream frosting, decorated with vibrant candy melts and colorful gels to create spooky holiday treats perfect for parties or trick-or-treaters. These cake pops combine easy baking with creative decorating for a fun dessert experience.
Ingredients
Chocolate Cake Ingredients
- 3/4 cup Cocoa powder
- 1 cup boiling water
- 1/2 cup plus 2 tablespoons butter, softened
- 2 cups sugar
- 3 eggs
- 1 teaspoon vanilla extract
- 1 3/4 cups all purpose flour
- 1 1/2 teaspoons baking soda
- 1/4 teaspoon salt
- 3/4 cup milk
- 1/4 cup sour cream
Buttercream Frosting Ingredients
- 1 cup salted butter
- 3 teaspoons vanilla extract
- 4 cups icing sugar
- 5-6 tablespoons heavy cream
Decorating Ingredients
- 2 cups orange candy melts
- 1/4 cup confectioners sugar
- Green food colouring gel
- Black food colouring gel or black food writer
Instructions
- Preheat and Prepare: Heat oven to 350ºF (175ºC). Grease and flour a 9 x 13 inch cake pan to prevent sticking.
- Mix Cocoa Mixture: In a small bowl, combine the cocoa powder with boiling water. Stir until smooth and set aside to cool.
- Cream Butter and Sugar: In a large bowl, beat the softened butter and sugar together using a mixer until fluffy.
- Add Eggs and Vanilla: Beat in eggs one at a time, ensuring each is fully incorporated before adding the next. Stir in the vanilla extract.
- Combine Wet and Dry Ingredients: Gradually add the cooled cocoa mixture into the butter mixture while beating. In a separate bowl, whisk together the all-purpose flour, baking soda, and salt.
- Alternately Add Dry Ingredients and Liquids: Add the flour mixture alternately with milk and sour cream into the butter mixture, mixing until just combined and smooth.
- Bake the Cake: Pour the batter into the prepared pan and bake for 30-40 minutes or until a wooden pick inserted in the center comes out clean. Remove from oven and allow to cool completely.
- Make Buttercream Frosting: Using a paddle attachment, whip the salted butter in a bowl until fluffy. Gradually add the icing sugar and vanilla. Add 5-6 tablespoons of heavy cream, adjusting to keep the frosting firm but fluffy. Continue mixing until fully combined and smooth.
- Decorate and Assemble: Steps for decorating and assembling the cake pops are provided in the post and involve shaping the cake mixture with buttercream and decorating with candy melts, confectioners sugar, and food coloring gels.
Notes
- The decorating and assembly steps for the cake pops are detailed in the full post, including shaping and coating techniques.
- For best results, ensure the cake is completely cooled before mixing with frosting for cake pops.
- Adjust the amount of heavy cream in the frosting to achieve the desired firmness for shaping.
- Use food coloring gels sparingly to avoid altering frosting texture.
- Store finished cake pops in an airtight container at room temperature for up to 2 days or refrigerate for longer storage.
Nutrition
- Serving Size: 1 cake pop (approx. 30g)
- Calories: 110
- Sugar: 14g
- Sodium: 65mg
- Fat: 5g
- Saturated Fat: 3g
- Unsaturated Fat: 2g
- Trans Fat: 0g
- Carbohydrates: 17g
- Fiber: 1g
- Protein: 1g
- Cholesterol: 20mg


