
I’m super excited to share this fun and festive Halloween Cake Pops Recipe that’s sure to be a hit at any spooky gathering! These pops are not only adorable but also ridiculously easy to make, using just a few ingredients you probably have on hand or can easily grab at the store. When I first tried this recipe, I was blown away by how vibrant and creative you can get with decorating – plus, they taste just as good as they look. Keep reading, and I’ll walk you through all the tips and tricks to make your Halloween celebration extra sweet.
Why You’ll Love This Recipe
- Simple and Quick: From start to finish, these cake pops take under an hour to make–perfect for last-minute Halloween prepping.
- Kid-Friendly Fun: Decorating the pops is a blast for kids and adults alike, making it a great activity to do together.
- Customizable Designs: You can easily switch up colors and decorations to suit your Halloween theme or personal style.
- No Baking Required: Using mini donuts instead of cake scraps cuts down on preparation and cleanup.

Ingredients You’ll Need
These ingredients come together to create a delightful Halloween treat that looks as amazing as it tastes. The candy melts provide ease of melting and color options, while the mini donuts serve as the perfect cake pop base – no crumbling or mixing needed!
- Candy melts (green, purple, or orange): These melt smoothly and come in vibrant Halloween colors that make decorating a breeze.
- Lollipop sticks: Essential for holding your cake pops and making them easy to eat.
- Mini donuts or donut holes: I love using mini donuts because they’re already perfect-sized and save you prep time.
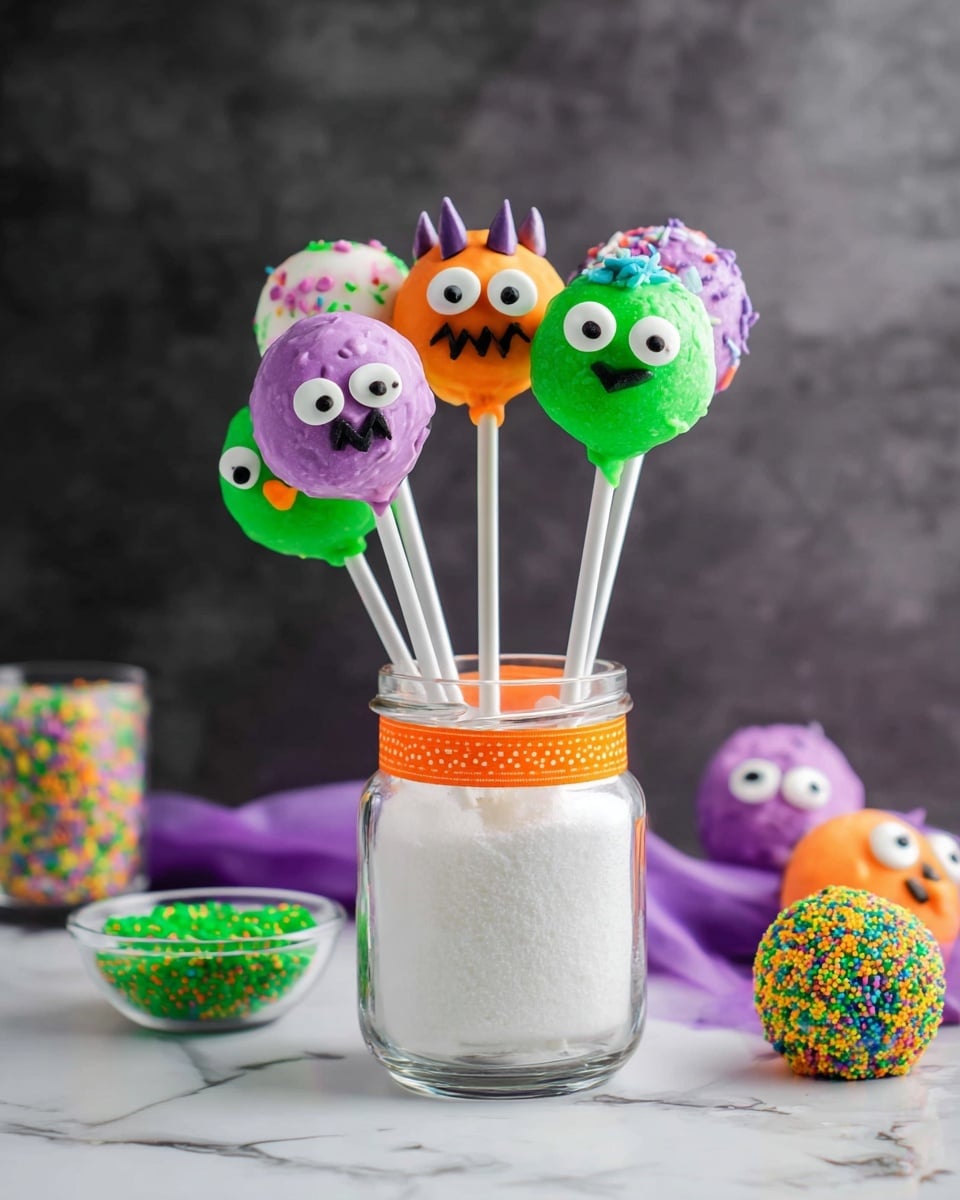
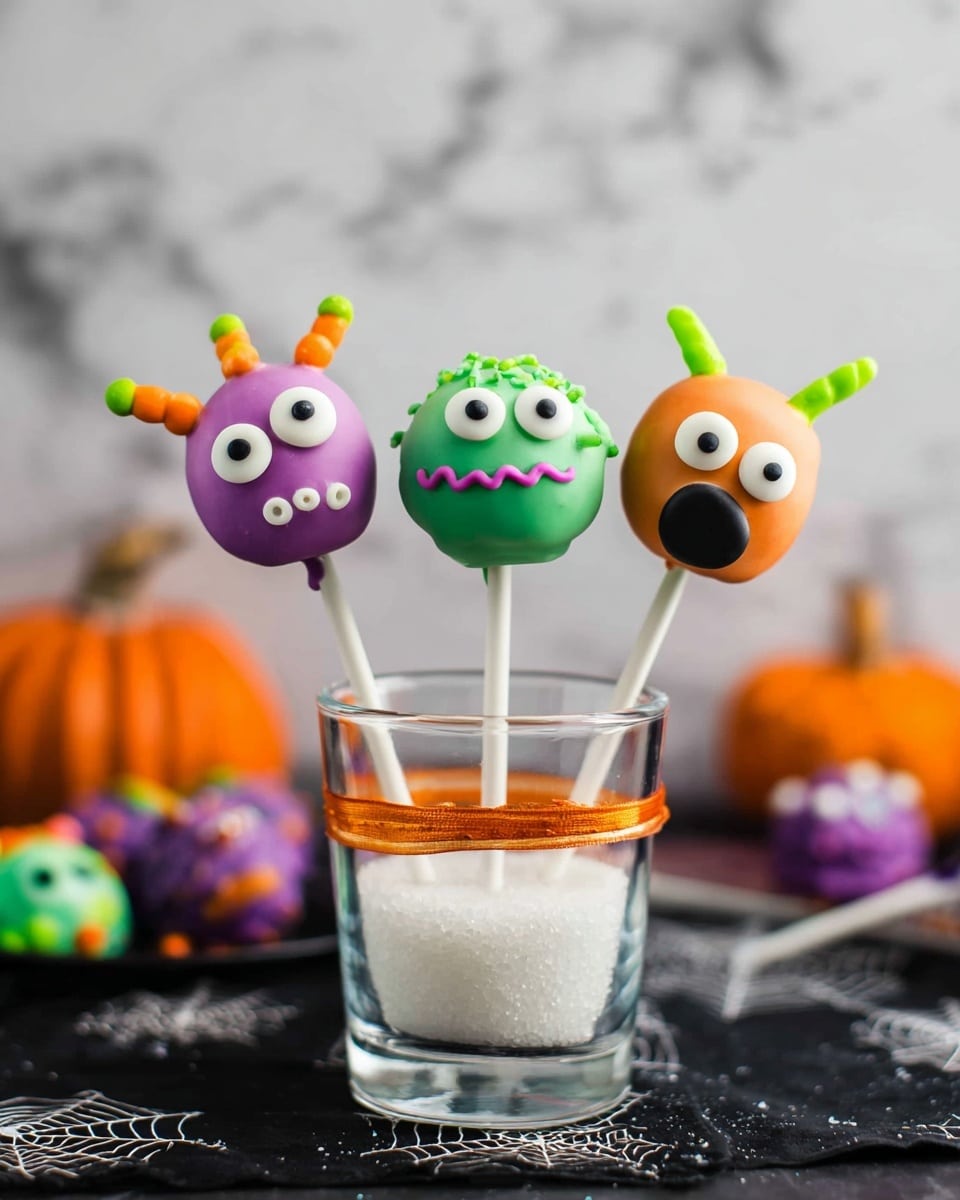
- Candy eyeballs, assorted sprinkles, and black decorating gel: These little accents take your pops from cute to spooky in no time.
Variations
I like to mix things up depending on the vibe I’m going for, and honestly, the base recipe is so flexible you can have a ton of fun personalizing it. Whether you want to make truly spooky monster pops or sprinkle them with candy confetti, there’s something here to inspire your creativity.
- Monster Pops: I adore how adding candy eyeballs and little horns made from piped candy melts transforms the donuts into adorable monsters—my kids can’t get enough!
- Sprinkle-Topped Pops: For a cheerful look, dipping the tops in sprinkles right after the first candy melt layer sets adds great texture and color.
- Drizzled Pops: When I almost let the coating harden before drizzling another color over it, it creates a cool layered effect.
- Gluten-Free Option: Swap donuts with gluten-free mini treats or cake crumbs if you need a wheat-free alternative.
How to Make Halloween Cake Pops Recipe
Step 1: Prep and Insert Sticks
First, melt your candy melts according to the package directions – I usually do this slowly in short bursts in the microwave to avoid overheating. Dip about 1/4 to 1/2 inch of each lollipop stick into the melted candy, then immediately insert it into a mini donut. This step glues the stick in place, ensuring your cake pops don’t fall off later. Let them cool upside down on wax paper (sticks pointing up) so the candy hardens well.
Step 2: Coat the Donuts
Once the sticks are securely in place, dip each donut into the candy melts and rotate until fully covered. This is where your pop comes to life with Halloween colors! Keep the coating smooth by moving slowly and letting excess drip off. Place them back on wax paper, upside down, and let the candy melts set completely before moving on.
Step 3: Decorate Your Spooky Creations
Here’s the fun part—the decorations! Use candy eyeballs, sprinkles, and black decorating gel to create monsters, ghosts, or whatever eerie designs you want. I discovered that letting the first layer dry fully before adding eyeballs or gel keeps the details crisp and avoids smudging. For monster horns, piping candy melts onto wax paper and sticking them on with more candy melt works like a charm. If you want big horns, a sprinkle stuck inside provides extra support.
Pro Tips for Making Halloween Cake Pops Recipe
- Perfect Stick Placement: Letting the candy melt cool just a bit before inserting sticks creates a firmer bond and prevents them from slipping out later.
- Avoid Clumps: When dipping donuts, rotate slowly and tap the edge gently to avoid thick spots of candy coating.
- Set Upside Down: Cooling cake pops upside down keeps the coating smooth and prevents flat spots or dents.
- Storage Tip: Don’t refrigerate these pops; candy melts sweat and crack when warmed—room temperature storage in an airtight container works best.
How to Serve Halloween Cake Pops Recipe
Garnishes
I’m a sucker for the little details, so I always go heavy on candy eyeballs and sprinkles that match my Halloween color scheme. Black decorating gel is perfect for adding spooky mouths, stitches, or spider webs. These small touches really bring the pops to life and make them fun for all ages.
Side Dishes
Pair these Halloween cake pops with some classic fall treats like caramel apple slices, pumpkin spice cookies, or even a spooky punch. They’re great on a dessert table alongside popcorn balls and candy corn for a full Halloween spread everyone will love.
Creative Ways to Present
One of my favorite presentation ideas is displaying the cake pops in a decorated foam block covered with black fabric or tissue paper, then adding faux spider webs and plastic spiders for a creepy vibe. I’ve also wrapped each pop individually with cellophane and tied them with orange and purple ribbons for easy grab-and-go party favors.
Make Ahead and Storage
Storing Leftovers
These cake pops are best enjoyed the day you make them, but if you have leftovers, store them at room temperature in a single layer inside an airtight container. I once learned the hard way that sticking them in the fridge causes the candy coating to sweat and crack, which isn’t pretty. Keeping them out prevents this and keeps your pops looking flawless.
Freezing
I haven’t had the best luck freezing these pops because the texture of the donut changes when thawed, and the candy melts can lose their shine. I’d recommend making them fresh or prepping the donuts and sticks separately if you want to plan ahead.
Reheating
Since these are best eaten fresh, reheating isn’t usually needed. If the candy coating has dulled, a quick few seconds near (but not in) a warm area can help revive the shine, but handle gently to avoid cracks.
FAQs
-
Can I use regular cake instead of donuts for this Halloween Cake Pops Recipe?
Absolutely! If you prefer traditional cake pops, you can crumble your favorite cake and mix it with frosting to form balls before dipping them in melted candy. Using mini donuts just saves you the extra step and cleanup, but both work great depending on what you prefer.
-
How do I prevent the candy coating from cracking?
To avoid cracking, make sure your candy melts aren’t overheated when melting, and don’t store finished pops in the fridge. Cooling them at room temperature and handling gently also helps keep the coating smooth and intact.
-
Can I make these cake pops with other colors?
Definitely! Candy melts come in tons of colors, so feel free to mix it up with blues, reds, or pastels if you want to create different themes or characters beyond Halloween.
-
How do I attach candy eyeballs securely to the cake pops?
Let your candy coating fully harden first, then use a dab of melted candy melt as glue to stick the eyeballs on. Hold them in place for a few seconds until set for the best hold.
-
Is it okay to prepare Halloween Cake Pops Recipe in advance?
You can make them up to 24 hours ahead and store at room temperature in an airtight container. Just avoid refrigerating to keep the candy melts from sweating and cracking.
Final Thoughts
Honestly, I absolutely love how this Halloween Cake Pops Recipe turns out every single time. It’s such a fun way to celebrate the season with minimal fuss and maximum smiles. Whether you’re making these with your kids or whipping them up for a party, they bring such a festive vibe and delicious treat that everyone enjoys. Give it a try, and I bet these pops will become a go-to for your Halloween celebrations year after year!
Print
Halloween Cake Pops Recipe
- Prep Time: 30 minutes
- Cook Time: 0 minutes
- Total Time: 40 minutes
- Yield: 24 servings
- Category: Dessert
- Method: No-Cook
- Cuisine: American
Description
These festive Halloween Cake Pops are a fun and colorful treat made by coating mini donuts with melted candy melts, then decorating with candy eyeballs, sprinkles, and black decorating gel to create spooky and playful designs. Perfect for Halloween parties or seasonal celebrations, these cake pops are quick to assemble and visually impressive.
Ingredients
Cake Pops
- 1 cup candy melts (green, purple, and/or orange)
- 24 lollipop sticks (6- to 7-inch)
- 24 plain mini donuts and/or donut holes
Decorations
- Candy eyeballs
- Assorted sprinkles
- Black decorating gel
Instructions
- Melt Candy Melts: Melt the candy melts according to the package directions until smooth and ready for dipping. This provides the coating that will stick to the donuts and create a colorful shell.
- Insert Sticks: Dip each lollipop stick about 1/4- to 1/2-inch into the melted candy melts, then carefully insert the stick into each mini donut. This secures the stick inside the donut and acts as an adhesive anchor. Place the donut pops upside down on a wax paper-covered surface with sticks pointing upwards and allow the candy melts to harden for a few minutes.
- Coat Donuts: Once the sticks are secure and the first layer is set, dip each donut completely into the melted candy melts. Rotate it to ensure full, even coverage. Place dipped donuts upside down again on wax paper to cool and harden completely.
- Decorate Cake Pops: Use candy eyeballs, assorted sprinkles, and black decorating gel to decorate the cake pops in spooky or creative ways. You can follow the tips for sprinkles, drizzles, and monster features for unique designs. Allow the candy melts to set fully before serving.
- Serving and Storage: These cake pops are best enjoyed the day they are made. However, you can prepare them up to 24 hours ahead and store at room temperature in an airtight container. Avoid refrigeration or freezing to prevent sweating and cracking of the candy coating.
Notes
- For sprinkle-topped pops: After the first candy melt layer, let set for 3 minutes before dipping tops in sprinkles.
- For drizzled pops: Let first layer almost fully set before drizzling a second layer of candy melt.
- For monster pops: Let first layer completely dry, then use melted candy melt to stick on eyes and add sprinkles and decorations with black gel.
- Monster horns can be created by piping candy melt onto wax paper; attach to pops using candy melt, and for large horns, support with a sprinkle in the base.
Nutrition
- Serving Size: 1 cake pop
- Calories: 150
- Sugar: 20g
- Sodium: 150mg
- Fat: 6g
- Saturated Fat: 4g
- Unsaturated Fat: 1g
- Trans Fat: 0g
- Carbohydrates: 25g
- Fiber: 1g
- Protein: 1g
- Cholesterol: 5mg

