
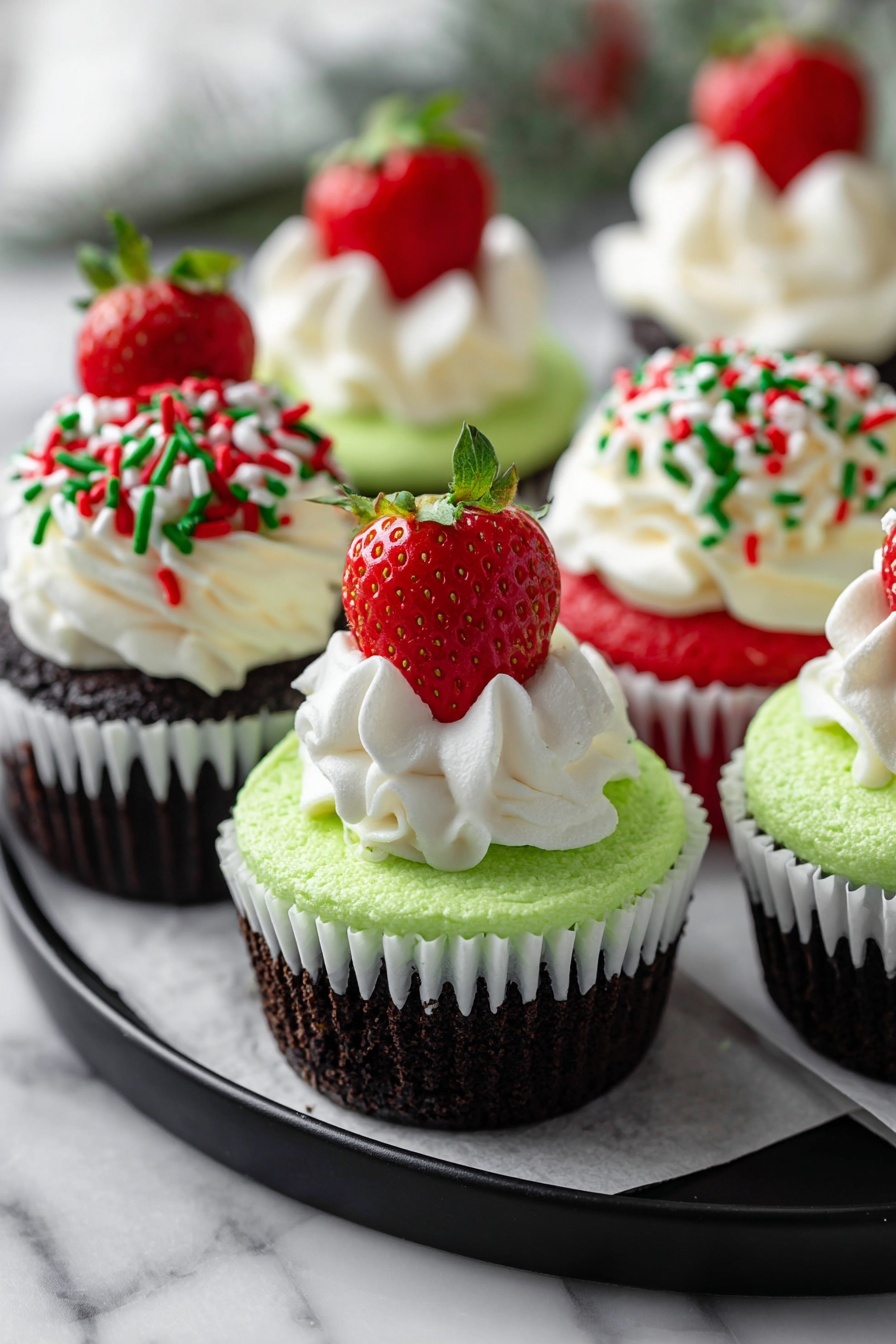
If you’re on the hunt for a dessert that’s as fun and festive as it is downright delicious, you’ve got to try my Grinch Cheesecake Cupcakes with Oreo Crust Recipe. These vibrant little cheesecakes catch everyone’s eye with their bright green hue and rich, creamy texture—plus that chocolatey Oreo crust is an absolute winner. Trust me, once you make these, you’ll be the go-to for festive treats at every holiday party!
Why You’ll Love This Recipe
- Easy and Quick to Make: You’ll have these cupcakes ready in under an hour, including baking and cooling time.
- Unique Festive Twist: The neon green filling instantly gives off those Grinch vibes that kids and adults adore.
- Perfect Portion Control: Mini cheesecakes mean you can enjoy indulgence without going overboard.
- Foolproof Oreo Crust: The buttery Oreo base adds great texture and flavor, making every bite unforgettable.

Ingredients You’ll Need
These ingredients are simple and easy to find, yet they come together to create a standout dessert. I especially love how the Oreo crust balances the creamy cheesecake, and the neon green color gives it that playful “Grinch” holiday charm.
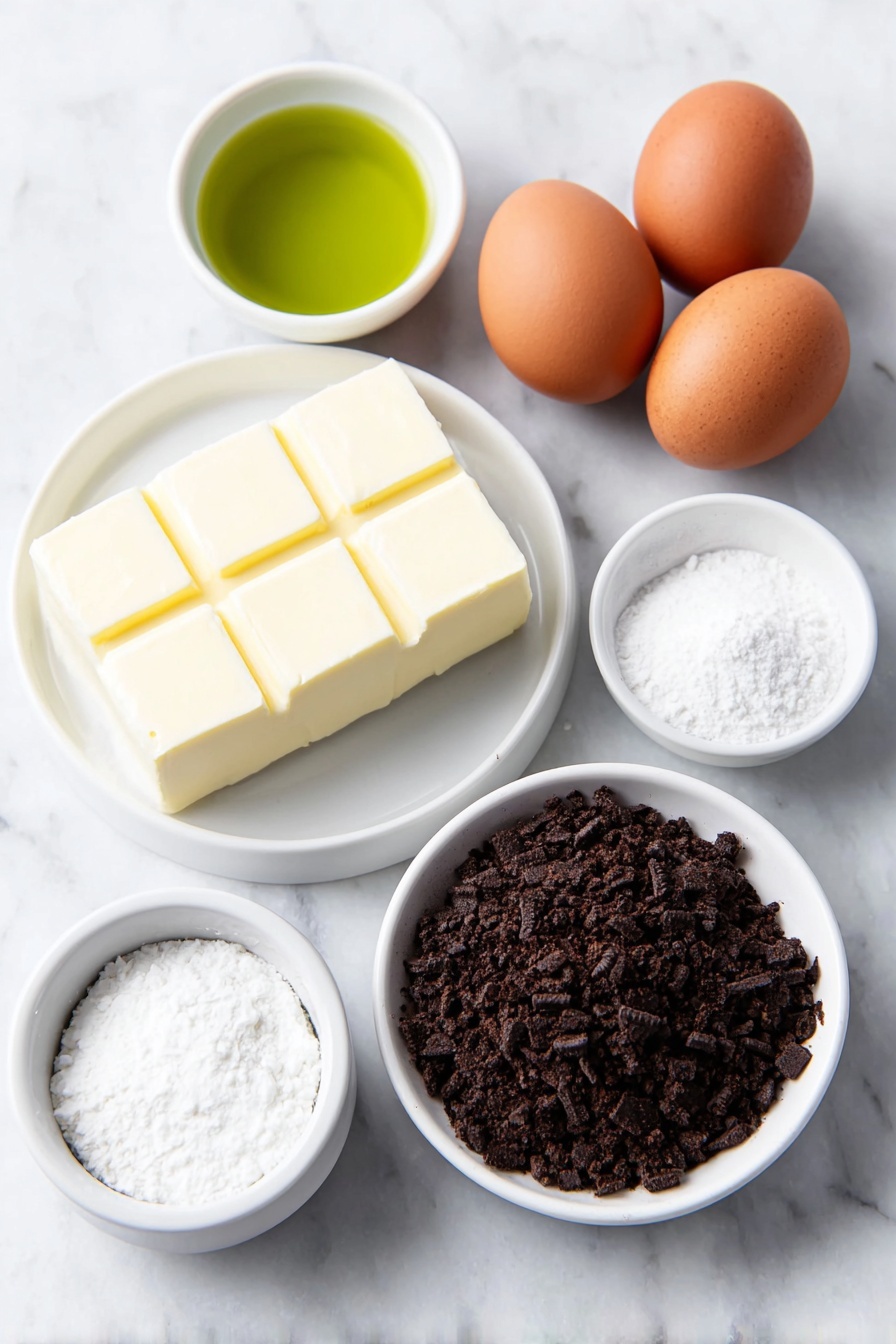
- Oreo crumbs: Using actual Oreos crushed fresh gives the crust great texture and chocolate flavor.
- Butter (melted): Helps bind the Oreo crumbs into a firm and tasty base.
- Cream cheese (softened): Make sure it’s at room temperature for the smoothest batter possible.
- Sugar: To sweeten the cheesecake filling just right.
- Eggs: These provide structure and creaminess to the cheesecake.
- Vanilla extract: Adds a lovely depth to the cheesecake flavor.
- Neon green food coloring: The magic ingredient that gives these cupcakes their unforgettable Grinchy glow.
Variations
I love making this recipe my own depending on the occasion or what I have on hand. Feel free to play around with toppings or even the crust—you’ll be surprised how easy it is to tweak these cupcakes without losing their charm.
- Mint Oreo Crust: Swap regular Oreos for mint-flavored ones to amp up the holiday spirit—I did this once and my guests went wild for the refreshing twist.
- Color Variations: Try using different neon colors for other characters or themes, like bright red for a Santa twist or blue for winter wonderland vibes.
- Whipped Topping Options: I sometimes add crushed candy canes or red and green sprinkles on top for extra festive flair.
- Non-Dairy Version: Use vegan cream cheese and plant-based butter if you want to make dairy-free cheesecakes—still just as tasty!
How to Make Grinch Cheesecake Cupcakes with Oreo Crust Recipe
Step 1: Prep Your Cake Pan and Crust
Start by preheating your oven to 350°F (175°C) and lining a cupcake pan with paper liners. I find the liners make it so much easier to remove the mini cheesecakes later, and they keep the crust intact. Next, pulse your Oreos in a food processor until they’re crumbly but not powdery—about 10 to 11 Oreos work perfectly. Then add melted butter and pulse just enough to combine—it should look like wet sand.
Step 2: Press the Oreo Crust
Distribute the Oreo crumb mixture evenly across each liner—this is key for even baking and texture. Press the crumbs down firmly with the back of a spoon or your fingers to create a compact crust. I often tap the pan lightly on the counter to help settle the crumbs. No need to bake the crust separately here—this cheesecake goes straight into the oven filled!
Step 3: Whip Up the Cheesecake Batter
In a medium bowl, beat the softened cream cheese and sugar until perfectly smooth and creamy. This step can’t be rushed—using room temperature cream cheese helps avoid lumps. Add the eggs one at a time, mixing after each, then stir in vanilla. Finally, add neon green food coloring little by little until you hit that fun Grinch-y shade. I usually go for a bright lime green that pops right off the plate.
Step 4: Fill and Bake
Scoop about 1/4 cup of batter into each crust-lined cup. Don’t overfill—these will puff a little while baking but settle perfectly afterward. Bake for 15-17 minutes; you’ll want the centers to still jiggle slightly when you gently shake the pan. This is the trick to creamy, not overcooked cheesecakes!
Step 5: Cool and Chill
Once baked, let the cheesecakes cool completely in the pan at room temperature. Then pop them in the fridge until they’re firm—about 2 hours, or even overnight if you have the time. This chilling step is what helps the texture turn silky smooth and makes them easy to remove from the liners.
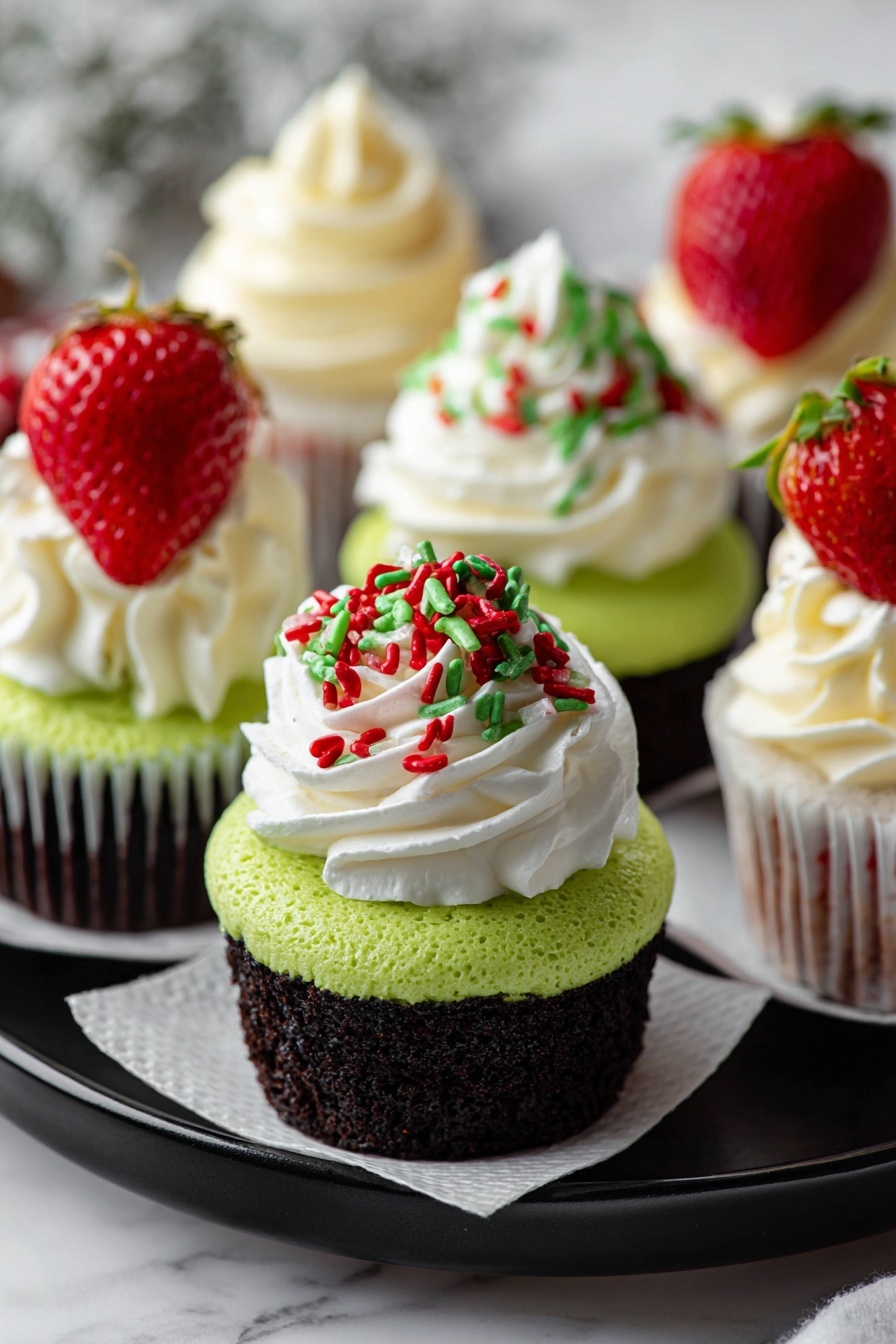
Step 6: Garnish and Serve
Top with a dollop of whipped cream and festive sprinkles or mini candy canes to really sell the holiday vibe. I love how the cool creaminess of the topping complements the tangy cheesecake flavor. Now, grab one, take a bite, and enjoy the festive cheer!
Pro Tips for Making Grinch Cheesecake Cupcakes with Oreo Crust Recipe
- Softening Cream Cheese Properly: I learned the hard way that cold cream cheese ruins your batter’s smoothness—always leave it out for at least 30 minutes before mixing.
- Avoid Overbaking: The slight jiggle in the center is your baking sweet spot for creamy texture—I set a timer and peek right at 15 minutes to avoid dry cupcakes.
- Press Crust Firmly: For a crust that holds together well, don’t skimp on firmly pressing those Oreo crumbs into the liners.
- Chill Overnight: Refrigerating overnight makes a massive difference in flavor and texture—I highly recommend it if you can wait!
How to Serve Grinch Cheesecake Cupcakes with Oreo Crust Recipe
Garnishes
I’m a sucker for a classic whipped cream topping—it balances the tangy cheesecake and adds a fluffy contrast. When I’m feeling extra festive, I grab some red and green sugar sprinkles or crushed peppermint candy to sprinkle on top. You could also add a tiny mint leaf or a mini red cherry for a pop of color and flavor.
Side Dishes
These cupcakes are sweet and rich enough to stand alone, but if you want to complete the holiday spread, I suggest serving them alongside a warm cup of peppermint hot chocolate or a fresh fruit platter with berries that complement the cheesecake’s creaminess.
Creative Ways to Present
For Christmas parties, I once arranged these cheesecakes on a platter lined with pine branches and holiday ornaments—everyone was instantly drawn to the vibrant green! You could also serve them in clear mini cups and layer with crushed Oreos and whipped cream for a parfait-inspired look. Gift-giving? Place them in a festive box with parchment paper and a ribbon.
Make Ahead and Storage
Storing Leftovers
I keep leftovers covered tightly in the refrigerator and always enjoy them within 3-4 days for the best texture and flavor. The crust stays crisp and the cheesecake creamy, especially if you keep them in an airtight container.
Freezing
I’ve frozen these mini cheesecakes successfully by placing them on a baking sheet to freeze individually, then transferring them to a freezer-safe container. Just thaw overnight in the fridge before serving—they hold up surprisingly well and taste fresh.
Reheating
Since these are cheesecakes, I don’t recommend reheating them. Instead, take them out of the fridge about 15-20 minutes before serving to take the chill off—they’ll be creamy and soft without needing any heat.
FAQs
-
Can I use a different type of cookie for the crust?
Absolutely! While Oreos give a classic chocolate flavor and great color contrast, you can substitute with any cookie you like—graham crackers, chocolate wafer cookies, or even ginger snaps for a spicy holiday twist. Just crush them finely and mix with melted butter as the recipe directs.
-
How do I achieve the perfect green color?
Use neon green gel food coloring for the brightest, most vibrant look. I find liquid coloring often produces a more muted shade, so gel or paste is best. Start with a small amount and add more until you get that signature Grinch glow without affecting the cheesecake texture.
-
Can I make these cheesecakes dairy-free?
Yes! You can swap regular cream cheese for dairy-free cream cheese and use vegan butter for the crust. Just make sure the substitutions are soft and spreadable for the best consistency. The texture might be slightly different but still delicious.
-
How do I prevent cheesecake cracking?
Cheesecake cracks occur when they cool too quickly or are overbaked. Baking until the centers are just set with a slight jiggle and gradually cooling the cupcakes in the pan before chilling helps prevent cracks. Also, avoid overmixing the batter once the eggs are added.
Final Thoughts
I have to say, the Grinch Cheesecake Cupcakes with Oreo Crust Recipe instantly became a holiday favorite in my house. There’s something so joyful about the bright green cheesecake paired with that crunchy chocolate crust—it’s like a little holiday party in every bite. Whether you’re baking for a crowd or just treating yourself, I promise these cupcakes will bring smiles all around. So grab your ingredients, whip up a batch, and make your next celebration extra special!
Print
Grinch Cheesecake Cupcakes with Oreo Crust Recipe
- Prep Time: 15 minutes
- Cook Time: 17 minutes
- Total Time: 40 minutes
- Yield: 12 mini cheesecakes
- Category: Dessert
- Method: Baking
- Cuisine: American
Description
These Grinch Mini Cheesecakes are festive and fun, perfect for holiday celebrations. With a crunchy Oreo crust and a vibrant neon green cheesecake filling, they bring a playful twist to the classic dessert. Easy to make and individually portioned, they’re sure to impress your guests with their colorful appearance and creamy texture.
Ingredients
Crust
- 1 cup Oreo Crumbs (about 10-11 Oreos processed)
- 2 1/2 tbsp Butter, melted
Cheesecake
- 16 oz (2 packages) Cream Cheese, softened
- 1/2 cup Sugar
- 2 Large Eggs
- 1 tsp Vanilla Extract
- Neon Green Food Coloring, to desired color
Topping (optional)
- Whipped Cream
- Sprinkles
Instructions
- Preheat Oven and Prepare Pan: Preheat your oven to 350°F (175°C). Line a cupcake pan with paper liners to make removing the mini cheesecakes easier after baking.
- Make the Crust: Pulse about 10 to 11 Oreos in a food processor until they turn into fine crumbs. Then add the melted butter and pulse again until the crumbs and butter are well combined and resemble wet sand.
- Form Crust Base: Divide the Oreo crumb mixture evenly among each cupcake liner and press down firmly with the back of a spoon or your fingers to create an even crust layer.
- Prepare Cheesecake Filling: In a medium bowl, beat the softened cream cheese and sugar together until smooth and creamy. Then beat in the eggs one at a time, followed by the vanilla extract.
- Add Coloring: Mix in neon green food coloring gradually until you reach the vibrant ‘Grinch’ shade you desire.
- Fill Cups: Spoon about 1/4 cup of the cheesecake mixture into each cupcake liner, filling them evenly over the prepared crusts.
- Bake: Bake the cheesecakes in the preheated oven for 15 to 17 minutes. The centers should still be slightly jiggly when you gently shake the pan – this ensures a creamy texture after cooling.
- Cool and Chill: Remove the cheesecakes from the oven and allow them to cool completely in the pan at room temperature. Once cooled, refrigerate them until firm, at least 2 hours or preferably overnight for best texture.
- Serve: Before serving, top each mini cheesecake with whipped cream and sprinkles if desired for a festive touch.
Notes
- Make sure the cream cheese is fully softened to avoid lumps in the cheesecake batter.
- The cheesecakes may crack if overbaked; watching the bake time carefully and removing them when centers are still slightly jiggly helps prevent this.
- Use neon gel food coloring for brighter colors without thinning the batter.
- Allow cheesecakes to chill well to ensure easy removal from liners and firmer texture.
- Optional toppings like whipped cream and sprinkles enhance presentation and festivity.
Nutrition
- Serving Size: 1 mini cheesecake
- Calories: 210 kcal
- Sugar: 15 g
- Sodium: 110 mg
- Fat: 14 g
- Saturated Fat: 8 g
- Unsaturated Fat: 5 g
- Trans Fat: 0 g
- Carbohydrates: 18 g
- Fiber: 1 g
- Protein: 4 g
- Cholesterol: 55 mg

