
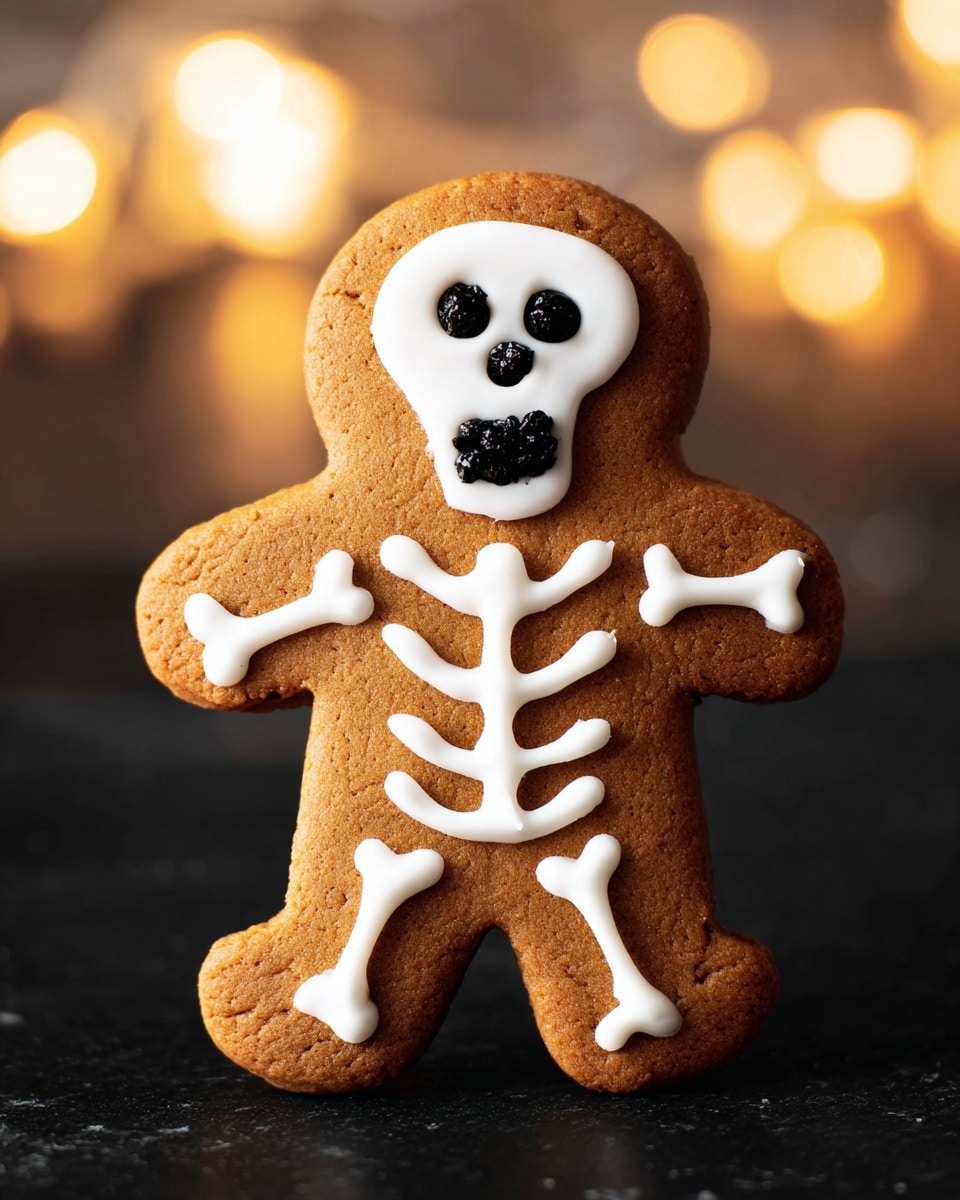
If you’re on the hunt for a *fun* seasonal treat that’s as adorable as it is delicious, you’ve got to try this Gingerbread Halloween Skeleton Cookies Recipe. I absolutely love how these little skeletons come to life with that classic warm gingerbread flavor, making them perfect for spooky celebrations or just sharing some festive joy with friends and family. Stick with me — I’m going to walk you through how to nail this recipe without any stress, plus share some tips I’ve learned along the way to make these cookies your new Halloween staple.
Why You’ll Love This Recipe
- Simple Ingredients: Uses pantry staples with just the right blend of warming spices you already love.
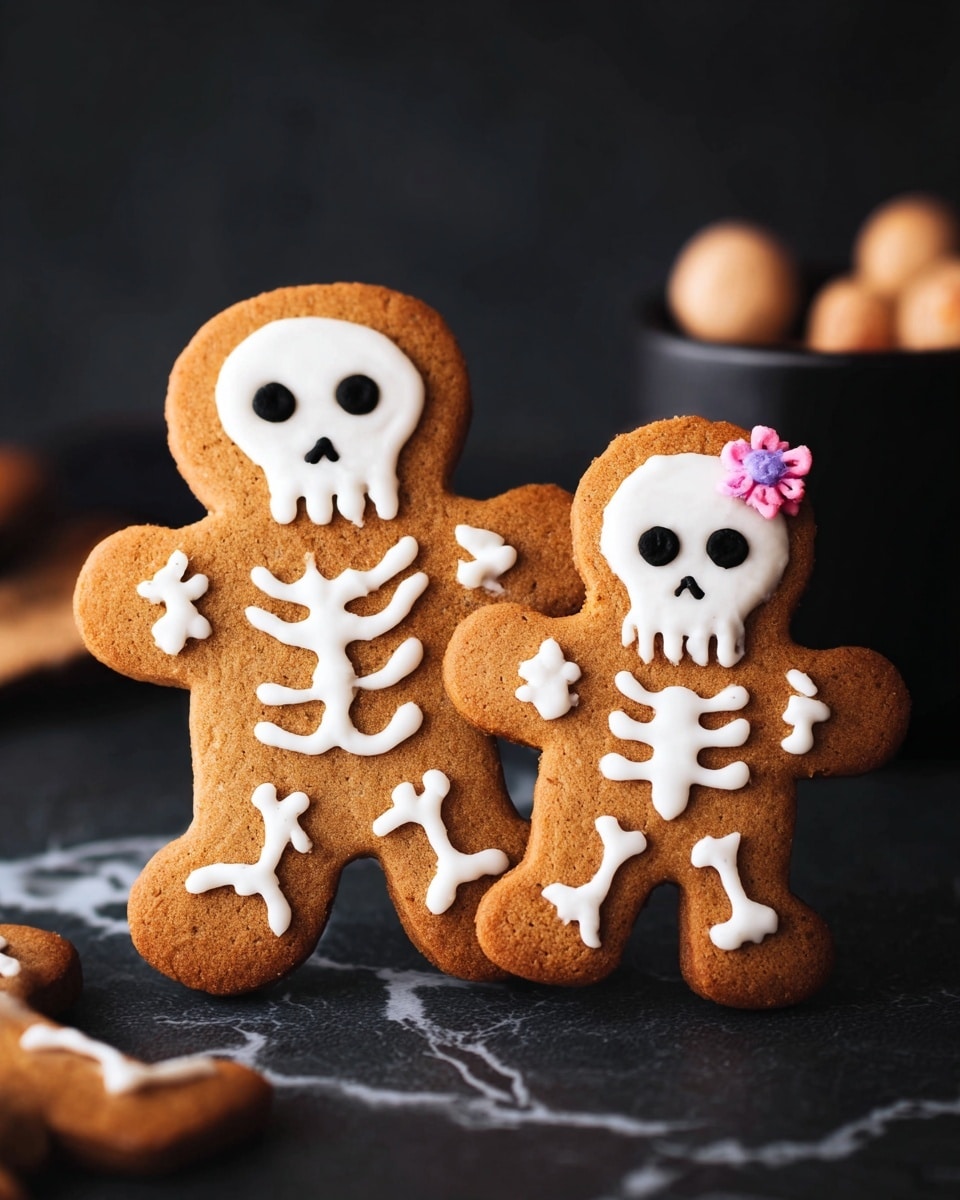
- Fun and Festive: The skeleton shapes combined with sweet royal icing bring Halloween vibes to a whole new level.
- Perfect Texture: Crisp edges with a tender center make these cookies irresistible every time.
- Beginner Friendly: Easy steps and helpful tips make this recipe doable even if you’ve never decorated cookies before.

Ingredients You’ll Need
The magic in this Gingerbread Halloween Skeleton Cookies Recipe comes from a blend of warm spices combined with molasses and brown sugar — it’s that classic gingerbread flavor you crave in autumn. What’s great is how these ingredients work together to create a cookie that’s not too sweet but loaded with festive spice. When you shop, look for fresh spices for the best aroma and flavor.
- Unsalted Butter: Room temperature butter helps achieve a creamy batter for smooth dough.
- Light Brown Sugar: Adds moisture and a subtle caramel flavor to balance the spices.
- Egg Yolk: Keeps the cookies tender and rich without making them cakey.
- Molasses (Unsulphured): This is the soul of gingerbread — deep flavor and that dark color.
- Vanilla Extract: A little extra flavor depth that rounds out the spice mixture.
- All-Purpose Flour: The building block for your dough — gives structure but still light enough for a tender bite.
- Baking Soda: Helps give a slight lift while keeping cookies crisp.
- Ground Cinnamon: Warm and sweet, cinnamon complements ginger perfectly.
- Ground Nutmeg: Adds a subtle nutty spice that’s not overpowering.
- Ground Cloves: Powerful and aromatic, but just a pinch goes a long way.
- Ground Ginger: This spice packs the signature punch your taste buds expect.
- Salt: Balances the sweetness and enhances all the flavors.
- Powdered Sugar: For the royal icing — smooth and easy to decorate with.
- Milk (any kind): Just enough to give the icing the perfect piping consistency.
Variations
I love how adaptable this Gingerbread Halloween Skeleton Cookies Recipe is. Whether you want to keep things classic or experiment a bit, feel free to tweak the flavor and decoration to suit your vibe or dietary preferences. I’ve tried a few fun twists and will share what worked for me!
- Vegan Version: I swapped the butter for coconut oil and used a flax egg instead of the yolk—still delicious and slightly softer cookies.
- Spice Adjustment: If you prefer less heat, I cut back on the cloves and ginger slightly and bumped up cinnamon for a sweeter taste.
- Colorful Icing: Adding gel food coloring to the royal icing brings your skeletons to life with pops of spooky color.
- Thicker Cookies: Rolling the dough a bit thicker makes the skeletons sturdier—great for gift-giving or cookie decorating parties.
How to Make Gingerbread Halloween Skeleton Cookies Recipe
Step 1: Cream Butter and Sugar Until Dreamy
Start by beating the unsalted butter and light brown sugar together. I like using a hand-held mixer on medium speed until the mixture is smooth and creamy — it usually takes about 2 minutes. This step is crucial because a good cream sets the stage for tender cookies. Then, add in your egg yolk, molasses, and vanilla extract. It might look a bit curdled at first — don’t worry, that’s normal! Just keep mixing until everything is nicely combined.
Step 2: Add Your Flour and Spices
Next, sprinkle the flour, baking soda, cinnamon, nutmeg, cloves, ginger, and salt over the wet ingredients. I like to sift everything together beforehand to avoid any unwanted clumps. Mix on low speed until the dough comes together and you no longer see dry streaks of flour. The dough will be soft but manageable, which is exactly what you want.
Step 3: Chill the Dough
Here’s a trick I discovered: wrapping your dough tightly in plastic wrap and chilling it in the fridge for at least an hour makes rolling out so much easier. It firms up the dough and stops the cookies from spreading too much in the oven. While waiting, you can prep your baking sheets and get your cookie cutters ready — I use a skeleton-shaped cutter for that perfect Halloween touch.
Step 4: Roll, Cut, and Chill Again
When your dough is chilled, roll it out on a lightly floured surface to about ¼ inch thickness. If you want thicker cookies, go a little thicker here. Use your cookie cutters to stamp out those cute skeleton shapes, then place each cookie about 2 inches apart on parchment-lined baking sheets. Don’t forget to save scraps and gently re-roll them — but limit this to two times so your cookies stay tender. Before baking, pop your cut-out cookies back into the fridge for 10 minutes to keep everything crisp and neat.
Step 5: Bake and Cool
Preheat your oven to 350°F and bake the cookies one sheet at a time for 8 to 10 minutes. I’ve found that baking one tray at a time ensures even heat distribution, so your cookies come out perfectly baked — edges set and lightly golden. If you like ’em a little crunchier, add a couple more minutes, but watch closely to avoid burning. Cool your cookies on the baking sheet for about 10 minutes before transferring to a wire rack to cool completely.
Step 6: Mix and Decorate with Royal Icing
For the royal icing, whisk together powdered sugar, vanilla extract, and start with one teaspoon of milk. Add more milk a little at a time to get the perfect thick but pipeable consistency. This simple icing works beautifully for outlining and filling in your skeletons. I recommend fitting a piping bag with a very small round tip for the tiniest bones and details. The kids love helping with decorating — it’s part of the fun!
Pro Tips for Making Gingerbread Halloween Skeleton Cookies Recipe
- Keep Dough Cold: If your dough warms up too much while working, pop it back in the fridge to avoid sticky messes and spreading cookies.
- Use Parchment Paper: Lining your baking sheets prevents sticking and makes clean-up a breeze.
- Customize Your Icing: Adjust milk carefully—too thin and the icing runs, too thick and it’s hard to pipe, so add slowly!
- Bake Individually: Baking one tray at a time results in more even cookies and prevents uneven browning.
How to Serve Gingerbread Halloween Skeleton Cookies Recipe
Garnishes
I typically keep garnishes simple here — the royal icing itself is the star of the show. But if you want to get fancy, a sprinkle of edible glitter or tiny candy eyes adds a playful extras that glow in dim Halloween lights. Colored sanding sugars around the edges also bring a fun crunch and sparkle.
Side Dishes
These cookies pair wonderfully with a warm spiced cider or a mug of rich hot chocolate. For a party, I like to serve them alongside pumpkin dip or a cheese board with autumnal nuts and fruits — the contrast between sweet and savory keeps everyone hooked.
Creative Ways to Present
Last Halloween, I placed these skeleton cookies standing upright in a faux “graveyard” display with crushed Oreo dirt and candy tombstones — the kids went nuts over it! You could also gift them in clear cellophane bags tied with orange and black ribbon or stack them in rustic tin boxes lined with seasonal napkins.
Make Ahead and Storage
Storing Leftovers
I keep leftover cookies in an airtight container at room temperature, layered between parchment paper to keep them from sticking, and they stay fresh for up to five days. This recipe is perfect for making ahead and enjoying throughout the week!
Freezing
Believe it or not, frozen gingerbread cookies retain their flavor spectacularly well. I wrap cooled cookies tightly in plastic wrap, then place them in a zip-top bag before freezing. When I need them, I simply thaw at room temperature for a few hours — the icing stays intact and the cookies’re as tasty as fresh.
Reheating
If you want to bring cookies back to just-baked warmth, pop them into a preheated 300°F oven for 3-5 minutes. This brings out the aroma and softens the texture just a touch, without melting the icing.
FAQs
-
Can I make the dough ahead of time?
Absolutely! This gingerbread dough can be made and refrigerated for up to 24 hours before rolling and cutting. You can also freeze the dough for up to 3 months—just thaw it overnight in the fridge before using.
-
What if my cookies spread during baking?
If your cookies spread too much, it usually means the dough was too warm or you didn’t chill the cut-out shapes before baking. Make sure to chill the dough well both before rolling and again after cutting and before baking to keep the shapes crisp.
-
How do I get the royal icing consistency just right?
Start with less milk and whisk into the powdered sugar gradually. The icing should be thick enough to hold shape without flattening out but still thin enough to pipe smoothly. If it’s too runny, add more powdered sugar; too thick, add small drops of milk.
-
Can I use these cookies for other holidays?
Definitely! While the skeleton shapes scream Halloween, the gingerbread cookie base works well for Christmas, fall parties, or anytime you want a spiced treat. Swap the shapes and icing colors for different themes.
Final Thoughts
When I first tried the Gingerbread Halloween Skeleton Cookies Recipe, I was amazed at how easy it was to bring these spooky little treats to life with just a handful of pantry staples. Not only do they taste deeply comforting with all those classic spices, but decorating them turns into such a fun, creative activity — something my family and I look forward to every fall. If you want a recipe that combines festive fun and cherished flavor without fuss, this one’s the keeper. Trust me, once you bake and decorate your first batch, you’ll be hooked and planning your spooky cookie party already!
Print
Gingerbread Halloween Skeleton Cookies Recipe
- Prep Time: 10 minutes
- Cook Time: 10 minutes
- Total Time: 1 hour 20 minutes
- Yield: 12 cookies
- Category: Dessert
- Method: Baking
- Cuisine: American
Description
These Gingerbread Halloween Skeleton Cookies combine classic spiced gingerbread flavors with a fun seasonal twist. Perfectly soft yet slightly crisp, these cookies are decorated with a simple royal icing to create skeleton designs, making them ideal for Halloween celebrations and cozy fall baking.
Ingredients
Gingerbread Cookies
- 4 tablespoons unsalted butter, room temperature
- 3 tablespoons light brown sugar
- 1 large egg yolk
- 3 tablespoons molasses, unsulphured
- ½ teaspoon vanilla extract
- 1 cup plus 2 tablespoons all-purpose flour
- ¼ teaspoon baking soda
- ¼ teaspoon ground cinnamon
- ¼ teaspoon ground nutmeg
- ¼ teaspoon ground cloves
- ½ teaspoon ground ginger
- ⅛ teaspoon salt
Royal Icing
- ¼ cup powdered sugar
- 1 to 2 teaspoons milk, any kind
- ⅛ teaspoon vanilla extract
Instructions
- Prepare the Gingerbread Dough: In a small mixing bowl, add the butter and brown sugar. Using a handheld mixer at medium speed, beat until smooth and creamy. Add the egg yolk, molasses, and vanilla extract, beating until well incorporated, noting the batter may appear slightly curdled, which is normal.
- Add Dry Ingredients: Sprinkle or sift the flour, baking soda, cinnamon, nutmeg, cloves, ginger, and salt over the wet ingredients. Mix on low speed until no dry streaks remain and the dough is well combined.
- Chill the Dough: Transfer the dough onto a piece of plastic wrap and gently shape into a disc. Wrap tightly and refrigerate for at least 1 hour to allow flavors to meld and dough to firm up for easier handling.
- Preheat the Oven and Prepare Baking Sheets: Preheat your oven to 350°F (175°C) and position the rack in the middle. Line two baking sheets with parchment paper for non-stick baking.
- Roll and Cut the Cookies: Remove the dough from the refrigerator and place on a lightly floured surface. Roll it out to a ¼ inch thickness, or thicker if you prefer a softer cookie. Use a skeleton or Halloween-themed cookie cutter to cut shapes, placing cookies at least 2 inches apart on the baking sheets. Re-roll scraps once or twice for additional cookies.
- Chill Cut-Out Cookies if Needed: If the dough becomes too warm and soft while rolling and cutting, place the baking sheets with cookies in the refrigerator for about 10 minutes before baking to prevent spreading.
- Bake the Cookies: Bake one sheet at a time for 8 to 10 minutes, or until the edges are set. For crispier cookies, extend baking by 1 to 2 minutes. After baking, let the cookies cool on the baking sheet on a wire rack for 10 minutes, then transfer cookies directly to the wire rack to cool completely.
- Make the Royal Icing: In a small bowl, whisk together powdered sugar, vanilla extract, and 1 teaspoon of milk until the sugar is moistened. Add additional milk a teaspoon at a time until you achieve the desired consistency for decorating.
- Decorate the Cookies: Use the royal icing to decorate cooled cookies as desired, creating spooky skeleton designs perfect for Halloween festivities.
Notes
- Serving Size: The number of cookies depends on the thickness of rolled dough and size of cookie cutters.
- Larger Batch: This recipe is tested as a small batch; doubling is possible but may require adjustments.
- Refrigerate Cut-Out Cookies: To minimize spreading, chill cookies before baking.
- Bake One Sheet at a Time: Ensures even baking and better texture.
- Crispy Cookies: For crunchier texture, bake 1 to 2 minutes longer.
- Royal Icing: This is a simplified royal icing recipe without egg whites; traditional versions include egg whites or meringue powder.
- Storing and Freezing: Cookies can be stored covered at room temperature up to 5 days or frozen tightly wrapped for up to 3 months. Thaw at room temperature before serving.
- Freezing Dough: Dough can be frozen tightly wrapped for up to 3 months and thawed in the refrigerator before use.
Nutrition
- Serving Size: 1 cookie
- Calories: 110
- Sugar: 7g
- Sodium: 80mg
- Fat: 4.5g
- Saturated Fat: 2.7g
- Unsaturated Fat: 1.5g
- Trans Fat: 0g
- Carbohydrates: 17g
- Fiber: 0.5g
- Protein: 1.2g
- Cholesterol: 30mg
