

If you’re looking for a show-stopping dessert that’s both adorable and delicious, you’re going to fall head over heels for this Ghost Cake Recipe. It’s got that cozy pumpkin spice vibe, a smooth vanilla buttercream, and with a few creative decorating touches, it transforms into the cutest little ghost that’ll impress every guest at your next gathering. Stick around, because I’ll walk you through every step to make this fun and festive cake a total breeze!
Why You’ll Love This Recipe
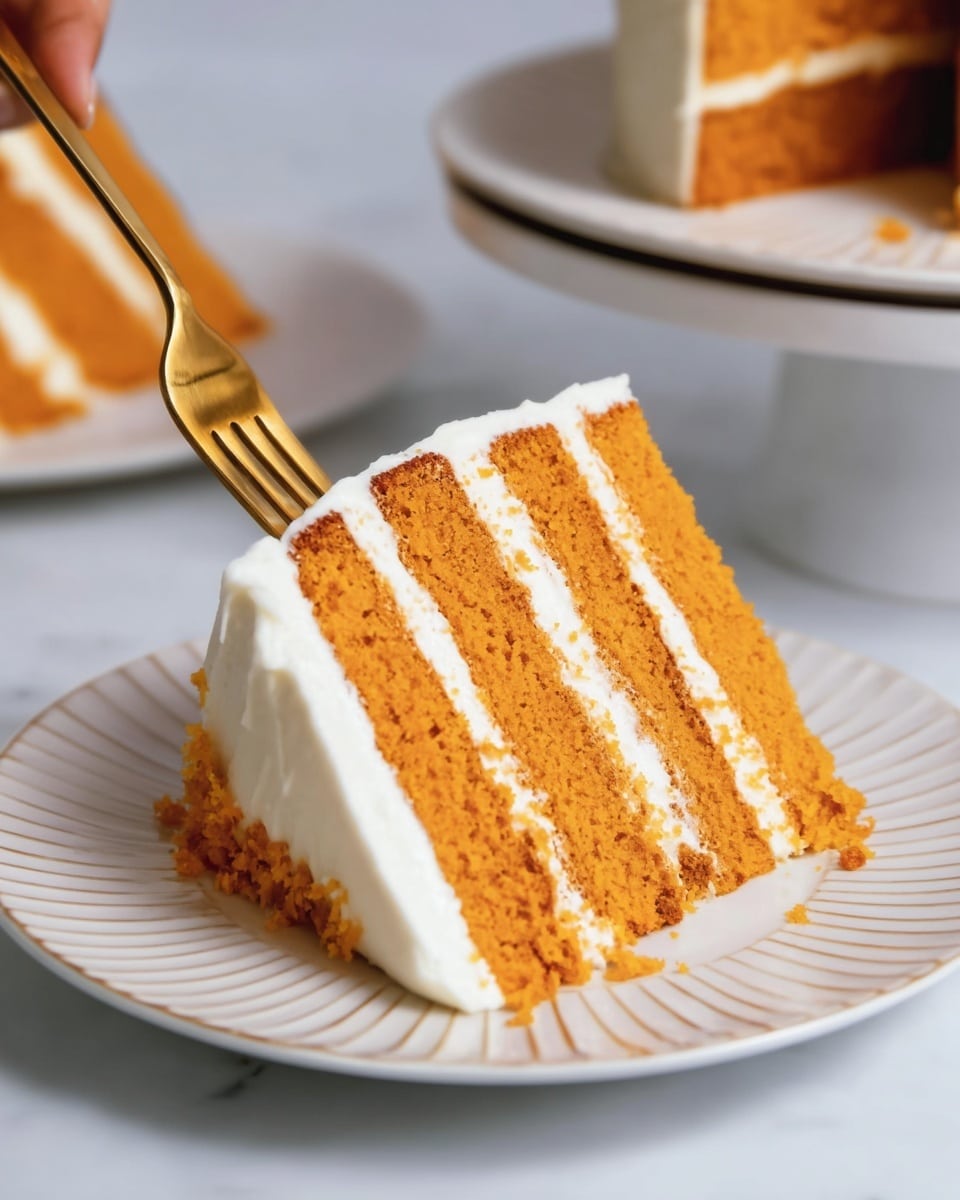
- Perfectly Spiced Pumpkin Layers: The pumpkin and warm spices blend so beautifully you’ll swear it’s fall all year round.
- Fluffy, Creamy Buttercream: The vanilla frosting is so silky and smooth, it’s just the right balance to the spiced cake.
- Fun, Festive Decorating: Customizing this cake into a ghost is easier than you think and adds a whimsical flair that’ll wow everyone.

Ingredients You’ll Need
These ingredients come together to give you a moist, flavorful pumpkin cake with a silky buttercream that’s easy to pipe and decorate. I love that you probably already have most of these staples in your pantry, making it a no-stress bake.
- All-purpose flour: This is the canvas of your cake, giving it structure without weighing it down.
- Granulated sugar: Sweetens perfectly and helps the cake brown beautifully.
- Baking powder: Essential for that nice rise and lift.
- Fine salt: Balances and enhances the flavors.
- Ground cinnamon, ginger, nutmeg: The trio of spices that give the pumpkin that signature warm, cozy flavor.
- Unsalted butter: I always use room temperature for creamier batter and even mixing.
- Egg whites: They lighten the texture, and using just whites makes this cake tender.
- Pumpkin puree: Not pumpkin pie filling—make sure it’s plain puree for the best taste and texture.
- Full-fat sour cream: Adds moisture and a slight tang that makes the cake irresistible.
- Vanilla extract or paste: Adds that sweet aromatic background note.
- Powdered sugar: For the buttercream’s smooth sweetness.
- Heavy whipping cream: Keeps the frosting light and silky.
- Gel food coloring: To get those vibrant decorative tones for the ghost’s face and pumpkin accents.
Variations
I like to play around with this Ghost Cake Recipe depending on the occasion and what I have on hand. Don’t hesitate to tweak and make it your own—it’s part of the fun!
- Size variations: I’ve made this recipe with both 6-inch and 8-inch cake pans; just note the ghost’s height and shape will vary slightly.
- Sheet cake option: For bigger crowds, this recipe doubles as a fantastic sheet cake, baking it in two 9×13 pans works great.
- Flavor twists: Try swapping sour cream for Greek yogurt for a tangier bite, or add a touch of espresso powder to your buttercream for a mocha ghost!
- Dietary adjustments: I’ve experimented with egg substitutes and vegan buttercream – results are good but expect subtle texture changes.
How to Make Ghost Cake Recipe
Step 1: Prepare Your Pumpkin Cake Layers
First things first, preheat your oven to 350°F (175°C) and prep your cake pans. I use four 6-inch round pans lined with parchment rounds and a quick spritz of non-stick spray—trust me, this little trick helps the cake slip out perfectly every time. If you don’t have four pans, no worries—bake what you can, then refrigerate the rest of the batter briefly. The pumpkin puree keeps it fresh for a few hours at room temp, so no rush.
Next, whisk together your dry ingredients. The spices mixed with flour, sugar, salt, and baking powder are going to give you a beautifully fragrant batter that smells amazing—my kitchen instantly feels like autumn!
When you add your room temperature butter, it should look like coarse, moist sand. This gives the crumb the perfect texture—don’t rush this step. Then, gently fold in your egg whites and pumpkin puree before adding sour cream and vanilla.
One little trick I learned is to add gel food coloring here if you want vibrant layers. For my ghost, a subtle orange tint works beautifully, so I add just a small squirt of orange gel color and stir gently.
After mixing everything on medium speed for about a minute to get it light and fluffy, divide the batter evenly into your pans and bake for roughly 34-38 minutes—or until a toothpick comes out with a few moist crumbs. Let them cool for 10 minutes then loosen the edges with an offset spatula before flipping onto wire racks or, better yet, pop them in the freezer for 45 minutes to cool completely without drying out.
Step 2: Whip Up That Vanilla Buttercream
While your cakes are cooling, it’s the perfect time to get your frosting ready. Beat softened, unsalted butter on medium-high speed until it’s light and creamy—this is what makes your buttercream fluffy, so don’t skip this step! Mixing in vanilla and salt gives it that perfect balance of sweetness.
Add the powdered sugar little by little on low speed, and halfway through, pour in the heavy cream. This combo makes the frosting smooth and silky without being too dense—exactly what you want for piping and spreading.
If your frosting feels too thick, add a tablespoon of cream at a time. Too thin? A little more powdered sugar fixes that quickly. I always finish with a manual stir using a spatula to push out any air bubbles—trust me, it’s these little things that give you that professional finish.
Step 3: Stack and Shape Your Ghost
Here’s where the fun really begins. Place your first level cake layer on an 8-inch cake board—sticking it with a little frosting so it doesn’t slide around—and spread a generous even layer of buttercream on top. Repeat stacking your leveled layers, then place the final rounded dome layer on top.
The tapered shape of your layers creates that ghost silhouette. Trim carefully if you need to shape the cake a bit—the ghost’s arms and rounded head really come to life with these gentle adjustments.
Next, do a thin “crumb coat” of frosting around the cake. You want just enough to catch all those loose crumbs but keep the texture smooth. Chill in the fridge for 30 minutes or freezer for 10 to firm up before your final frosting coat.
Step 4: Decorate the Ghost
Here’s my favorite part: coloring your frosting and bringing the ghost to life. Divide small amounts of buttercream into piping bags and tint with gel colors—orange for pumpkin, pink for cheeks, green for leaves, brown for pumpkin stem, and black for the spooky face details. The rest stays pure white for the ghost’s body.
Use a large piping bag for a smooth outer layer of white buttercream. I use an acetate sheet and a large offset spatula to get that perfectly smooth ghostly surface you see in the photos. Then pipe squiggly lines at the base to mimic a ruffled ghost bottom—it’s such a cool texture and easy to do!
Using a toothpick, lightly mark where you want to place the ghost’s eyes, mouth, and pumpkin details. Pipe on the black facial features with a fine round tip or use black fondant if piping feels tricky.
Finish off by piping pink cheeks, a cute little orange pumpkin under the face with brown and green accents, and white ghostly arms reaching out. Seeing your ghost slowly come together is sooo rewarding!
Pro Tips for Making Ghost Cake Recipe
- Room Temperature Ingredients: I used to skip this and noticed my batter was lumpy—having everything at room temp mixes so much smoother!
- Chill Your Layers: Freezing the cake layers for about 45 minutes before assembling makes trimming and frosting way easier.
- Smoothing with Acetate: Using an acetate sheet to smooth your frosting helped me avoid messy spatula marks and gave that professional glow.
- Avoid Overmixing: I once overbeat the batter and it got too dense—sticking to medium speed mixing keeps it light and airy.
How to Serve Ghost Cake Recipe
Garnishes
When I serve this ghost cake, I like to keep the garnishes playful yet simple—tiny edible pearls or silver dragées for the eyes add a little sparkle, and a few extra piped leaves around the pumpkin make for a charming fall touch. Fresh cinnamon sticks on the side add aroma and look beautiful on the serving table too.
Side Dishes
Since this Ghost Cake Recipe is rich and flavorful, I usually pair it with lighter sides like fresh apple slices, a bowl of spiced whipped cream, or a hot cup of chai or coffee. It balances the sweetness perfectly!
Creative Ways to Present
For Halloween parties, I’ve placed the ghost cake on a cake stand surrounded by mini pumpkins and autumn leaves for a spooky atmosphere. I’ve also tried making individual ghost cupcakes using this same recipe for smaller gatherings—just as fun, and everyone loved the single-serve version!
Make Ahead and Storage
Storing Leftovers
After serving, I wrap leftover cake snugly with plastic wrap and refrigerate. Covering any exposed cake edges with leftover frosting helps keep the cake moist. It stays fresh in the fridge for up to a week, though truth be told, this cake rarely lasts that long in my house!
Freezing
I’ve frozen both unfrosted cake layers and fully decorated cakes. For layers, wrap tightly in plastic and foil, and thaw overnight in the fridge before assembling. For decorated cakes, wrap gently in plastic wrap and a cake box, then freeze. When ready, move the cake to the fridge a day ahead to minimize condensation on the frosting.
Reheating
If you want to warm up a slice, I usually microwave it for 10-15 seconds. This brings the buttercream to that creamy texture without melting it completely, and the pumpkin cake tastes extra fresh. Just watch it closely—nobody wants a melted ghost!
FAQs
-
Can I use canned pumpkin pie filling instead of pumpkin puree?
It’s best to use plain pumpkin puree, not pumpkin pie filling, because the pie filling already contains added spices and sugars that can throw off the cake’s flavor and texture.
-
What if I don’t have enough cake pans for all layers?
No worries! Bake as many layers as you can, cool them completely, then repeat with remaining batter. You can store the cooled layers in the freezer until ready to assemble.
-
Can I make this Ghost Cake Recipe dairy-free?
You can swap butter for plant-based margarine and use non-dairy sour cream alternatives. Keep in mind the flavor and texture might differ slightly, but it still works well!
-
How long does the decorated cake last?
A frosted cake like this keeps well in the fridge for up to one week. Make sure it’s covered properly to avoid drying out or absorbing other fridge smells.
-
Any tips for piping the ghost face if I’m new to decorating?
If piping feels intimidating, you can use a toothpick to lightly sketch the face on the cake surface first, or use black fondant cut-outs for the eyes and mouth. Practice on parchment paper before piping directly on the cake.
Final Thoughts
This Ghost Cake Recipe is hands down one of my favorite seasonal treats to make for family and friends. It hits that perfect note of cozy pumpkin spice with a buttery, dreamy frosting, and decorating it feels like a little art project in the kitchen. I honestly love how it brightens up any celebration, whether it’s Halloween or just a fun fall weekend. So grab your apron, get baking, and have a blast turning this ghost into the star of your dessert table—I promise you’ll get lots of compliments and happy smiles!
Print
Ghost Cake Recipe
- Prep Time: 15 minutes
- Cook Time: 35 minutes
- Total Time: 1 hour 50 minutes
- Yield: 24 servings
- Category: Dessert
- Method: Baking
- Cuisine: American
Description
This Ghost Cake recipe combines moist pumpkin cake layers with rich vanilla buttercream frosting to create a festive and adorable ghost-shaped cake perfect for Halloween celebrations. The pumpkin-spiced cake, topped with smooth and creamy buttercream, is decorated with colored piping to form a playful ghost, pumpkin, and facial features, making it both delicious and visually charming.
Ingredients
Pumpkin Cake Layers
- 3 cups all-purpose flour (375g)
- 3 cups granulated sugar (600g)
- 2 1/2 tsp baking powder (10g)
- 1 tsp fine salt (6g)
- 2 tsp ground cinnamon (6g)
- 1 tsp ground ginger (3g)
- 1/2 tsp ground nutmeg (2g)
- 1 cup unsalted butter, room temperature (226g)
- 1/2 cup carton egg whites or 4 large egg whites, room temperature (120g)
- 2/3 cup pumpkin puree (165g)
- 1 1/2 cups full-fat sour cream, room temperature (360g)
- 2 tsp vanilla extract or vanilla bean paste (8g)
Vanilla Buttercream Frosting
- 2 cups unsalted butter, room temperature (452g)
- 1 Tbsp vanilla extract or vanilla bean paste (12g)
- 1/2 tsp fine salt (3g)
- 7 cups powdered sugar (875g)
- 1/4 cup heavy whipping cream, room temperature (60g)
Ghost Cake Decorations
- 4, 6- inch Cake Pans
- Spinning Cake Stand
- 8- inch Cake Board
- Offset Spatula
- Acetate Sheet
- 5 Small Piping Bags
- 1 Large Piping Bag
- 4 Small Round Piping Tips like a Wilton 10
- 1 Small Leaf Piping Tips like a Wilton 352
- Black, Pink, Orange, Green, and Brown Gel Food Coloring
Instructions
- Prepare Cake Pans and Oven: Preheat oven to 350°F (175°C). Line four 6-inch round pans with parchment rounds and grease with non-stick spray. If using fewer pans, bake in batches, allowing batter to rest at room temperature if needed.
- Mix Dry Ingredients: In a mixer with paddle attachment, combine flour, sugar, baking powder, salt, cinnamon, ginger, and nutmeg until thoroughly mixed.
- Add Butter: Slowly add room temperature unsalted butter on low speed until mixture resembles moist sand with no large butter chunks.
- Incorporate Wet Ingredients: Pour in egg whites and pumpkin puree and mix on low until just combined. Add sour cream and vanilla extract; mix on low speed. Optionally add orange gel food coloring here for colored layers.
- Blend Batter: Scrape bowl sides and beat on medium speed for about one minute to lighten texture and ensure even mixing.
- Bake Layers: Divide batter evenly into prepared pans and bake 34–38 minutes or until toothpick inserted comes out with a few moist crumbs. Cool pans for 10 minutes, then run an offset spatula around edges.
- Freeze to Cool: Place pans in freezer for 45 minutes to accelerate cooling. Once cooled, invert pans to remove cakes.
- Level and Shape Layers: Level three layers with serrated knife; leave one layer rounded on top. Trim sides of rounded layer and others to create a tapered domed ghost shape. Wrap and freeze if making ahead.
- Make Vanilla Buttercream: Beat butter on medium-high until smooth and lighter in color. Mix in vanilla extract and salt on low speed. Slowly add powdered sugar while mixing low, add heavy cream halfway through. Adjust consistency by adding cream or powdered sugar as needed. Stir by hand to smooth and remove air bubbles. Cover with plastic wrap.
- Assemble Cake: Place a leveled cake layer on 8-inch cake board with a dab of frosting. Spread an even layer of frosting on each leveled layer and stack. Top with the domed layer for ghost shape.
- Crumb Coat and Chill: Apply a thin coat of frosting to entire cake, smooth with offset spatula and acetate sheet. Chill in fridge for 30 minutes or freezer for 10 minutes until firm.
- Prepare Colored Frostings: Divide about 1/4 cup frosting to color orange, 2 tbsp each for pink and green, 2 tbsp for brown, and 3 tbsp for black, placing each in small piping bags fitted with appropriate tips. Leave remaining white buttercream in a large piping bag.
- Final Frost and Decorate: Apply a second smooth layer of white buttercream using offset spatula and acetate sheet. Pipe squiggly lines around base to create a ruffled ghost effect.
- Pipe Face and Decorations: Trace ghost face and pumpkin shapes lightly with toothpick. Use black frosting to pipe ghost’s eyes and mouth, pink for cheeks, orange for pumpkin and bow, white for ghost arms, and brown and green for pumpkin stump and leaf details.
- Enjoy: Once decorated, the Ghost Cake is ready to serve and delight your guests with its festive look and delicious flavor.
Notes
- Flour should be measured properly: spoon into measuring cup then level with a knife or use a kitchen scale.
- Ensure all ingredients are at room temperature for better mixing and texture.
- Chill cake layers in freezer before assembling to make stacking and frosting easier.
- Crumb coat and chill before applying final frosting layer for a smooth finish.
- Adjust buttercream consistency with cream or powdered sugar for easier frosting application.
- Make cake layers and frosting ahead and freeze for easier assembly later.
- Store leftover frosting in an airtight container in fridge up to 1 month or freeze up to 3 months; stir well after thawing.
- Refrigerate frosted cake up to one week or freeze up to one month; thaw in fridge to minimize condensation.
- Use extra frosting to cover cut sections of leftover cake to keep moist.
- This recipe is adaptable to 6-inch, 7-inch, or 8-inch layers or can be made as a sheet cake using same batter.
Nutrition
- Serving Size: 1 slice (1/24 of cake)
- Calories: 370 kcal
- Sugar: 35 g
- Sodium: 190 mg
- Fat: 18 g
- Saturated Fat: 11 g
- Unsaturated Fat: 6 g
- Trans Fat: 0.3 g
- Carbohydrates: 49 g
- Fiber: 1.5 g
- Protein: 4 g
- Cholesterol: 55 mg


