
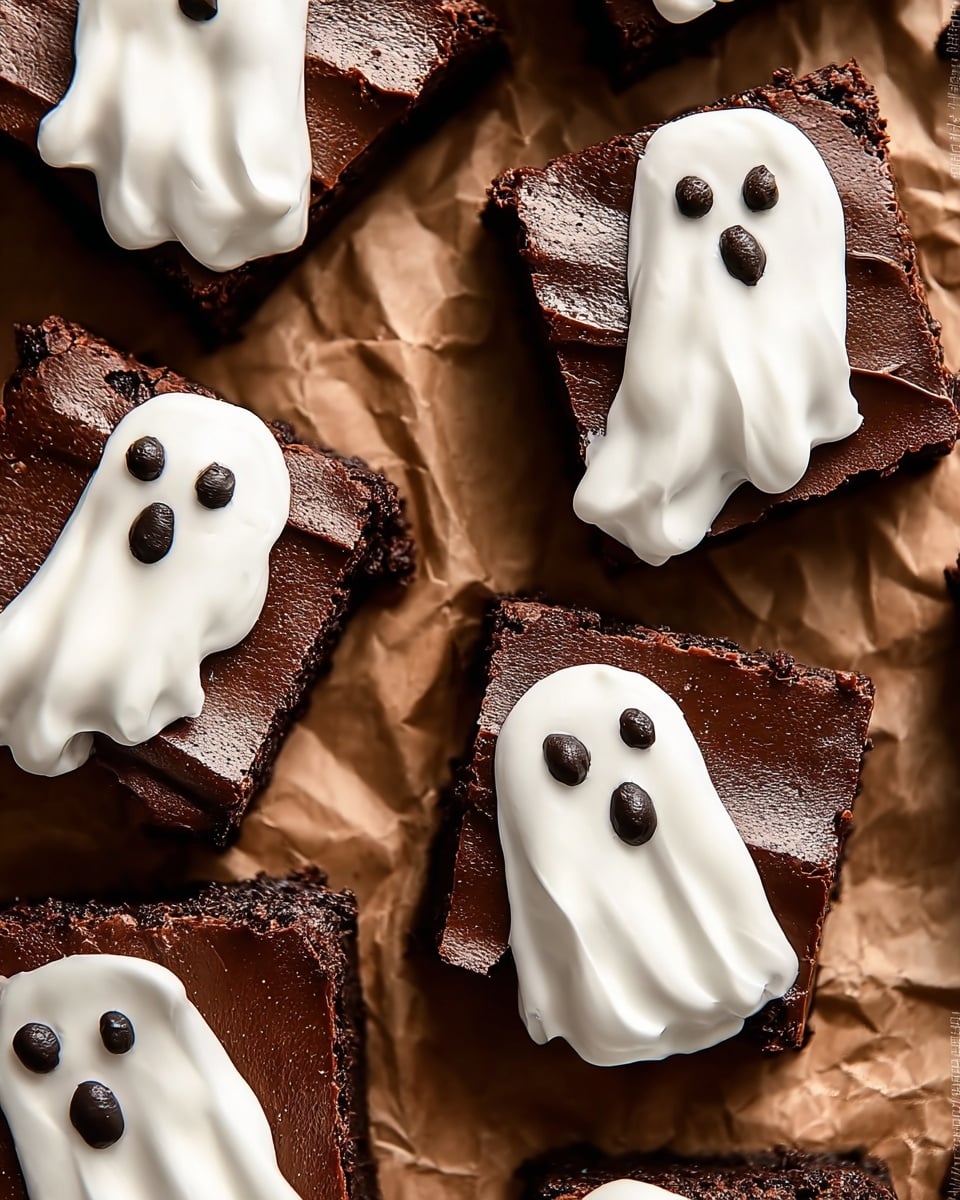
If you’re looking for a show-stopping dessert that’s not only delicious but also super fun to make, this Ghost Brownies Recipe has got you covered. I absolutely love how these brownies come out perfectly fudgy with a rich chocolate flavor, plus the adorable white chocolate ghosts on top make them a total hit, especially around Halloween or any spooky occasion you want to celebrate. Stick around, and I’ll walk you through every step, sharing my personal tips so your brownies turn out just right every time!
Why You’ll Love This Recipe
- Perfectly fudgy texture: The combination of bittersweet chocolate and cocoa powder makes these brownies decadently rich without being too dense.
- Fun and festive decoration: The white chocolate ghosts add a playful, homemade charm that kids and adults adore.
- Easy to make: No fancy equipment or intimidating techniques needed—if you can melt chocolate and mix batter, you’re all set.
- Great for gifting or parties: These brownies are great conversation starters and always disappear quickly at get-togethers.

Ingredients You’ll Need
This Ghost Brownies Recipe uses simple pantry staples, but choosing high-quality chocolate really makes all the difference here. I suggest grabbing good bittersweet chocolate for that deep cocoa flavor and smoother melt.
- Bittersweet chocolate: Opt for good-quality chocolate chunks or chips to ensure smooth melting and rich flavor.
- Unsalted butter: Helps control the saltiness and ensures the butter flavor shines through.
- Unsweetened cocoa powder: Adds intense chocolate flavor and deep color.
- Eggs: Bring room temperature eggs to make mixing easier and keep the batter smooth.
- Granulated sugar: Sweetens the brownies perfectly without overpowering the chocolate.
- Pure vanilla extract: Elevates the overall flavor and adds fragrant warmth.
- Salt: Balances sweetness and enhances chocolate depth.
- All-purpose flour: Gives structure without making brownies cakey.
- White chocolate melting wafers: For crafting those cute ghost shapes on top.
- Black icing tube: A quick and easy way to decorate ghost faces.
- Confectioners’ sugar, cocoa powder, water, pinch of salt: These come together to make a simple chocolate icing to spread on top before you add the ghosts.
Variations
This is one of those recipes I always encourage you to tweak for your personal taste. I have a few favorite twists I swear by, but don’t hesitate to experiment—you might find a new favorite version yourself!
- Add nuts or chocolate chips: I love folding in chopped walnuts or extra chocolate chips for a bit of texture and crunch.
- Use dark chocolate instead of bittersweet: For a slightly sweeter brownie, dark chocolate can work well if that’s your preference.
- Make it gluten-free: Substitute the all-purpose flour with a one-to-one gluten-free flour blend for a gluten-free option.
- Spice it up: Sometimes I add a pinch of cinnamon or espresso powder to enhance the chocolate notes—it adds surprising depth.
How to Make Ghost Brownies Recipe
Step 1: Prep Your Pan and Melt Chocolate
Preheat your oven to 350°F and line an 8×8-inch baking pan with parchment paper, giving it a light spray of nonstick cooking spray. This little prep saves you a sticky mess later! Then, melt the bittersweet chocolate and butter together using a double boiler or a heatproof bowl set over simmering water—stir occasionally so it melts evenly and nothing burns. Once melted, whisk in the cocoa powder and set it aside to cool slightly. You don’t want it hot or it’ll scramble the eggs.
Step 2: Mix the Eggs and Sugar, Then Combine
Using a stand mixer or hand mixer, beat the eggs and granulated sugar on medium-high speed for about a minute until thick and pale. This aerates the batter just enough to give your brownies a wonderful texture. Reduce to low and add vanilla and salt to mix through. While on low speed, slowly pour in the chocolate mixture. I like to add it gradually to keep everything smooth and avoid lumps.
Step 3: Fold in the Flour and Bake
Remove the bowl from the mixer and gently fold the flour into the batter with a wooden spoon or spatula—don’t overmix here, or you’ll end up with cakey brownies. Spread the batter evenly in your prepared pan and pop it in the oven for 25 to 30 minutes. You’re aiming for a set top but a gooey center—check with a toothpick, but a few moist crumbs are perfect. Let the brownies cool completely in the pan; this is key before you move on to decorating.
Step 4: Make Your Ghost Decorations
Place the white chocolate melting wafers in a microwave-safe bowl and melt them at half power for 90 seconds, stirring every 30 seconds until smooth—this prevents the white chocolate from overheating and seizing. Spoon about a teaspoon of melted white chocolate onto parchment paper and use the back of the spoon to shape ghosts—don’t worry, they don’t have to be perfect! Repeat about 15 times and then use your black icing tube to dot on eyes and mouths for that spooky character. Pop the tray into the fridge to harden.
Step 5: Chocolate Icing and Assembly
Whisk together confectioners’ sugar, cocoa powder, water, and a pinch of salt to make a smooth chocolate icing. Spread it over the cooled brownies before placing your hardened white chocolate ghosts on top. This adds an extra layer of brownie goodness and helps the ghosts stick.
Pro Tips for Making Ghost Brownies Recipe
- Choose Quality Chocolate: I’ve learned that the better the chocolate, the richer and smoother your brownies will taste—don’t skimp here.
- Don’t Overbake: Pull the brownies out when a toothpick comes out with moist crumbs, not dry—this keeps them fudgy and irresistible.
- Cool Completely Before Decorating: Adding icing or ghosts on warm brownies can cause melting—you’ll thank me for the patience!
- Use Low Microwave Power for White Chocolate: White chocolate burns easily, so melting slowly with stirring prevents a gritty mess.
How to Serve Ghost Brownies Recipe
Garnishes
I usually keep the garnish simple—it’s all about the adorable white chocolate ghosts! If I want to jazz it up, I sometimes dust the tops lightly with a bit of cocoa powder or add a sprinkle of edible glitter for a magical touch, especially for kid parties.
Side Dishes
These brownies pair beautifully with a scoop of vanilla ice cream or a dollop of whipped cream to balance out their fudgy richness. For drinks, hot coffee, a creamy latte, or even a glass of cold milk make perfect complements.
Creative Ways to Present
For a Halloween party, I place brownies on a black or orange platter and scatter edible spider decorations or candy eyes around. You can also arrange the brownies in a spooky shape or stack them creatively as a “ghost tower” for fun visual appeal. Adding a few sprigs of fresh mint leaves or edible flowers adds unexpected color contrast.
Make Ahead and Storage
Storing Leftovers
I store leftover brownies in an airtight container at room temperature—they stay perfectly moist for up to 5 days. Covering them tightly is key to keep the brownies from drying out.
Freezing
I’ve frozen these brownies wrapped in plastic wrap and foil with great success, up to 3 months in the freezer. When I’m ready to eat one, I just thaw it overnight in the fridge so it stays moist and fudgy.
Reheating
To warm up a leftover brownie, I pop it in the microwave for about 15 seconds. This melts the chocolate slightly and brings back that freshly-baked feeling—just don’t overheat or it’ll dry out!
FAQs
-
Can I use chocolate chips instead of chopped bittersweet chocolate?
Absolutely! Chocolate chips work fine, but I recommend using high-quality chips that melt well and don’t have stabilizers that might affect texture. If you can, use chopped bittersweet chocolate because it melts more evenly and gives a richer taste.
-
How do I make the white chocolate ghosts without a mold?
The recipe’s technique of spooning and spreading melted white chocolate on parchment paper is my go-to. It’s surprisingly simple and fun to shape with the back of a spoon—imperfections add character. Once hardened, decorate with black icing for eyes and mouth!
-
What’s the best way to tell when brownies are done?
Check by inserting a toothpick near the center—ideally, it should come out with a few moist crumbs attached, not completely clean. This means your brownies will be fudgy, not dry or cakey.
-
Can I make this recipe dairy-free?
You can try substituting dairy butter with a vegan butter alternative and use dairy-free chocolate. Be sure to check that your cocoa powder and other ingredients are vegan-friendly. Texture might vary slightly, but it’s worth experimenting!
-
How long can I keep decorated brownies before serving?
Once decorated, it’s best to serve the brownies within 1-2 days for optimal freshness and to keep the ghost decorations intact. Store them in a cool place in an airtight container to avoid melting or sweating.
Final Thoughts
I remember the first time I made this Ghost Brownies Recipe—my family went wild for those cute little ghosts perched on fudgy, chocolatey brownies. It’s one of those recipes that brings a smile not just because of the taste but because it’s so playful and creative. If you want a dessert that feels homemade yet festive and impressive, you’ll really enjoy making (and eating!) these. Give it a try—I can’t wait to hear how yours turn out!
Print
Ghost Brownies Recipe
- Prep Time: 15 minutes
- Cook Time: 30 minutes
- Total Time: 2 hours 45 minutes
- Yield: 16 brownies
- Category: Dessert
- Method: Baking
- Cuisine: American
Description
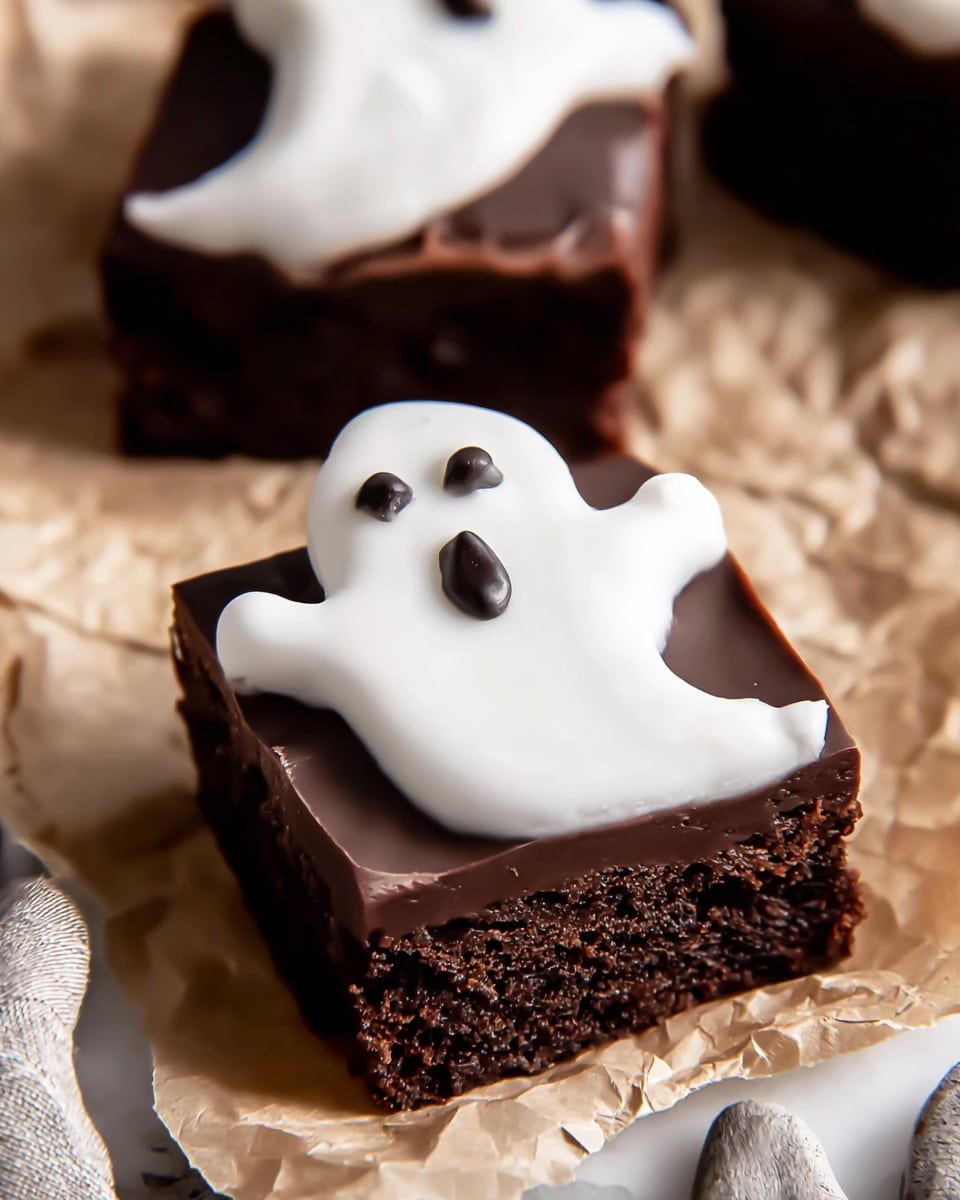
These Ghost Brownies are a delightfully spooky twist on classic brownies, featuring rich bittersweet chocolate brownies topped with a smooth chocolate icing and cute white chocolate ghosts decorated with black icing. Perfect for Halloween or any fun occasion, they combine fudgy texture with festive decoration for an irresistibly charming treat.
Ingredients
Brownies
- 1 cup plus 2 tablespoons (200 g) good quality bittersweet chocolate, chopped (or chocolate chips)
- ½ cup (113 g or 1 stick) unsalted butter, cut into quarters
- 3 tablespoons (18 g) unsweetened cocoa powder
- 3 large eggs, room temperature
- 1 ¼ cups (250 g) granulated sugar
- 2 teaspoons pure vanilla extract
- ½ teaspoon salt
- 1 cup (125 g) all-purpose flour
Ghost Decoration
- ½ cup white chocolate melting wafers
- Mini squeeze tube of black icing
Chocolate Icing
- ½ cup (60 g) confectioners’ sugar, sifted
- 1 Tablespoon unsweetened cocoa powder
- 1 Tablespoon water
- Pinch of salt
Instructions
- Prepare the oven and pan: Preheat your oven to 350° F. Line an 8 by 8-inch square baking pan with parchment paper and lightly grease it with nonstick cooking spray to prevent sticking.
- Melt chocolate and butter: Using a makeshift double boiler over low heat, melt the bittersweet chocolate and butter together, stirring occasionally until smooth. Remove from heat and whisk in the cocoa powder. Allow the mixture to cool slightly.
- Mix eggs and sugar: In the bowl of a stand mixer, beat the eggs and granulated sugar on medium-high speed for 1 minute to incorporate air and create volume.
- Add vanilla, salt, and chocolate: Reduce mixer speed to low and add vanilla extract and salt. Then slowly pour in the chocolate mixture while mixing, or stir by hand for gentle incorporation.
- Combine with flour: Remove the bowl from the mixer and fold in the all-purpose flour using a wooden spoon until just combined, careful not to overmix to maintain brownie texture.
- Bake the brownies: Pour the batter into the prepared baking pan and spread evenly. Bake for 25 to 30 minutes until a toothpick inserted near the center comes out with a few moist crumbs. Let cool completely in the pan.
- Melt white chocolate for ghosts: Place white chocolate melting wafers in a microwave-safe bowl. Heat at 50% power in the microwave for 90 seconds, stirring every 30 seconds until fully melted and smooth.
- Create white chocolate ghosts: Line a cookie sheet with parchment paper. Drop about 1 teaspoon of melted white chocolate onto the parchment and spread with the back of the spoon into ghost shapes. Repeat to make about 16 ghosts. Decorate with black icing to create two eyes and a mouth on each ghost. Refrigerate until hardened.
- Prepare chocolate icing: Whisk together confectioners’ sugar, cocoa powder, water, and a pinch of salt until smooth. Spread this chocolate icing evenly over the cooled brownies.
- Assemble the ghost brownies: Cut the brownies into 16 squares. Top each square with a hardened white chocolate ghost for a festive presentation.
Notes
- Use high quality chocolate such as Ghirardelli or Guittard for better melting and rich flavor.
- Store covered at room temperature for up to 5 days to maintain freshness.
- Freeze brownies wrapped tightly with plastic wrap and foil for up to 3 months. Defrost in refrigerator before serving.
- Handle white chocolate carefully to avoid overheating and seizing.
- For uniform ghost shapes, work quickly when the white chocolate is melted but still fluid.
Nutrition
- Serving Size: 1 brownie
- Calories: 256
- Sugar: 26g
- Sodium: 91mg
- Fat: 12g
- Saturated Fat: 7g
- Unsaturated Fat: 4g
- Trans Fat: 0.2g
- Carbohydrates: 34g
- Fiber: 2g
- Protein: 3g
- Cholesterol: 47mg


