
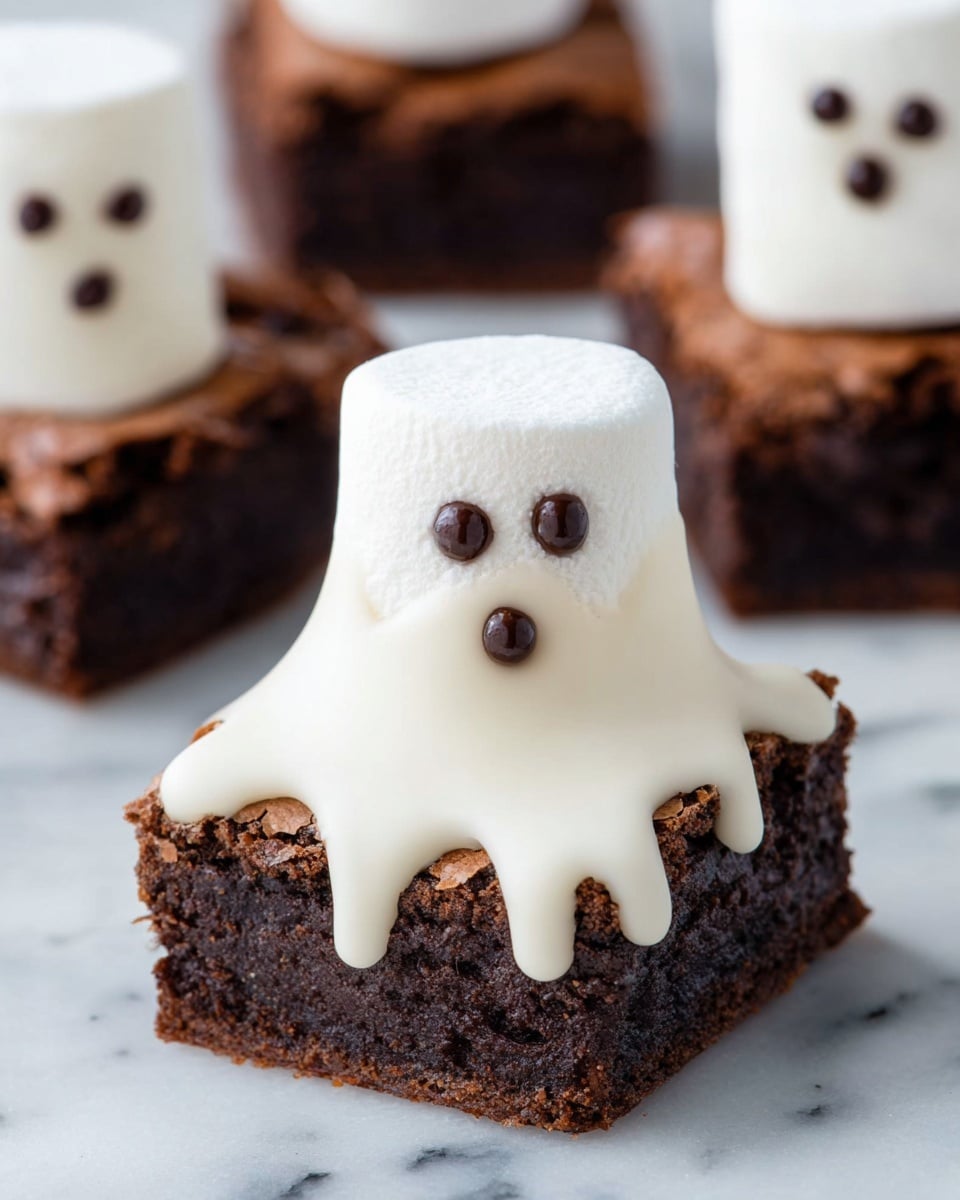
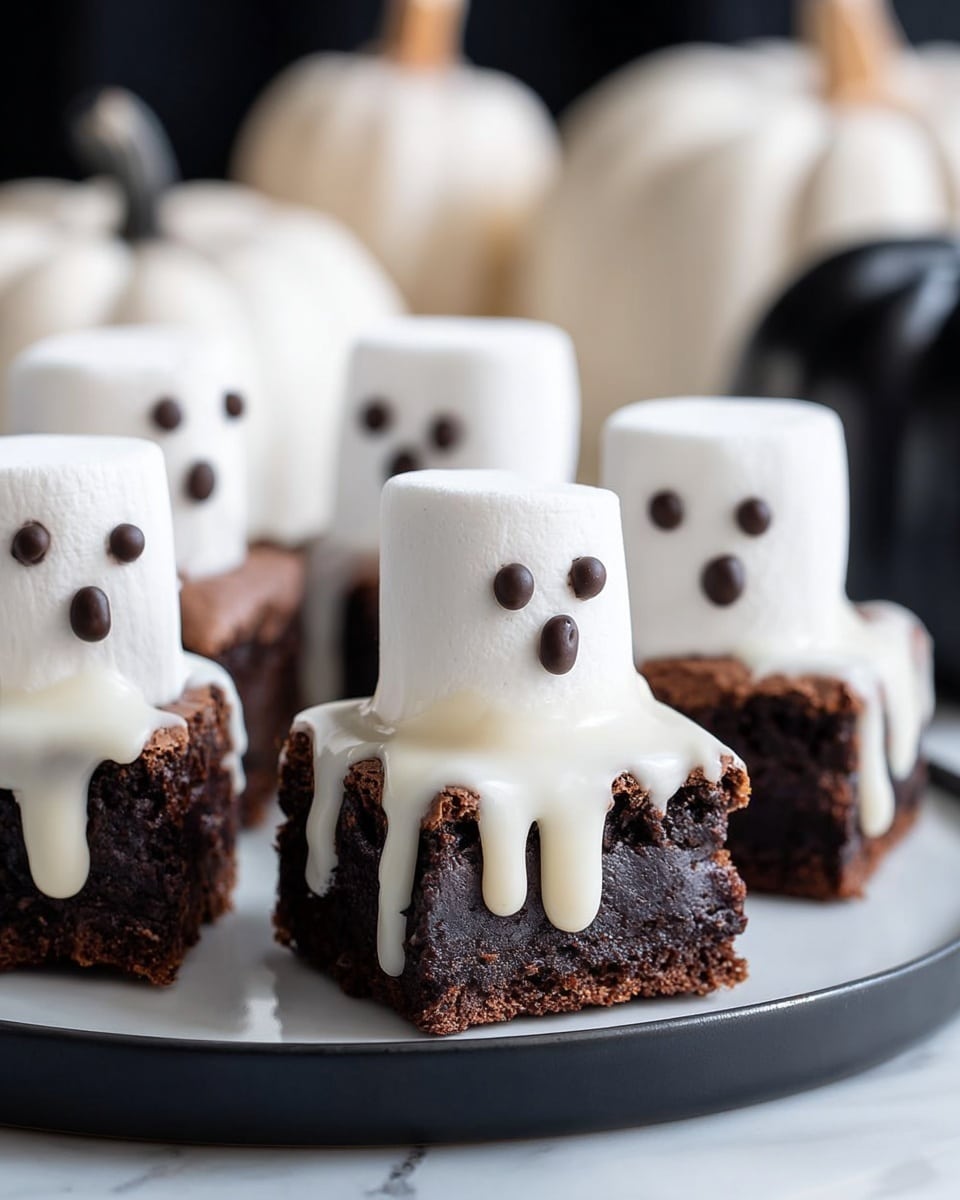
Hey there! If you’re looking for a fun and festive treat to celebrate the spooky season, you’re in the right place. I’m beyond excited to share my Ghost Brownies for Halloween Recipe with you — it’s one of those delightful mashups that’s super simple to make but sure to wow your friends and family. These brownies have a rich, fudgy base topped with adorable marshmallow ghosts coated in glossy white chocolate and finished with sweet little chocolate faces. The best part? They’re not just cute; they’re downright delicious. Keep reading, and I’ll walk you through every step so your Ghost Brownies become the star of your Halloween spread!
Why You’ll Love This Recipe
- Crazy Easy But Impressively Cute: You’ll get these spooky ghosts to shine with surprisingly little effort.
- Perfect Texture Balance: Fudgy brownies meet fluffy marshmallow with a smooth white chocolate shell — my personal favorite combo.
- Great for All Skill Levels: Whether you’re a baking newbie or a pro, these ghost brownies come together without stress.
- Kid-Friendly Decorating: Your little helpers will have so much fun adding the chocolate faces — it’s a Halloween party in your kitchen!

Ingredients You’ll Need
The ingredients for these ghost brownies are simple but thoughtfully chosen to get the best results, especially when it comes to the white coating on the marshmallows. Here’s a quick rundown and why they work so well together.
- Brownie mix: I like using a high-quality boxed mix for the base — trust me, it saves time without sacrificing that rich chocolatey taste.
- White melting wafers: These are key! Unlike white chocolate chips, which can seize or thicken too fast, melting wafers melt smoothly and set nicely for that perfect ghostly sheen.
- Large marshmallows: The fluffy ghosts themselves — you’ll need big ones to make sure they look just right.
- Semi-sweet chocolate chips: These create the tiny eyes and mouths, bringing your ghostly friends to life with minimal effort.
Variations
I love making this recipe my own by swapping a few things here and there. Feel free to get creative — that’s what makes baking this so much fun! Whether you want to make it dairy-free, add a twist on flavors, or change the design, here are some ideas.
- Use vegan brownie mix and dairy-free white candy melts: I’ve done this for my vegan friends, and they were amazed that it still tastes awesome.
- Add a touch of orange or pumpkin spice to the brownie batter: This little seasonal tweak makes the brownies extra festive and cozy.
- Swap marshmallows for mini ghost-shaped marshmallows: Perfect if you want to amp up the Halloween vibes without extra decorating.
- Dress the ghosts up with colored candy melts: Try spooky orange or eerie green for a colorful twist that kids adore.
How to Make Ghost Brownies for Halloween Recipe
Step 1: Prepare the Perfect Brownie Base
Start by prepping your brownie mix according to the box instructions and pour it into a 9×9-inch baking pan lined with parchment paper. Lining the pan is a game changer here — it makes lifting the brownies out to cut way easier (trust me, I learned the hard way!). Bake until just set, then pop them out of the oven and let them cool completely. This step is crucial because warm brownies can make the marshmallow ghosts slide or melt, and nobody wants a mess.
Step 2: Cut and Arrange the Brownie Squares
Once cooled, lift the brownies out using the parchment paper and cut them into 16 equal squares. Transfer these onto a parchment-lined baking sheet, spacing them about an inch apart. This spacing gives you room to work on each ghost without worrying about them sticking together — plus, it looks cute for a Halloween presentation!
Step 3: Melt the White Chocolate Wafers and Coat the Marshmallows
Next up, gently melt your white candy wafers following the package directions (usually short bursts in the microwave, stirring often works best). Now here’s a little trick I discovered: dip the bottom of each large marshmallow in the melted white chocolate, then place it on top of each brownie square, firmly pressing so it sticks. Then, use a spoon to drizzle and smooth more melted chocolate over the marshmallow, coating every side. This method creates those perfect ghostly shapes with a shiny finish. But here’s something important — move quickly when coating the marshmallows, because the wafers start to harden fast! If your chocolate thickens before you finish, just stir in a teaspoon of shortening or coconut oil and remelt it for a few seconds. It’s a lifesaver.
Step 4: Let the Ghosts Set
Leave the coated brownies at room temperature for about 30 minutes, or until the white chocolate ghosts harden completely. You want the ghosts firm enough to pipe on the cute little faces next.
Step 5: Add the Ghostly Faces Using Melted Chocolate
Finally, melt your semi-sweet chocolate chips in short bursts — 15 seconds at a time, stirring thoroughly each time — until smooth and glossy. Transfer the melted chocolate into a small piping bag made from a sandwich zip-lock bag with a teeny hole cut at the tip. Pipe adorable eyes and spooky mouths onto each ghost to bring them to life. Wait a little for the chocolate to set, and voilà, your Ghost Brownies are ready to be devoured or dazzled over!
Pro Tips for Making Ghost Brownies for Halloween Recipe
- Line Your Pan: Using parchment paper makes cutting and removing brownies much less stressful — I had a total crumble mess once without it!
- Work Quickly with the Wafers: Because the white melting wafers start to solidify fast, dipping and coating marshmallows in small batches keeps things smooth.
- Use a Piping Bag for Faces: Cutting a super small hole in a zip bag lets you control the chocolate for those cute eyes and mouths with ease.
- Don’t Skip Cooling Time: Let brownies cool fully before decorating — it keeps the marshmallow ghosts stable and prevents sliding.
How to Serve Ghost Brownies for Halloween Recipe
Garnishes
I like keeping it simple here, but if you want to get fancy, a light dusting of edible glitter or sprinkles around the plate adds some extra Halloween magic. You can also pop a few candy eyes nearby or scatter some mini candy corn for a fun, festive touch. I usually skip heavy garnishes because these brownies already steal the show!
Side Dishes
These ghost brownies are sweet and rich, so I love pairing them with fresh fruit like orange slices or a simple bowl of berries to balance the indulgence. For drinks, a cold glass of milk or spiced hot chocolate works wonders — perfect for wrapping up a Halloween party or cozy night in.
Creative Ways to Present
One Halloween, I layered these brownies on a tiered stand with cobweb decorations and miniature pumpkins for a desert table centerpiece. Another time, I served them individually on black plates with little paper flags that said “Boo!” or “Spooky Sweet”. Adding a bit of dry ice nearby for a smoky effect can totally amp up the fun, especially if you’re serving kids or guests who love theatrics.
Make Ahead and Storage
Storing Leftovers
If you have leftovers (which, honestly, is rare in my house), store them in an airtight container at room temperature for up to 3 days. I recommend placing parchment paper between layers so the marshmallow ghosts don’t stick together — nobody wants a ghost pileup!
Freezing
These brownies freeze wonderfully if you want to prep early. Freeze them unglazed (brownie squares alone) in a single layer wrapped tightly in plastic wrap, then thaw completely before adding marshmallows and decorating so the chocolate coating stays perfect. I tried freezing the fully decorated ghosts once, but the marshmallow texture changed a bit after thawing.
Reheating
Reheating isn’t usually necessary, but if you like warm brownies, gently microwave the brownie alone for 10-15 seconds and add the marshmallow on top after warming. The white chocolate coating looks best fresh, so I skip reheating decorated brownies to keep their spooky charm intact.
FAQs
-
Can I make Ghost Brownies for Halloween Recipe from scratch instead of a boxed mix?
Absolutely! While the boxed brownie mix keeps things quick and foolproof, going from scratch with your favorite brownie recipe works great, too. Just make sure your brownies are firm enough to hold the marshmallow ghosts without crumbling.
-
What if I can’t find white melting wafers?
If white melting wafers aren’t available, white candy melts or coating chocolate are great alternatives. I don’t recommend using regular white chocolate chips because they tend to seize up or harden unevenly, making decorating tricky.
-
How do I keep marshmallow ghosts from sliding off the brownies?
Make sure your brownies are completely cooled and slightly firm before attaching marshmallows. Also, pressing the dipped marshmallow bottom into the melted wafers acts like glue, helping it stick and stay put as it sets.
-
Can kids help with this recipe?
Definitely! Kids usually love dipping marshmallows and piping on the chocolate faces. Just keep an eye on them around the melted chocolate and the oven, and it becomes a fun hands-on Halloween activity.
-
How long do Ghost Brownies for Halloween Recipe stay fresh?
When stored properly in an airtight container at room temperature, these brownies stay fresh for about 3 days. Because of the marshmallow and chocolate coating, they’re best enjoyed within that time for optimum texture and flavor.
Final Thoughts
Honestly, this Ghost Brownies for Halloween Recipe has become one of my go-to treats every autumn because it hits that perfect combo of sweet, fun, and festive without fuss. I love how it gets everyone involved, especially when the kids pipe on the faces — it’s such a joy to watch their creativity run wild. If you want a dessert that brings smiles (and maybe a few friendly scares) to your Halloween celebrations, I can’t recommend these ghost brownies enough. Give them a try, and I promise you’ll be hearing requests for them year after year!
Print
Ghost Brownies for Halloween Recipe
- Prep Time: 20 minutes
- Cook Time: 35 minutes
- Total Time: 1 hour 25 minutes
- Yield: 16 brownies
- Category: Dessert
- Method: Baking
- Cuisine: American
Description
Celebrate Halloween with these spooky and delicious Ghost Brownies! Rich, fudgy brownies topped with marshmallow ghosts coated in creamy white chocolate, and finished with expressive chocolate faces. Perfect for Halloween parties and festive gatherings.
Ingredients
Brownie Base
- 1 box (18 oz) brownie mix (plus the ingredients called for on the box)
Ghost Decoration
- 1 bag (10 oz) white melting wafers (about 1½ cups)
- 16 large marshmallows
- 2 tablespoons semi-sweet chocolate chips
Instructions
- Prepare Brownies: Preheat your oven as directed on the brownie mix box. Line a 9×9 inch square baking pan with parchment paper for easy removal. Prepare the brownies according to the box instructions and bake in the pan. Once done, remove brownies from the oven and allow them to cool completely before decorating.
- Cut Brownies: Carefully lift the cooled brownies out of the pan using the parchment paper. Cut the brownies into 16 even squares. Place the brownie squares on a parchment-lined baking sheet, leaving at least 1 inch of space between each.
- Melt White Chocolate: Melt the white melting wafers following the package directions until smooth and runny, ready for dipping and coating.
- Attach Marshmallows: Dip the bottom of each large marshmallow into the melted white chocolate, then firmly press it onto the center of each brownie square. Repeat with all marshmallows and brownie squares.
- Coat Marshmallows: Spoon melted white chocolate over the tops of the marshmallows, allowing the coating to cascade down and cover their sides completely. Use the spoon to gently spread the melted wafers if needed. Some drips on the brownies are fine and add to the look.
- Let Set: Allow the coated brownies to sit at room temperature until the white chocolate ghosts harden and set, approximately 30 minutes.
- Decorate Faces: Melt the semi-sweet chocolate chips in 15-second increments in the microwave, stirring thoroughly between each until smooth. Transfer the melted chocolate into a sandwich Ziploc bag and snip a tiny corner to create a piping bag. Pipe spooky eyes and mouths onto each ghost to complete the faces.
- Final Set: Allow the chocolate faces to firm up before serving. Enjoy your festive Halloween ghost brownies!
Notes
- Work quickly when dipping and coating marshmallows with melted white wafers to prevent premature hardening. If the wafers thicken, stir in 1 teaspoon of shortening or coconut oil and remelt for 15-30 seconds.
- Use white melting wafers or white candy melts for coating instead of white chocolate chips, as they melt smoother and stay liquid longer—perfect for an even ghost finish.
- Lining the baking pan with parchment paper prior to baking brownies makes it easier to remove and cut them without breaking.
Nutrition
- Serving Size: 1 brownie
- Calories: 280
- Sugar: 24g
- Sodium: 170mg
- Fat: 12g
- Saturated Fat: 7g
- Unsaturated Fat: 4g
- Trans Fat: 0g
- Carbohydrates: 38g
- Fiber: 2g
- Protein: 3g
- Cholesterol: 25mg


