
If you’re looking for a fun, festive treat to wow your holiday guests or bring some extra cheer to your family dessert table, I promise you’ll love this Frosted Christmas Brownie Trees Recipe. It combines fudgy brownies with colorful frosting and sparkly edible decorations that make these brownies look like Christmas trees right out of a winter wonderland. I’ve made these for several holiday parties and trust me, they’re a hit every time—kids, adults, and even those who say they’re “not into sweets” get drawn in! Stick with me, and I’ll share all the tips to make your Frosted Christmas Brownie Trees just perfect.
Why You’ll Love This Recipe
- Festive & Fun: These brownies double as delicious treats and charming holiday décor on your dessert table.
- Simple to Make: Using boxed brownie mix saves time, but I include tips if you want to make them from scratch too.
- Customizable Colors & Decor: You can mix your own frosting shades and decorate with sprinkles to match your holiday theme perfectly.
- Guaranteed Crowd-Pleaser: Whether for family or a festive party, these brownies always disappear faster than I expect!

Ingredients You’ll Need
I’ve kept this recipe approachable by leaning on classic brownie mix and store-bought frosting, but the results feel truly special. You can always use homemade brownies or frostings if you want to elevate it even more. The key is picking ingredients that balance rich chocolate with bright, colorful frosting and festive sprinkles.
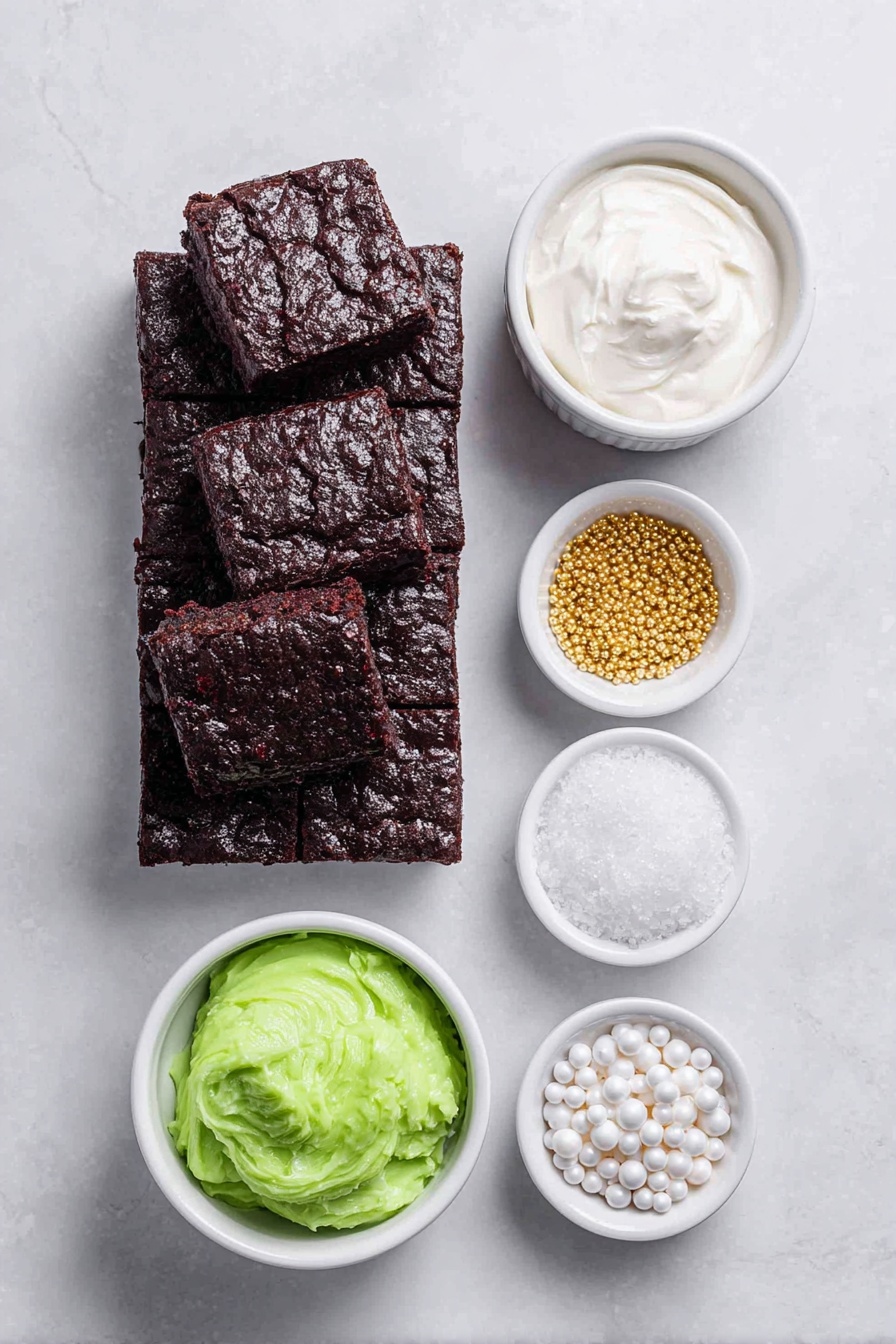
- Brownie Mix: I usually grab two boxes to get thick slabs for cutting—I love that fudgy texture, but one box works if you want thinner brownies.
- White Frosting: Choose a creamy vanilla buttercream or classic white frosting; you’ll be dividing and coloring this throughout the recipe.
- Edible Gel Food Coloring: Gel colors give you vibrant shades without thinning the frosting, but I sometimes use natural coloring for a cleaner ingredient list.
- Edible Gold Stars: These add a magical, sparkly finishing touch that makes the brownie trees look extra festive.
- White Pearl Sprinkles: They mimic snow and add pretty texture—my kids always try to snag more of these!
- Icing Bags and Frosting Tips: A large star tip like Wilton 1M works beautifully for piping the “branches” of these Christmas tree brownies with flair.
Variations
Part of what makes the Frosted Christmas Brownie Trees Recipe so fun is how you can get creative with flavors and decorations. I like to tweak it occasionally for dietary needs or just to mix things up depending on who’s coming to dessert.
- Gluten-Free Variation: I’ve swapped out the brownie mix for my favorite gluten-free brand with great results. Just watch baking times since they tend to differ slightly.
- Homemade Brownies: Once, I tried making thick, fudgy homemade brownies instead of box mix—totally doable and super indulgent but expect a longer prep time.
- Natural Coloring: I sometimes use beet juice and spinach powder for red and green frosting colors if I want to avoid artificial dyes, which gives a lovely, subtle hue.
- Extra Toppings: Adding crushed candy canes or chopped nuts on top gives a fun twist and more texture that my family loves.
How to Make Frosted Christmas Brownie Trees Recipe
Step 1: Baking the Perfect Brownie Base
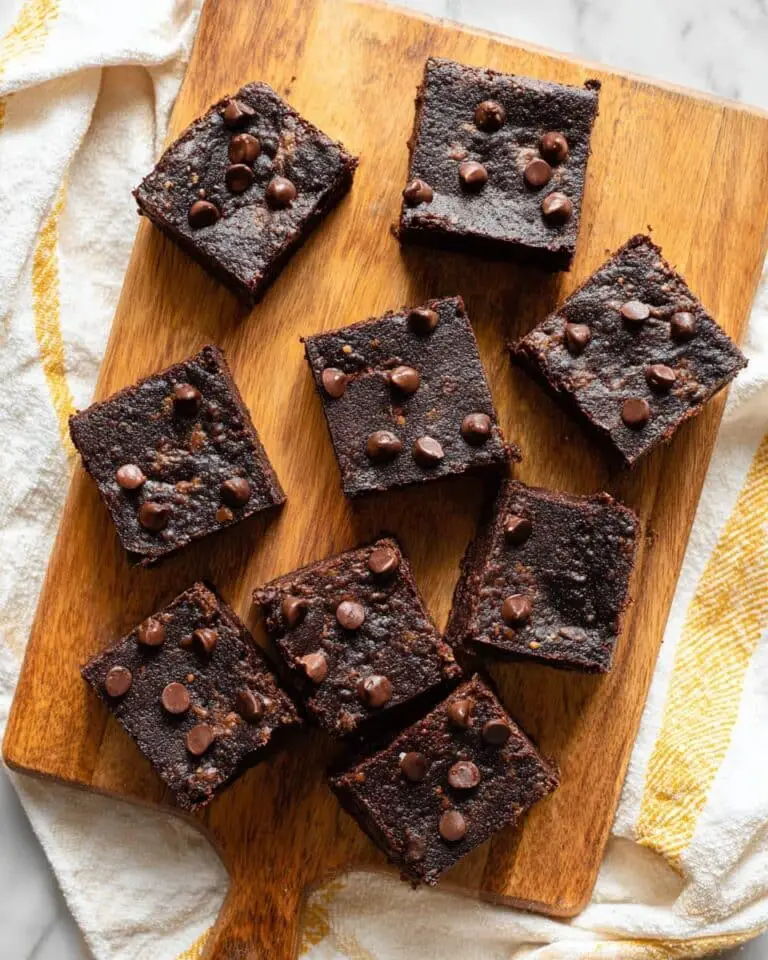
Preheat your oven as instructed on your brownie box. I spray a 9-inch springform pan with oil—it’s perfect because the removable sides make cutting and transferring the brownies easier. Mix your two boxes of brownie mix thoroughly, pour into the pan, and bake. Since I use a double batch for thicker brownies, I often add 10-15 minutes to the baking time—just keep testing by inserting a toothpick in the center; it should come out clean or with just a few crumbs clinging.
Step 2: Cooling and Cutting into Trees
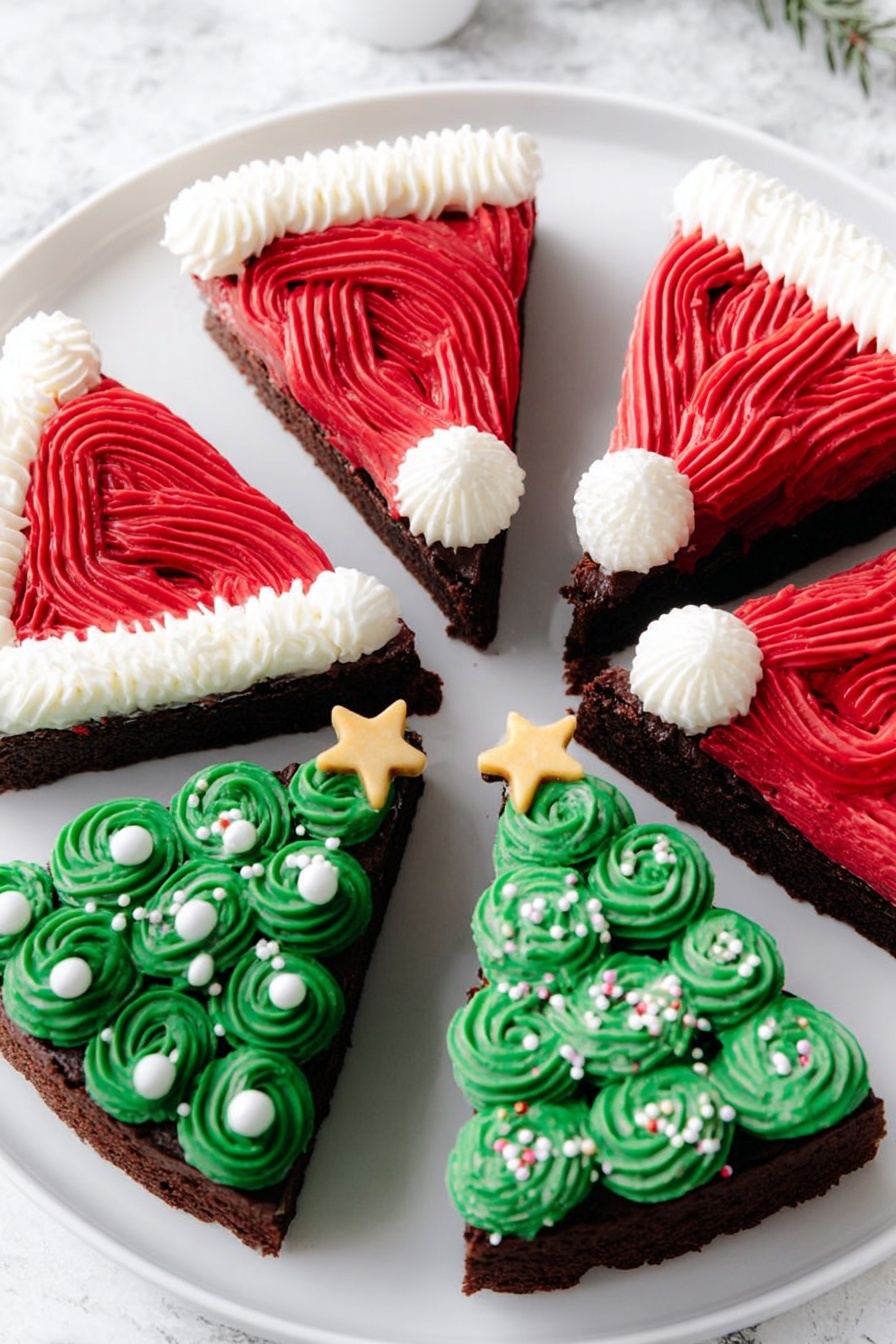
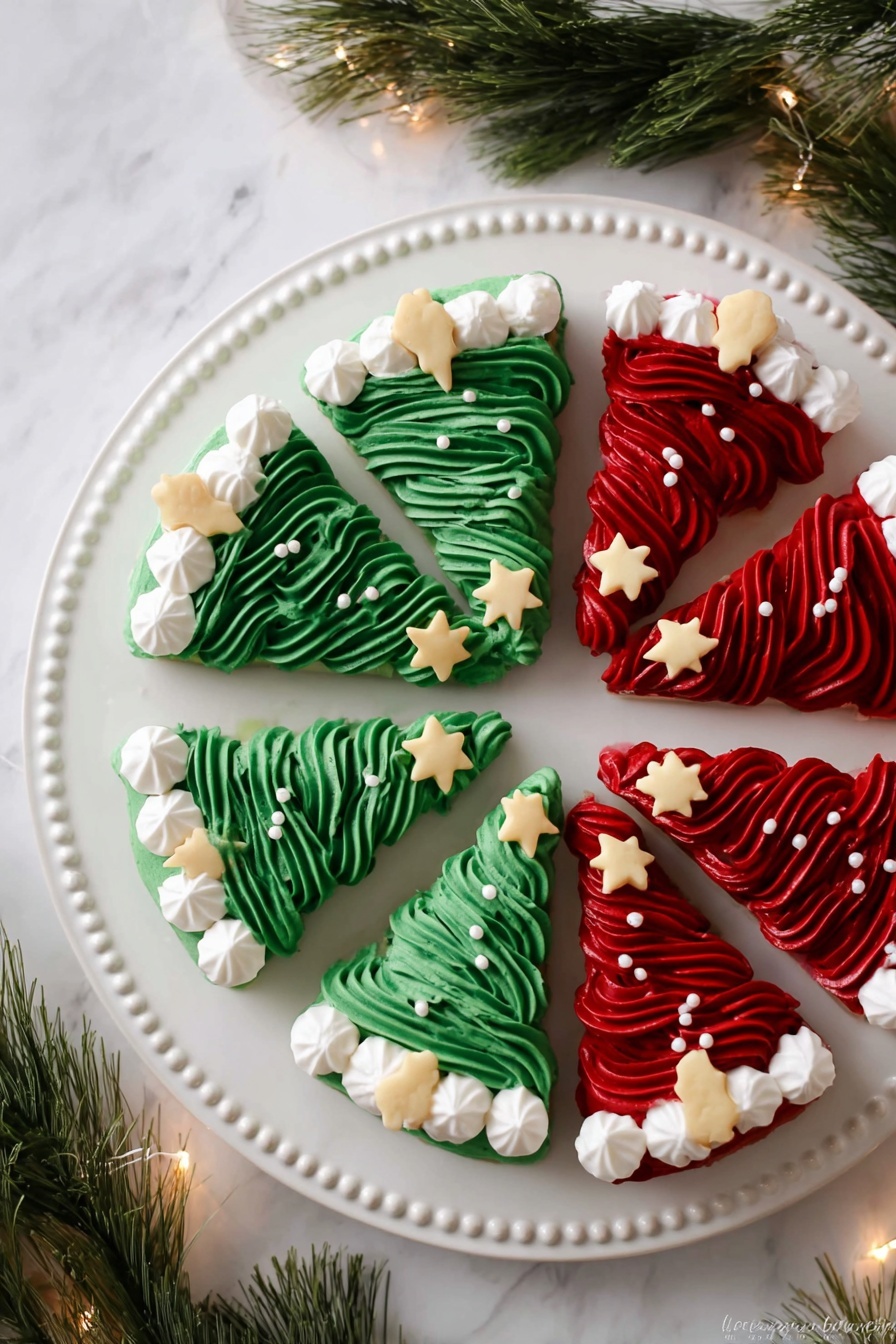
Once baked, let the brownie cool completely—this is crucial because warm brownies will make frosting melt and slide off. When cool, carefully release the springform sides and transfer the brownie slab to a cutting board. Cut evenly into 8 triangles. These will become your Christmas trees, so aim for nice even shapes for uniform decorating.
Step 3: Coloring and Preparing Your Frostings
In small bowls, mix some white frosting with red gel coloring until you get a bright red shade you love. Repeat with green gel coloring for a festive green frosting. Leave some frosting plain white for extra accents. Using gel coloring is a game changer—it keeps your frosting thick and pipeable. Load each colored frosting into its own piping bag fitted with a large star tip for easy decorating.
Step 4: Decorating Your Frosted Christmas Brownie Trees
Now the fun part! Use the green frosting with your star tip to pipe “branches” all over each brownie triangle, creating that classic tree silhouette. Dot white pearl sprinkles over the green frosting to mimic snow gently sitting on the branches. Add an edible gold star at the top of each tree as your magical finishing touch. For extra flair, you can use the red and white frosting to decorate some brownies like Santa hats or candy canes.
Arrange your decorated brownie trees on a festive platter and watch guests’ faces light up!
Pro Tips for Making Frosted Christmas Brownie Trees Recipe
- Check Doneness Carefully: Since a double batch takes longer, rely on a toothpick rather than the timer to avoid under or over-baking brownies.
- Use Gel Food Coloring: For bold frosting colors without watering down your frosting, gel color is the best choice—trust me, I’ve tried liquid and it was too runny.
- Cool Brownies Fully: Decorating warm brownies is a recipe for disaster—the frosting melts and slides off—so patience here pays off beautifully.
- Piping Bag Control: I pinch the bag near the tip and use my dominant hand to guide, ensuring neat, even frosting swirls that look like tree branches.
How to Serve Frosted Christmas Brownie Trees Recipe
Garnishes
White pearl sprinkles and edible gold stars are my go-to garnishes because they add texture and sparkle without overpowering the look or taste. Sometimes, I toss on tiny red sugar beads for “ornaments,” which add cute pops of color and a little crunch for fun.
Side Dishes
I usually serve these alongside a cup of hot cocoa or rich eggnog. If I’m hosting, I also love pairing them with a light fruit salad to balance the richness of the brownies and frosting.
Creative Ways to Present
Around the holidays, I like to arrange these brownie trees upright in a shallow decorative box lined with parchment, almost like a mini forest. Some folks even stack a few triangles slightly offset to give a 3D tree look—which you can image is a real showstopper at parties!
Make Ahead and Storage
Storing Leftovers
If you have any leftovers — and I say “if” loosely because these brownies disappear fast — store them in an airtight container at room temperature for up to 3 days. The frosting holds up well and brownies stay moist but firm.
Freezing
I’ve frozen leftover uncut brownie slabs before baking and then decorated after thawing, which worked great. You can also freeze decorated brownies, but I recommend wrapping each piece individually in plastic wrap and storing in a freezer-safe container to protect the frosting. Thaw overnight in the fridge.
Reheating
If you want the fudgy brownie warm, zap it briefly in the microwave for 10-15 seconds—but avoid heating too long or the frosting will melt. I prefer enjoying these at room temperature to keep the frosting intact.
FAQs
-
Can I use homemade brownies instead of boxed mix for this Frosted Christmas Brownie Trees Recipe?
Absolutely! Homemade brownies work wonderfully and make these treats extra special. Just make sure your brownies are thick enough to cut into triangles and fully cool before decorating.
-
What’s the best type of frosting for decorating the brownie trees?
I recommend using a thick, creamy white frosting like buttercream that holds its shape well. This helps when piping the branches and ensures your decorations don’t slide off.
-
How do I achieve bright red and green frosting without thinning it out?
Use gel food coloring instead of liquid—it gives you more vibrant colors without changing the frosting’s consistency, which is key for good piping control.
-
Can these Frosted Christmas Brownie Trees be made ahead of time?
Yes! You can bake the brownies and store undecorated in an airtight container for a couple of days, then frost and decorate just before serving for the freshest look and taste.
Final Thoughts
This Frosted Christmas Brownie Trees Recipe has become one of my go-to holiday desserts because it’s easy, looks incredible, and tastes like a little festive joy in every bite. When I first made it, I was nervous about frosting the brownies evenly, but with a bit of practice and the right tips, it turned out magical. I love how the colorful frosting and sparkly toppings make these brownies almost too pretty to eat—almost! So whether you’re making them for a family gathering, a party, or just to brighten up a winter day, I hope you enjoy making and sharing these delightful fudgey treats as much as I do. Give it a try—you’ll have fun, and your holiday guests will thank you for it!
Print
Frosted Christmas Brownie Trees Recipe
- Prep Time: 15 minutes
- Cook Time: 35-45 minutes (depending on double batch thickness)
- Total Time: 50-60 minutes
- Yield: 8 large brownies
- Category: Dessert
- Method: Baking
- Cuisine: American
Description
These Frosted Christmas Brownies are a festive and delicious holiday treat, featuring thick, rich brownies topped with colorful red, green, and white frosting, edible gold stars, and white pearl sprinkles. Perfect for holiday parties and gatherings, these brownies offer both a decorative and tasty way to celebrate the season.
Ingredients
Brownies
- 2 Boxes of Brownie Mix, or a double batch of homemade brownies
Frosting & Decorations
- 1 to 3 jars of White Frosting
- Edible Gel Food Coloring (red and green), or alternative natural food coloring
- Edible Gold Stars
- White Pearl Sprinkles
- Icing Bags
- Frosting Tips (large star tip – 1M)
Instructions
- Prepare the Pan and Preheat Oven: Preheat your oven according to the instructions on your brownie mix packaging. Lightly spray a 9-inch springform pan with cooking spray to prevent sticking.
- Mix and Pour Brownie Batter: Combine both boxes of brownie mix or prepare a double batch of homemade brownie batter. Pour the batter evenly into the prepared springform pan.
- Bake the Brownies: Bake the brownies following the package instructions or until a toothpick inserted into the center comes out clean. Note that a double batch may require additional baking time beyond the standard instructions.
- Cool and Slice: Once baked, let the brownies cool completely. Remove them from the springform pan and place on a cutting board. Cut the brownies into 8 triangular pieces.
- Prepare Frosting Colors: In separate small bowls, tint the white frosting with red and green edible gel food coloring, mixing thoroughly to achieve your desired shades. Leave some frosting white for decoration.
- Fill Icing Bags: Spoon each colored frosting into individual icing bags fitted with your choice of frosting tips, ideally a large star tip like the 1M for decorative effect.
- Decorate the Brownies: Use the green frosting, white frosting, edible gold stars, and white pearl sprinkles to decorate the brownies as Christmas trees. Use a combination of green and white frosting to create Santa Claus hat designs on other brownies.
- Serve and Enjoy: Arrange your decorated brownies on a festive platter and serve to enjoy the colorful, tasty holiday treat.
Notes
- You can prepare just one box or batch of brownies if you prefer thinner brownies; the recipe uses two for extra thickness.
- Baking time may be longer with a double batch, so check doneness with a toothpick rather than relying solely on packaging times.
- The amount of frosting used depends on how thick you prefer your frosting layers and the intensity of red and green coloring.
Nutrition
- Serving Size: 1 brownie (1/8 of pan)
- Calories: 350
- Sugar: 30g
- Sodium: 180mg
- Fat: 18g
- Saturated Fat: 6g
- Unsaturated Fat: 10g
- Trans Fat: 0g
- Carbohydrates: 45g
- Fiber: 2g
- Protein: 3g
- Cholesterol: 30mg
