
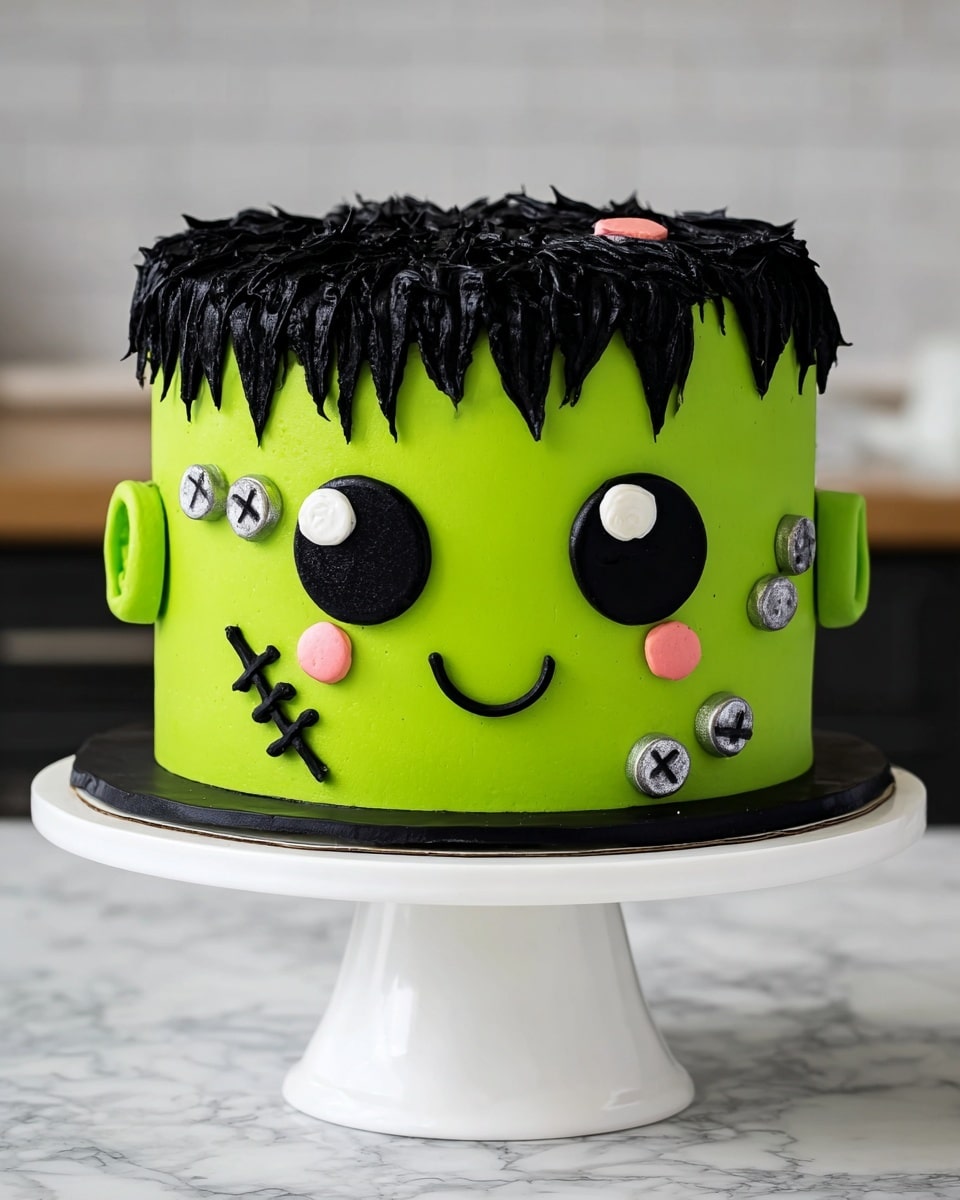
If you’re on the hunt for a showstopping dessert that’s fun, spooky, and downright delicious, let me introduce you to the Frankenstein Cake Recipe. I absolutely love how this recipe combines a vibrant green velvet cake with luscious cream cheese buttercream, all crowned with charming, creepy decorations that will wow your family and friends. Whether you’re baking for Halloween or just craving a playful twist on a classic, you’re going to want to stick around and see how easy it is to nail this monster masterpiece.
Why You’ll Love This Recipe
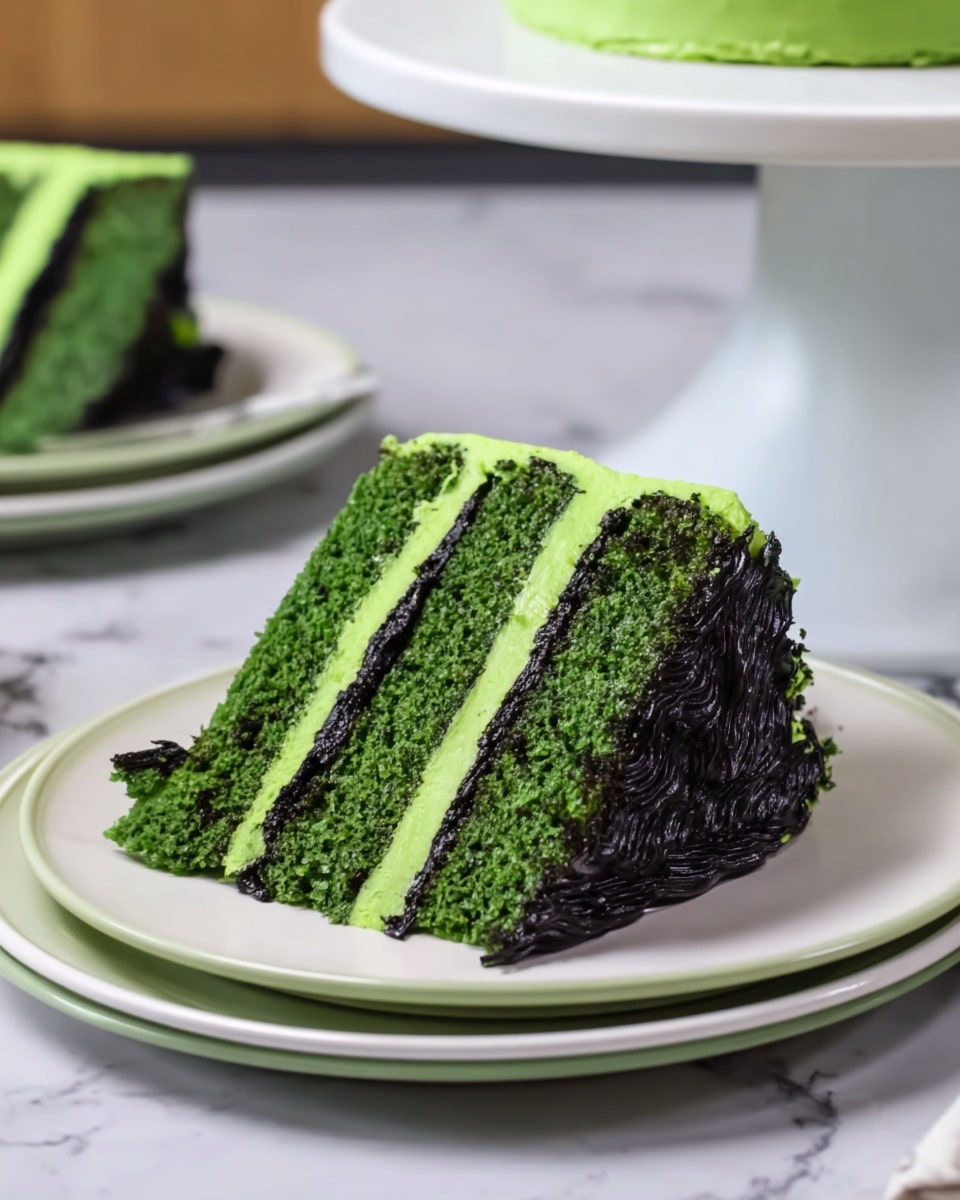
- Vibrant and Moist Cake: The green velvet layers are perfectly tender and brightly colored without tasting artificial.
- Cream Cheese Buttercream Magic: This frosting strikes the perfect balance of tangy and sweet, making every bite irresistible.
- Playful Decorations: Getting creative with piping for Frankenstein’s features is both fun and incredibly satisfying.
- Make-Ahead Friendly: You can bake the layers and prep the frosting days in advance, making party prep stress-free.

Ingredients You’ll Need
One thing I really like about the Frankenstein Cake Recipe is how straightforward the ingredients are. The cake’s bright green color comes from gel food coloring, which I trust because it doesn’t mess with flavor or texture. Also, the cream cheese buttercream combines richness and tang that pairs perfectly with the cake’s subtle cocoa note.
- Cake Flour: Using cake flour keeps the layers tender and light; if you only have all-purpose, try to sift it well.
- Unsweetened Cocoa Powder: Adds just a hint of chocolate depth without overpowering the green velvet vibe.
- Baking Soda and Salt: Essential leavening and flavor balance for a perfect crumb.
- Unsalted Butter: Room temperature butter creams up beautifully, making the batter fluffy.
- Granulated Sugar: Sweetens without clumping; make sure it’s fresh for the best texture.
- Large Eggs: I always use room temperature eggs – they mix more evenly, resulting in a uniform batter.
- Buttermilk: This adds moisture and tenderness – don’t substitute unless you have a buttermilk replacement ready.
- Vegetable or Canola Oil: Keeps the cake extra moist and elevates the richness.
- Green Gel Food Coloring: This is key for that vibrant, electric green without any bitterness.
- Vanilla Extract or Bean Paste: Adds warm, aromatic notes that round out the flavor.
- White Vinegar: Reacts with baking soda for lift and subtle tang, a classic in velvet cakes.
- Full-Fat Cream Cheese & Unsalted Butter (for frosting): The cream cheese adds personality to the buttercream, making it creamy but not overly sweet.
- Powdered Sugar: For a silky smooth frosting consistency.
- Heavy Whipping Cream: Adjusts frosting texture for easy spreading and piping.
- Black Gel Food Coloring: For dark, spooky decorating details – choose gel for coloring power without thinning your icing.
- Dark or Black Cocoa Powder: Adds depth and velvety darkness to the black frosting.
Variations
One of the best things about the Frankenstein Cake Recipe is how easy it is to tweak to your taste or dietary needs. I’ve played around with a few versions over time, and you can too – it’s your cake after all!
- Egg-Free Version: I once swapped eggs with applesauce when a friend came over with allergies – it worked pretty well! Just swap each egg for 1/4 cup unsweetened applesauce.
- Vegan Adaptation: Use plant-based butter and cream cheese alternatives, along with flax eggs, and you still get a surprisingly delicious cake.
- Flavor Twists: Sometimes I add a teaspoon of mint extract to the frosting for a creepy minty vibe – my family goes crazy for that fresh surprise.
- Color Choices: While green is classic Frankenstein, feel free to swap the food coloring for other themed colors like purple or orange for other fun occasions.
How to Make Frankenstein Cake Recipe
Step 1: Prep Your Pans and Ingredients
Before you dive in, I highly recommend greasing your pans well and lining them with parchment paper. This cake has a pretty delicate crumb, so this trick helps keep your layers intact when you flip them out. Also, taking the time to bring butter, eggs, buttermilk, and cream cheese to room temperature is worth it – they mix better, and your batter will be nice and smooth.
Step 2: Mix Your Green Velvet Cake Batter
I like to sift the dry ingredients together first – cake flour, cocoa powder, baking soda, and salt – so I avoid lumps and get even distribution. Then, cream butter and sugar until fluffy; this part is where that light texture starts forming. When I add eggs, I do it one at a time and mix just enough to combine – overmixing is a cake’s enemy. The wet ingredients come next: buttermilk, oil, vanilla, green gel food coloring, and vinegar. You might notice the batter looks a little “broken” here and there, but don’t panic – mixing in your dry ingredients will fix that. Just fold everything together gently; no need to overdo it.
Step 3: Bake and Cool the Cake Layers
I pour the batter evenly into my prepared pans, then give them a firm tap against the counter a few times to pop any air bubbles hiding in there. It’s a small step that makes a huge difference. Bake for about 28 to 32 minutes until a toothpick comes out with a few moist crumbs – that perfect halfway point between under- and over-baked. Let the cakes cool 10 minutes in their pans, then gently loosen them with an offset spatula before flipping onto a rack to cool completely. If you can, chill or even freeze them – cold layers are a dream to level and frost.
Step 4: Whip Up the Cream Cheese Buttercream
Start by beating butter and cream cheese for about 30 seconds to get a smooth base. Add vanilla and salt next, mixing until everything melds together. Then, slowly add powdered sugar and whipping cream, lowering the speed to avoid a cloud of sugar in your kitchen—trust me, I’ve learned this the fun way! Adjust with more cream or sugar until the frosting feels just right for spreading and piping. Remember to set some frosting aside white and light grey for Frankenstein’s eyes and neck bolts before coloring the bulk a vivid green.
Step 5: Assemble and Chill the Cake
Place your first cake layer on a greased board with a dab of frosting underneath to keep it still. Spread frosting evenly between each layer—it’s tempting to pile it high, but a good balance keeps your cake stable. After stacking, apply a thin crumb coat and smooth it out before chilling in the fridge or freezer to firm up. Then add the final thick green frosting layer, smoothing carefully. Chill again so the frosting is set and smooth for decorating.
Step 6: Pipe Frankenstein’s Face
Color the remaining buttercream black using gel food coloring and dark cocoa for body and hair details. Using your piping bags and different sized tips, draw on Frankenstein’s eyes in white, outline with black, pipe the mouth and hair, and add little bolts in grey. I like to use a glass with the right diameter as a guide to keep his eyes symmetrical – it’s a little trick I picked up that really helps the final cake look polished!
Pro Tips for Making Frankenstein Cake Recipe
- Room Temperature Rule: I can’t stress enough how much smoother your batter and frosting will blend when ingredients aren’t cold.
- Measure for Success: Using a kitchen scale to portion your batter makes cake layers bake evenly and rise uniformly.
- Freeze Before Frosting: Chilling cake layers solidifies crumbs, making frosting easier and cleaner to apply.
- Use Gel Colorings: They give you bold colors without altering flavor or frosting texture the way liquid dyes sometimes do.
How to Serve Frankenstein Cake Recipe
Garnishes
I usually keep decorations simple to highlight the fun piping, but a few fresh mint leaves or edible silver dragees add an extra touch of “mad scientist” flair. Sometimes I dust a bit of powdered sugar lightly around the edges for a foggy effect—it’s subtle but makes the presentation pop.
Side Dishes
This cake is rich and sweet, so I love pairing it with tart berry compote or fresh fruit salad to balance flavors. A cool scoop of vanilla ice cream also complements the cream cheese frosting beautifully, especially on warmer days.
Creative Ways to Present
For Halloween parties, I’ve arranged the Frankenstein Cake on a platter with “cobweb” spun from cotton candy, and surrounded it with gummy worms. Another time, I placed it atop a black cake stand and used green and black candles for a spooky vibe. Getting playful with the setting adds to the fun and makes the cake the hero of the table.
Make Ahead and Storage
Storing Leftovers
Once frosted, this cake keeps wonderfully in the fridge for up to a week. I wrap leftover slices tightly in plastic wrap to prevent drying out and keep them fresh. It’s surprisingly hard to resist sneaking bites over those days!
Freezing
I’ve frozen entire cakes and individual layers, and it always turns out well. Wrap each layer tightly in plastic wrap, then foil or an airtight container before freezing. When ready to use, thaw overnight in the fridge for best texture.
Reheating
For leftover slices, I find letting them sit at room temperature for 15-20 minutes revives the cake’s softness. If you want warm cake, just pop a slice in the microwave for 10-15 seconds — it’s amazing how the frosting slightly melts into a perfect gooey bite.
FAQs
-
Can I use regular food coloring instead of gel for the Frankenstein Cake Recipe?
You can, but I don’t recommend it. Gel food coloring gives you much brighter colors without thinning your frosting or batter. Regular liquid food coloring might leave your cake wet or make the frosting too loose, which can affect texture and decorating.
-
How do I keep the cream cheese buttercream from being too soft?
Make sure your butter and cream cheese are at room temperature—not too warm. If your frosting gets too soft, pop it in the fridge for 10-15 minutes before frosting or piping. You can also adjust the consistency by adding more powdered sugar if it’s too runny.
-
Can I make this cake in larger or smaller pans?
Yes! The original recipe calls for 6 or 7-inch pans for layering. If you use different sizes, you’ll want to adjust baking time and batter amounts. Just keep an eye on the cake as it bakes and use a toothpick test for doneness.
-
What’s the best way to transport the Frankenstein Cake?
Since this cake has a soft buttercream, chilling it before transport is key. Keep it in the fridge until about 30 minutes before serving, and transport it in a sturdy box or container that fits the cake snugly to prevent sliding.
-
Can I substitute the cream cheese buttercream with regular buttercream?
Definitely. If you prefer a classic buttercream, just replace the cream cheese with more butter in the same quantity. Your cake will be sweeter and less tangy, but still delicious for decorating.
Final Thoughts
Honestly, the Frankenstein Cake Recipe has become one of my go-to festive treats because it’s playful, delicious, and surprisingly easy once you get the hang of the steps. I love sharing it with friends who marvel at how bright and moist the cake is, and how fun the decorating turns out. Give it a try – you’ll enjoy the process as much as the sweet, spooky results. Trust me, once you see the smiles this cake brings, you’ll want to make it every Halloween (or maybe even just because).
Print
Frankenstein Cake Recipe
- Prep Time: 20 minutes
- Cook Time: 28 minutes
- Total Time: 1 hour 48 minutes
- Yield: 20 servings
- Category: Dessert
- Method: Baking
- Cuisine: American
Description
This whimsical Frankenstein Cake features vibrant green velvet cake layers enveloped in a smooth, tangy cream cheese buttercream frosting. Perfect for Halloween or themed celebrations, the cake is decorated with piped black and white buttercream details to bring the monster to life. Made from scratch with precise baking techniques and creative decorating tips, this cake delivers both stunning looks and delicious flavor.
Ingredients
Green Velvet Cake
- 2 1/2 cups cake flour (300g)
- 2 Tbsp unsweetened cocoa powder, sifted (10g)
- 1 tsp baking soda (6g)
- 1/2 tsp fine salt (3g)
- 1/2 cup unsalted butter, room temperature (113g)
- 1 3/4 cups granulated sugar (350g)
- 2 large eggs, room temperature (112g)
- 1 1/4 cups buttermilk, room temperature (300g)
- 2/3 cup vegetable or canola oil (145g)
- 2 squirts green gel food coloring or 1 Tbsp liquid green food coloring
- 2 tsp vanilla extract or vanilla bean paste (8g)
- 1 tsp white vinegar (4g)
Cream Cheese Buttercream Frosting
- 1 1/2 cups unsalted butter, room temperature (339g – 3 sticks)
- 1/2 cup full-fat cream cheese, room temperature (113g or 4 oz.)
- 1 Tbsp vanilla extract or vanilla bean paste (12g)
- 1 tsp fine salt (6g)
- 8 cups powdered sugar (1000g)
- 2 Tbsp heavy whipping cream, room temperature (30g)
- Electric green gel food coloring
- Black gel food coloring
Additional Tools / Decorations
- 10-inch greaseproof cake board
- Spinning cake stand
- Small offset spatula
- 1 large piping bag
- 3 small piping bags
- 2 large round piping tips (e.g., Wilton 2A)
- 1 small round piping tip (e.g., Wilton 12)
- 1 tiny piping tip (e.g., Wilton 3)
- 3 Tbsp dark or black cocoa powder (for black buttercream)
Instructions
- Prepare Cake Pans: Preheat oven to 350°F (175°C). Grease four 6-inch or three 7-inch cake pans with homemade cake release or non-stick spray, line with parchment paper, and set aside.
- Mix Dry Ingredients: In a medium bowl, sift together cake flour, cocoa powder, baking soda, and salt thoroughly.
- Cream Butter & Sugar: In a large bowl or stand mixer, beat butter and granulated sugar on medium-high speed for 1–2 minutes until light and fluffy. Scrape bowl as needed.
- Add Eggs: Mix in the eggs on medium speed until fully incorporated.
- Add Wet Ingredients: Pour in buttermilk, oil, green gel food coloring, vanilla extract, and white vinegar. Mix on low speed until combined; the batter may appear broken but will come together once dry ingredients are added.
- Combine Wet and Dry: Gradually add dry ingredients in two parts on low speed. Mix until just combined with no visible flour streaks, avoiding overmixing.
- Fill Pans and Bake: Divide batter evenly between pans, tapping them on the counter to release air bubbles. Bake 28–32 minutes or until a toothpick inserted into the center comes out with a few moist crumbs.
- Cool Cake Layers: Cool pans on a wire rack for 10 minutes, run an offset spatula around edges, then invert layers onto racks to cool completely. Once cool, level layers with a serrated knife.
- Make Buttercream: Beat butter and cream cheese with paddle attachment at medium speed until smooth (~30 seconds). Add vanilla and salt; mix on low speed until combined.
- Add Sugar & Cream: Slowly mix in powdered sugar and heavy cream on low speed, covering the mixer to avoid sugar clouds. Scrape sides as needed. Adjust consistency by adding cream or powdered sugar as necessary.
- Color Frosting: Set aside 1/4 cup white frosting in a small piping bag with a large round tip. Tint 1/4 cup frosting light grey with a tiny drop of black gel color in a separate small piping bag with a large round tip. Add green gel color to remaining frosting until bright green. Cover with plastic wrap.
- Assemble Cake: Place cake board on a spinning cake stand. Use a dab of green frosting to adhere the first layer to the board. Stack remaining layers, spreading even frosting between layers.
- Crumb Coat: Apply a thin, even crumb coat around the entire cake. Smooth with an offset spatula or bench scraper, then chill in the fridge for 20 minutes or freezer for 5 minutes until firm.
- Final Coat: Cover cake with a thick, smooth second layer of bright green frosting. Chill again for 30 minutes in the fridge or 10 minutes in the freezer until completely firm.
- Prepare Black Frosting: Mix black gel coloring and 3 Tbsp black or dark cocoa powder into remaining buttercream until deeply black. Place in a piping bag fitted with a small round tip.
- Decorate: Pipe Frankenstein’s eyes, smile, and hair using black and white frosting. Use grey frosting to pipe neck bolts. Finish decorating to resemble Frankenstein’s monster, then serve and enjoy!
Notes
- Use room temperature ingredients for better mixing and texture.
- Accurately measure cake flour by spooning into cup measure and leveling or use a kitchen scale.
- Gel food coloring ensures vibrant colors without affecting frosting consistency or flavor.
- Do not overmix batter to keep cake layers tender and fluffy.
- Weigh cake pans with batter to ensure even cake layer heights and bake times.
- Tap cake pans on the counter to remove trapped air bubbles before baking.
- Level cake layers with a serrated knife for easier stacking and smoother frosting.
- Chill layers in the freezer before assembly for easier handling and trimming.
- Use a circle cutter or small glass to evenly space and size Frankenstein’s eyes when decorating.
- Make and freeze cake layers ahead for a more manageable baking schedule.
- Store leftover frosting in an airtight container for up to one month in the fridge or up to three months in the freezer; stir well before use.
- A fully frosted cake can be refrigerated for up to one week or frozen for up to one month.
Nutrition
- Serving Size: 1 slice (1/20th of cake)
- Calories: 420
- Sugar: 35g
- Sodium: 210mg
- Fat: 25g
- Saturated Fat: 13g
- Unsaturated Fat: 10g
- Trans Fat: 0g
- Carbohydrates: 45g
- Fiber: 1g
- Protein: 4g
- Cholesterol: 75mg


