
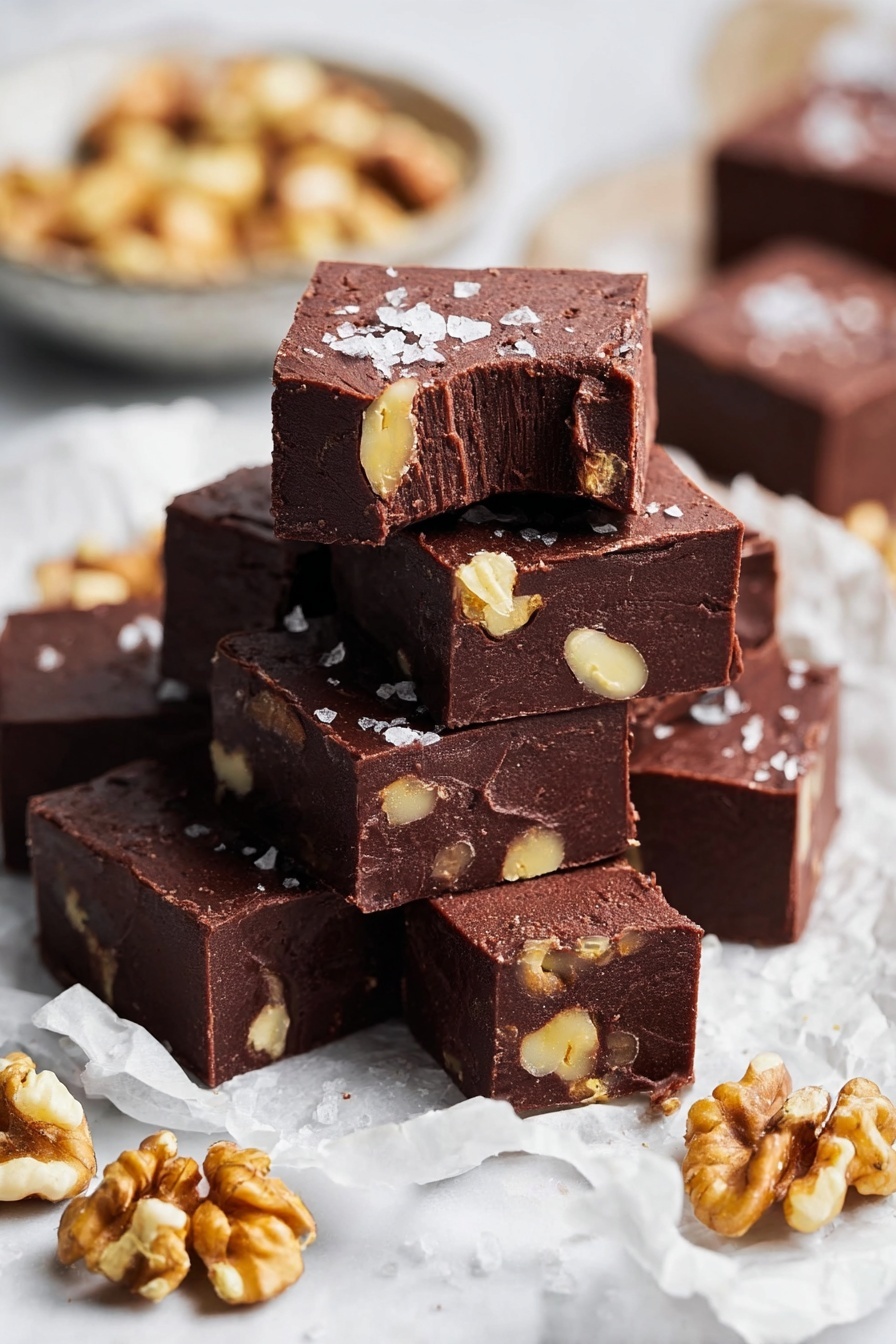
If you’re craving a rich, melt-in-your-mouth treat that feels like a hug in dessert form, you’re in for a real treat with this Easy Chocolate Fudge Recipe. I absolutely love how this fudge turns out every single time—it’s creamy, chocolaty, and surprisingly simple to make. You’ll find that it’s perfect for gifting, sharing at parties, or sneaking a few pieces when no one’s looking. So stick around, because I’m sharing all my tips and tricks to help you nail this classic favorite effortlessly.
Why You’ll Love This Recipe
- Simplicity at Its Best: Just a handful of ingredients comes together with minimal steps, perfect for last-minute cravings.
- Reliable Results Every Time: I’ve never had this fudge turn out dry or gritty—consistency is key, and this recipe delivers.
- Customizable Flavors: Whether you like nuts, sea salt, or even a splash of bourbon, you can tailor it to your taste.
- Long-lasting and Freezable: Keeps well in the fridge or freezer so you can enjoy it over weeks or save for special occasions.

Ingredients You’ll Need
These ingredients are straightforward pantry staples that work together brilliantly—sweetened condensed milk brings creaminess, semi-sweet chocolate provides deep flavor, and a touch of butter gives that perfect melt. When shopping, pick good-quality chocolate for the best fudge, and avoid evaporated milk (trust me, it’s a common mistake) because it changes the texture.
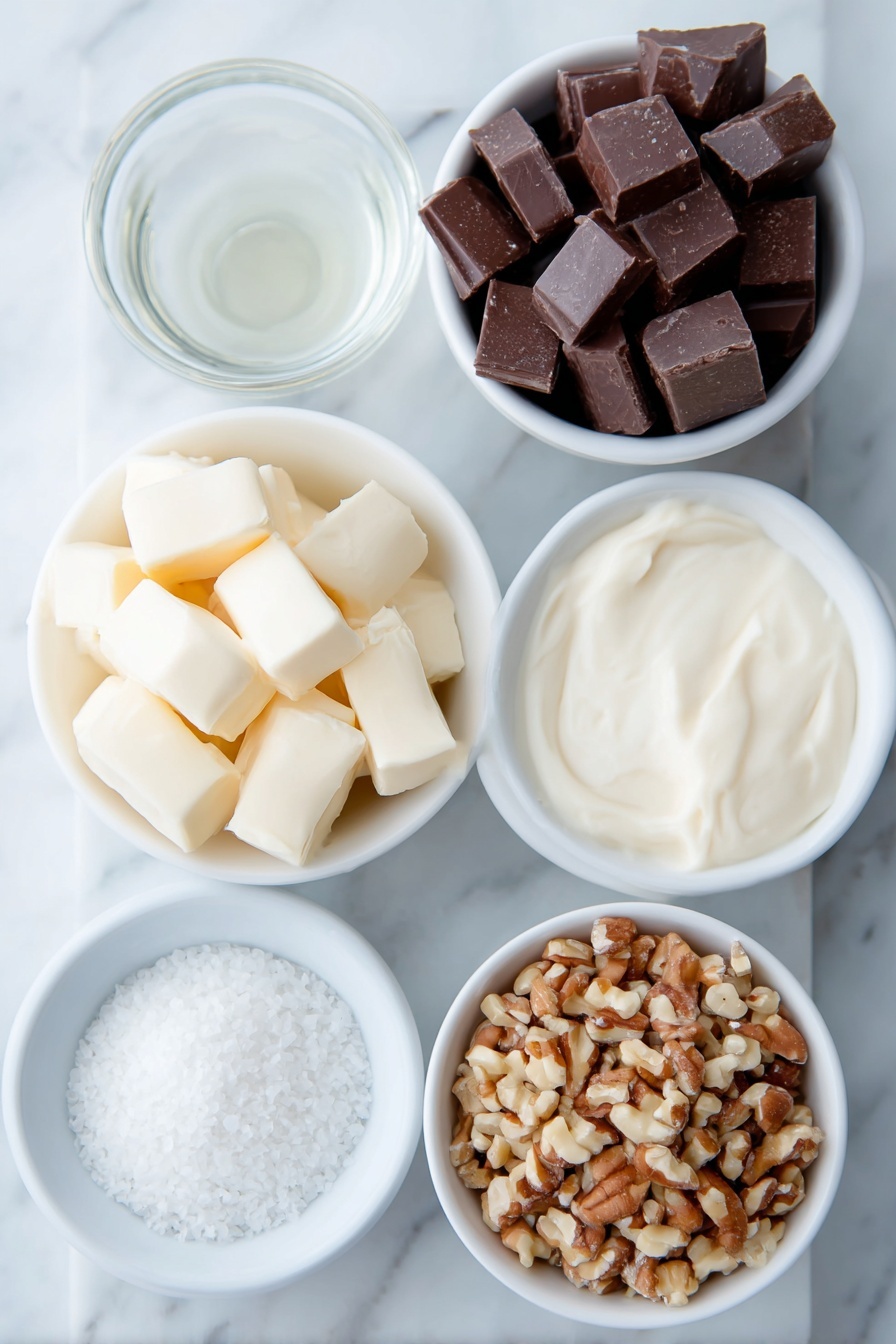
- Sweetened Condensed Milk: This is the heart of your fudge, keeping it silky and sweet without needing extra sugar.
- Pure Vanilla Extract: Adds a subtle warmth and depth that rounds out the chocolate flavor beautifully.
- Semi-sweet Chocolate: I always use chopped chocolate bars instead of chips—they melt creamier and smoother.
- Unsalted Butter: Room temperature butter blends easily and enriches the fudge without adding saltiness.
- Flaky Sea Salt (optional): Sprinkling some on top creates a lovely contrast to the sweetness—highly recommend trying it!
- Chopped Nuts or Crushed Candies (optional): For added texture and flavor variations, nuts like walnuts or pecans work perfectly.
Variations
I love to switch up this Easy Chocolate Fudge Recipe depending on my mood or the season. The great thing is, you can add your personal twist easily—whether it’s a crunchy nutty surprise or a splash of your favorite liqueur. Don’t be shy about making this your own!
- Nutty Fudge: Adding walnuts or pecans gives a lovely crunch—I often add chopped nuts when making this for family gatherings, and everyone loves it.
- Salted Caramel Swirl: Drizzle warmed caramel sauce on top before setting for a sweet-salty combo that’s out of this world.
- Spiked Fudge: Stir in a tablespoon of bourbon or rum for a grown-up twist that I started making around the holidays.
- Dairy-Free Alternative: Swap butter with coconut oil and use dairy-free chocolate to make this recipe vegan-friendly without losing that creamy texture.
How to Make Easy Chocolate Fudge Recipe
Step 1: Prep Your Pan Like a Pro
Lightly grease an 8×8-inch baking pan, then line it with parchment paper or foil, letting the edges hang over the sides. This makes it so much easier to lift out the fudge later without any mess. I always double-line my pan because nothing’s worse than fudge stuck to the pan when you’re ready to enjoy it!
Step 2: Combine Your Ingredients Gently
In a large, heatproof bowl, add your sweetened condensed milk, vanilla, chopped chocolate, and butter pieces. No mixing just yet—we want to let the heat work its magic first without burning anything.
Step 3: Use the Double Boiler Technique
Fill a saucepan with about 1/4 full water and bring it to a boil, then reduce to a gentle simmer. Set your bowl with all the ingredients on top of the pan, making sure the water doesn’t touch the bottom of the bowl. Stir with a rubber spatula consistently, and after about 4 minutes, the chocolate will be nearly melted with just a few small chunks left. This step requires patience but is what keeps your fudge silky smooth!
Step 4: Finish the Melting Off the Heat
Remove the bowl from the heat but keep stirring to fully melt the remaining chocolate and bring everything to a perfect, glossy consistency. This usually takes about 2 minutes. Be sure not to leave it on the heat too long or the chocolate can separate, making your fudge greasy—this little step saved me from failed batches more than once!
Step 5: Add Mix-Ins and Chill
If you want to add nuts, candies, or a sprinkle of flaky sea salt, now’s the time to stir them in gently. Then, scrape the fudge into your prepared pan and smooth it out evenly. Pop it in the refrigerator and let it set for about 2 hours until firm.
Step 6: Cut and Enjoy
Once set, run a butter knife around the edges of the pan to loosen the fudge. Use the parchment or foil overhang to lift the whole slab out, peel off the lining, and slice into your favorite sized squares. I like mine bite-sized for easy snacking—and it makes it hard to stop at just one!
Pro Tips for Making Easy Chocolate Fudge Recipe
- Use Quality Chocolate: Good chocolate really makes a difference in flavor and texture—go for 60-70% cocoa for the best balance.
- Don’t Overheat Your Fudge: Removing the bowl from the heat before chocolate fully melts prevents grainy or greasy results.
- Line Your Pan Well: I always double-line with parchment and foil, which makes cleanup and cutting so much easier.
- Refrigerate Until Firm: Resist the temptation to slice early—give it a full two hours to set for clean cuts and delicious texture.
How to Serve Easy Chocolate Fudge Recipe

Garnishes
I usually sprinkle flaky sea salt over the top right before chilling—it adds that dreamy sweet-salty combo that my family goes crazy for. Another favorite garnish is a light dusting of cocoa powder or a few crushed peppermint candies during the holidays; it makes the fudge feel extra special.
Side Dishes
This fudge pairs wonderfully with a hot cup of coffee or tea. I sometimes serve it alongside fresh berries or a scoop of vanilla ice cream for a little indulgent dessert plate that’s sure to impress guests.
Creative Ways to Present
For gift-giving, I wrap individual squares in colorful parchment paper or place them in cute mini boxes tied with twine. I’ve also layered pieces between wax paper in airtight tins to share at potlucks—it’s a crowd-pleaser every time!
Make Ahead and Storage
Storing Leftovers
I keep leftover fudge stored in an airtight container in the fridge, where it stays fresh and firm for up to a month. It’s great to pull out for unexpected guests or a sweet afternoon treat.
Freezing
If I want to keep fudge longer, I freeze it in an airtight container lined with parchment paper between layers. When properly wrapped, it freezes well for up to two months without losing flavor or texture.
Reheating
Since fudge is better chilled or at room temperature, I usually just thaw frozen fudge overnight in the fridge and serve directly. If you want to soften it a bit, let it sit at room temperature for 20 minutes—no microwave necessary!
FAQs
-
Can I use chocolate chips instead of chopped chocolate?
You can, but I recommend chopped chocolate bars because they melt more smoothly and give a better texture to your fudge. Chips often contain stabilizers that can affect melting.
-
Why doesn’t my fudge set properly?
Using evaporated milk instead of sweetened condensed milk, overheating the chocolate, or not chilling long enough are common culprits. Make sure you follow each step closely, especially around heating and cooling times.
-
Can I make this fudge ahead of time for a party?
Absolutely! This fudge actually tastes better after sitting a day or two. Just store it in the fridge in an airtight container until you’re ready to serve.
-
How do I prevent grainy fudge?
Avoid rushing the melting process and don’t let any water touch the chocolate. Stir gently and slowly remove from heat to prevent sugar crystals from forming.
Final Thoughts
This Easy Chocolate Fudge Recipe is one of those timeless classics you’ll turn to again and again—it’s quick, forgiving, and absolutely delicious. I remember the first time I made it, and my whole family couldn’t stop raving about how smooth and rich it was. I know you’ll enjoy making it just as much as eating it, and every batch feels like a little celebration of homemade love. Seriously, give it a try and watch the magic happen—you’ll be glad you did!
Print
Easy Chocolate Fudge Recipe
- Prep Time: 10 minutes
- Cook Time: 10 minutes
- Total Time: 2 hours 20 minutes
- Yield: Approximately 32 small squares (1 8-inch pan)
- Category: Dessert
- Method: Stovetop
- Cuisine: American
Description
This Foolproof Chocolate Fudge recipe is a simple, no-bake treat that combines sweetened condensed milk, rich semi-sweet chocolate, and creamy butter for a luscious texture. Made using a gentle double boiler method, it yields smooth, rich fudge that can be customized with nuts or crushed candies for extra crunch. Perfect for gifting or satisfying a chocolate craving, this fudge sets in the refrigerator within two hours for easy preparation and indulgence.
Ingredients
Fudge Base
- 1 14-ounce can sweetened condensed milk (NOT evaporated milk)
- 1 teaspoon pure vanilla extract
- 20 ounces semi-sweet chocolate, roughly chopped
- 3 tablespoons unsalted butter, cut into 1/2-inch pieces, at room temperature
Optional Mix-ins and Garnish
- Flaky sea salt, for sprinkling
- 1/2 cup chopped nuts or crushed candies
Instructions
- Prepare the Pan: Lightly grease an 8×8-inch baking pan. Line it with parchment paper or aluminum foil, leaving the excess to overhang the edges for easy removal later.
- Combine Ingredients: In a large heatproof bowl, mix sweetened condensed milk, vanilla extract, chopped chocolate, and butter together; set aside.
- Set Up Double Boiler: Fill a saucepan with about 1/4 full of water and bring it to a boil. Reduce the heat to a bare simmer. Place the bowl with the fudge ingredients on top of the saucepan, ensuring it doesn’t touch the water.
- Melt the Chocolate Mixture: Stir continuously with a rubber spatula until the chocolate is nearly melted with just a few small pieces remaining, approximately 4 minutes. Be careful not to overheat or fully melt at this stage to avoid the fudge becoming greasy due to chocolate separation.
- Finish Melting Off Heat: Remove the bowl from the heat and continue stirring until the chocolate completely melts and the mixture is smooth, about 2 minutes.
- Add Mix-ins: If using nuts or crushed candies, fold them into the fudge mixture now.
- Set the Fudge: Pour and scrape the mixture into the prepared pan and spread it evenly with a spatula. Optionally sprinkle flaky sea salt on top for added flavor.
- Refrigerate: Chill the fudge until firm, about 2 hours.
- Cut and Serve: Loosen the fudge edges with a butter knife. Use the parchment or foil overhang to lift it out of the pan. Peel off the lining and slice into squares.
- Storage: Serve immediately or store the fudge chilled in the refrigerator for up to 1 month, or freeze in an airtight container for up to two months.
Notes
- Do not use evaporated milk as it will alter the texture and sweetness.
- Maintaining gentle heat during melting prevents the chocolate from separating and becoming greasy.
- Adding flaky sea salt enhances the chocolate flavor but is optional.
- Use high-quality semi-sweet chocolate for the best taste and texture.
- If storing frozen, thaw fudge in the refrigerator before serving to maintain texture.
- Chopped nuts or crushed candies add texture but can be omitted for a smooth fudge.
Nutrition
- Serving Size: 1 piece (1/32 of 8×8 pan)
- Calories: 110
- Sugar: 16g
- Sodium: 30mg
- Fat: 5g
- Saturated Fat: 3g
- Unsaturated Fat: 2g
- Trans Fat: 0g
- Carbohydrates: 17g
- Fiber: 1g
- Protein: 1g
- Cholesterol: 10mg


