
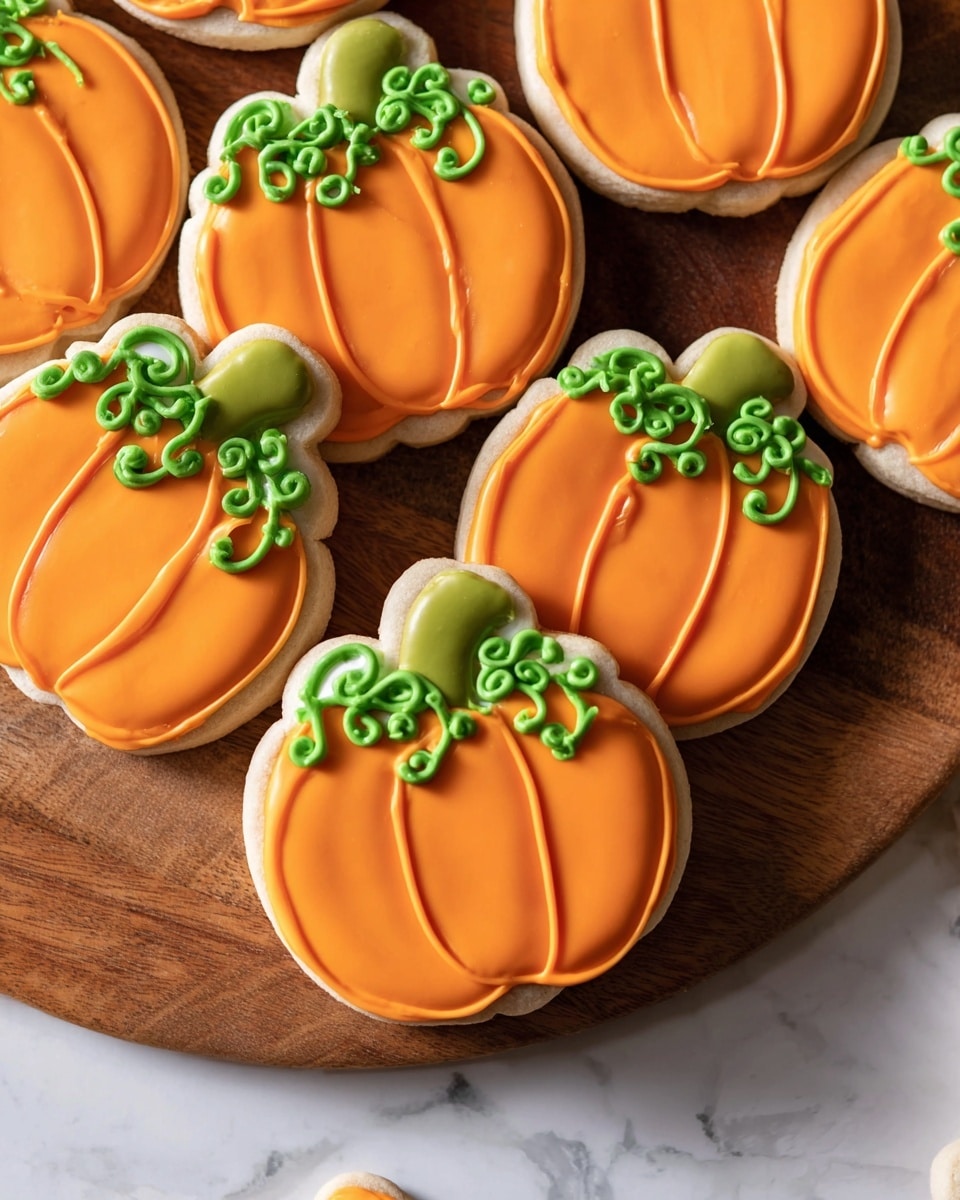
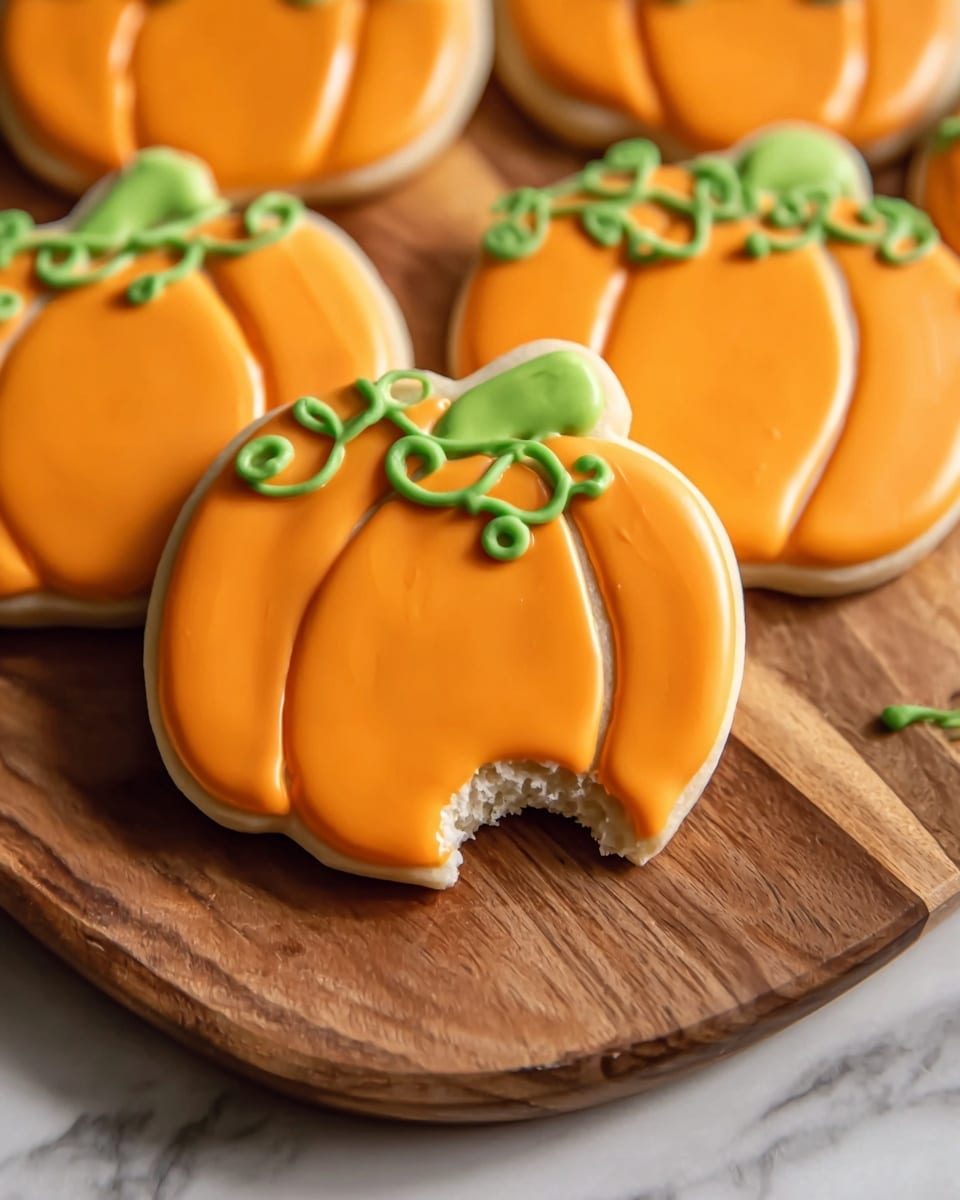
If you’re looking to add a festive touch to your autumn baking, this Decorated Pumpkin Cookies Recipe is simply perfect. I absolutely love how these pumpkin-shaped sugar cookies combine a tender, buttery base with the fun of colorful royal icing decoration. Whether you’re baking for a party, gifting for the holidays, or just craving a sweet seasonal treat, these cookies never disappoint — they’re as delightful to make as they are to eat!
Why You’ll Love This Recipe
- Fun Seasonal Design: Pumpkin-shaped cookies decorated with bright royal icing that scream fall vibes.
- Perfect Texture: Sugar cookies with just the right balance of softness and structure to hold up the decorations.
- Customizable Flavors: A hint of pumpkin pie spice adds warmth, but you can easily skip or swap it.
- Great for Gifting: These cookies store well and freeze beautifully, making them ideal for holiday treats.

Ingredients You’ll Need
To get these decorated pumpkin cookies just right, you’ll need a few pantry staples plus a couple specialized items for the icing. The flour and butter create that classic cookie base, while the meringue powder is what makes royal icing so fabulous to work with.
- All-purpose flour: Make sure it’s fresh for tender cookies and dust your surface lightly to avoid sticking.
- Baking powder: Gives the cookies a slight lift without puffing them up too much.
- Salt: Just a pinch to balance the sweetness.
- Pumpkin pie spice (optional): If you want those cozy fall flavors, this is your secret weapon.
- Unsalted butter: Softened at room temperature for easy mixing and rich flavor.
- Confectioners’ sugar: This keeps the dough smooth and sweet, plus it’s sifted for the icing to avoid lumps.
- Large egg: Room temperature is key here — it blends better and keeps the dough from cracking.
- Vanilla extract: Pure vanilla makes all the difference in depth of flavor.
- Meringue powder: You can find this at baking or craft stores; it’s what gives royal icing its perfect hold.
- Warm water: Helps dissolve the meringue powder and adjust icing consistency.
- Orange and green food gel: For those iconic pumpkin colors that really pop compared to liquid food coloring.
Variations
While I adore the classic decorated pumpkin theme, I sometimes like to mix things up a bit. This recipe is super forgiving, so don’t hesitate to tailor it to your taste or holiday mood!
- Spiced Up: Adding a pinch of cinnamon or nutmeg alongside pumpkin pie spice can deepen that cozy fall flavor — I discovered this trick when looking for a more robust spice blend.
- Vegan Option: Swap the butter for plant-based margarine and use a flax egg in place of the egg; the texture may be slightly different but still delicious.
- Simple Sugar Cookies: Skip the pumpkin spice and decorate with classic white and yellow royal icing for a versatile look.
- Different Shapes: If you’re short on a pumpkin cutter, any fall-themed cookie cutter works — leaves, acorns, or even simple circles!
How to Make Decorated Pumpkin Cookies Recipe
Step 1: Whip Up the Dough
Start by preheating your oven to 400° F and lining your baking sheets with parchment paper — this prevents sticking and makes cleanup a breeze. Whisk together the dry ingredients (flour, baking powder, salt, and pumpkin pie spice if you’re using it). In a large bowl, cream the softened butter and confectioners’ sugar on medium speed until light and fluffy. This usually takes about one to two minutes and is key for that tender cookie texture. Then add the egg and vanilla, mixing just until combined.
Step 2: Combine Dry and Wet Ingredients
Slowly add your flour mixture to the wet ingredients on a low mixer setting. You’ll know your dough is just right when it clings mostly to the paddle and feels soft but isn’t sticky to the touch — if it’s too sticky, sprinkle in a bit more flour, but just a tablespoon at a time. Flour your work surface, then roll the dough to about 1/4-inch thickness. If you live somewhere warm or humid, I like to pop the rolled dough in the fridge to chill for 20 minutes before cutting. It makes handling so much easier!
Step 3: Cut and Bake Pumpkin Shapes
Use a pumpkin-shaped cookie cutter to stamp out your cookies and arrange them onto your prepared baking sheets. Gather and re-roll scraps as needed, but be careful not to overwork the dough or your cookies will turn tough. Bake for 7 to 8 minutes, rotating the pan halfway through to ensure even baking. Let the cookies cool on the trays for a couple of minutes before transferring them to a wire rack — I always struggle to wait here because they smell so amazing fresh from the oven!
Step 4: Prepare the Royal Icing
This royal icing is the magic that brings these pumpkins to life. Start by whipping the meringue powder and warm water until foamy, which takes about 3 minutes. Then add your vanilla and sifted confectioners’ sugar and whip again until you reach a thick, medium-soft peak. If the icing is too stiff, thin it with a few drops of water. Divide the icing into two bowls—color one orange and the other green with food gels. I always use gel because it gives richer colors without changing the consistency.
Step 5: Decorate Like a Pro
Outline each cookie with the orange icing, then pipe two lines to create three sections on your pumpkin — it’s those little details that make these look extra special. Let that dry completely before flooding the sections with more orange icing. Set aside for several hours; I usually let mine dry overnight. Finally, add details like the green stem and vines once the orange is fully dry, and let those dry too. Patience here is key — it’s worth waiting to ensure your designs don’t get smudged!
Pro Tips for Making Decorated Pumpkin Cookies Recipe
- Perfect Dough Texture: If your dough feels too sticky, adding flour bit by bit saves frustration and prevents tough cookies. I learned this the hard way after a sticky mess!
- Chilling Helps Shape: Chilling the rolled dough before cutting really helps maintain clean pumpkin shapes, especially in warmer kitchens.
- Royal Icing Consistency: Aim for a medium-soft peak in your icing; too thin and it will run off the cookies, too thick and it’s tough to pipe.
- Drying Time is Key: Don’t rush drying! I usually leave my decorated cookies overnight before handling to keep designs crisp and neat.
How to Serve Decorated Pumpkin Cookies Recipe
Garnishes
I like to keep the garnishing simple—sometimes just a sprinkle of edible gold dust on the “stem” brings a magical touch that guests comment on. Another fun idea is using tiny edible pearls or sanding sugar along the icing lines for a sparkly effect. These little touches make your cookies look professionally decorated, even if you’re new to piping.
Side Dishes
Pair your pumpkin cookies with a warm cup of spiced apple cider or a rich chai latte for an unbeatable autumn combo. I’ve also served them alongside pumpkin bread or cinnamon-roasted nuts at fall parties — the sweet and savory mix always goes down well!
Creative Ways to Present
For Halloween or Thanksgiving, I’ve arranged these pumpkin cookies on a tiered cookie stand along with mini gourds and autumn leaves for a cozy centerpiece. Wrapping a stack in cellophane tied with orange and green ribbon makes handmade gifts that my family and friends absolutely adore. Don’t be afraid to get festive and let your creativity shine!
Make Ahead and Storage
Storing Leftovers
I store leftover decorated pumpkin cookies in an airtight container at room temperature, placing parchment paper between layers to keep them from sticking. They stay fresh for about a week this way, though it’s rare they last that long in my house!
Freezing
Freezing works wonderfully for these cookies. I wrap them individually in plastic wrap and then place them in a sealed container or freezer bag. They keep well for up to 3 months. When you’re ready, defrost in the refrigerator overnight to avoid condensation that can damage the icing.
Reheating
No reheating needed here since these cookies are best enjoyed at room temperature. Just let your thawed cookies sit out for about 30 minutes before serving to bring back their tender texture and full flavor.
FAQs
-
Can I make this Decorated Pumpkin Cookies Recipe without pumpkin pie spice?
Absolutely! The pumpkin pie spice is optional and just adds a warm, cozy flavor. If you omit it, your cookies will still taste delicious — just classic buttery sugar cookies that pair beautifully with orange and green royal icing.
-
How do I keep my royal icing from cracking while drying?
Royal icing dries best in a cool, dry environment. Avoid high humidity and direct sunlight. Also, make sure the consistency is right—not too thick or dry when piping—to prevent cracking. Instant-drying occasionally causes edges to harden before the center, so patience for overnight drying helps everything set evenly.
-
Can I use powdered egg whites instead of meringue powder for the icing?
You can, but meringue powder is preferred because it’s pasteurized and stabilizes royal icing better, especially for detailed decorations. Powdered egg whites might require adjustments in water and could affect drying time.
-
How long will these decorated pumpkin cookies stay fresh?
Stored properly in an airtight container with parchment paper between layers at room temperature, these cookies stay fresh for up to one week. The royal icing will harden completely, making them great for sharing or gifting.
Final Thoughts
Making these decorated pumpkin cookies has become a fall tradition for me and my family — there’s just something so joyful about rolling out the dough, piping the bright orange pumpkins, and seeing everyone’s faces light up. I hope you enjoy this Decorated Pumpkin Cookies Recipe as much as I do and that it brings a little extra sweetness and sunshine to your kitchen this season. Grab that pumpkin cutter, dust off your piping bag, and give it a whirl — I’m cheering you on!
Print
Decorated Pumpkin Cookies Recipe
- Prep Time: 20 minutes
- Cook Time: 10 minutes
- Total Time: 6 hours 30 minutes
- Yield: 22 cookies
- Category: Dessert
- Method: Baking
- Cuisine: American
Description
These Decorated Pumpkin Cookies are soft, lightly spiced sugar cookies shaped like pumpkins and beautifully decorated with royal icing. Perfect for fall celebrations, Halloween, or Thanksgiving, these cookies combine classic sugar cookie flavors with festive orange and green royal icing designs. The dough is easy to prepare, rolled out, cut with a pumpkin cutter, baked until just golden, and then meticulously decorated with homemade royal icing that dries hard for stacking and gifting.
Ingredients
Cut Out Sugar Cookies
- 2 ½ cups (312 g) all-purpose flour, plus more for dusting work surface
- 2 teaspoons baking powder
- ¾ teaspoon salt
- 1 teaspoon pumpkin pie spice (optional)
- 1 cup (226 g) unsalted butter, room temperature
- 1 ½ cups (180 g) confectioners’ sugar
- 1 large egg, room temperature
- 2 teaspoons pure vanilla extract
Royal Icing
- 2 Tablespoons meringue powder
- 5-6 Tablespoons warm water
- 1 teaspoon pure vanilla extract
- 2 ⅔ cups (320 g) confectioners’ sugar, sifted
- Orange food gel
- Green food gel
Instructions
- Preheat and prepare baking sheets: Preheat oven to 400° F. Line baking sheets with parchment paper and set aside.
- Mix dry ingredients: In a bowl, whisk together all-purpose flour, baking powder, salt, and pumpkin pie spice (if using). Set aside.
- Cream butter and sugar: In a large bowl, combine softened unsalted butter and confectioners’ sugar using a hand mixer. Beat until light and fluffy, about 1 to 2 minutes.
- Add egg and vanilla: Add the large egg and pure vanilla extract to the butter mixture and beat until thoroughly incorporated, about 30 seconds, scraping the sides as needed.
- Add flour mixture: With the mixer on low speed, slowly add the flour mixture into the wet ingredients until most of the dough sticks to the paddle. The dough should have some give but not stick to your fingers. Add more flour by tablespoons if too sticky.
- Roll and cut dough: Flour the work surface and roll the dough to about ¼-inch thickness. Dust with flour as needed. Use a pumpkin-shaped cookie cutter to cut out cookies and place them on prepared baking sheets. Gather scraps and re-roll as necessary. If baking in a warm climate, chill the cut cookies for 20 minutes before baking.
- Bake the cookies: Bake cookies at 400° F for 7 to 8 minutes, rotating the pan halfway through baking. Remove from oven and let cookies cool on the baking sheet for 2 minutes, then transfer to a wire rack to cool completely.
- Prepare royal icing base: In a large mixing bowl, combine meringue powder and 5 tablespoons warm water. Whip with a whisk attachment until foamy, about 3 minutes.
- Add vanilla and sugar to icing: Add vanilla extract and sifted confectioners’ sugar to the meringue mixture. Whip on medium speed until thick and holding a medium soft peak, about 3 minutes. Thin with additional water a few drops at a time if necessary to achieve desired consistency.
- Color the royal icing: Transfer ¼ cup of icing to a separate bowl and tint with green food gel, mixing well. Transfer this green icing to an icing bag fitted with a small round tip (Wilton #2 recommended). Add orange food gel to the remaining icing in the main bowl and mix thoroughly; transfer to a separate icing bag with a small round tip.
- Decorate cookies: Outline each cooled pumpkin cookie with the orange icing. Add two curved lines to divide the pumpkin into thirds to mark the ridges. Allow the outline to dry completely before flooding the inside of the pumpkin shape with orange icing. Let this layer dry fully, which may take several hours.
- Add finishing touches: Use the green icing to fill in the pumpkin stem and add decorative vines if desired. Allow all icing decorations to dry completely before stacking or packaging.
Notes
- Meringue powder can be found at local baking or craft stores, or purchased online.
- Royal icing takes several hours to dry hard enough for stacking and packaging; patience is essential for best results.
- Store decorated cookies in an airtight container at room temperature for up to 1 week, placing parchment paper between layers to prevent sticking.
- Cookies can be frozen for up to 3 months if wrapped tightly in plastic wrap and stored in an airtight container. Defrost in the refrigerator before bringing to room temperature.
- The cookie dough can also be frozen for up to 3 months; thaw completely before rolling and cutting as usual.
Nutrition
- Serving Size: 1 cookie
- Calories: 191 kcal
- Sugar: 14 g
- Sodium: 85 mg
- Fat: 9 g
- Saturated Fat: 5 g
- Unsaturated Fat: 2.4 g
- Trans Fat: 0.3 g
- Carbohydrates: 35 g
- Fiber: 0.4 g
- Protein: 2 g
- Cholesterol: 30 mg

