
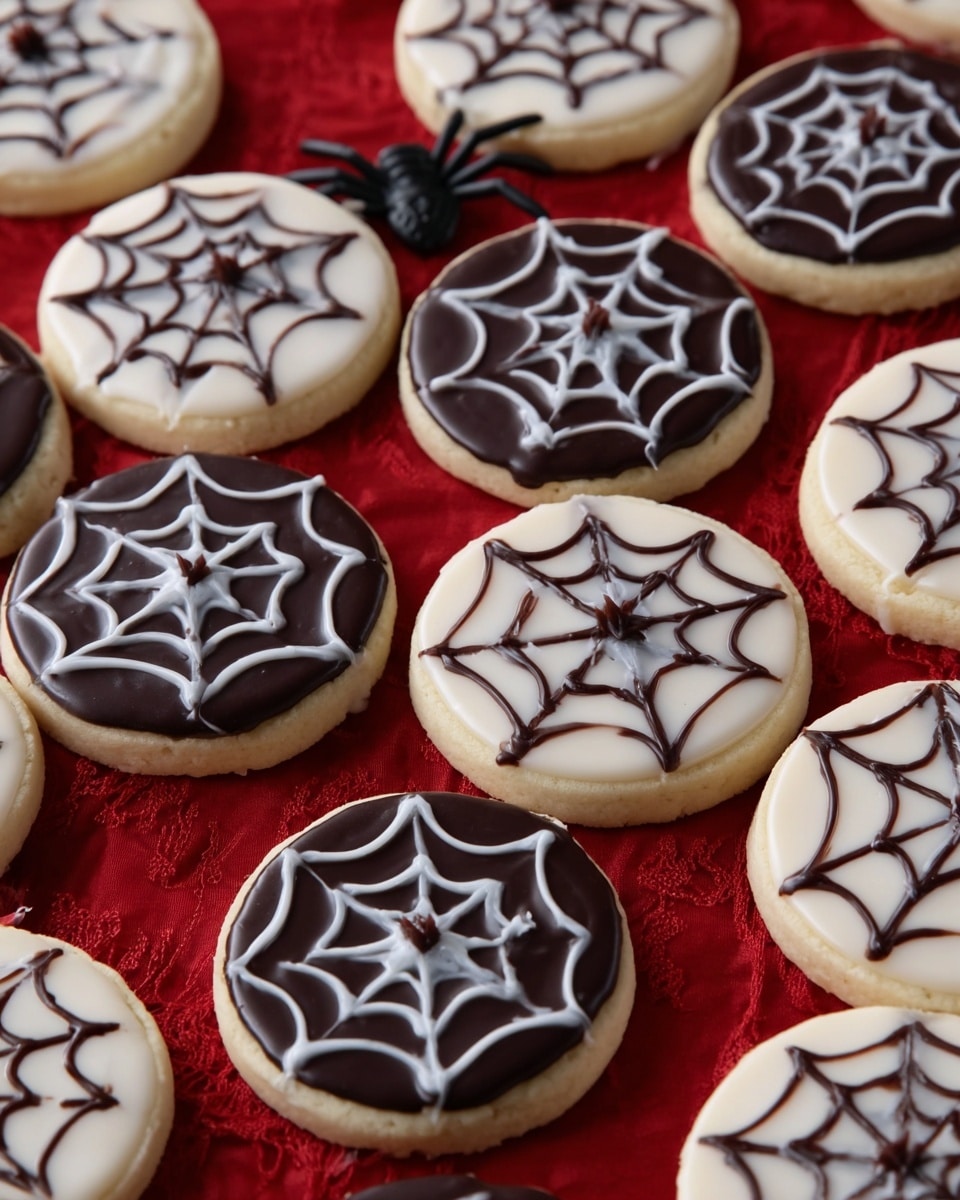
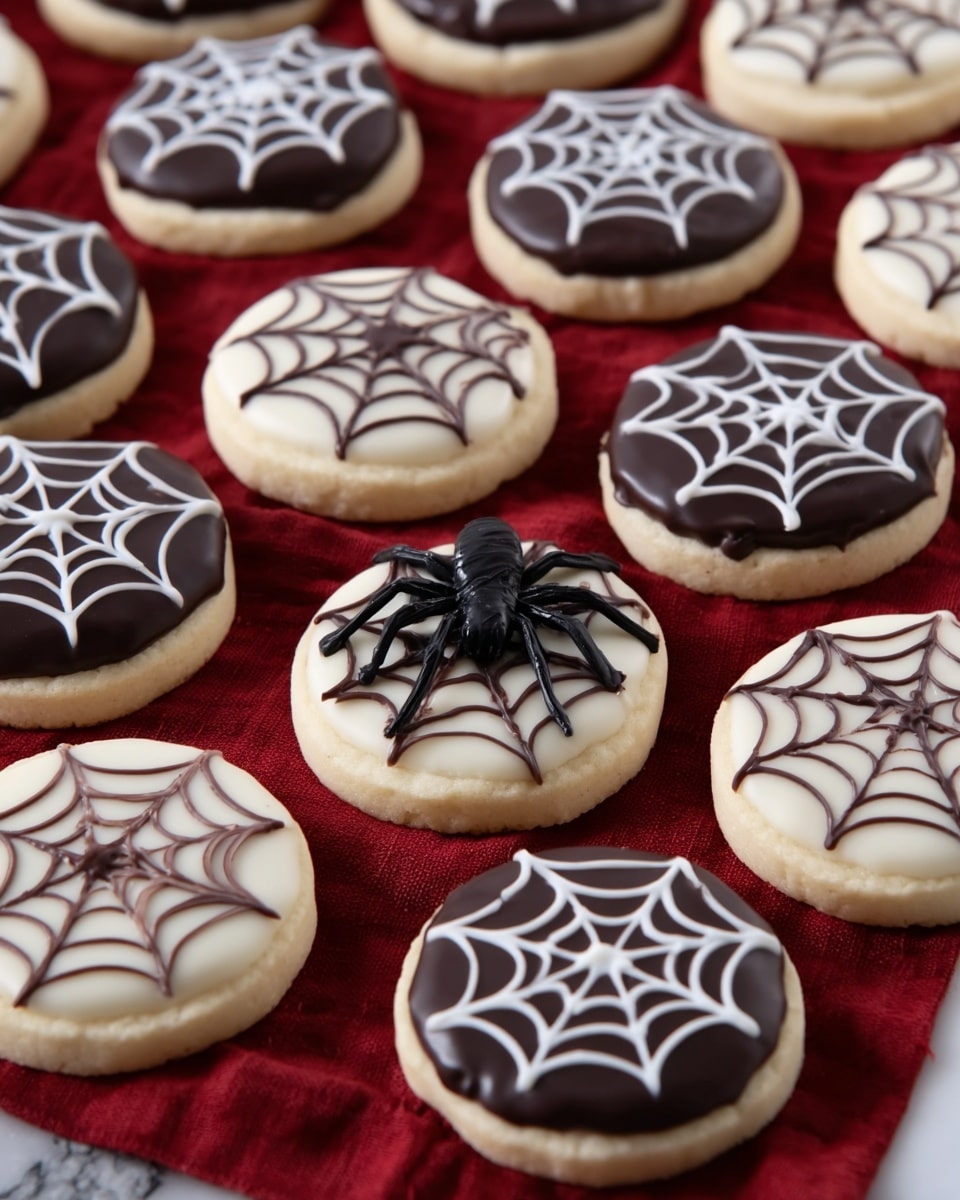
If you’re looking for a super fun and festive treat to wow your friends and family this season, you’ve got to try this Cobweb Halloween Cookies Recipe. I absolutely love how these cookies turn out — gorgeous spiderweb designs on top of soft, buttery cookies that taste as good as they look. When I first tried this recipe, I had zero clue how cool the glazing technique would be, but once I got the hang of it, my whole family went crazy for them. If you want a Halloween cookie that’s as much fun to make as it is to eat, keep reading!
Why You’ll Love This Recipe
- Fun & Festive Design: The spiderweb icing technique is surprisingly simple, yet it creates a show-stopping effect.
- Soft & Buttery Cookies: These aren’t dry or crumbly — the cookie base stays tender and delicious every time.
- Make Ahead Friendly: You can easily prepare these cookies in advance and store them without losing freshness.
- Kid-Approved: If you have little helpers, they’ll love joining you in decorating the cobwebs — a fun activity for Halloween!

Ingredients You’ll Need
Every ingredient in this Cobweb Halloween Cookies Recipe works together to create a rich and tender cookie, plus those luscious chocolate and vanilla glazes that make the cobweb effect pop. I find that using good-quality butter really boosts the flavor, so keep an eye out for that at the store.
- Butter: Use softened butter for smooth creaming and rich flavor.
- Shortening: Helps keep the cookies tender and gives a nice texture.
- Granulated Sugar: Sweetens the dough and aids in that perfect cookie crumb.
- Egg: Binds everything together and adds moisture.
- Vanilla Extract: Adds warmth and depth of flavor.
- All-Purpose Flour: The sturdy base of the cookies — I always sift it lightly for an even mix.
- Baking Powder: Gives a gentle lift for soft cookies.
- Salt: Balances the sweetness and enhances all the flavors.
- Chocolate Chips: Essential for the chocolate glaze’s richness and smooth finish.
- Heavy Whipping Cream: Creates a silky texture in the glaze.
- Powdered Sugar: Perfect for the vanilla glaze — smooth and lump-free.
- Milk: Used sparingly to adjust glaze consistency just right.
Variations
One of the things I love about the Cobweb Halloween Cookies Recipe is how easy it is to make it your own. I’ve tried swapping out the chocolate for white chocolate or even colored candy melts to mix up the look. You can totally have fun with it!
- White Chocolate Glaze: I replaced the chocolate chips with white chocolate and tinted the vanilla glaze with orange food coloring for an extra pop of spooky colors.
- Gluten-Free Option: Use a gluten-free all-purpose flour blend in place of the regular flour — the texture turned out wonderfully soft.
- Spiced Version: Adding a pinch of cinnamon or pumpkin pie spice to the cookie dough gave it a cozy fall vibe that my guests loved.
How to Make Cobweb Halloween Cookies Recipe
Step 1: Cream and Prepare Your Dough
First things first, preheat your oven to 350°F and line a baking sheet with parchment paper — always saves cleanup later. Beat together the softened butter, shortening, and sugar until everything is smooth and creamy. I usually use a stand mixer for this part to get that velvety texture faster. Next, add in the egg and vanilla extract, mixing again until fully combined. Meanwhile, whisk together the flour, baking powder, and salt in a separate bowl. Slowly add the dry ingredients to the wet mix and stir until just combined — you don’t want to overmix here, or your cookies could turn out tough.
Step 2: Shape and Bake Your Cookies
Scoop the dough into 1.5 tablespoon-sized balls and place them on your prepared sheet. Here’s a tip I discovered: gently flatten each dough ball with the bottom of a glass that’s been sprayed with non-stick spray — about 1/4 inch thick works perfectly. Bake for 10-12 minutes until just set. When I first made these, I was tempted to overbake for a crunchier cookie, but keeping them soft makes the glaze look better and the bites tastier. Let the cookies cool on the sheet for a few minutes before transferring them to a wire rack — patience really helps them hold their shape.
Step 3: Make the Glazes
For the chocolate glaze, microwave butter and heavy cream in a glass bowl for about 1 minute 30 seconds. Stir in the chocolate chips, then cover the bowl and let it sit for 5 minutes—this melting trick makes the glaze ultra-smooth and shiny when you whisk it. Transfer a few tablespoons into a small sandwich bag and snip a tiny corner off to pipe later. For the vanilla glaze, melt butter, then mix in vanilla, powdered sugar, and milk until you get a silky spreadable consistency—don’t add too much milk or it’ll runny! Transfer that glaze to its own baggie as well.
Step 4: Create Your Cobwebs
This is the super fun part. Start by spooning about 1 tablespoon of one glaze (say chocolate) onto the center of a cookie. Then, pipe the opposite glaze (vanilla) in concentric circles on top, starting small and getting bigger—but be careful not to let the circles touch each other. Take a clean toothpick and drag it from the middle out through the circles in several even strokes around the cookie, creating that iconic spiderweb pattern. Here’s a tip I learned: the glaze needs to be warm and soft for the effect to work, so don’t try to decorate too many cookies at once—you’ll likely manage 2 or 3 at a time before you need to move on to the next batch. Alternate which glaze you spoon first and which you pipe to keep the design balanced across your cookies.
Pro Tips for Making Cobweb Halloween Cookies Recipe
- Manage Glaze Temperature: Keep your glazes warm but not hot — that makes piping smooth and drawing the cobweb easier.
- Work in Small Batches: I found that doing only 2-3 cookies at a time prevents the glaze from drying and ruining your spiderwebs.
- Flatten Your Dough Well: Using a glass bottom sprayed with oil gives an even thickness, which helps your cookies bake uniformly.
- Don’t Overbake: Pull cookies out as soon as they set to keep them soft and perfect for glazing.
How to Serve Cobweb Halloween Cookies Recipe
Garnishes
I like to keep it simple with these cookies because the cobweb design steals the show. But if I’m feeling festive, I’ll sprinkle a few edible glitter stars or tiny candy spiders on the edges right after piping the glaze. It adds a little extra Halloween charm without overpowering that classic look.
Side Dishes
These cookies pair beautifully with a warm cup of spiced apple cider or a classic pumpkin spice latte. I’m partial to serving them with a bowl of fresh fruit or vanilla ice cream too — the cool creaminess complements the chocolate and vanilla without competing.
Creative Ways to Present
For a Halloween party, I like arranging the cobweb cookies on a black platter dusted with powdered sugar “spider webs” drawn with a stencil. Another idea I tried was stacking a few cookies with tiny plastic spiders peeking out for a creepy-cute tower centerpiece—always a conversation starter!
Make Ahead and Storage
Storing Leftovers
Once the icing is fully set, I store the cookies in an airtight container at room temperature. I put parchment paper between layers because stacking them looks neat and helps keep the decor intact. They usually stay fresh for up to 5 days, perfect if you’re making them ahead for Halloween.
Freezing
I’ve had really good success freezing these cookies after the glaze has fully hardened. Just layer them with parchment paper in a freezer-safe bag or container and thaw them at room temp when you’re ready. The design stays surprisingly intact, and the flavors remain just as vibrant.
Reheating
Because these are cookies with glaze, I don’t recommend reheating in the microwave—it can melt the icing. Instead, if you want them warm, let them sit at room temp for a bit or gently warm in a low oven (275°F for 5 minutes or so) while keeping a close eye to avoid ruining the glaze.
FAQs
-
Can I use a different type of chocolate for the glaze?
Yes! You can substitute semi-sweet chocolate chips with milk, dark, or white chocolate chips. Just keep in mind that white chocolate behaves slightly differently when melting, so watch the consistency carefully for smooth piping.
-
What if my glaze is too runny or too thick?
If it’s too runny, add a bit more powdered sugar (for vanilla glaze) or chill the chocolate glaze slightly. If it’s too thick, gently stir in a little milk or cream to loosen it up. The glazes should be smooth and pipe-friendly, not dripping.
-
How soon can I decorate the cookies after baking?
Let the cookies cool for at least 10 minutes after baking so they’re firm but slightly warm — this helps the glaze set nicely without melting off the warm cookies.
-
Can I make this recipe dairy-free?
You can swap the butter for dairy-free margarine or coconut oil and use a non-dairy chocolate and cream alternative for the glaze. Keep the texture and flavor in mind, but it’s definitely doable!
-
How many cookies does this recipe yield?
This recipe makes around two dozen medium-sized cookies, perfect for sharing with friends or handing out on Halloween night.
Final Thoughts
This Cobweb Halloween Cookies Recipe has become one of my go-to treats for the spooky season, and I’m sure once you try it, you’ll love it just as much as I do. It’s not just about the taste (though these cookies are pretty amazing) — the process of creating those delicate cobweb designs really adds a special touch that’s perfect for Halloween celebrations. Give it a shot and invite some friends or family to help decorate — it’s a great way to make memories while indulging your sweet tooth. Happy baking!
Print
Cobweb Halloween Cookies Recipe
- Prep Time: 20 minutes
- Cook Time: 10-12 minutes
- Total Time: 30-32 minutes
- Yield: Approximately 24 cookies
- Category: Dessert
- Method: Baking
- Cuisine: American
Description
Delightfully festive Cobweb Halloween Cookies featuring buttery sugar cookies topped with alternating vanilla and chocolate glazes piped into spooky spiderweb designs, perfect for Halloween celebrations or themed parties.
Ingredients
Cookie Dough
- 1/2 cup butter, softened
- 1/2 cup shortening
- 3/4 cup granulated sugar
- 1 egg
- 1 tsp vanilla extract
- 2 1/2 cups all-purpose flour
- 1 tsp baking powder
- 1/2 tsp salt
Chocolate Glaze
- 2 cups chocolate chips
- 1 cup heavy whipping cream
- 1/2 cup butter
Vanilla Glaze
- 2 tbsp melted butter
- 1 tsp vanilla extract
- 2 cups powdered sugar
- 4-5 tbsp milk
Instructions
- Preheat and Prepare Baking Sheet: Preheat your oven to 350°F (175°C) and line a baking sheet with parchment paper to prevent sticking and ensure even baking.
- Cream Wet Ingredients: In a large mixing bowl, cream together the softened butter, shortening, and granulated sugar until smooth and fluffy. Add in the egg and vanilla extract and continue mixing until well combined.
- Combine Dry Ingredients: In a separate bowl, whisk together the all-purpose flour, baking powder, and salt to evenly distribute the leavening and salt throughout the flour.
- Make Cookie Dough: Gradually add the dry ingredients into the wet mixture and mix until a uniform dough forms. Be careful not to overmix to keep the cookies tender.
- Shape Cookies: Scoop out dough balls measuring about 1.5 tablespoons each. Place them spaced apart onto the prepared baking sheet. Using the bottom of a glass sprayed with non-stick spray, gently press and flatten each dough ball to about 1/4 inch thickness.
- Bake Cookies: Bake in preheated oven for 10-12 minutes until edges are lightly golden. Allow cookies to cool on the baking sheet for a few minutes before transferring them to a wire rack to cool completely.
- Prepare Chocolate Glaze: In a microwave-safe glass bowl, heat the butter and heavy cream for 1 minute and 30 seconds. Add the chocolate chips and cover the bowl with a small plate. Let it sit for 5 minutes, then whisk until the mixture is smooth, shiny, and fully combined. Transfer 3-4 tablespoons of this glaze into a small sandwich bag and cut a small corner when ready to pipe.
- Prepare Vanilla Glaze: Melt butter and combine with vanilla extract, powdered sugar, and enough milk to create a smooth, spreadable glaze. Place 3-4 tablespoons of vanilla glaze into a small sandwich bag and cut a corner for piping.
- Create Cobweb Design: Spoon about 1 tablespoon of one glaze onto a cooled cookie. Pipe the opposite glaze in concentric circles of increasing size starting from the center, being careful not to touch adjacent circles. Using a toothpick, drag lines from the center outward through all the circles to create a spiderweb effect. Work on only 2-3 cookies at a time to decorate before the icing sets. Alternate starting glaze (vanilla or chocolate) for different cookies for contrast.
- Set and Store: Allow the icing to set completely for a few minutes. Once dry, store cookies in an airtight container. These cookies can be prepared ahead of time and are safe to stack after the icing has fully set.
Notes
- Flatten cookies with a non-stick sprayed glass bottom for even thickness and shape.
- Do not attempt to decorate too many cookies at once; the glaze sets quickly, and working in small batches ensures better design control.
- If needed, adjust milk quantity in vanilla glaze to achieve the correct consistency for piping.
- Cookies can be stored in an airtight container at room temperature for up to one week.
- This recipe yields about 24 cookies depending on cookie size.
Nutrition
- Serving Size: 1 cookie
- Calories: 160
- Sugar: 12g
- Sodium: 75mg
- Fat: 9g
- Saturated Fat: 5g
- Unsaturated Fat: 3g
- Trans Fat: 0g
- Carbohydrates: 20g
- Fiber: 1g
- Protein: 2g
- Cholesterol: 25mg


