
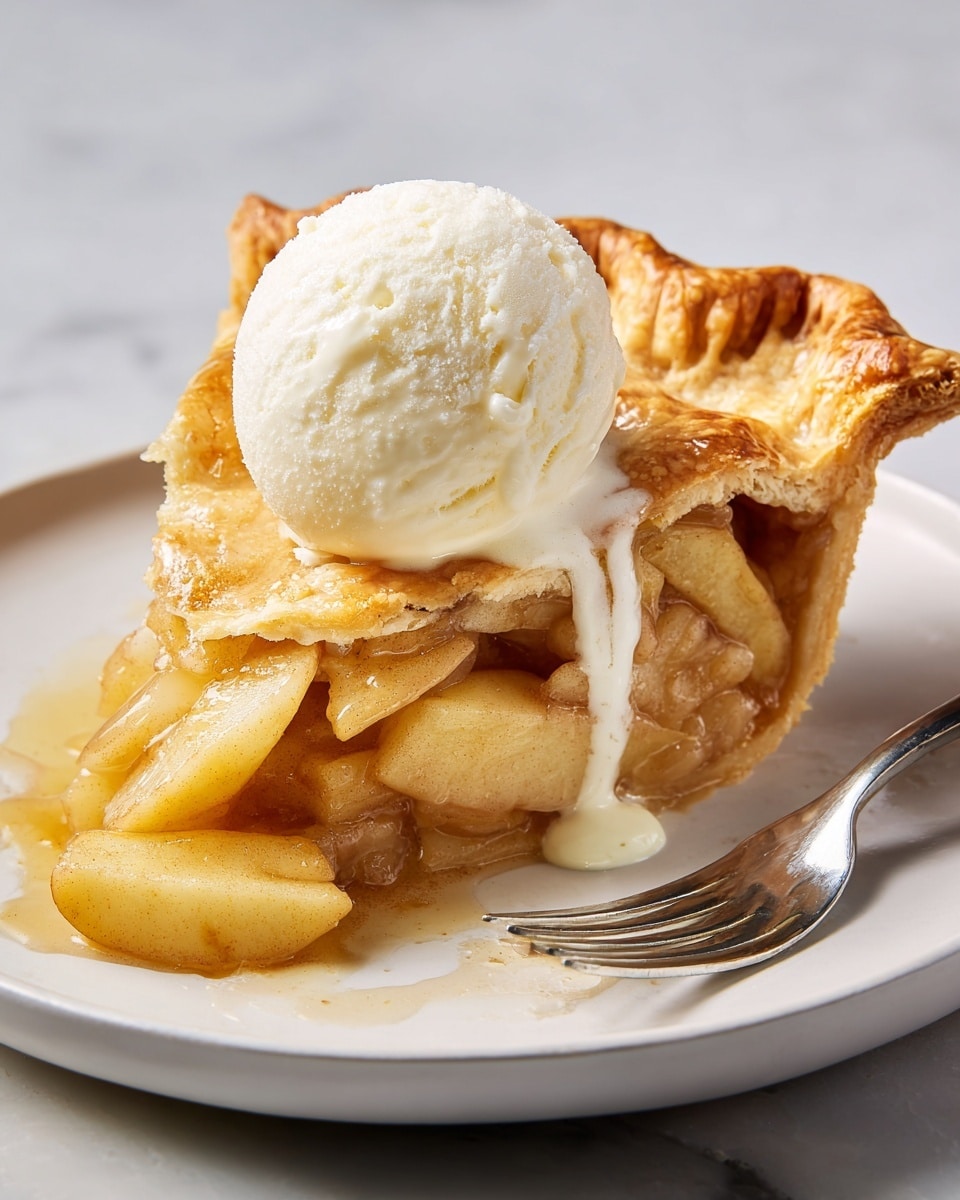
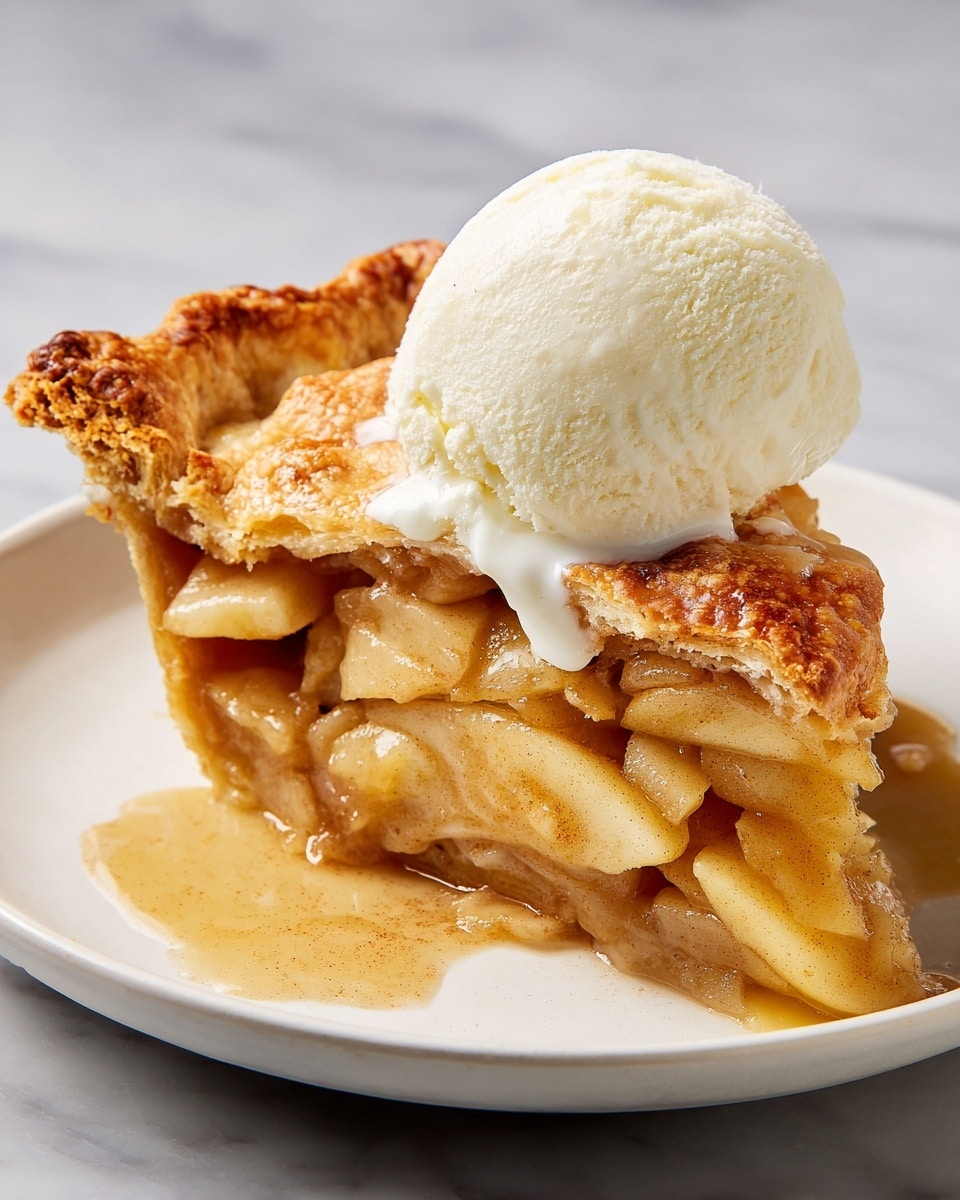
I absolutely love this Classic Homemade Apple Pie Recipe because it brings together the perfect balance of sweet and tart apples wrapped in a flaky, buttery crust. Every time I make it, the warm aroma fills my kitchen and feels like a cozy hug on a chilly day. Whether you’re baking to impress guests or simply craving some comfort food, this pie never disappoints.
When I first tried this recipe, I was amazed by how straightforward it was to get such a bakery-quality pie at home. You’ll find that using a mix of apples like Granny Smith, Honeycrisp, and Gala adds a fantastic depth of flavor and texture. It’s definitely a recipe worth having in your back pocket for fall gatherings, holidays, or any time you want to treat yourself.
Why You’ll Love This Recipe
- Perfect Apple Blend: Combining tart and sweet apples gives your pie a complex, irresistible flavor.
- Flaky, Buttery Crust: Chilling the dough ensures a tender, crispy crust that holds the filling beautifully.
- Simple Steps: The straightforward method makes it approachable, even if you’re new to baking pies.
- Make-Ahead Friendly: You can prepare the crust ahead of time to save stress on baking day.

Ingredients You’ll Need
Every ingredient in this Classic Homemade Apple Pie Recipe has its role to play, from the crisp apples to the dash of cinnamon that wraps everything in warmth. Using fresh ingredients will really make your pie shine, so choose your apples carefully and pick quality butter for the crust.
- Assorted apples: I recommend a mix of Granny Smith for tartness, Honeycrisp for sweetness, and Gala for balance and texture.
- Granulated sugar: Sweetens the filling evenly without overpowering the apples’ natural flavor.
- All-purpose flour: Helps thicken the filling and gives structure to the crust.
- Fresh lemon juice: Brightens the flavors and prevents apples from browning.
- Ground cinnamon: Adds a warm, cozy spice that’s classic in apple pies.
- Pure vanilla extract: Just a splash elevates the aroma and enriches the filling.
- Kosher salt: Balances sweetness and enhances all the flavors.
- Unsalted butter: Use for the filling dots and in the crust for that flaky richness.
- Pie crust dough: Two batches chilled well for easy rolling and perfect texture.
- Egg: For an egg wash that gives the crust a glossy, golden finish.
- Water (for egg wash): Thins the egg to brush smoothly.
- Coarse sugar: Sprinkled on top for a little sparkle and crunch after baking.
Variations
I love that this Classic Homemade Apple Pie Recipe is so versatile—you can easily tweak it to suit different tastes or dietary needs. I often experiment with add-ins or crust styles depending on the occasion.
- Spiced Up: Adding a pinch of nutmeg or ground cloves creates a deeper spiced flavor that feels extra festive in the fall.
- Gluten-Free Crust: I’ve swapped the regular crust for a gluten-free version with great success by using a blend of almond and rice flours.
- Double Crust vs. Lattice: For a beautiful twist, try a lattice top to show off the bubbling apples underneath.
- Reduced Sugar: You can cut back on sugar slightly if you prefer a less sweet pie, especially if your apples are very sweet.
How to Make Classic Homemade Apple Pie Recipe
Step 1: Prep the Apple Filling
Start by peeling, coring, and thinly slicing your apples—getting them uniform helps them cook evenly. Toss them with sugar, flour, lemon juice, cinnamon, vanilla, and salt in a big bowl. I always make sure the lemon juice is fresh because it really keeps the apples bright and stops browning. Set this mixture aside so the flavors meld while you prepare the crust.
Step 2: Roll Out and Fit the Bottom Crust
On a lightly floured surface, roll one dough disc into about a 12-inch circle. I like to use my rolling pin to carefully lift and place the dough into a 9-inch pie dish without stretching it, which can cause shrinkage later. Let the dough relax in the fridge for 30 minutes to keep it from shrinking in the oven—this little trick saved me many times when I was starting out!
Step 3: Fill and Dot with Butter
Transfer the apple filling into your chilled crust, spreading it out evenly. Then, dot the surface with small pieces of unsalted butter. This adds richness and helps create a luscious filling as it melts while baking.
Step 4: Top Crust, Egg Wash, and Venting
Roll the second dough batch out into another 12-inch circle. Place it gently over the apples, trim the edges to about 1 inch, then fold and crimp to seal. Brush the crust with an egg wash made from beaten egg and water to get that golden shine. Don’t forget to cut 5 or 6 small slits in the center for steam to escape—trust me, this prevents soggy spots or bursts during baking.
Step 5: Bake to Perfect Golden Brown
Preheat your oven to 425ºF with a baking sheet on the center rack—placing the pie on this hot sheet helps crisp the bottom crust. Bake the pie for 20 minutes at this high temperature, then reduce to 375ºF for another 40 minutes or so. If the edges start to darken too quickly, cover them loosely with foil to keep your crust evenly baked and beautiful.
Step 6: Cool and Serve
Once baked, move your pie to a wire rack and let it cool for at least 2 hours. This cooling time is key—it lets the filling set so slices come out clean and your pie is easier to enjoy without falling apart.
Pro Tips for Making Classic Homemade Apple Pie Recipe
- Chilling the Dough: Always chill your pie dough well before rolling to prevent shrinking and help achieve flakiness.
- Mixing Apples: I learned that combining tart and sweet apples gives the best texture and flavor balance.
- Steam Vents Matter: Cutting enough vents avoids soggy crust by letting steam escape efficiently during baking.
- Don’t Skip Cooling: Letting your pie cool properly makes slicing neater and enhances the apple filling’s texture.
How to Serve Classic Homemade Apple Pie Recipe
Garnishes
I love to top each slice with a scoop of good vanilla ice cream — classic, right? Sometimes, a drizzle of warm caramel sauce or a sprinkle of cinnamon sugar adds just the right finishing touch. Fresh whipped cream is another favorite that complements the pie’s warm spices beautifully.
Side Dishes
This apple pie pairs perfectly with a hot cup of coffee or spiced tea. If you’re serving it as part of a larger meal, simple salads or roasted nuts work well to balance the richness. For holiday dinners, I like to keep sides light and let the pie shine as the star dessert.
Creative Ways to Present
For a festive occasion, I sometimes cut the pie into mini servings using a cookie cutter after cooling, then garnish each with a small mint leaf or a dusting of powdered sugar. Another fun idea is to bake it in individual ramekins for personal pies that are perfect for gifting or intimate gatherings.
Make Ahead and Storage
Storing Leftovers
I store leftover apple pie covered loosely with foil or plastic wrap in the fridge, where it stays good for up to 4 days. I find the flavors actually deepen a bit after a day, so leftovers can be even better the next day!
Freezing
I’ve frozen this pie both unbaked and baked. For best results, wrap tightly in plastic wrap and foil to avoid freezer burn. When ready to enjoy, thaw overnight in the fridge and reheat—more on that next!
Reheating
To reheat, I cover the pie loosely with foil and bake at 350ºF for about 15-20 minutes until warmed through. This brings back the crust’s crispness without drying out the filling. You can also microwave a slice for a quick warm treat, but baking is the best for texture.
FAQs
-
What apples work best in a Classic Homemade Apple Pie Recipe?
Using a mix of sweet and tart apples like Granny Smith, Honeycrisp, and Gala gives your pie a well-balanced flavor and texture. Tart apples hold their shape well, while sweeter ones add natural sweetness.
-
Can I make the pie crust from scratch?
Absolutely! Making your own pie crust adds incredible flavor and flakiness. Just be sure to chill the dough before rolling to prevent shrinking and maintain texture.
-
How long should I bake apple pie for?
This recipe bakes the pie at 425ºF for 20 minutes then reduces to 375ºF for about 40 more minutes. This two-step baking ensures a golden crust and bubbly filling.
-
Can I freeze apple pie?
Yes! You can freeze apple pie either before or after baking. Wrap it tightly to preserve freshness, and thaw overnight before reheating for best quality.
Final Thoughts
This Classic Homemade Apple Pie Recipe has become a true favorite in my kitchen, not just for its delightful flavors but because it’s a comforting tradition that brings family and friends together. I really encourage you to try it—you’ll be amazed at how satisfying it is to create such a timeless dessert from scratch. Trust me, once you master this one, it’s going to be your go-to for special occasions and those peaceful weekend moments alike.
Print
Classic Homemade Apple Pie Recipe
- Prep Time: 45 mins
- Cook Time: 1 hr
- Total Time: 4 hrs 45 mins
- Yield: 8 servings
- Category: Dessert
- Method: Baking
- Cuisine: American
- Diet: Vegetarian
Description
This classic homemade apple pie features a perfect balance of tart and sweet apples combined with a delicate cinnamon-spiced filling and wrapped in a flaky, golden-brown double crust. It’s a timeless dessert ideal for gatherings or cozy fall evenings, with a luscious filling made from a mix of Granny Smith, Honeycrisp, and Gala apples and a buttery flaky crust baked to perfection.
Ingredients
Filling
- 3 1/2 lb. assorted apples (such as Granny Smith, Honeycrisp, and/or Gala), cored, peeled, thinly sliced
- 2/3 cup granulated sugar
- 2 Tbsp. all-purpose flour
- 2 Tbsp. fresh lemon juice
- 1 tsp. ground cinnamon
- 1/2 tsp. pure vanilla extract
- 1/4 tsp. kosher salt
- 2 Tbsp. unsalted butter, cut into small pieces
Crust and Assembly
- 2 batches pie crust, made and chilled at least 2 hours
- All-purpose flour, for rolling
- 1 large egg
- 1 Tbsp. water
- Coarse sugar, for sprinkling
Instructions
- Prepare the Filling: In a large bowl, toss together the sliced apples, granulated sugar, flour, fresh lemon juice, ground cinnamon, vanilla extract, and kosher salt until everything is well combined and the apples are evenly coated.
- Transfer to Pie Dish: Pour the apple mixture into your prepared pie dish, then evenly dot the filling with small pieces of unsalted butter for extra richness and flavor.
- Roll Out Bottom Crust: On a lightly floured surface, roll out one batch of pie dough into a 12-inch circle. Carefully wrap the dough around a rolling pin and unfurl it into a 9-inch pie dish. Lift the edges and allow the dough to slump into the dish naturally without stretching. Refrigerate for 30 minutes or freeze for 10 minutes to set the crust.
- Preheat Oven and Prep Baking Sheet: Place a rack in the center of the oven and preheat to 425°F (220°C). Place a large baking sheet on the rack to heat up; this will help the pie bake evenly and prevent soggy crust.
- Add Top Crust: Roll out the second dough disk on a lightly floured surface into a 12-inch circle. Carefully drape this over the apple filling. Trim any overhang to about 1 inch, then fold and crimp the edges decoratively to seal the pie.
- Apply Egg Wash and Vent: In a small bowl, whisk together the egg and water to create an egg wash. Brush this evenly over the top crust to give it a beautiful golden color. Cut 5 to 6 small slits in the center of the crust to allow steam to escape during baking. Sprinkle the crust with coarse sugar for a delightful crunch and sparkle.
- Bake the Pie: Carefully place the pie dish on the preheated baking sheet and bake at 425°F (220°C) for 20 minutes. Then reduce the oven temperature to 375°F (190°C) and continue baking for about 40 minutes more. If the crust edges begin to brown too quickly, cover them loosely with foil to prevent burning. Bake until the crust is golden brown and the filling is bubbly.
- Cool Before Serving: Remove the pie from the oven and transfer it to a wire rack to cool completely, allowing the filling to set, for at least 2 hours before slicing and serving.
Notes
- Using a mixture of tart and sweet apples like Granny Smith and Honeycrisp adds a balanced flavor and texture to the filling.
- Chilling the dough before baking prevents shrinking and helps achieve a flakier crust.
- Cutting slits in the top crust allows steam to escape, avoiding soggy filling or a bursting crust.
- Cover pie edges with foil if they brown too fast during baking to maintain an even golden crust.
- Allowing the pie to cool completely before slicing helps the filling set and improves serving quality.
Nutrition
- Serving Size: 1 slice (1/8 of pie)
- Calories: 350
- Sugar: 22g
- Sodium: 150mg
- Fat: 15g
- Saturated Fat: 7g
- Unsaturated Fat: 6g
- Trans Fat: 0g
- Carbohydrates: 50g
- Fiber: 4g
- Protein: 3g
- Cholesterol: 40mg


