
If you’ve ever wanted to master a bakery-worthy bread right at home, this Classic French Brioche Recipe is absolutely the way to go. I absolutely love how this brioche turns out—light, buttery, slightly sweet, and with an irresistible fluffy texture that just melts in your mouth. Whether you’re looking to impress guests or just treat yourself to something special during brunch, you’re going to want to read on because this recipe truly nails that authentic French bakery vibe!
Why You’ll Love This Recipe
- Authentic French Flavor: This recipe was developed with a French chef, so it’s truly traditional and bursting with buttery richness.
- Soft, Fluffy Texture: Thanks to a longer kneading process and the right flour, you’ll get that melt-in-your-mouth softness that bakery brioche is known for.
- Perfect for Any Occasion: Whether it’s breakfast, dessert, or a snack, this bread works beautifully with sweet or savory toppings.
- Step-by-Step Tips: I’ve included all my best tricks so you won’t feel overwhelmed, even if you’re new to making enriched doughs.

Ingredients You’ll Need
The ingredients are simple and classic, but each one plays a big role in creating that perfect brioche crumb and flavor. When you use full-fat milk, real butter, and good quality flour, you’ll notice a huge difference in your final loaf.
- Instant or rapid-rise dried yeast: Blooming it first makes the bread softer and gives a better rise—trust me, it’s worth the extra step.
- Full-fat warm milk: Helps activate the yeast and adds richness to the dough.
- Plain or all-purpose flour: Surprisingly better than bread flour here; it results in a softer crumb for the brioche.
- Caster/superfine sugar: Dissolves easily and gives a subtle sweetness without graininess.
- Eggs: Essential for that beautiful yellow color and tender texture—make sure they’re at room temp.
- Salt: Use kosher or cooking salt, but reduce quantity if using table salt as it’s more concentrated.
- Unsalted butter (softened, not melted): This gives the brioche its signature richness; temperature is key here.
- Oil spray: Neutral-flavored for greasing pans—no olive oil here because of its distinct taste.
- Leftover egg for egg wash: Gives your brioche that stunning golden crust.
Variations
While I love the classic version the way it is, sometimes I like to mix it up a bit—brioche is surprisingly versatile, and you can add in your own personal twist depending on what you’re craving.
- Chocolate chip brioche: My family goes crazy for this—just fold in 1/2 cup of dark chocolate chips after the first rise before shaping.
- Herbed brioche: Adding fresh thyme and rosemary to the dough creates an amazing savory loaf perfect for sandwiches.
- Overnight fridge rise: For a slower, deeper flavor, refrigerate the dough overnight after shaping instead of just 1.5 hours.
- Dairy-free adaptation: Swap milk with a rich plant-based milk and use vegan butter; results won’t be quite traditional but still delicious!
How to Make Classic French Brioche Recipe
Step 1: Bloom the Yeast
Start by mixing a teaspoon of sugar with your yeast and warm milk, then cover and set it aside in a cozy spot. Within 10 minutes, you’ll see it turn foamy—this step wakes up the yeast to give you the fluffiest brioche possible. If your yeast doesn’t foam, it’s time for fresh yeast!
Step 2: Mix and Knead the Dough
Using a stand mixer fitted with a dough hook makes this easier but you can also do it by hand if you’re patient. Add your flour, eggs, salt, sugar (minus the sugar for blooming), and that bubbly yeast mixture. Start slow to combine, then knead for a total of around 15 minutes at medium speed—yes, it’s a bit longer than your usual dough, but this longer kneading builds strength in the dough even with all that butter coming later.
Next comes the fun part: slowly add your softened butter in small chunks while mixing. Don’t rush this step; adding it over 1-2 minutes allows the butter to incorporate evenly, forming that unbelievably soft and rich dough. You’ll notice the dough turns sticky and pasty before becoming smooth and elastic after mixing an additional 20 minutes or so.
Step 3: First Rise
Shape your dough into a ball and pop it into a greased bowl. Cover it and let it rise in a warm spot for about 2 hours, or until it doubles in size. I love to check halfway and gently press it to see if it springs back—that tells me the gluten development is on point.
Step 4: Divide and Chill
After that, punch down your dough to release air, fold it a few times, and divide it into three equal balls. Here’s a trick I discovered: popping these into the fridge for 1.5 hours makes shaping a breeze because the dough firms up slightly but stays super soft inside. If you skip this step, expect a stickier mess!
Step 5: Shape and Braid
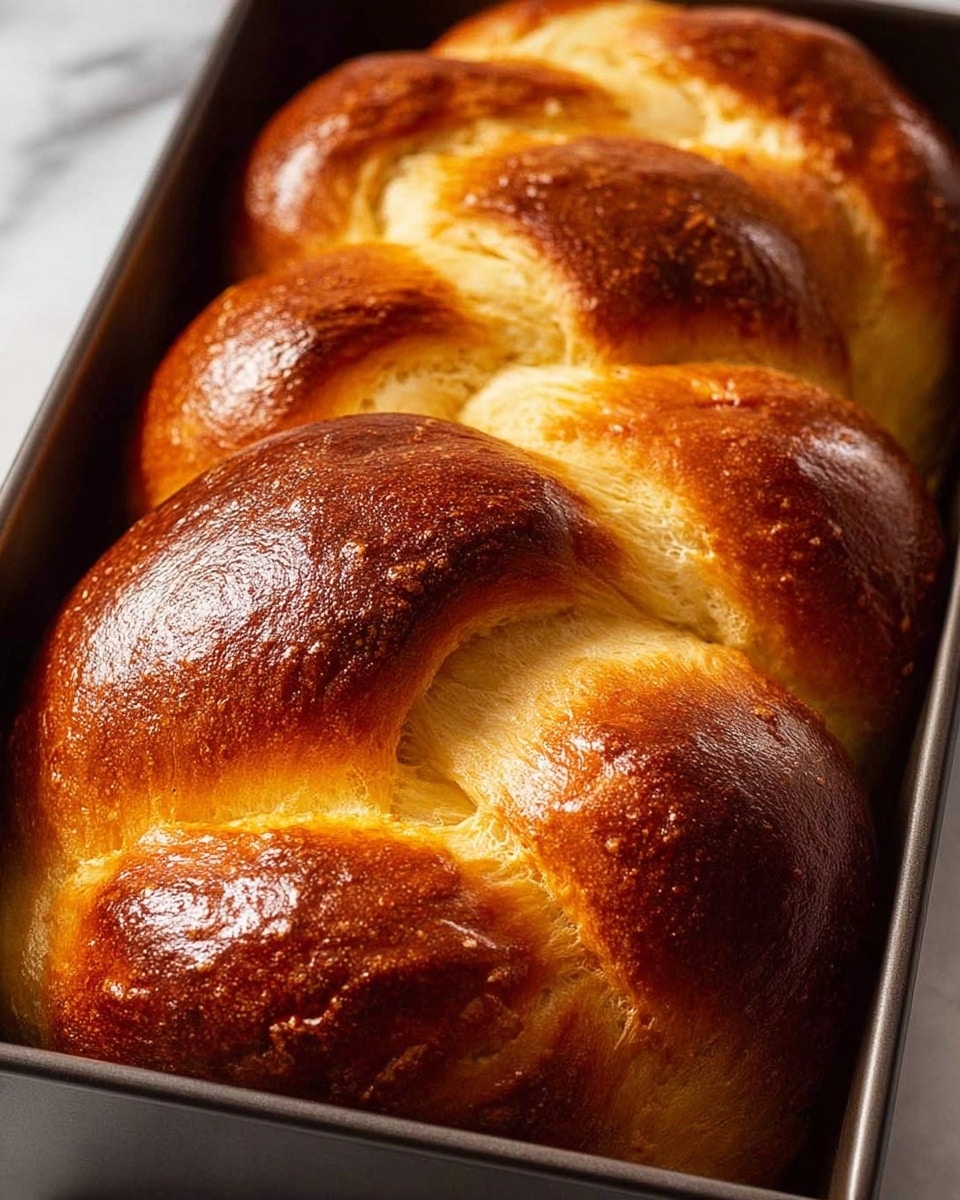
Roll each chilled dough ball into long logs, about 14 inches in length. Then braid the three logs together gently, tucking the ends under to keep everything tidy. Place the braid into a well-greased loaf pan, cover lightly with oiled plastic wrap, and let it rise again for about 3 hours until it nearly doubles in size. This second rise is where you’ll watch your brioche puff up beautifully!
Step 6: Bake to Golden Perfection
Preheat your oven to 200°C (390°F). Just before baking, gently brush your braid with the leftover egg wash to give it that irresistible glossy, golden crust. Bake uncovered for 15 minutes, then tent loosely with foil and bake another 20 minutes until the internal temp hits 88°C (190°F). This two-step bake ensures a perfect crust without burning the butter-rich dough inside.
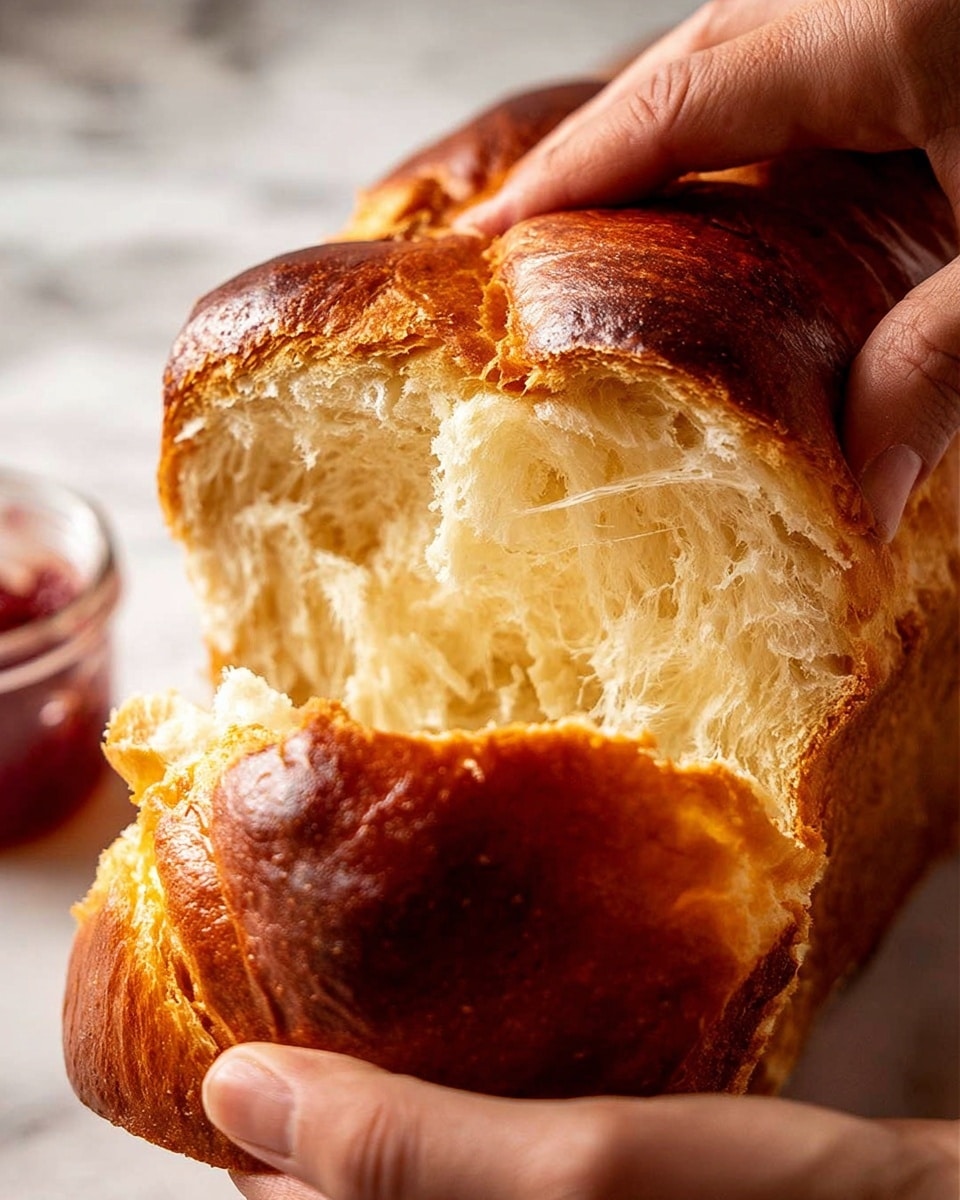
When it’s done, immediately turn the brioche out onto a rack to cool for at least 45 minutes. I know it’s hard to wait but slicing while warm locks in that tender crumb texture.
Pro Tips for Making Classic French Brioche Recipe
- Blooming Yeast Matters: Even though instant yeast doesn’t require blooming, doing this first greatly improves the softness and rise of your brioche.
- Butter Temperature: Softened butter should be just firm enough to handle—too warm and the dough gets greasy, too cold and it won’t incorporate properly.
- Patience with Kneading: This dough requires longer kneading because the fat slows gluten development; don’t rush or your brioche won’t have that perfect structure.
- Fridge Rest for Easy Shaping: Cooling the dough before shaping makes for a smoother surface and much easier handling—it’s a game changer!
How to Serve Classic French Brioche Recipe
Garnishes
I often keep it simple, brushing the warm slices with a little extra butter and a smidge of good jam—apricot or raspberry are my favorites. For something savory, a schmear of soft cheese and a drizzle of honey works wonders. Sometimes I even sprinkle a little sea salt on top right after the egg wash before baking to add a subtle crunch and flavor contrast.
Side Dishes
Classic French brioche pairs beautifully with fresh fruit salads, elegant scrambled eggs, or even a side of smoked salmon for a fancy brunch. Or keep it casual with a bowl of homemade soup—the softness of the brioche balances creamy soups especially well.
Creative Ways to Present
For a special occasion, I like to slice the brioche into thick rounds, toast them lightly, then top with whipped mascarpone and fresh berries for a dreamy dessert. Alternatively, you can slice the loaf horizontally and make a decadent sandwich filled with ham and Gruyère for a French-inspired lunch that feels super indulgent.
Make Ahead and Storage
Storing Leftovers
If you don’t finish your brioche right away (which can definitely happen!), wrap it tightly in plastic wrap and store it at room temperature. It stays fresh for about 2 days thanks to the butter content. I usually keep mine in a bread box to maintain softness, but avoid refrigeration as it can dry out the bread faster.
Freezing
Brioche freezes like a dream! Slice it before freezing so you can just pull out what you need. Wrap slices or the whole loaf tightly in foil and then place them in a zip-top bag. It keeps for up to 3 months and defrosts quickly at room temperature.
Reheating
To refresh the brioche, wrap it in foil and pop it into a 350°F (180°C) oven for 10-15 minutes. This warm-up restores the bread’s softness and revives its buttery aroma like it just came out of the oven.
FAQs
-
Can I use bread flour instead of all-purpose flour for this brioche?
Actually, this Classic French Brioche Recipe works better with all-purpose flour because it creates a softer crumb. Bread flour’s higher protein can make the brioche a bit tougher, which is not the texture you’re aiming for here.
-
Why does the recipe call for such long kneading times?
The enriched dough is high in butter, which inhibits gluten formation. Kneading longer encourages the gluten to develop fully for that soft, fluffy texture. Don’t skip or shorten this step, or your brioche may be dense or crumbly.
-
Is the refrigeration step before shaping necessary?
While optional, refrigerating the dough chills the butter slightly and makes the dough much easier to handle and shape. It also helps create a smoother surface on your brioche, which makes for an attractive loaf.
-
Can I make this brioche without a stand mixer?
You absolutely can, but be prepared for a bit of an arm workout! The key is to knead the dough well to develop gluten. If you have a food processor, that’s a handy alternative as well, just follow the same ingredient order and kneading times.
-
What’s the best way to tell when the brioche is fully baked?
Besides the beautiful deep golden crust, the internal temperature should reach about 88°C (190°F). If you don’t have a thermometer, you can tap the bottom of the loaf—it should sound hollow.
Final Thoughts
This Classic French Brioche Recipe is genuinely one of my favorite bread projects because it’s challenging, rewarding, and the result is something that feels fancy without being complicated. I used to struggle with enriched doughs, but once I discovered these kneading and chilling tricks, my brioche turned out perfect every time. I can’t recommend giving this a go enough—you’ll enjoy every buttery, soft bite and it’s sure to be a hit whether you’re serving it up for guests or keeping it all to yourself. So grab your mixing bowl and let’s bake a little piece of France right in your kitchen!
Print
Classic French Brioche Recipe
- Prep Time: 45 minutes
- Cook Time: 35 minutes
- Total Time: 8 hours 30 minutes
- Yield: 1 loaf (serves approximately 10 people)
- Category: Bread
- Method: Baking
- Cuisine: French
Description
This classic French brioche recipe delivers a rich, tender, and buttery bread with a delicate crust and a soft, fluffy crumb. The dough is enriched with butter and eggs, carefully kneaded for gluten development, then shaped into a braided loaf and baked to golden perfection. Perfect for breakfast, brunch, or as a base for sweet and savory dishes, this brioche boasts a subtle sweetness and a luxurious texture that tears apart like cotton candy.
Ingredients
Dough
- 2 1/2 tsp instant/rapid rise dried yeast
- 4 tbsp warm full-fat milk
- 2 cups plain/all purpose flour (not bread flour)
- 3 1/2 tbsp caster/superfine sugar
- 1/2 cup eggs (approx. 2 1/2 eggs), lightly whisked, at room temperature
- 1 tsp cooking/kosher salt (not table salt)
- 150g / 10.5 tbsp unsalted butter, softened and cut into 1.25 cm / 1/2″ pieces
Other
- Oil spray (neutral flavored such as canola or vegetable oil)
- 1/2 leftover egg, lightly whisked (for egg wash)
Instructions
- Bloom yeast: In a small bowl, mix 1 tsp sugar, yeast, and warm milk together. Cover with cling wrap and set aside in a warm place for 10 minutes until the mixture becomes foamy to activate the yeast.
- Make dough: Using a stand mixer fitted with a dough hook, combine the flour, whisked eggs, salt, remaining sugar, and bloomed yeast at Speed 1 until ingredients are combined.
- Initial mixing: Continue mixing at Speed 1 for 5 minutes, then increase to Speed 2 and mix for an additional 10 minutes to develop the gluten.
- Slowly add butter: With mixer still at Speed 2, gradually add butter cubes over 90 seconds to 2 minutes, allowing the fat to be partially incorporated while mixing.
- Incorporate butter fully: Keep mixing at Speed 2 for about 1 minute until butter is fully incorporated. The dough will initially be pasty and sticky.
- Extended mixing: Continue mixing at Speed 2 for 20 minutes, scraping down the sides of the bowl regularly. The dough should become soft, elastic, and come together around the dough hook, passing the “window pane” test.
- First rise: Form dough into a ball and place back into the stand mixer bowl. Cover with cling wrap and let rise in a warm place for 2 hours until doubled in size.
- Divide and shape: Punch down dough to release air. Turn out onto a lightly floured surface, fold edges in six times, shape into a log, then divide into three equal balls (~225g each).
- Chill dough: Place dough balls on oiled parchment in a deep container or roasting pan, cover with cling wrap, and refrigerate for 1.5 hours. This step helps dough handle better and smooths the surface.
- Braid dough: Remove dough from fridge, roll each ball into 35 cm / 14″ logs. Braid the three logs and tuck ends under neatly.
- Prepare loaf pan: Spray an 21.5 x 11 cm (8.5 x 4.3″) loaf pan with oil spray, place braided dough inside. Lightly oil cling wrap and cover dough.
- Second rise: Let the dough rise in a warm place for 3 hours or until just over doubled in size.
- Preheat oven: When dough is nearly ready, preheat oven to 200°C / 390°F (180°C fan) and position oven rack in the lowest third.
- Egg wash: Gently brush the surface of the brioche with the leftover whisked egg to achieve a glossy crust.
- Bake uncovered: Bake the brioche uncovered for 15 minutes until deeply golden brown.
- Bake covered: Remove from oven, cover loosely with foil, and bake for another 20 minutes until internal temperature reaches 88°C / 190°F.
- Cool: Immediately turn the brioche out of the pan onto a cooling rack. Allow it to cool for at least 45 minutes before slicing or tearing to serve while still warm.
- Serving suggestion: Serve warm with butter and jam or toast slices. Brioche can also be enjoyed in various sweet and savory preparations as per taste.
Notes
- Use instant yeast activated by blooming in warm milk for a softer, higher-rise loaf; dry active yeast works similarly at equal quantities.
- Full fat/whole milk improves dough texture.
- All-purpose flour yields a softer crumb than bread flour in brioche.
- Caster sugar integrates better but granulated sugar can substitute.
- Accurate egg measurement ensures dough consistency and is key for proper texture.
- If only table salt is available, reduce salt quantity to 3/4 tsp.
- Butter should be softened but not melting to avoid greasy dough.
- Long kneading is necessary to develop gluten affected by high-fat dough.
- Perform the window pane test to confirm proper gluten development; knead longer if dough breaks.
- Add butter gradually for optimal incorporation.
- If dough is too sticky after mixing, add flour one tablespoon at a time; if too crumbly, add warm milk carefully or restart.
- The fridge step is optional but improves handling and appearance.
- Second rise should result in dough rising about 1 cm above the pan rim.
- Bake brioche to an internal temperature of 88°C to accommodate the enriched dough.
- To reheat, wrap loaf in foil and warm at 180°C for 10-15 minutes.
- Brioche freezes well up to 3 months; thaw and reheat before serving.
- A food processor method exists for faster dough preparation.
- Overnight refrigerated rise of divided dough is possible, extending second rise to about 4 hours.
- Recipe source: collaboration with French chef Jean-Baptiste Alexandre and classic culinary references.
Nutrition
- Serving Size: 1 slice (1/16th of loaf)
- Calories: 210
- Sugar: 4 g
- Sodium: 150 mg
- Fat: 11 g
- Saturated Fat: 7 g
- Unsaturated Fat: 3 g
- Trans Fat: 0 g
- Carbohydrates: 22 g
- Fiber: 1 g
- Protein: 5 g
- Cholesterol: 60 mg


