
If you’ve ever wished for that perfect buttery, melt-in-your-mouth cookie that feels both nostalgic and timeless, then you’re in for a real treat because this Classic Butter Cookies Recipe is just that. I absolutely love how these cookies strike the perfect balance between crisp edges and tender centers. When I first tried this recipe, it quickly became a go-to for holidays and cozy afternoons. Stick around, and I’ll share all my secrets to help you get these just right every time.
Why You’ll Love This Recipe
- Simple Ingredients: You probably already have everything in your pantry, making this an easy bake anytime.
- Perfect Texture: The cookies come out crisp on the edges but tender and buttery inside — just like grandma used to make.
- Customizable: You can dress these up with chocolate, sprinkles, or even a hint of citrus zest to make them your own.
- Make Ahead Friendly: Dough chills beautifully, and you can store the baked cookies for days without losing that fresh-baked appeal.

Ingredients You’ll Need
These ingredients work together to create that classic rich, buttery flavor and the perfect cookie consistency. I always recommend using real butter — it really makes a difference — and be sure to use room temperature items so everything blends smoothly.
- Unsalted Butter: Softened to room temperature for easy creaming and rich flavor without extra salt.
- White Granulated Sugar: Just the right sweetness and helps with that nice crisp edge.
- Pure Vanilla Extract: Adds depth and warmth — never sub with imitation if you can help it.
- Egg: I always let mine warm up to room temp to ensure even mixing and fluffiness.
- All-Purpose Flour: Spoon and level to avoid packing in too much flour that can make cookies dry.
- Salt: Balances the sweetness and enhances the buttery flavor.
- Milk: Just enough to loosen the dough for piping, making it silky and easy to shape.
Variations
I love tinkering with this Classic Butter Cookies Recipe to suit whatever mood I’m in or occasion I’m baking for. It’s easy to add flavors or toppings that feel festive and fun.
- Lemon Zest Twist: Adding fresh lemon zest to the dough gives it a bright, summery note — my family goes crazy for this fresh flavor in spring!
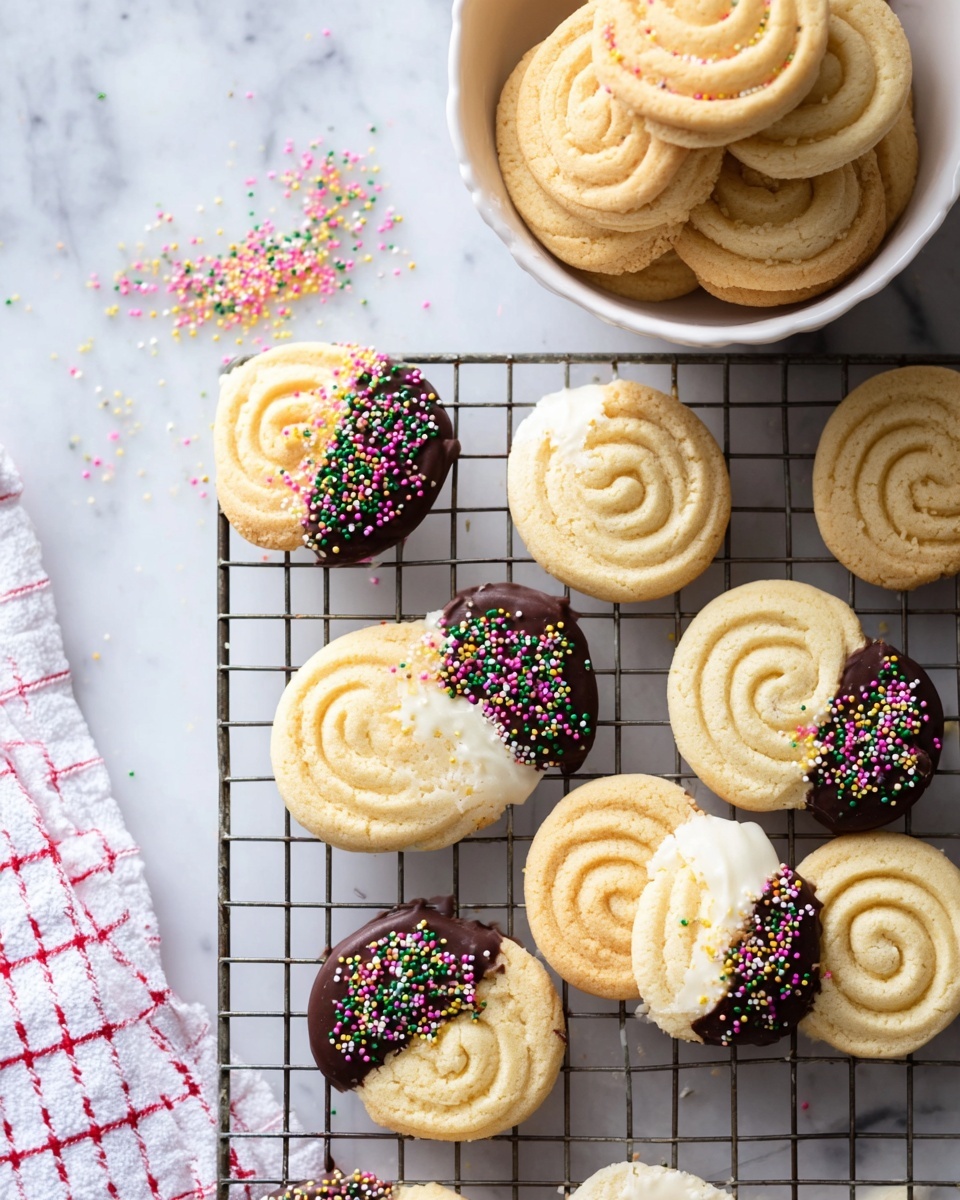
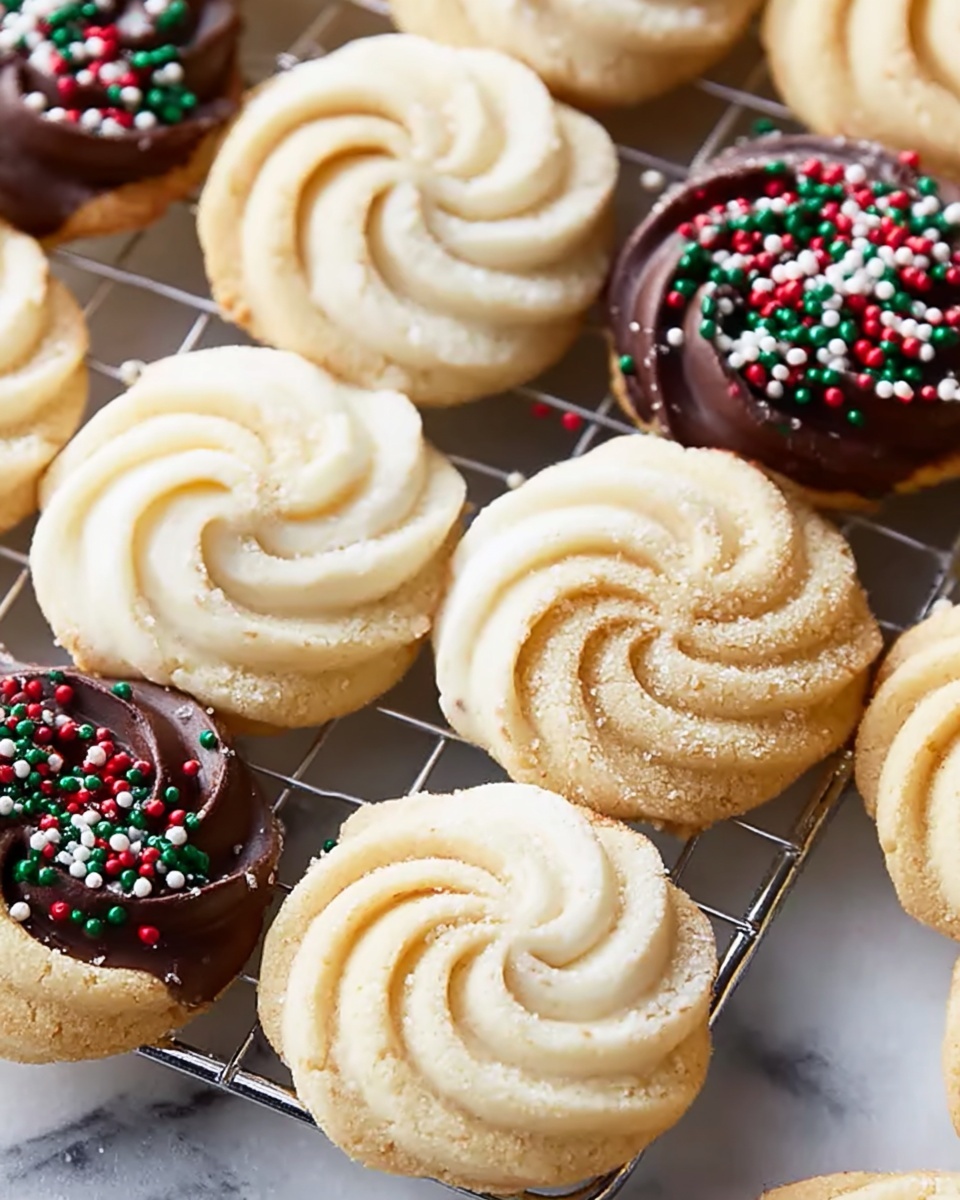
- Chocolate Dipped: Once cooled, dip these in melted dark or milk chocolate and sprinkle with sea salt or festive sprinkles for an elegant finish.
- Almond Extract Boost: Try swapping half the vanilla for almond extract for an old-fashioned bakery vibe.
- Gluten-Free: Substitute with a gluten-free flour blend and adjust the milk a bit to get the perfect piping consistency.
How to Make Classic Butter Cookies Recipe
Step 1: Cream Butter and Sugar Until Fluffy
Start by softening your butter completely — I usually take it out of the fridge about an hour before baking. Beat the butter and sugar together on medium speed for about 2 minutes until you get a light, fluffy mixture. This step is crucial because it adds air and creates that melt-in-your-mouth texture. Don’t rush it — scraping the bowl down halfway ensures everything gets evenly mixed.
Step 2: Add Egg and Vanilla
Next, add your egg and vanilla extract while mixing at a higher speed. I love how this combination boosts flavor and tenderizes the dough. Scrape down the sides once more so no bits are left behind.
Step 3: Mix in Dry Ingredients
Turn mixer to low and add the salt and flour. The dough will look crumbly at first, but don’t be tempted to add more liquid yet. Increase to high speed and beat until fully combined. The texture should be creamy and thick, almost pipe-able, but not runny. Slowly beat in 1 ½ tablespoons of milk. If it’s still too stiff to pipe, add a little more milk, up to 2 ½ tablespoons.
Step 4: Pipe or Scoop the Dough and Chill
Transfer the dough to a piping bag fitted with a large star tip to create those signature swirls. Pipe 1 to 2-inch swirls onto your prepared baking sheets, spacing them about two inches apart. If piping isn’t your thing, use a cookie scoop instead. Here’s a trick I learned — chilling the dough in the fridge on the baking sheet for 30 minutes helps the cookies hold their shape and bake evenly without spreading too much.
Step 5: Bake and Cool
While the dough chills, preheat your oven to 350°F (177°C) with the rack in the center. Bake the cookies for 12 to 15 minutes or until the edges start to turn a soft golden brown. If your oven tends to run hot, start checking at 12 minutes. Once out, let them cool on the baking sheet for about 5 minutes before transferring to a wire rack to cool completely.
Step 6: Optional Chocolate Dip
If you’re feeling fancy, melt some chocolate chips in the microwave in 30-second bursts, stirring in between. Dip the cooled cookies halfway and add your favorite sprinkles or a pinch of sea salt. Let them set either at room temperature for an hour or pop them in the fridge for 20 minutes. Trust me, this makes them a crowd-pleaser at parties.
Pro Tips for Making Classic Butter Cookies Recipe
- Use Room Temperature Ingredients: This helps everything blend smoothly and results in a uniform dough texture.
- Don’t Skip Chilling: Chilling the piped dough ensures cookies keep their shape and prevents them from spreading too thin.
- Watch Your Oven: Oven temperatures vary — start checking around 12 minutes to avoid over-baking and keep that tender center.
- Piping Bag Hack: If you don’t have a piping bag, use a zip-top bag with the corner snipped off for easy shaping.
How to Serve Classic Butter Cookies Recipe
Garnishes
I usually keep it simple with a light dusting of powdered sugar or a quick dip in chocolate, but for holiday parties, decorating with colorful sprinkles or edible glitter adds a festive touch that kids—and adults—absolutely adore.
Side Dishes
These butter cookies pair beautifully with a cozy cup of tea or a rich hot cocoa, especially during chilly evenings. For brunches or afternoon teas, serve alongside fresh fruit or a cheese board for a delightful sweet contrast.
Creative Ways to Present
One year, I arranged them in festive shapes on a holiday platter—think wreaths or snowflakes—and tied bundles of a few cookies with rustic twine as edible gifts. They make charming party favors and an unforgettable centerpiece!
Make Ahead and Storage
Storing Leftovers
I store leftover cookies in an airtight container at room temperature for up to a week. To keep them from getting soggy, I add a piece of crusty bread in the container—it absorbs excess moisture beautifully and keeps the cookies crisp!
Freezing
You can freeze both the dough (before baking) and the baked cookies. For dough, pipe onto a baking sheet, freeze until solid, then transfer to a freezer bag. When ready, bake from frozen—just add a couple extra minutes. Baked cookies freeze well in airtight tins; just thaw at room temperature before serving.
Reheating
If you want to freshen up your cookies, pop them in a 300°F oven for 3-5 minutes or microwave them for about 10 seconds. This warms up the butter just enough to bring back that homemade taste and slightly soften the cookies without making them greasy.
FAQs
-
Can I use salted butter instead of unsalted butter?
You can, but you should reduce or omit the added salt in the recipe to avoid making your cookies too salty. Unsalted butter gives you better control over the final flavor.
-
Why do I need to chill the dough before baking?
Chilling helps the dough firm up so the cookies keep their shape and develop a better texture when baked. It also prevents spreading, resulting in nicely defined cookies.
-
Can I make these cookies gluten-free?
Absolutely! Substitute the all-purpose flour with a gluten-free blend, and adjust the milk slightly if needed for the right dough consistency. Just make sure your blend contains xanthan gum for structure.
-
How long will these cookies keep fresh?
Stored properly in an airtight container at room temperature, they stay fresh for about a week. You can also freeze them to enjoy later for up to 2 months.
Final Thoughts
This Classic Butter Cookies Recipe is truly close to my heart—it’s the kind of treat that makes your kitchen smell like happy memories and fills your heart as much as your plate. Whether you’re baking for a holiday gathering, a simple afternoon coffee, or gift-giving, these cookies never fail to impress. I can’t wait for you to try them and experience that cozy, buttery goodness that always brings a smile. Happy baking, my friend!
Print
Classic Butter Cookies Recipe
- Prep Time: 20 minutes
- Cook Time: 14 minutes
- Total Time: 64 minutes
- Yield: 24 cookies
- Category: Dessert
- Method: Baking
- Cuisine: American
Description
Old Fashioned Butter Cookies are a classic treat cherished for their crisp edges and tender centers. Perfect for the holiday season or any special occasion, these cookies are simple to prepare and feature a rich buttery flavor with a hint of vanilla. This recipe includes instructions for piping elegant swirls or using a cookie scoop, resulting in beautiful, delicious cookies that are ideal for gifting or sharing at cookie exchanges.
Ingredients
Main Ingredients
- 1 cup unsalted butter (softened to room temperature)
- ¾ cup white granulated sugar
- 2 teaspoons pure vanilla extract
- 1 large egg (room temperature)
- 2 ¼ cups all-purpose flour (spooned and leveled)
- ½ teaspoon salt
- 1-2 tablespoons milk
Instructions
- Prepare Dough: In a large bowl, cream together the softened butter and granulated sugar using a hand or stand mixer with the paddle attachment on medium speed until light and fluffy, about 2 minutes. Scrape down the bowl to incorporate all ingredients evenly.
- Add Egg and Vanilla: Mix in the egg and vanilla extract at high speed until fully combined, scraping down the bowl again to ensure uniform mixing.
- Incorporate Dry Ingredients: Add the salt and all-purpose flour to the wet mixture, mixing on a low speed until just combined. Then increase to high speed and beat until the dough forms and is cohesive.
- Adjust Dough Consistency: On medium speed, gradually beat in 1½ tablespoons of milk to achieve a creamy, pipe-able (but thick) dough. Add up to 2½ tablespoons if needed to reach the right texture.
- Pipe or Scoop Dough: Transfer the dough into a piping bag fitted with a large star tip and pipe 1-2 inch swirls onto baking sheets lined with parchment paper or silicone mats, spacing them about 2 inches apart. Alternatively, use a cookie scoop to drop dough onto the sheet.
- Chill Dough: Refrigerate the shaped dough on the baking sheets for 30 minutes to firm up; this helps cookies retain their shape during baking.
- Preheat Oven: Set the oven to 350°F (177°C) and arrange the rack in the center position.
- Bake Cookies: Bake chilled cookies for 12-15 minutes until the edges just begin to turn golden brown.
- Cool: Allow cookies to cool on the baking sheet for 5 minutes before transferring them to a wire rack to cool completely.
- Optional Chocolate Decoration: Melt chocolate morsels in a microwave-safe bowl using 30-second intervals, stirring after each until smooth. Dip cooled cookies in melted chocolate and sprinkle with toppings if desired. Let set at room temperature for 1 hour or refrigerate for 20 minutes.
Notes
- These butter cookies are a traditional holiday favorite, known for their crunchy yet tender texture.
- The dough chilling step is essential to maintain the piped shape while baking.
- You can customize the cookies by dipping them in chocolate and decorating with sprinkles for festive occasions.
- The recipe makes approximately 24 cookies, perfect for sharing or gifting.
Nutrition
- Serving Size: 1 cookie
- Calories: 138
- Sugar: 6 g
- Sodium: 53 mg
- Fat: 8 g
- Saturated Fat: 5 g
- Unsaturated Fat: 2.4 g
- Trans Fat: 0.3 g
- Carbohydrates: 15 g
- Fiber: 0.3 g
- Protein: 2 g
- Cholesterol: 27 mg


