
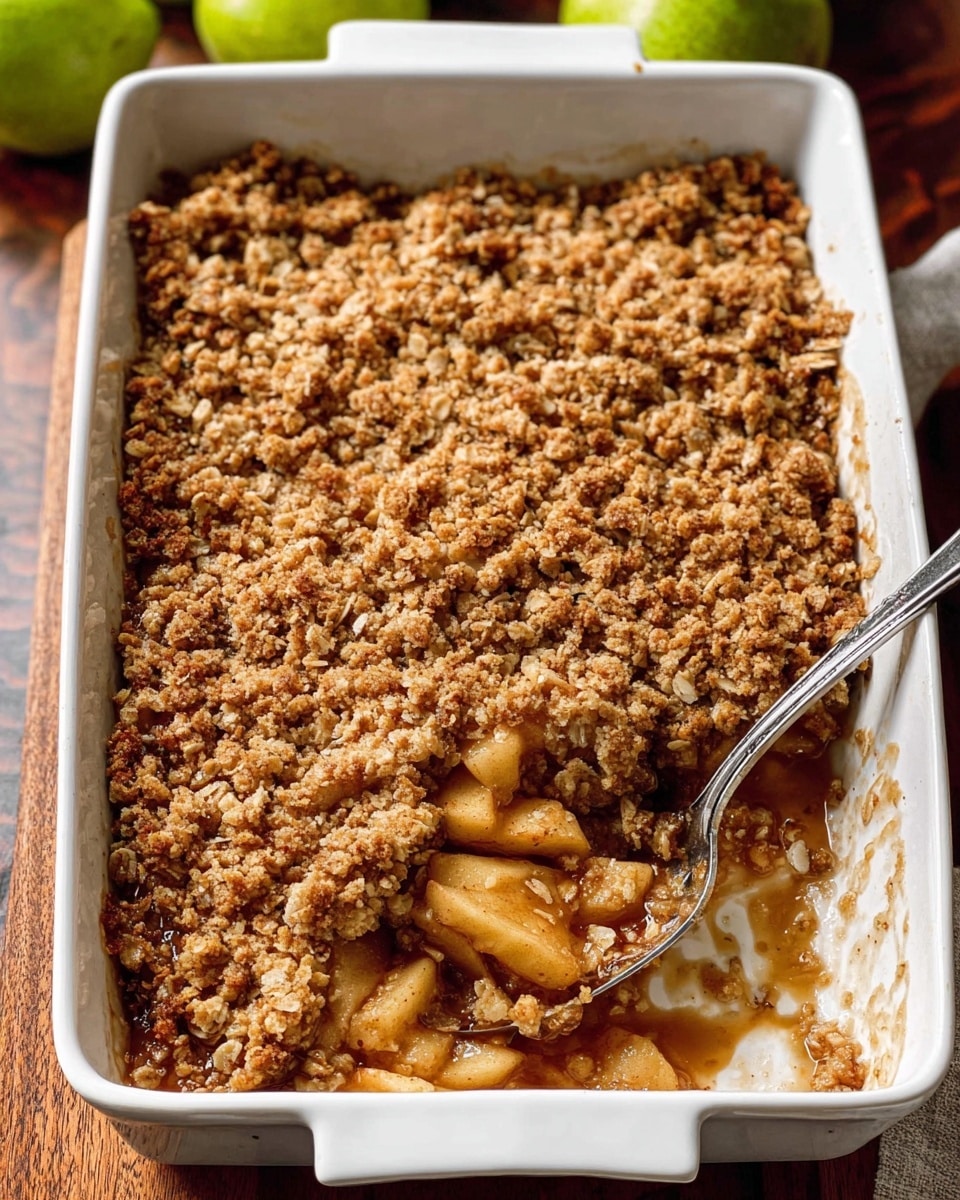
I absolutely love this Classic Apple Crisp Recipe because it hits that perfect balance between tart, tender apples and a buttery, crunchy oat topping. Whenever the weather cools down, this dessert becomes my go-to comfort food — it’s like a warm hug on a plate. You’ll find that this recipe is super simple but feels like you spent hours in the kitchen, making it a fantastic choice for casual family dinners or special gatherings.
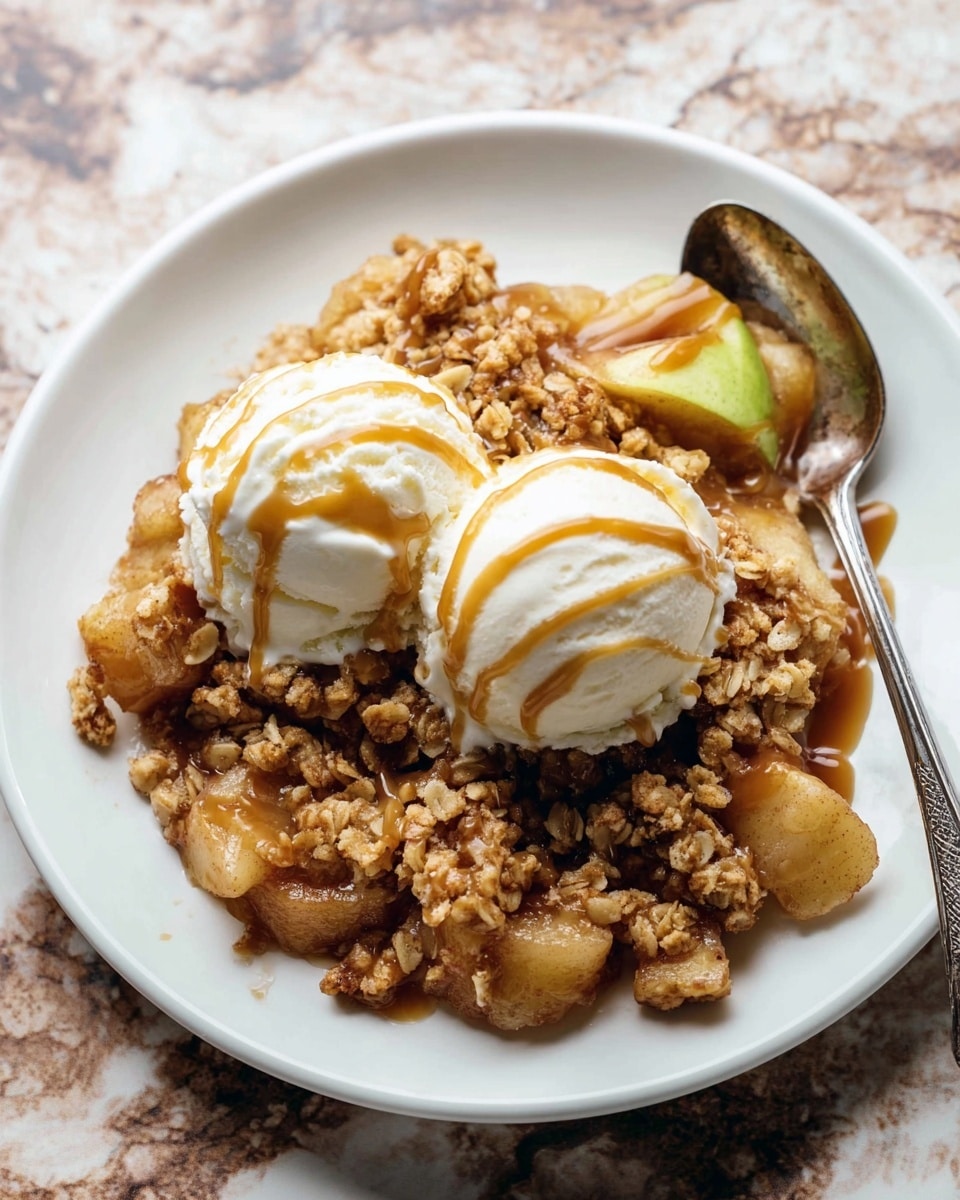
What makes this Classic Apple Crisp Recipe special is its versatility and the cozy flavors that just scream fall. The combination of cinnamon, nutmeg, and vanilla creates a deeply satisfying aroma, and the crisp topping adds the ideal amount of texture. Whether you serve it warm with a scoop of vanilla ice cream or enjoy it plain, it’s always a hit — I promise you, this is one recipe you’ll want on repeat.
Why You’ll Love This Recipe
- Easy to Make: This Classic Apple Crisp Recipe comes together quickly with simple ingredients you likely already have on hand.
- Perfect Texture: The crumbly oat topping contrasts beautifully with soft, juicy apples for a delightful bite every time.
- Customizable: You can easily add nuts or adjust spices to suit your family’s preferences.
- Make-Ahead Friendly: It stores and freezes well, so you can enjoy your apple crisp anytime without the hassle.

Ingredients You’ll Need
The magic of this Classic Apple Crisp Recipe lies in the perfect harmony of fresh apples, warm spices, and a crunchy topping. Choosing the right apples and quality ingredients really makes a difference in flavor and texture.
- Apples: Use a mix of tart Granny Smith and sweeter apples like Pink Lady or Jazz for balanced flavor and texture.
- Brown Sugar: Adds deep sweetness and moisture; dark brown sugar will bring a richer molasses note.
- All-Purpose Flour: Key for both filling thickening and the crisp topping structure.
- Vanilla Extract: Enhances the flavor depth of the apple filling significantly.
- Cinnamon: A classic spice that’s essential for that comforting apple dessert aroma.
- Nutmeg: Just a touch adds warm, nutty complexity to the spice blend.
- Salt: Balances sweetness and highlights the other flavors.
- Unsalted Butter: Cold and cubed for the topping, it creates a flaky and crumbly texture when cut in.
- Rolled Oats: Old-fashioned oats add the signature wholesome crunch; quick oats work in a pinch but change texture slightly.
- Optional Toppings: Salted caramel sauce and vanilla ice cream take this dessert over the top (your guests will thank you!).
Variations
One of my favorite things about this Classic Apple Crisp Recipe is how easily you can make it your own. I like to experiment with additions and tweaks depending on the season or mood — and honestly, that keeps it exciting every time I make it!
- Add Nuts: I often toss in chopped pecans or walnuts to the topping for extra crunch and a toasty flavor; my family goes crazy for that addition.
- Spice it Up: Try adding a pinch of ground cloves or ginger if you want a bit more warmth and holiday vibes.
- Gluten-Free: Swap the all-purpose flour for a gluten-free blend and use gluten-free oats to make this crisp allergy-friendly.
- Fruit Mix: For a twist, half the apples and half pears or berries for a multi-fruit crisp.
How to Make Classic Apple Crisp Recipe
Step 1: Prep Your Apples for Perfect Texture
Start by peeling and chopping your apples into chunks about 1/4 to 1/2 inch thick — this thickness lets them soften during baking but still hold their shape. I find using a sharp veggie peeler speeds up peeling, and toss the pieces into a big mixing bowl as you go to keep everything organized.
Step 2: Mix the Filling Ingredients
Next, add the brown sugar, flour, vanilla, cinnamon, nutmeg, and salt right into your bowl with the apples. Stir everything together gently until all the apple pieces are evenly coated. I remember the first time I made this — not mixing well enough meant some apples were dull in flavor, so take your time here for the best results.
Step 3: Prepare the Crumbly Topping
In another bowl, whisk together the flour, brown sugar, and cinnamon. Then, cutting in cold, cubed butter using a pastry cutter or fork is key — do this until the mixture looks crumbly, like coarse crumbs. Stir in the rolled oats last to add texture. I always chill the butter first, because it helps the topping stay crisp rather than greasy when baked.
Step 4: Bake to Golden Perfection
Spread your apple filling evenly in a greased 9×13-inch baking pan and sprinkle the topping all over. Bake at 350°F (177°C) for about 45 minutes or until the topping is golden and you see the apple juices bubbling around the edges. Keep an eye in the last 10 minutes — the sweet caramelized edges are a sign the crisp is ready! Let it cool for at least 5 minutes before serving to allow the filling to thicken slightly.
Pro Tips for Making Classic Apple Crisp Recipe
- Choose the Right Apples: I’ve learned that mixing tart and sweet apples brings the best flavor and texture balance.
- Don’t Overmix the Topping: When cutting in butter, stop as soon as the mixture forms coarse crumbs to avoid a greasy result.
- Let It Rest Before Serving: Allowing the crisp to cool slightly helps the juices thicken so it’s not runny when you serve.
- Optional Add-Ins: Adding nuts or swapping spices can personalize the crisp to suit your taste without any fuss.
How to Serve Classic Apple Crisp Recipe
Garnishes
I love topping my apple crisp with a dollop of vanilla ice cream or a drizzle of salted caramel sauce — that warm-and-cold contrast is irresistible. Sometimes just a simple sprinkle of chopped toasted pecans adds an extra crunch and eye appeal. You don’t need much more than that to take this humble dessert to the next level.
Side Dishes
When I serve this Classic Apple Crisp Recipe as part of a meal, it pairs wonderfully with cozy sides like spiced cider or even a creamy cinnamon latte. For a heartier dinner, it’s a lovely finale after roasted chicken or pork — the apples feel right at home with those flavors.
Creative Ways to Present
For holiday dinners or gatherings, I sometimes serve the crisp in individual ramekins topped with whipped cream and a sprig of mint for a pretty touch. Another fun idea is scooping the warm crisp into hollowed-out apples – it’s festive and a total conversation starter!
Make Ahead and Storage
Storing Leftovers
I always cover leftover apple crisp tightly and store it in the fridge for up to 5 days. I’ve found that it tastes even better the next day as the flavors meld together, making it perfect for quick desserts during the week.
Freezing
Freezing this apple crisp works beautifully — I’ve frozen both the fully baked crisp and the unbaked assembly. Just thaw overnight in the fridge, then bake or reheat accordingly. It’s a great way to have a comforting dessert ready whenever you want without having to start from scratch.
Reheating
To reheat leftovers, I like warming them in a 350°F oven for about 15-20 minutes to get the topping crisped back up. Microwaving works if you’re in a pinch, but you might lose some crunch — so for that perfect texture, the oven’s best.
FAQs
-
Can I use other fruits besides apples in this crisp?
Absolutely! While apples are classic, this recipe can be customized with pears, berries, or peaches. For best results, use firmer fruits that won’t turn to mush during baking, and adjust sugar if your fruit is naturally sweet.
-
What’s the best type of apple for baking in this recipe?
I recommend mixing tart Granny Smith apples with sweeter varieties like Pink Lady or Jazz. This combo provides a great balance of tang and sweetness and ensures the apple chunks hold their shape without getting mushy.
-
Can I make this Classic Apple Crisp Recipe vegan?
Yes! Simply swap the butter for a vegan butter substitute or coconut oil. The texture changes a bit, but it’s still delicious and keeps that crisp topping intact.
-
How do I prevent the topping from becoming soggy?
Make sure your butter is cold and cut into the flour-sugar mixture just until crumbly. Also, avoid overmixing the topping and don’t cover the crisp while it’s still warm, so the steam doesn’t soften the topping.
Final Thoughts
This Classic Apple Crisp Recipe really feels like home to me — each time I bake it, I’m reminded of those cozy autumn afternoons with family. I hope once you try it, you’ll find it becoming one of your go-to desserts, too. Don’t hesitate to make it your own with toppings or tweaks; this recipe is forgiving and endlessly delicious. Trust me, you’ll want to keep this one on your recipe list for years to come!
Print
Classic Apple Crisp Recipe
- Prep Time: 15 minutes
- Cook Time: 45 minutes
- Total Time: 1 hour, 5 minutes
- Yield: Serves 8-10
- Category: Dessert
- Method: Baking
- Cuisine: American
Description
Classic Apple Crisp is a warm, comforting dessert featuring tender, cinnamon-spiced baked apples topped with a buttery oat crumble. Perfect served warm with a scoop of vanilla ice cream or a drizzle of salted caramel, this easy-to-make recipe highlights the perfect balance of sweet, tart, and crunchy textures. Made with simple pantry ingredients, it’s ideal for cozy gatherings or anytime you crave a homestyle treat.
Ingredients
Filling
- 8 medium peeled apples, cut into 1-inch chunks that are 1/4 – 1/2 inch thick (about 10 cups, or 1200g, chunks)
- 1/2 cup (100g) packed light or dark brown sugar
- 1/4 cup (31g) all-purpose flour (spooned & leveled)
- 1 teaspoon pure vanilla extract
- 1 teaspoon ground cinnamon
- 1/2 teaspoon ground nutmeg
- 1/4 teaspoon salt
Topping
- 3/4 cup (94g) all-purpose flour (spooned & leveled)
- 3/4 cup (150g) packed light or dark brown sugar
- 1 teaspoon ground cinnamon
- 1/2 cup (8 Tbsp; 113g) unsalted butter, cold and cubed
- 1 cup (85g) old-fashioned whole rolled oats
- Optional: salted caramel and vanilla ice cream for serving
Instructions
- Preheat and Prepare Pan: Preheat your oven to 350°F (177°C) and lightly grease a 9×13-inch baking pan or a similar 3.5-4 quart baking dish to prevent sticking.
- Mix Filling Ingredients: In a large bowl, combine the peeled and chopped apple chunks with brown sugar, all-purpose flour, vanilla extract, ground cinnamon, ground nutmeg, and salt. Mix gently to evenly coat the apples.
- Spread Filling: Evenly spread the apple mixture into the prepared baking pan, creating a uniform layer as the base of your crisp.
- Make the Topping: In a medium bowl, whisk together the flour, brown sugar, and cinnamon. Cut in the cold, cubed unsalted butter using a pastry cutter or fork until the mixture becomes crumbly. Stir in the rolled oats until well combined.
- Top the Filling: Sprinkle the crumbly oat topping evenly over the apple filling, covering the entire surface.
- Bake: Place the pan in the preheated oven and bake for 45 minutes, or until the topping is golden brown and the fruit juices are bubbling around the edges.
- Cool and Serve: Remove from the oven and transfer to a wire rack. Allow the apple crisp to cool for at least 5 minutes before serving. Enjoy warm, at room temperature, or cold, optionally with salted caramel and/or vanilla ice cream.
- Store Leftovers: Cover any leftovers and store in the refrigerator for up to 5 days.
Notes
- Make Ahead & Freezing: Baked and cooled apple crisp freezes well for up to 3 months. Thaw overnight in the refrigerator; then reheat covered in a 350°F (177°C) oven for 30 minutes or until heated through. You can also prepare up to step 3, cover, and refrigerate for up to 1 day before baking. The crisp can be frozen unbaked for up to 3 months—thaw overnight and then bake as usual, allowing extra bake time.
- Best Apples: A mix of Granny Smith and Jazz or Pink Lady apples works beautifully, balancing tartness and sweetness.
- Oats Substitution: Use quick oats if whole rolled oats are unavailable; use a 1:1 substitution, but expect a slightly powdery topping. Do not reduce flour.
- Adding Nuts: Optionally, add 1 cup of chopped pecans or walnuts to the topping when mixing in the oats for added crunch and flavor.
- Half Recipe: Halve ingredients for a smaller crisp baked in a 9-inch square or round dish. Reduce baking time to approximately 30-35 minutes.
Nutrition
- Serving Size: 1/8 of recipe
- Calories: 310
- Sugar: 28g
- Sodium: 90mg
- Fat: 12g
- Saturated Fat: 7g
- Unsaturated Fat: 4g
- Trans Fat: 0g
- Carbohydrates: 48g
- Fiber: 4g
- Protein: 2g
- Cholesterol: 30mg


