
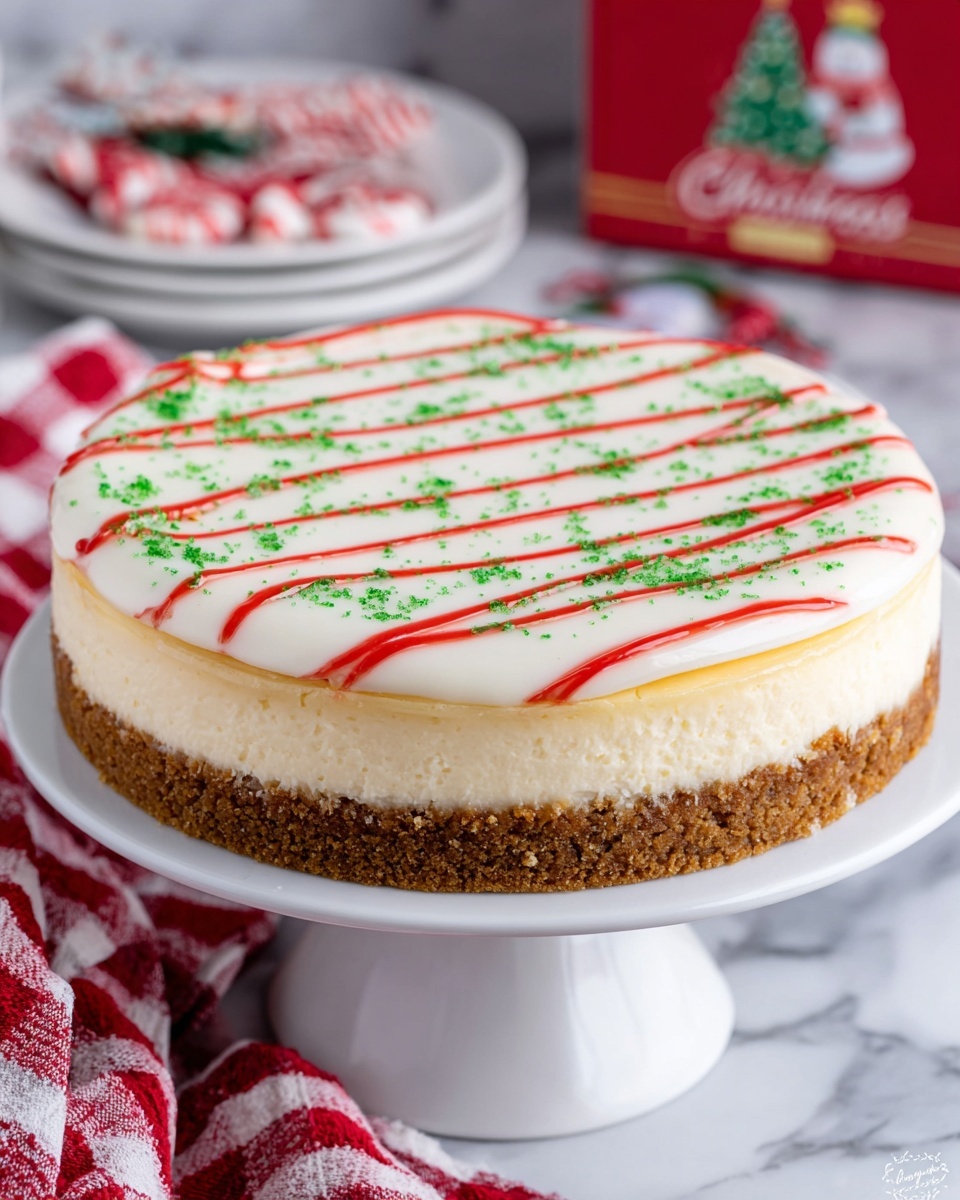
If you’re looking for a festive dessert that absolutely dazzles both in flavor and presentation, I’ve got just the thing for you. This Christmas Tree Cheesecake with Little Debbie Cakes Recipe is a fun and delicious way to celebrate the season with a show-stopping treat. Imagine creamy, luscious cheesecake layered with chunks of those beloved Little Debbie Christmas Tree Cakes, all topped with a swirl of vanilla frosting, sparkling green sanding sugar, and iconic red stripes. It’s one of those recipes that’ll get everyone asking for seconds, and you’re going to love how easy it is to make!
Why You’ll Love This Recipe
- Festive and Fun: The Christmas Tree Cakes tucked inside give this cheesecake a playful holiday twist that’s perfect for gatherings.
- Creamy Yet Textured: You get that rich cheesecake smoothness with little bursts of cake chunks for delightful surprise in every bite.
- Easy to Make: Despite looking fancy, it’s really straightforward—especially if you follow my tips for success.
- Eye-Catching Presentation: The green sanding sugar and red stripes turn this into a centerpiece dessert that’ll wow your guests.

Ingredients You’ll Need
Getting the ingredient lineup right is essential for a cheesecake that’s rich and smooth, but also captures the festive charm of those Little Debbie Christmas Tree Cakes. Each component brings something special, from the crunchy graham cracker crust to the creamy filling with hidden cake bits.
- Graham Cracker Crumbs: These create a classic, slightly sweet crust that crisps up nicely with butter.
- Sugar: For both the crust and filling, sugar balances the tanginess of the cream cheese perfectly.
- Butter (melted): Mix this into the crust for that perfect buttery hold.
- Cream Cheese (softened): The star of the cheesecake—room temperature cream cheese makes the batter ultra smooth.
- All-purpose Flour: It stabilizes the cheesecake, helping it set beautifully without cracking.
- Vanilla Extract: Adds warmth and enhances the cheesecake’s sweetness.
- Eggs: Eggs give the cheesecake structure, so add them gently but completely.
- Sour Cream: This keeps the cheesecake creamy and adds a bit of tang to balance the richness.
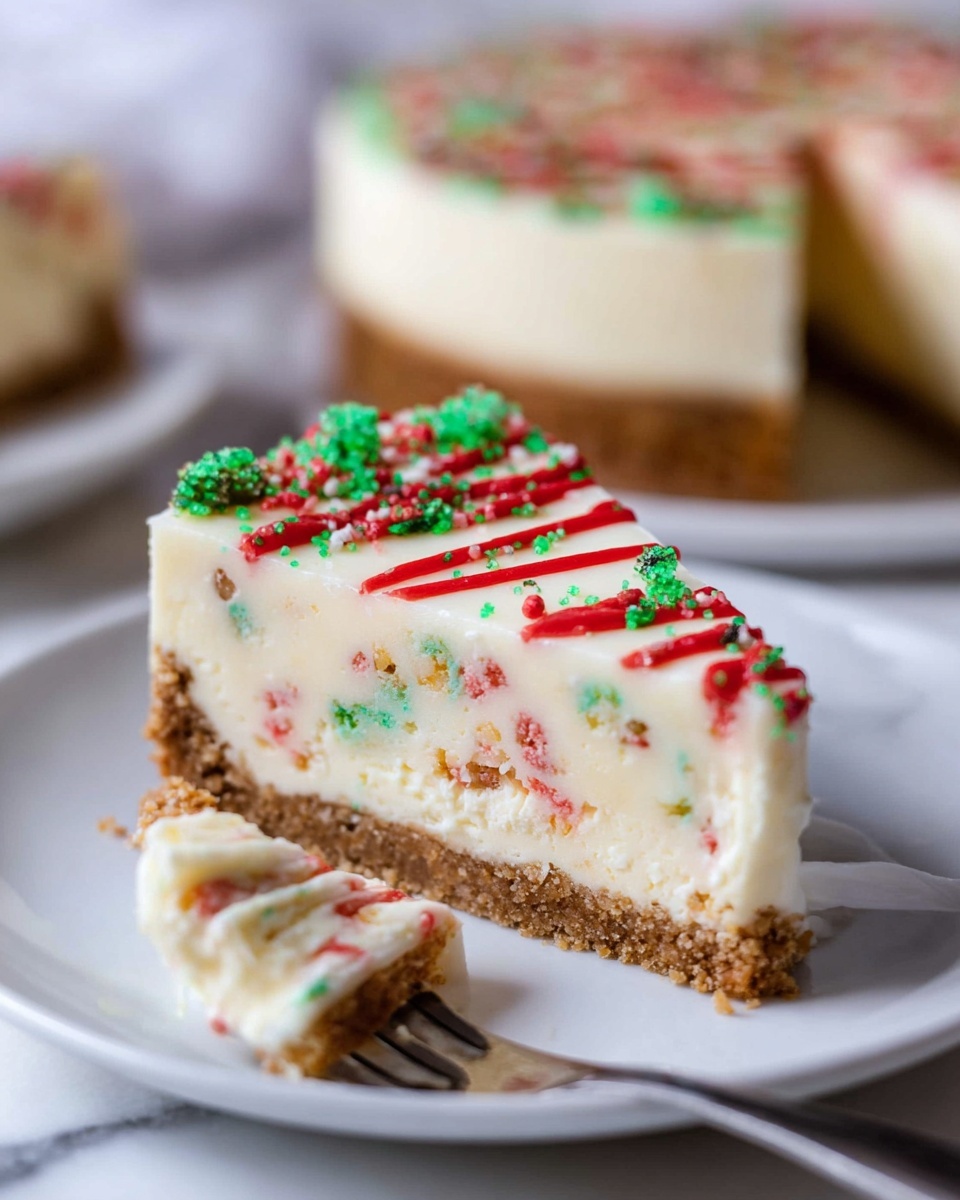
- Little Debbie Christmas Tree Cakes (crumbled): The festive surprise inside that adds flavor and texture.
- Vanilla Frosting: I recommend Pillsbury White for that smooth, sweet glaze on top.
- Green Sanding Sugar: For sparkling festive flair.
- Red Frosting or Candy Melts: These create the iconic red stripes on top, completing the look.
Variations
I love that this Christmas Tree Cheesecake with Little Debbie Cakes Recipe is so adaptable, and I’m always tweaking it slightly depending on the occasion or what I have on hand. Don’t hesitate to make it your own!
- Gluten-Free Version: I’ve swapped the graham crackers for gluten-free crumbs, and it turned out just as delicious—great news if you’re serving guests with allergies.
- Chocolate Lovers’ Twist: I once added mini chocolate chips to the batter and switched the frosting for chocolate ganache—totally decadent!
- Berry Burst: Mixing in fresh raspberries or topping with a berry compote adds a tart contrast that pairs beautifully.
- Less Sweet Frosting: For those who prefer less sweetness, try a cream cheese frosting instead of vanilla icing—it balances the richness without overpowering flavors.
How to Make Christmas Tree Cheesecake with Little Debbie Cakes Recipe
Step 1: Prepare Your Crust Base
Start by preheating your oven to 325°F. In a bowl, mix together the graham cracker crumbs, sugar, and melted butter until the texture feels like wet sand. This is essential for a crust that holds firm without being too dry or crumbly. Press this mixture evenly into the bottom of a greased springform pan—taking care to smooth it out nicely so your cheesecake foundation is solid. Bake for 10 minutes, then set aside to cool. I like to line my springform pan with parchment paper on the bottom for super easy removal later on.
Step 2: Whip Up the Creamy Cheesecake Batter
Using a stand mixer, beat the softened cream cheese and sugar on high until silky smooth with no lumps. Next, add the vanilla extract and flour, mixing until just combined—too much mixing after this can add air and cause cracks in the cheesecake. Then, carefully add eggs two at a time, fully incorporating each batch before adding more. Finally, beat in the sour cream on high speed until the batter is rich, creamy, and perfectly lump-free. This step makes such a difference—the sour cream really brightens the flavor while keeping the texture velvety.
Step 3: Layer the Batter and Little Debbie Cakes
Pour half of your cheesecake batter into the cooled crust. Then sprinkle the crumbled Little Debbie Christmas Tree Cakes evenly on top—don’t worry, they’ll keep their shape nicely and add delightful pockets of flavor. Pour the remaining cheesecake batter over the top, smoothing it gently with a spatula. To get rid of any pesky air bubbles that might cause cracks, give your pan a firm tap on the counter a few times.
Step 4: The Water Bath and Baking
This is a crucial step for creamy cheesecake without cracks. Place a sheet pan in your oven and fill it with about 2 inches of boiling water. Wrap the outside bottom of your springform pan tightly with aluminum foil to keep water from seeping in. Set your cheesecake pan in the middle of the sheet pan filled with water, and bake at 325°F for 1 hour and 10 minutes. When the baking time’s up, turn off the oven but leave the door slightly open—trust me, this slow cooling helps the cheesecake set perfectly without shrinking or cracking. Once it’s completely cooled, loosen the edges with a knife and let it come to room temperature before chilling overnight.
Step 5: Frost and Decorate
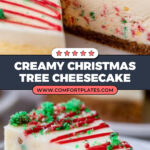
Microwave your vanilla frosting for about 1 minute so it’s easier to pour, then spread it smoothly over the top of your chilled cheesecake—still in the springform pan to keep it neat. Pop it back in the fridge for an hour until the frosting sets up nicely. Now for the fun part: sprinkle green sanding sugar all over to mimic the needles of a Christmas tree, and pipe wavy, curvy red stripes using frosting or melted candy melts. These colorful stripes are the iconic finishing touch that make this cheesecake truly festive and memorable.
Pro Tips for Making Christmas Tree Cheesecake with Little Debbie Cakes Recipe
- Use Room Temperature Cream Cheese: I once skipped softening the cream cheese, and the batter was lumpy—trust me, softened cream cheese is non-negotiable!
- Avoid Overmixing After Eggs: Mixing too much after adding eggs can trap air, causing cracks; just blend until combined.
- Wrap the Springform With Foil Tight: This prevents water leakage in the water bath and keeps your cheesecake perfectly moist.
- Cool Gradually in Oven: Leaving the door ajar during cooling avoids cracks from sudden temperature changes.
How to Serve Christmas Tree Cheesecake with Little Debbie Cakes Recipe
Garnishes
I stick to the classic green sanding sugar and red stripes because they bring that unmistakable Christmas tree vibe, but sometimes I add a few festive sprinkles or edible glitter for extra sparkle when I’m feeling fancy. Fresh cranberries or mint leaves around the plate also look gorgeous and add a nice fresh note to the richness of the cheesecake.
Side Dishes
This cheesecake pairs nicely with a simple cup of coffee or hot cocoa for dessert after a holiday meal. If you want to serve something alongside, fresh fruit, like sliced pears or apples, balances the richness perfectly. Or try a scoop of vanilla ice cream if you’re going all out.
Creative Ways to Present
A personal favorite is placing the whole cheesecake on a festive cake stand surrounded by evergreen sprigs and holiday ornaments for a centerpiece-worthy dessert table. I’ve also made mini versions in individual springform pans for parties, which guests love because they feel so special and perfectly portioned.
Make Ahead and Storage
Storing Leftovers
After serving, just cover leftovers tightly with plastic wrap or keep in an airtight container in the fridge. Cheesecake tastes even better the next day when the flavors have had a chance to meld. I’ve found it keeps well for up to 4 days, still creamy and delicious.
Freezing
This cheesecake freezes well if you want to make it extra ahead of time. I recommend freezing single slices individually wrapped in plastic and foil, so you can pull out exactly what you need without thawing the whole cake. Just let slices thaw gently in the fridge overnight before serving.
Reheating
Cheesecake is best served chilled, so I usually don’t reheat leftovers. But if you want a warm treat, letting it sit at room temperature for 15-20 minutes works great. Avoid microwaving to prevent ruining the smooth texture.
FAQs
-
Can I use other flavors of Little Debbie Cakes in this cheesecake?
Absolutely! While the Christmas Tree Cakes work perfectly for a holiday theme, you could try other Little Debbie cakes like Swiss Roll or Cosmic Brownies for fun flavor twists. Just crumble them similarly and fold into the batter.
-
What’s the best way to prevent cheesecake cracks?
Using a water bath during baking and cooling the cheesecake gradually with the oven door cracked open really helps keep cracks at bay. Also, avoid overmixing after adding eggs to reduce air bubbles that cause cracking.
-
Can I make this cheesecake without a springform pan?
A springform pan is highly recommended since it makes removing the cheesecake cleanly so much easier. If you don’t have one, line a regular cake pan with parchment paper and carefully unmold after chilling, but be gentle as it’s more delicate.
-
How long should I refrigerate the cheesecake before serving?
For best texture and flavor, refrigerate overnight or at least 8 hours so the cheesecake fully sets and the flavors meld beautifully.
Final Thoughts
I have to tell you, this Christmas Tree Cheesecake with Little Debbie Cakes Recipe has become my go-to festive dessert every holiday season. It feels like a little slice of holiday magic in every bite—the perfect combo of classic cheesecake richness and nostalgic holiday cake chunks. It’s always a hit with my family and friends, and I think you’re going to adore it just as much. So grab those Little Debbie Cakes, fire up your mixer, and let’s make your holiday dessert table unforgettable. You’ve got this—and I can’t wait to hear how much everyone loves it!
Print
Christmas Tree Cheesecake with Little Debbie Cakes Recipe
- Prep Time: 30 minutes
- Cook Time: 1 hour 10 minutes
- Total Time: 9 hours 40 minutes
- Yield: 12 servings
- Category: Dessert
- Method: Baking
- Cuisine: American
- Diet: Vegetarian
Description
This delicious Little Debbie Christmas Tree Cheesecake combines creamy homemade vanilla cheesecake with chunks of festive Little Debbie Christmas Tree Cakes for a perfect holiday treat. Topped with smooth vanilla frosting, green sanding sugar, and classic red frosting stripes, this cheesecake is both visually stunning and decadently flavorful, making it a show-stopper dessert for any Christmas gathering.
Ingredients
Crust
- 1 cup of Graham Cracker Crumbs
- 3 tablespoons of Sugar
- 3 tablespoons of butter, melted
Cheesecake Filling
- 4 packages of cream cheese, softened
- 1 cup of sugar
- 3 tablespoons of all-purpose flour
- 1 tablespoon of vanilla extract
- 4 eggs
- 1 cup of sour cream
- 4 Little Debbie Christmas Tree Cakes (crumbled)
Topping
- 1 16-ounce container of Vanilla Frosting (Pillsbury White recommended)
- Green Sanding Sugar
- Red frosting or Candy Melts for the red stripes
Instructions
- Preheat Oven: Preheat your oven to 325°F to prepare for baking the crust and cheesecake.
- Prepare Crust: In a mixing bowl, combine graham cracker crumbs, melted butter, and sugar. Mix until the mixture resembles wet sand. Press this mixture evenly into the bottom of a well-greased springform pan. Bake the crust at 325°F for 10 minutes, then remove and set aside to cool.
- Make Cheesecake Batter: In a stand mixer, beat softened cream cheese and sugar on high speed until smooth and creamy. Add vanilla extract and flour and mix until fully combined. Gradually add eggs two at a time, mixing until smooth after each addition. Finally, add the sour cream and mix on high until the batter is smooth and well combined.
- Assemble Cheesecake: Pour half of the cheesecake batter into the cooled crust in the springform pan. Evenly sprinkle the crumbled Little Debbie Christmas Tree Cakes over the batter. Pour the remaining batter on top carefully, then gently tap the pan on the counter to remove any air bubbles.
- Prepare Water Bath: Fill a sheet pan with about 2 inches of boiling water to create a water bath, which helps the cheesecake bake evenly and prevents cracking. Wrap the bottom of the springform pan tightly with aluminum foil to prevent water from leaking in.
- Bake Cheesecake: Place the springform pan in the center of the sheet pan with water and bake at 325°F for 1 hour and 10 minutes.
- Cool Down Slowly: After baking, turn off the oven and crack the oven door open halfway. Allow the cheesecake to cool completely inside the oven to avoid sudden temperature changes.
- Remove Cheesecake from Oven: Take the cheesecake out once cooled, run a knife around the edges to loosen it from the pan, and let it come to room temperature.
- Refrigerate: Cover and refrigerate the cheesecake overnight, or for at least 8 hours, to set properly.
- Add Frosting: Microwave the container of vanilla frosting for 1 minute to soften. Pour the warmed frosting evenly over the chilled cheesecake while still in the springform pan.
- Chill Frosting: Refrigerate the cheesecake again until the frosting sets, about 1 hour.
- Decorate: Carefully remove the cheesecake from the springform pan. Sprinkle with green sanding sugar and pipe curvy red stripes using red frosting, melted chocolate, or cookie icing to mimic the iconic Christmas tree decorations.
- Serve: Slice and serve the cheesecake. Enjoy this festive and rich holiday dessert!
Notes
- This cheesecake combines the creamy richness of homemade cheesecake with the nostalgic flavor and festive look of Little Debbie Christmas Tree Cakes.
- Wrapping the springform pan in foil and baking in a water bath ensures a smooth, crack-free cheesecake.
- Allowing the cheesecake to cool slowly in the oven and then refrigerating overnight helps set the texture perfectly.
- Microwaving the frosting before pouring allows it to spread easily and create a smooth finish.
- Decorate with green sanding sugar and red frosting stripes to emulate the Christmas Tree Cake design and add visual appeal.
- This dessert will be a standout festive centerpiece for holiday gatherings or parties.
Nutrition
- Serving Size: 1 slice (1/12 of cheesecake)
- Calories: 578
- Sugar: 46.6 g
- Sodium: 335.8 mg
- Fat: 36.6 g
- Saturated Fat: 19.1 g
- Unsaturated Fat: 17.5 g
- Trans Fat: 0 g
- Carbohydrates: 55.9 g
- Fiber: 0.2 g
- Protein: 7.6 g
- Cholesterol: 131 mg
