
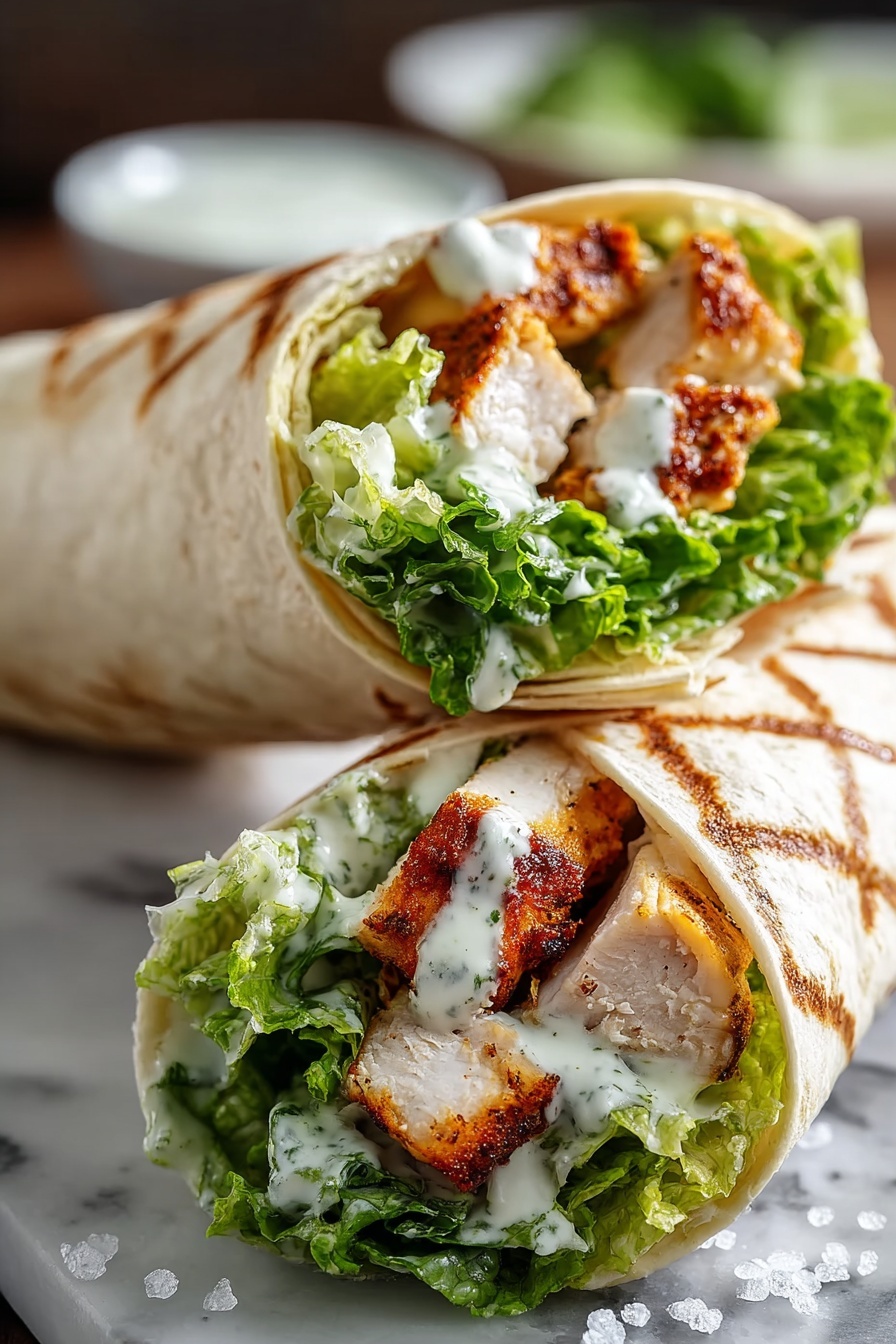
If you’re looking for a quick, fresh, and absolutely delicious lunch or light dinner, you’ve got to try this Chicken Caesar Wraps Recipe. I absolutely love how this recipe comes together with simple ingredients yet delivers a seriously flavorful bite every single time. Whether you’re packing lunch for work, throwing together dinner for the family, or just craving something satisfying without a ton of fuss, these wraps check all the boxes.
Why You’ll Love This Recipe
- Super Simple Ingredients: You’ll find everything you need in your local grocery store, no fancy items required.
- Customizable Toppings: I love adding croutons and bacon bits, but you can tweak it however you like.
- Perfect for Meal Prep: Make these ahead of time and keep them fresh for busy days on the go.
- A Family Favorite: My crew goes crazy for this wrap, and I bet yours will, too!

Ingredients You’ll Need
These Chicken Caesar Wraps come together with fresh and flavorful ingredients that naturally complement each other. I always recommend using crisp romaine and freshly grilled chicken—it really makes a difference. If you want to keep things easy, buy pre-cooked chicken breasts, but grilling your own adds that extra touch.

- Large Flour Tortillas: Choose soft tortillas that are pliable enough to roll without cracking.
- Fresh Romaine Lettuce: Wash and dry very well to avoid soggy wraps.
- Grilled Chicken Breasts: Sliced into thin strips for easy rolling and eating.
- Garlic Powder: A small sprinkle amps up the flavor without overpowering the wrap.
- Fresh Lemon Juice: Adds a bright, fresh zing; totally optional but recommended.
- Parmesan Cheese: The classic Caesar salad touch—grated finely to melt into the dressing.
- Croutons: Optional but adds a satisfying crunch that I personally love.
- Cherry Tomatoes: Halved to bring in a pop of sweetness and color.
- Bacon Bits: If you enjoy smoky flavors, sprinkle these in for extra yum.
- Caesar Dressing: The delicious base that holds everything together—choose your favorite brand or homemade.
- Black Pepper: Freshly cracked for seasoning to taste.
Variations
I love to switch things up depending on what I have on hand or what mood we’re in. These Chicken Caesar Wraps are incredibly flexible, so go ahead and make them your own.
- Use Grilled Shrimp Instead of Chicken: I tried this once for a lighter take and it was fantastic—deliciously fresh and easy to prep.
- Swap Caesar Dressing for Greek Yogurt Dressing: For a healthier twist without losing that creamy vibe.
- Add Avocado Slices: Creamy texture that pairs so well with the crisp lettuce and tangy dressing.
- Makes It Vegetarian: Use roasted chickpeas or grilled tofu instead of chicken for a hearty vegetarian option.
How to Make Chicken Caesar Wraps Recipe
Step 1: Prep Your Ingredients
Make sure your grilled chicken is cooked through and cool to the touch before slicing it thinly—this helps it stay juicy and prevents the wrap from getting soggy. Wash your romaine thoroughly and dry it well; I’ve learned the hard way that wet lettuce kills the crunch factor.
Step 2: Lay Out the Base
Spread a thin layer of Caesar dressing right in the center of each large flour tortilla. Don’t overdo it here or the wrap gets messy to eat. Start layering with dry romaine leaves on top of the dressing—you want a nice bed for the chicken.
Step 3: Assemble the Wrap Fillings
Arrange the sliced chicken in a line right in the middle atop the lettuce, then sprinkle the grated Parmesan cheese evenly. This is where you can add any of those optional toppings like croutons, bacon bits, or cherry tomatoes. Finish with a light dusting of black pepper and a squeeze of fresh lemon juice if you’re using it.
Step 4: Wrap It Up Tight
Fold the bottom edge of the tortilla up over the filling. Then fold in both sides snugly before rolling firmly from bottom to top. This technique keeps everything snug and less likely to spill out when you bite in. You can secure the wrap with a toothpick or wrap it in plastic wrap, especially if you plan to refrigerate it.
Step 5: Chill and Serve
Put your wraps in the fridge until you’re ready to serve. I find letting them rest for about 10 minutes helps the flavors meld and makes cutting them diagonally with a sharp knife so much easier. Plus, they hold together beautifully once cut.
Pro Tips for Making Chicken Caesar Wraps Recipe
- Keep Lettuce Crisp: Always dry lettuce thoroughly using a salad spinner or paper towels to avoid soggy wraps.
- Warm Tortillas: Lightly warm tortillas in a dry pan for 10-15 seconds before assembling to make them more flexible for rolling.
- Don’t Overload Filling: I learned that less is more here — overstuffing makes rolling hard and can cause the wrap to fall apart.
- Wrap Securely: Using plastic wrap to tightly wrap each tortilla helps everything meld and keeps wraps fresh longer in the fridge.
How to Serve Chicken Caesar Wraps Recipe

Garnishes
I like to serve these wraps with a sprinkle of extra Parmesan and a few cracked black peppercorns on top for a nice visual and flavor boost. A lemon wedge on the side adds a fresh citrus kick that brightens the wrap just before eating.
Side Dishes
When I want to make it a little more filling, I pair these wraps with classic sides like sweet potato fries, a crisp pickle, or a simple cucumber salad. They complement the wrap’s flavors without overpowering them.
Creative Ways to Present
For gatherings, I sometimes slice the wraps into smaller pinwheel bites—perfect for parties or healthy appetizers. You can also thread them with colorful toothpicks and arrange on a platter with fresh herbs for a vibrant presentation.
Make Ahead and Storage
Storing Leftovers
Store extra wraps wrapped tightly in plastic wrap and placed in an airtight container in the fridge. They keep great for up to 2 days. I usually keep the wraps whole until ready to eat to avoid dryness.
Freezing
Personally, I avoid freezing these wraps because the lettuce doesn’t hold up well and turns mushy upon thawing. If you want to freeze, try freezing the cooked chicken separately and assemble the wrap fresh when ready.
Reheating
If you want to warm leftovers, unwrap them and heat gently in a skillet or microwave for just 20-30 seconds. I recommend removing the lettuce before warming and adding it back afterward to keep that fresh crunch.
FAQs
-
Can I use store-bought rotisserie chicken for this recipe?
Absolutely! Using rotisserie chicken is a perfect shortcut that saves time and still tastes delicious. Just shred or slice the chicken breasts before assembling your wraps.
-
What kind of Caesar dressing works best?
Any good-quality creamy Caesar dressing works here—store-bought or homemade. I love a dressing that has a good balance of garlic, anchovy (if you like that), and tanginess to complement the chicken.
-
How do I keep the wraps from becoming soggy?
Dry your lettuce completely and don’t overdo the dressing—spread it thinly. Wrapping them tightly in plastic and refrigerating until serving also helps keep things fresh.
-
Can this recipe be made gluten-free?
Yes! Simply swap the flour tortillas for gluten-free wraps or large lettuce leaves for a low-carb, gluten-free version. Just watch your croutons or bacon bits, as some store-bought versions may contain gluten.
Final Thoughts
This Chicken Caesar Wraps Recipe has become a go-to for me when I want something tasty, fuss-free, and totally satisfying. I love how it strikes the right balance between fresh, creamy, and crunchy. You really can’t go wrong, and I promise that once you try this, it’ll be a staple for your quick meals, too. Give it a whirl and tell me how your family likes it—I bet they’ll be asking for seconds!
Print
Chicken Caesar Wraps Recipe
- Prep Time: 15 minutes
- Cook Time: 10 minutes
- Total Time: 35 minutes
- Yield: 4 wraps
- Category: Lunch
- Method: Stovetop
- Cuisine: American
- Diet: Low Salt
Description
These Chicken Caesar Wraps are a quick and delicious meal featuring grilled chicken, fresh romaine lettuce, and creamy Caesar dressing wrapped in soft flour tortillas. Perfect for a light lunch or easy dinner, they combine savory flavors with a satisfying crunch from optional croutons and bacon bits.
Ingredients
Wrap Base
- 4 Large Flour Tortillas
Filling
- 2 cups Fresh Romaine Lettuce, washed and dried
- 2 Grilled Chicken Breasts, sliced
- ½ teaspoon Garlic Powder
- 1 teaspoon Fresh Lemon Juice (optional)
- ¼ cup Parmesan Cheese, grated
- 4 tablespoons Caesar Dressing
- ¼ teaspoon Black Pepper
Optional Toppings
- ½ cup Croutons
- ½ cup Cherry Tomatoes, halved
- ¼ cup Bacon Bits
Instructions
- Prepare the chicken: Cook the chicken breasts thoroughly on a grill or stovetop, ensuring they are fully cooked and nicely browned. Allow the chicken to cool completely before slicing to prevent moisture buildup inside the wrap.
- Prepare lettuce and ingredients: Wash and dry the romaine lettuce leaves thoroughly. This step is crucial to avoid soggy wraps. Gather all other ingredients and lay the tortillas flat on a clean surface for assembly.
- Assemble the wrap: Spread a thin layer of Caesar dressing in the center of each tortilla to serve as the base sauce. Layer dry romaine leaves on top, then place the sliced grilled chicken breast in a line down the center. Sprinkle grated Parmesan cheese evenly and add optional toppings like croutons, cherry tomatoes, and bacon bits as desired. Season with garlic powder, fresh lemon juice if using, and black pepper to taste.
- Wrap it up: Fold the bottom edge of the tortilla up over the filling, then fold in both sides tightly. Carefully roll the tortilla firmly from bottom to top to enclose the filling completely. Secure each wrap with plastic wrap or a toothpick to hold its shape.
- Chill before serving: Place wrapped wraps in the refrigerator until serving to allow flavors to meld together. Let them rest for about 10 minutes before cutting for cleaner slices.
- Serve: Using a sharp knife, cut the wraps diagonally into halves or thirds depending on preference. Wrap individually for storage or immediate serving. Enjoy your refreshing and flavorful Chicken Caesar Wraps!
Notes
- Ensure the romaine lettuce is completely dry to prevent soggy wraps.
- Cook chicken breasts fully and cool before slicing for best texture.
- Optional toppings like croutons and bacon bits add extra crunch and flavor but can be omitted for a lighter wrap.
- Wraps can be prepared ahead and refrigerated for up to 24 hours; add croutons just before serving to keep them crunchy.
- Use a sharp knife for clean diagonal cuts to maintain wrap structure.
Nutrition
- Serving Size: 1 wrap
- Calories: 380 kcal
- Sugar: 3 g
- Sodium: 720 mg
- Fat: 18 g
- Saturated Fat: 5 g
- Unsaturated Fat: 10 g
- Trans Fat: 0 g
- Carbohydrates: 30 g
- Fiber: 3 g
- Protein: 32 g
- Cholesterol: 85 mg


