
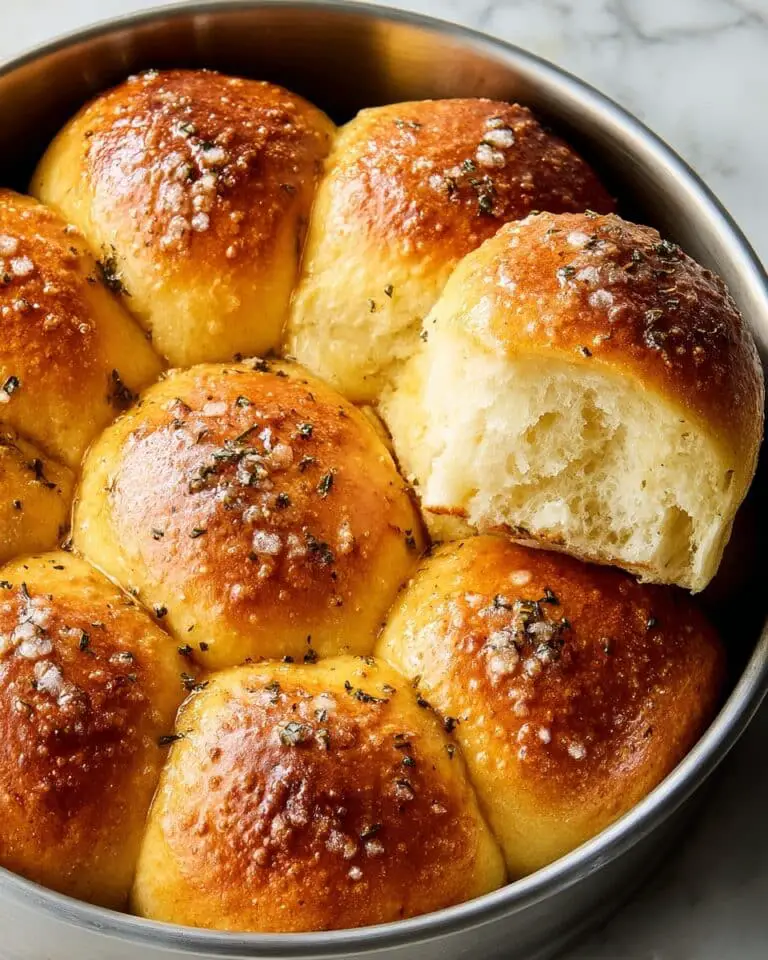
If you’re anything like me and love the idea of fresh, flavorful bread but don’t have time to wait around for yeast to do its magic, then you’ll be absolutely thrilled with this Cheese, Garlic and Herb Quick Bread (No Yeast) Recipe. It comes together in under two hours and tastes like you baked it all day long. The cheesy ribbons, fragrant herbs, and that lovely garlic punch make it a total crowd-pleaser—perfect for lazy weekend breakfasts, quick snacks, or alongside a hearty soup. Trust me, once you try this, it’ll be your go-to for when you want homemade bread but need it ASAP!
Why You’ll Love This Recipe
- Speedy No-Yeast Bread: Makes soft, delicious bread without the wait for yeast to rise, perfect for busy days.
- Flavor Packed: The cheese, garlic, and fresh herbs combine for an irresistible savory loaf bursting with flavor.
- Simple Ingredients: Uses pantry staples and a handful of fresh herbs, nothing too fancy or hard to find.
- Versatile and Fun: Customize it easily by swapping herbs or cheese types to suit your tastes — I love how flexible this recipe is!

Ingredients You’ll Need
This bread relies on a simple yet harmonious set of ingredients that work beautifully together to create layers of flavor and texture. When choosing your cheese and herbs, go for freshness as it really makes the difference — that burst of garlic and bright rosemary will pop in every bite.
- Cheese: I like using a block of cheddar or tasty cheese sliced about 3mm thick for those beautiful cheese ribbons inside the bread.
- Fresh rosemary: Adds a lovely piney, fragrant note; finely chop it to release those amazing oils.
- Fresh parsley leaves: A nice fresh flavor and pretty green flecks throughout the bread.
- Dried oregano and dried thyme: These add a more subtle herb depth, balancing out the fresh herbs.
- Garlic cloves: Two kinds here—one minced for the swirl and a couple crushed in the batter for that gentle garlic kick.
- Extra virgin olive oil: For the herb swirl and a bit more body in the batter.
- Plain flour (all-purpose): The backbone of your bread; make sure it’s fresh for best rise with the baking soda.
- Baking soda: The magic leavening agent replacing yeast, gives you that quick rise and light texture.
- Cooking salt/kosher salt: Season appropriately to enhance all the flavors, remembering to adjust if using finer salt.
- Plain yogurt: Gives moisture and a subtle tang to the bread, helping it stay soft.
- Milk: Full-fat is best for richness, but low-fat works if needed.
- Eggs: Provide structure and richness to the batter.
- Unsalted butter: Melted, for that rich, tender crumb.
- Olive oil: Another layer of fat to keep the bread moist.
Variations
I love how flexible this Cheese, Garlic and Herb Quick Bread (No Yeast) Recipe is. You can easily swap herbs and cheeses based on what’s in your fridge or tailor it to dietary needs. Here are some of my favorite ways to mix things up:
- Herb Mix Variation: Sometimes I swap out rosemary and parsley for basil and thyme for a different herbal twist — it works beautifully with pesto in place of the herbs too!
- Cheese Swap: Colby or tasty cheese are my go-tos, but I’ve also tried smoked cheddar for an extra depth of flavor, which my family goes crazy for.
- Gluten-Free Adaptation: I’ve experimented with gluten-free flour blends that include xanthan gum, and it turned out quite well—just watch the baking time closely.
- Garlic Intensity: Adjust how much garlic you use depending on your crowd; I’ve learned that starting with less and then adding a garlic butter on top after baking is a nice option too.
How to Make Cheese, Garlic and Herb Quick Bread (No Yeast) Recipe
Step 1: Get Your Oven and Tin Ready
First things first: preheat your oven to 180°C/350°F. Whether you have a fan or conventional oven, this temperature works perfectly. Grease your loaf tin lightly with butter or oil spray and line it with baking paper to make sure the bread slides out easily after baking. A 21 x 11 x 7 cm pan is ideal, but don’t stress if you only have a different size — you’ll just get a slightly different loaf shape.
Step 2: Make the Herb and Garlic Swirl Mixture
In a small bowl, mix the finely chopped rosemary, parsley, dried oregano and thyme along with crushed garlic, olive oil, and salt. This mixture should be thick enough to dollop and swirl through the batter, infusing it with vibrant flavor that shines through every slice. I discovered this trick of making a swirl to add a beautiful herb pattern and an extra pop of flavor in the center layers.
Step 3: Combine Dry Ingredients
Whisk together your plain flour, baking soda, and salt in a large bowl until well combined. This helps distribute the leavening agent evenly and ensures your bread will rise just right.
Step 4: Mix Wet Ingredients
In a separate bowl, whisk the plain yogurt, milk, eggs, melted butter, olive oil, and minced garlic. Combining these separately makes it easier to fold them into the dry mix just right. I like to break the eggs individually to avoid any mishaps, and make sure the butter isn’t too hot so it doesn’t cook the eggs.
Step 5: Combine and Layer with Cheese and Herb Swirls
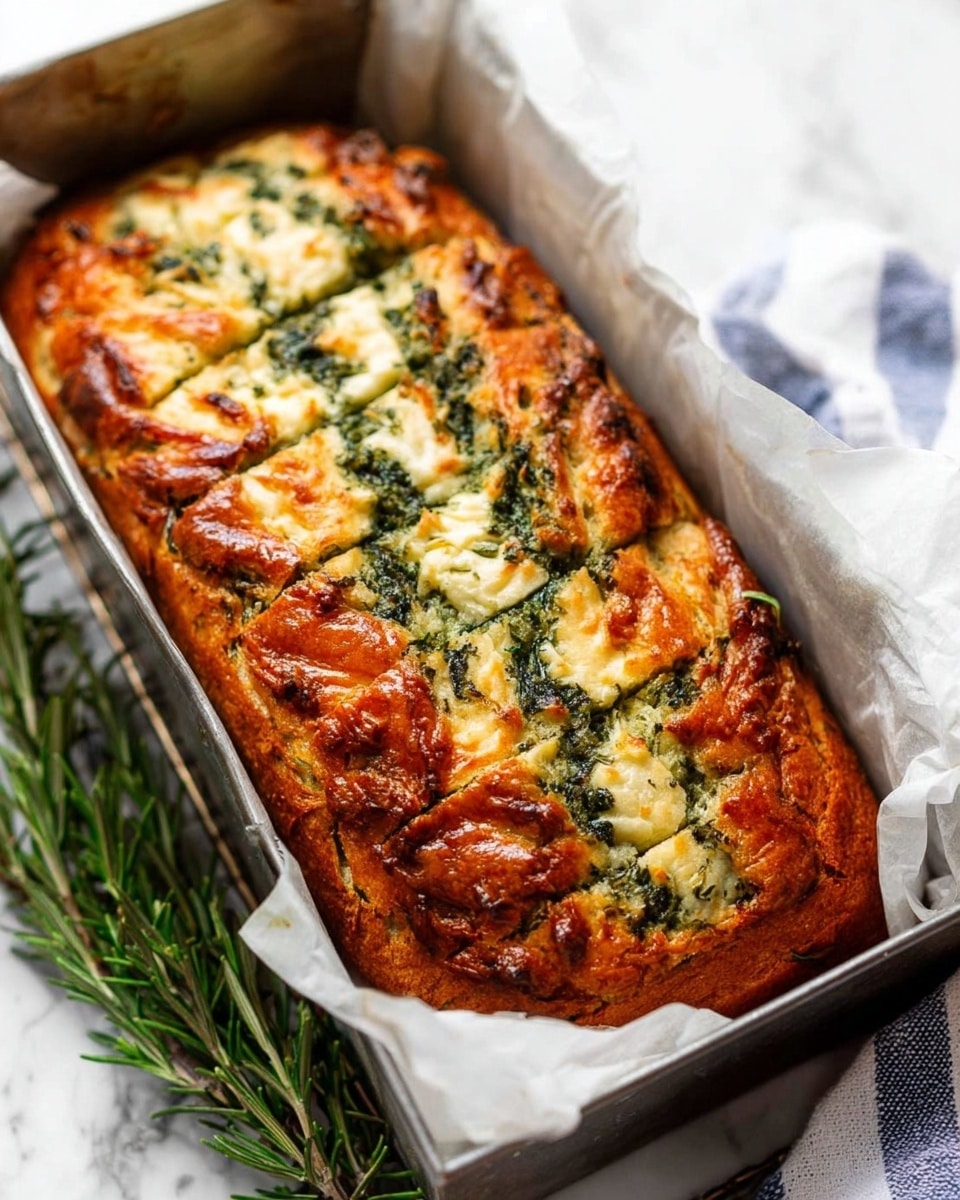
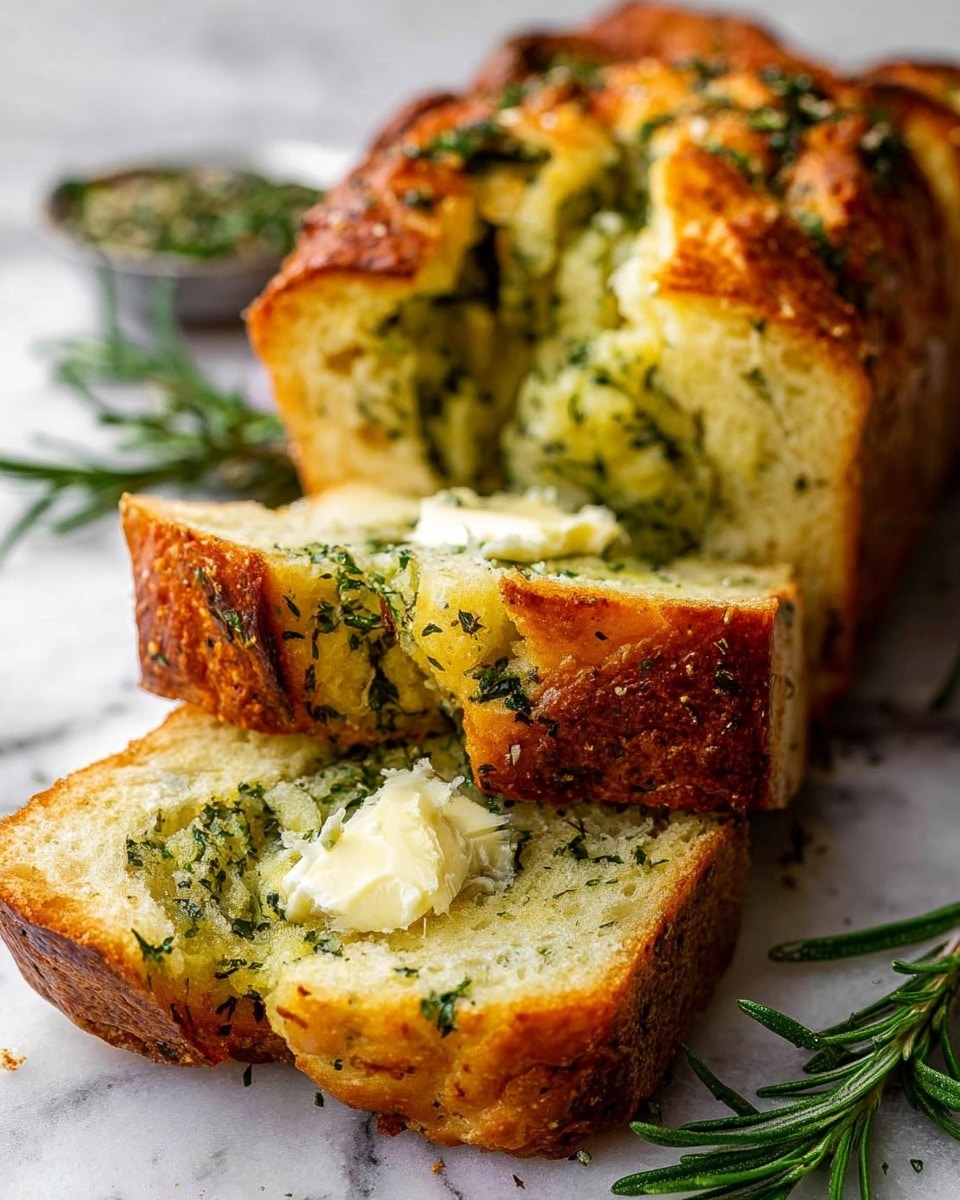
Make a well in the center of the dry ingredients and pour in the wet mixture. Stir gently until just combined — be careful not to overmix or your bread could turn out dense. Then, pour about a third of the batter into the prepared loaf pan. Dollop a third of your herb and garlic swirl over the batter. Use a knife to gently swirl the herbs up and down through the batter and turn it over in places so it creates lovely streaks.
Next, take a third of your sliced cheese and push some slices randomly into the batter—some all the way in, some poking out. This creates those wonderful cheesy ribbons that I absolutely love. Repeat this layering and swirling twice more so you end up with three layers of batter, herbs, and cheese. Don’t worry if the herb mix looks exposed or the cheese is sticking out; it bakes beautifully and looks rustic and homey.
Step 6: Bake and Cool
Bake the bread for 30 minutes or until the top is golden brown. Then cover loosely with foil to prevent over-browning and bake for another 20 minutes. Total baking time is around 50 minutes, but check by inserting a skewer in the center — it should come out clean. Let the bread cool in the tin for 5 minutes, then carefully turn it out onto a cooling rack. Allow at least 10 more minutes before slicing so the crumb sets nicely. Pro tip: slathering a little butter on warm slices is completely optional but always highly recommended!
Pro Tips for Making Cheese, Garlic and Herb Quick Bread (No Yeast) Recipe
- Cheese Slices vs Shredded: I prefer slicing my cheese into ribbons about 3mm thick because they create those gorgeous melty pockets—shredded cheese mixes into the batter but doesn’t have the same visual effect.
- Don’t Overmix the Batter: Stir just until the dry and wet ingredients combine to keep the bread light and fluffy.
- Swirling Technique: Use a gentle up-and-down motion with a knife to create beautiful herb ribbons without overworking the batter.
- Avoid Soggy Bottom: Make sure your loaf tin is well-lined and drained excess moisture by not overloading the batter with wet ingredients.
How to Serve Cheese, Garlic and Herb Quick Bread (No Yeast) Recipe
Garnishes
I often sprinkle a little extra fresh parsley or rosemary on top of the warm bread slices for color and freshness. A light brushing of melted garlic butter right after baking makes it extra indulgent. If you’re feeling fancy, a few flaky sea salt crystals on top just before baking add a delightful texture contrast.
Side Dishes
My favorite way to enjoy this quick bread is alongside a bowl of warm tomato soup or creamy butternut squash soup. It also pairs wonderfully with a fresh garden salad or garlic sautéed greens for a simple light meal. I’ve even served it as a snack with a selection of cheeses and charcuterie—it’s that versatile!
Creative Ways to Present
For a cozy brunch spread, slice the bread thick and stack the slices on a wooden board with little ramekins of olive oil and balsamic vinegar for dipping. Around the holidays, I like adding some sun-dried tomatoes to the herb mix and serving the bread with roasted garlic butter—it’s always a hit and looks so inviting on the table.
Make Ahead and Storage
Storing Leftovers
Once cooled, store your quick bread in an airtight container at room temperature. It stays fresh for about 4 days. I recommend slicing only what you need and keeping the loaf wrapped well to retain moisture. If you notice it beginning to dry out, toast the slices before serving—they come back to life beautifully.
Freezing
I’ve frozen slices of this bread many times without any loss of flavor or texture. Wrap individual slices tightly in plastic wrap then place in a freezer-safe bag. This way, you can pull out as many slices as needed without thawing the whole loaf—super handy for busy mornings or unexpected guests.
Reheating
To reheat, unwrap your slice and pop it into a toaster or under a grill for just a couple of minutes until warm and slightly crisped on the edges. It tastes almost like freshly baked. You can also melt a little butter on top while reheating for an extra treat.
FAQs
-
Can I use other types of cheese in the Cheese, Garlic and Herb Quick Bread (No Yeast) Recipe?
Absolutely! While cheddar or tasty cheese gives the best flavor and texture, you can experiment with colby, gouda, or smoked cheeses. Avoid mozzarella as it tends to be too mild and doesn’t add enough salt or flavor to the bread.
-
Why doesn’t this recipe use yeast?
This recipe uses baking soda as a leavening agent instead of yeast, making it much quicker to prepare since you don’t have to wait for the dough to rise. It’s great for when you want fresh bread fast without sacrificing flavor or texture.
-
Can I make this bread vegan or dairy-free?
To make it vegan or dairy-free, substitute the yogurt with a plant-based alternative like coconut yogurt, use a non-dairy milk, replace eggs with flax eggs, and use dairy-free cheese or omit cheese altogether. The texture will be slightly different, but it still works well as a savory quick bread.
-
How do I store leftover quick bread to keep it fresh?
Store leftover bread in an airtight container or wrapped tightly in plastic wrap at room temperature for up to 4 days. If you want to keep it longer, refrigerate or freeze slices and reheat as needed for best freshness.
-
Can I add other ingredients like sun-dried tomatoes or olives?
Definitely! Adding sun-dried tomatoes, olives, or even chopped roasted peppers into the herb swirl or batter gives the bread a tasty Mediterranean vibe. I’ve tried sun-dried tomatoes and it elevated the flavor beautifully.
Final Thoughts
This Cheese, Garlic and Herb Quick Bread (No Yeast) Recipe is one of those easy bakes that truly feels like a gift to your kitchen routine. I remember the first time I whipped it up, amazed at how fast it came together and how incredibly flavorful it was, even without the fuss of yeast. It’s become a staple in my home for casual lunches and dinner sides, and I’m so excited for you to try it out. You’ll find it’s not just bread—it’s a warm, satisfying experience that brings those cozy, cheesy, garlicky vibes straight to your table with minimal effort. Let me know how you go and what your favorite variations are—because with this recipe, the possibilities are endless!
Print
Cheese, Garlic and Herb Quick Bread (No Yeast) Recipe
- Prep Time: 15 minutes
- Cook Time: 50 minutes
- Total Time: 1 hour 20 minutes
- Yield: 8 to 10 servings
- Category: Bread
- Method: Baking
- Cuisine: Western
Description
This Cheese, Garlic, and Herb Quick Bread is a deliciously savory no-yeast bread featuring layers of flavorful herbs, aromatic garlic, and rich cheese swirled throughout. Perfect for a quick bake, this moist and tender bread is ideal for slicing thick, serving with butter, or alongside soups and salads. The herb and cheese ribbons create an irresistible texture and visual appeal, making it a delightful addition to any meal or snack time.
Ingredients
Cheese
- 7 oz / 200g block of cheese (cheddar or tasty), cut into 3mm / 0.1″ thick slices, mixed widths for random ribbons
Herb and Garlic Swirl
- 2 tbsp fresh rosemary, finely chopped
- 2 tbsp fresh parsley leaves, finely chopped
- 1 tsp dried oregano
- 1/2 tsp dried thyme
- 2 garlic cloves, crushed or finely grated
- 3 tbsp extra virgin olive oil
- 1/2 tsp cooking salt / kosher salt (halve for fine table salt)
Dry Ingredients
- 2 1/4 cups plain flour (all-purpose flour)
- 1 tsp baking soda (or substitute 3 1/2 tsp baking powder)
- 3/4 tsp cooking salt / kosher salt (halve if using table salt)
Wet Ingredients
- 1/2 cup plain yogurt, Greek or regular (full fat, unsweetened)
- 3/4 cup milk, full fat preferred (low fat okay)
- 2 large eggs (~50-55g/2oz each)
- 3 1/2 tbsp (50g) unsalted butter, melted
- 2 tbsp olive oil
- 2 small garlic cloves, crushed or grated
Instructions
- Preheat Oven: Preheat your oven to 180°C / 350°F (fan and standard ovens both applicable).
- Prepare Loaf Tin: Lightly grease a 21 x 11 x 7 cm loaf pan (8.3 x 4.5 x 2.75″) with butter or oil spray, then line it with baking paper or parchment paper to ensure easy removal.
- Make Herb and Garlic Swirl: In a small bowl, combine the finely chopped rosemary, parsley, oregano, thyme, crushed garlic, olive oil, and salt. Mix until you achieve a thick, dollop-able consistency.
- Mix Dry Ingredients: In a separate large bowl, whisk together the flour, baking soda (or baking powder substitute), and salt thoroughly.
- Mix Wet Ingredients: In another bowl, whisk the yogurt, milk, eggs, melted butter, olive oil, and crushed garlic until smooth and well combined.
- Combine Wet and Dry: Create a well in the center of the dry ingredients and pour in the wet ingredients. Stir gently until just combined—do not overmix to maintain a light texture.
- Layer and Swirl – First Layer: Pour one-third of the batter into the prepared loaf pan. Dollop one-third of the herb mixture over the top. Using a knife, swirl the herbs gently through the batter up and down and fold some over to distribute flavor evenly. Scatter one-third of the cheese slices into the batter, pushing some fully in and leaving some poking out.
- Continue Layers: Repeat the layering and swirling process two more times, using remaining batter, herb mixture, and cheese. Allow cheese slices to stick out of the surface for a visually appealing look when baked.
- Bake Bread: Place the loaf pan in the preheated oven and bake for 30 minutes until the top becomes golden brown.
- Cover and Continue Baking: Remove the bread from the oven and cover loosely with foil to prevent over-browning. Return to the oven and bake for an additional 20 minutes, totaling around 50 minutes baking time.
- Check Doneness: Insert a skewer into the center of the bread—if it comes out clean, the bread is fully baked; if not, bake a few minutes longer as needed.
- Cool Bread: Let the bread cool in the loaf pan for 5 minutes. Then, carefully turn it out onto a wire rack and allow it to cool for at least 10 minutes before slicing thickly.
- Serve: Serve warm or at room temperature. Optionally, spread with butter for extra richness. Enjoy your flavorful, cheesy, herb-infused quick bread!
Notes
- Cheese: For best visual ribbons, slice cheese about 3-4mm thick with mixed widths. Pre-sliced cheese will work but slices are thinner and less visible after baking. Shredded cheese (about 2 cups tightly packed / 200g) can be mixed directly into batter if preferred.
- Cheese Types: Recommended are colby, cheddar, or tasty cheese varieties. Avoid mozzarella as it lacks sufficient salt and flavor for this recipe.
- Herbs: Feel free to experiment with different fresh or dry herbs. Using 1 tbsp dried herbs instead of fresh works well. Pesto can be used as a substitute by incorporating 1/3 to 1/2 cup.
- Chopping Herbs: Blitzing herbs with a stick blender creates a finer mixture, slightly less green after baking, but faster to prepare.
- Loaf Pan Size: A larger pan will produce a flatter loaf but the recipe still works fine.
- Storage: Keep bread in an airtight container at room temperature for up to 4 days. For longer storage, refrigerate and toast slices to refresh.
- Cooling Time: Allow enough cooling before slicing to prevent crumbling and ensure clean slices.
Nutrition
- Serving Size: 1 slice (based on 10 slices per loaf)
- Calories: 210 kcal
- Sugar: 2 g
- Sodium: 350 mg
- Fat: 12 g
- Saturated Fat: 6 g
- Unsaturated Fat: 5 g
- Trans Fat: 0 g
- Carbohydrates: 18 g
- Fiber: 1.2 g
- Protein: 8 g
- Cholesterol: 60 mg


