
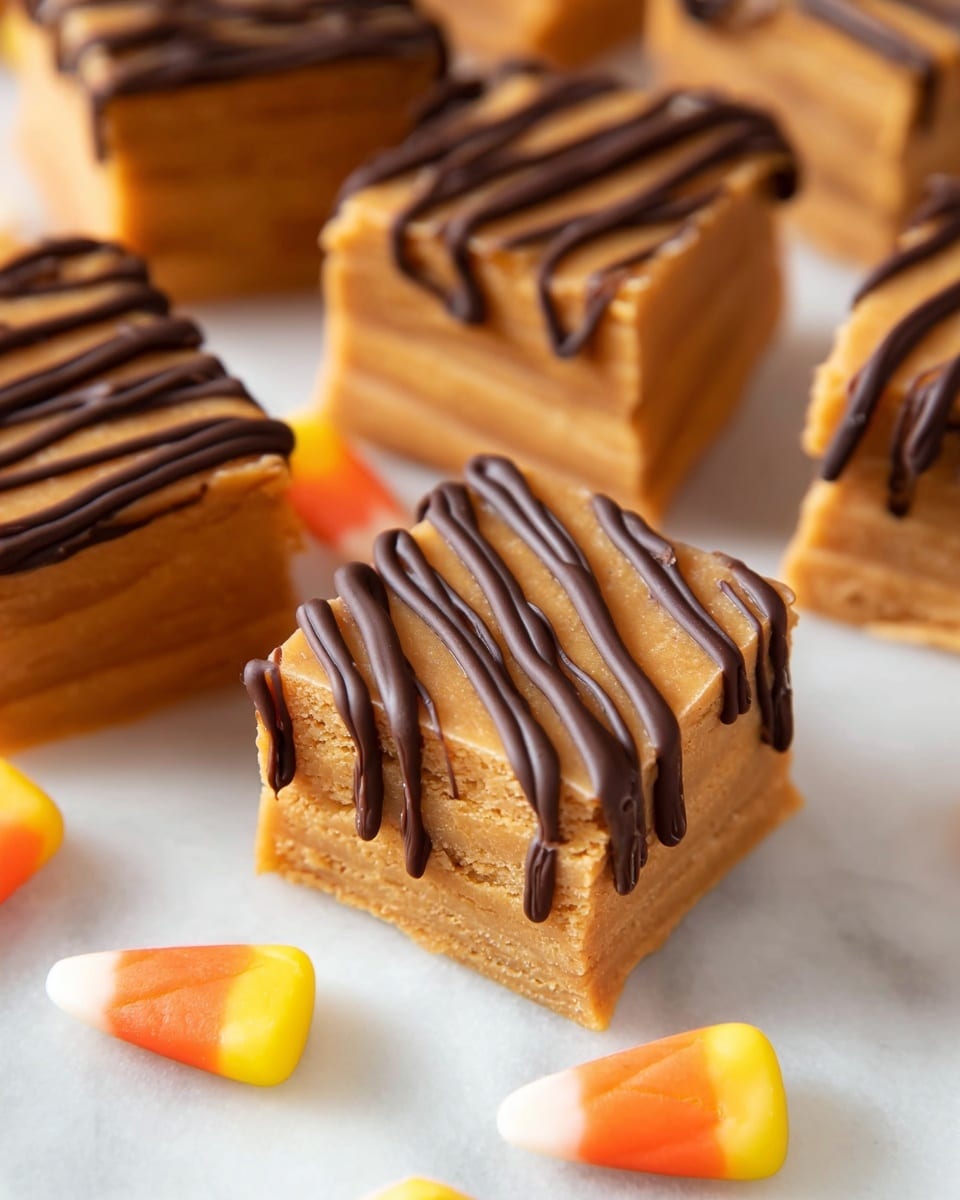
If you’re craving that nostalgic, crispy peanut buttery candy flavor wrapped in a soft, melt-in-your-mouth treat, you *have* to try this Butterfinger Fudge Recipe. I absolutely love how this fudge captures the essence of Butterfingers without the hassle of tempering chocolate or complicated candy making steps. Trust me, once you try this, it’ll become your go-to sweet fix for holidays, parties, or any time you just need a little indulgence.
Why You’ll Love This Recipe
- No Candy-Making Expertise Needed: You just stir and melt, no candy thermometer or fuss.
- Tastes Just Like Butterfinger: Seriously, the flavor and chewy crispness are spot on.
- Quick & Simple Ingredients: Using candy corn and white chocolate chips makes this fudge easy to throw together.
- Perfect for Gifting or Parties: It cuts into perfect squares and feels special enough to wow friends and family.

Ingredients You’ll Need
The magic in this Butterfinger Fudge Recipe comes from a playful combo of candy corn, peanut butter, and sweetened condensed milk, all melded with creamy white chocolate. Each ingredient plays a role in creating that classic crunch and sweet, rich flavor we adore. When shopping, try to grab good quality peanut butter (I prefer creamy, but chunky can add an extra texture layer if you like) and fresh candy corn for the best result.
- Candy Corn: This is the secret hero that gives the fudge that Butterfinger crunch; chopping it finely helps it meld better.
- Peanut Butter: Creamy works best for smoothness, but feel free to add a little crunch if you want more texture.
- Sweetened Condensed Milk: Adds creaminess and sweetness; make sure it’s well-shaken before opening.
- White Chocolate Chips: Melts into the fudge to add sweetness and creaminess – quality chips really make a difference.
- Milk Chocolate Chips (optional): Use for dipping fudge squares for that extra silky chocolate coating.
Variations
I love how versatile this Butterfinger Fudge Recipe is — I’ve played around with a few tweaks over time to match moods and occasions. Feel free to mix things up and make it your own!
- Nut-Free Variation: I once substituted peanut butter for sunflower seed butter to accommodate a friend’s allergy, and it still had great flavor and texture.
- Chocolate Dipped: My family goes crazy when I dip the fudge squares in melted milk chocolate — it adds a luscious finish and extra snap.
- Extra Crunch: Sometimes I sprinkle chopped roasted peanuts on top before chilling to add a nutty crunch punch.
- Seasonal Twist: Try mixing in a pinch of cinnamon or pumpkin spice during fall for an unexpected cozy flavor boost.
How to Make Butterfinger Fudge Recipe
Step 1: Prep Your Pan and Ingredients
Start by lining an 8×8 or 9×9 inch pan with foil and spraying it with cooking spray. I used an 8×8 pan once, but the fudge was super thick — so next time, I’d grab a 9×9 for a nicer sliceable thickness. Next, finely chop your candy corn — this step makes melting much smoother and prevents chunks from lingering in the fudge.
Step 2: Melt Candy Corn and Peanut Butter
In a medium saucepan, add the chopped candy corn and peanut butter. Heat over low, stirring every 30 seconds for about 3 minutes. This gentle melting ensures the candy corn softens without scorching. Keep your eye on the pot — patience is key for a silky base.
Step 3: Add Sweetened Condensed Milk and Continue Stirring
Pour in the sweetened condensed milk and stir continuously for another 3 minutes, heating gently. You want it just to a slight simmer; boiling can cause the fudge to seize. This creamy mixture is the heart of your Butterfinger fudge, so take your time to get it smooth and luscious.
Step 4: Stir in White Chocolate Chips Until Melted
Toss in the white chocolate chips and keep stirring over low heat. This part tests your patience — the chips seem stubborn, but they *will* melt if you keep going. The mixture will transform into a glossy, thick base that smells heavenly. Once fully combined, quickly transfer to your prepared pan and spread evenly.
Step 5: Chill and Cut
Let the fudge cool on your counter for about 15 minutes, then pop it into the fridge until it’s fully set — usually a couple of hours. Cut into bite-sized squares once firm. If you’re feeling fancy, dip the bottoms in melted milk chocolate mixed with a little vegetable oil to thin it out; set on wax paper to harden. That extra step always impresses guests.
Pro Tips for Making Butterfinger Fudge Recipe
- Chop the Candy Corn Finely: I learned this the hard way — whole pieces take forever to melt and can leave unwanted chunks.
- Low and Slow Heating: Keeping your heat low and stirring often prevents burning and grainy texture.
- Use a Silicone Spatula: It scrapes the sides perfectly and helps you stir thoroughly without scratching your pan.
- Don’t Rush Cooling: Let the fudge sit at room temp briefly before chilling to avoid condensation or fading texture.
How to Serve Butterfinger Fudge Recipe

Garnishes
For garnishes, I often sprinkle a pinch of crushed peanuts or a few extra tiny candy corn pieces right before the fudge sets — it adds a playful crunch and looks beautiful on festive trays. Sometimes, a slight dusting of sea salt on the dipped fudge squares balances the sweetness perfectly.
Side Dishes
This fudge is pretty rich, so I love serving it alongside a bright, fresh fruit platter or a cup of salty, buttery popcorn. If you’re making it for a gathering, pairing it with tea or coffee really complements the candy-like sweetness.
Creative Ways to Present
For parties, I like arranging Butterfinger fudge squares on decorative tiered trays or individually wrapping them in clear cellophane with a festive ribbon — makes for lovely homemade gifts. I’ve also layered them with chocolate bark or nuts in treat boxes to mix textures and flavors.
Make Ahead and Storage
Storing Leftovers
I store leftover Butterfinger fudge in an airtight container lined with parchment paper between layers. It stays great at room temperature for a few days, but I personally prefer refrigerating it if it’s warmer — this helps maintain that perfect chewy texture without getting too soft.
Freezing
Freezing works surprisingly well! I wrap individual fudge pieces in wax paper, place them in a zip-top bag, and freeze. When you’re ready to indulge, just thaw at room temp for an hour or so — no microwave needed. The flavor remains just as incredible after freezing.
Reheating
If you want to soften chilled fudge before serving, I warm it gently in the microwave for 10-15 seconds or let it sit at room temp for a bit. Be gentle because overheating can cause it to get sticky — you’re aiming for that perfect chewy softness.
FAQs
-
Can I substitute peanut butter in the Butterfinger Fudge Recipe?
Yes! You can swap peanut butter for almond butter, sunflower seed butter, or any nut-free alternative if allergies are a concern. Just keep in mind it may slightly change the flavor and texture, but the fudge will still be delicious.
-
Why does the fudge seem grainy sometimes?
Graininess usually happens if the candy corn isn’t chopped finely enough or the mixture gets too hot. Melting low and slow with frequent stirring helps prevent this issue.
-
Can I skip the milk chocolate dip?
Absolutely! The fudge tastes fantastic on its own without dipping, but the milk chocolate coating adds a lovely extra layer and texture if you want to elevate the presentation.
-
How long does Butterfinger fudge keep?
Stored properly in an airtight container, it keeps well for up to one week at room temperature and up to two weeks refrigerated. Freezing extends its shelf life up to three months.
Final Thoughts
Honestly, this Butterfinger Fudge Recipe is one of those gems that’s easy enough to tackle any day but delivers that “wow” factor every time. I love sharing it with friends because it sparks so many smiles and brings back sweet childhood memories. Whether you’re making it for a celebration or a little midweek treat, I’m confident you’ll enjoy every chewy, crunchy bite as much as I do. Go ahead—grab some candy corn and peanut butter, and let’s make some fudge magic happen!
Print
Butterfinger Fudge Recipe
- Prep Time: 10 minutes
- Cook Time: 15 minutes
- Total Time: 30 minutes
- Yield: 36 pieces
- Category: Dessert
- Method: Stovetop
- Cuisine: American
Description
This Butterfinger Fudge is a rich, sweet, and chewy treat that perfectly mimics the classic candy bar’s flavor. Made with candy corn, peanut butter, sweetened condensed milk, and white chocolate chips, it’s a delightful no-bake fudge that’s easy to prepare and perfect for satisfying your sweet tooth. The optional milk chocolate dip adds an extra layer of indulgence.
Ingredients
Main Ingredients
- 3 cups Candy Corn
- 1 cup (268g) peanut butter
- 1 (14 ounce) can sweetened condensed milk
- 2 cups (340g) white chocolate chips
- 1 cup (170g) milk chocolate chips (optional)
- Vegetable oil (a small amount for thinning chocolate, optional)
Instructions
- Prepare the Pan: Line an 8×8 or 9×9 inch pan with foil and spray it with cooking spray to prevent sticking.
- Melt Candy Corn and Peanut Butter: In a medium saucepan, over low heat, combine candy corn and peanut butter. Stir every 30 seconds for about 3 minutes until melted and blended.
- Add Sweetened Condensed Milk: Stir in the sweetened condensed milk and continue cooking over low heat for another 3 minutes, stirring every 30 seconds. Avoid boiling; a slight simmer is acceptable.
- Melt White Chocolate Chips: Add the white chocolate chips to the saucepan and stir continuously until all ingredients melt together into a smooth mixture. This may take a little time but keep stirring.
- Set the Fudge: Pour and spread the mixture evenly into the prepared pan. Let it cool on the counter for about 15 minutes, then refrigerate until fully hardened.
- Optional Milk Chocolate Dip: If desired, melt the milk chocolate chips with a small amount of vegetable oil to thin. Dip the bottoms of fudge squares into the melted chocolate and place on wax paper-lined cookie sheet to harden.
- Slice and Serve: Cut the fudge into approximately 36 squares and serve.
Notes
- The fudge has a softer, chewier texture compared to traditional fudge but accurately captures the Butterfinger flavor.
- Chopping the candy corn into smaller pieces before melting or using a food processor makes melting easier and more uniform.
- Using a 9×9 inch pan yields thinner pieces, making the fudge easier to eat if you prefer less thickness.
- Adding vegetable oil to the milk chocolate chips thins the chocolate, making it easier to dip fudge pieces.
Nutrition
- Serving Size: 1 piece (approx. 1/36th of recipe)
- Calories: 160
- Sugar: 22g
- Sodium: 60mg
- Fat: 8g
- Saturated Fat: 4.5g
- Unsaturated Fat: 3g
- Trans Fat: 0g
- Carbohydrates: 22g
- Fiber: 0.5g
- Protein: 3g
- Cholesterol: 5mg

